Nov 18, 2013
Technology###Enable No Password for Login
Generate the public/private rsa key pair.
	root@OpenWrt:~# ssh-keygen -t rsa
	root@OpenWrt:~# ls ~/.ssh
	authorized_keys  id_rsa           id_rsa.pub       known_hosts
Upload the id_rsa.pub to the Home's PC.
	# cat .ssh/id_rsa.pub | ssh USER@HOME_PC 'cat >> .ssh/authorized_keys'
Check If you can login without entering the password:
	$ ssh USER@HOME_PC
###OpenWRT Modification
Since the default ssh client is dropbear on OpenWRT, thus the key length is 1024, we have to using the 2048 for most of the cases. so we have to remove dropbear, and install openssh-client for linking to our home PC.
Change the /etc/init.d/dropbear’s listenning port from 22 to 2222 or other ports, this doesn’t matter, for later we will totally remove the dropbear.
Now remove the dropbear
$ opkg remove dropbear
Install the packages of openssh:
	$ opkg install openssh-client openssh-sftp-client sshtunnel openssh-keygen
	$ opkg install openssh-client-utils
Now using " ssh-keygen -t rsa” we will get the following:
+--[ RSA 2048]----+
But previous we got is:
+--[ DSA 1024]----+
That’s why we can’t use dropbear for login to HOME PC.
###autossh Configuration
Install autossh on your own OpenWRT
$ opkg install autossh
Edit the configuration file:
	root@OpenWrt:~# cat /etc/config/autossh
	config autossh
		option ssh	'-N -T -R 4381:localhost:22 root@goewugouog.gowugoeug.com '
		option gatetime	'0'
		option monitorport	'20000'
		option poll	'600'
Start the server immediately, later it will be started automatically:
$ /etc/init.d/autossh start
###Jump to the Open World!!!
Jump to the American Server on OpenWRT:
$ ssh -L 13@.XXX.XXX.XXX:9004:13g.XXX.XXX.XXX:8000 fXXXXXX@remote.american.com
From Home machine Jump to the OpenWRT in company:
$ ssh -L 10.0.0.111:9001:13@.XXX.XXX.XXX:9004 root@localhost -p 4381
Now the connection has been setup between your family network to company network, finally to the US network.
Enjoy Jumping!!!
###How to make it automatically?
Maybe I can write the script to make it automatically executed. Via python or via expect? Maybe try python.
Nov 18, 2013
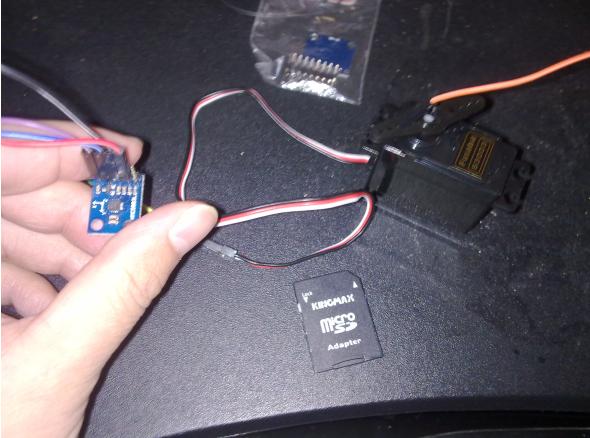
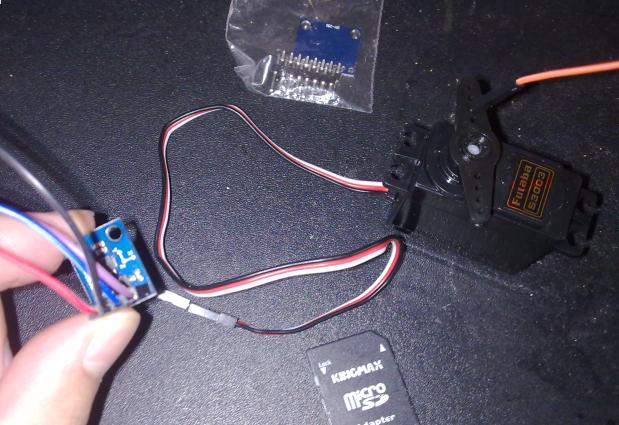
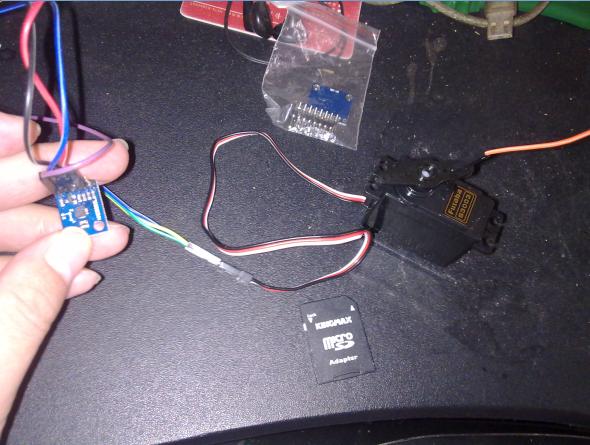
Technology###Wired
__Servo __
5V/GND
Input–> D4
__HMC5883L __
3.3V/GND
SCL–> A5
SDA–> A4
###Code:
#include <Wire.h>
#include <HMC5883L.h>

HMC5883L compass;

//Definition of servopin
int servopin = 4;


void setup(){
  Serial.begin(9600);
  Wire.begin();

  compass = HMC5883L(); //new instance of HMC5883L library
  setupHMC5883L(); //setup the HMC5883L

  pinMode(servopin,OUTPUT);//设定舵机接口为输出接口
}

// Our main program loop.
void loop(){

  float heading = getHeading();
  //Serial.println(heading);

  int angle = (int)heading/2;
  /*
  int angle = (int)heading;
  if(angle > 180)
  {
    angle = angle - 180;
  }
  */
  Serial.println(angle);
    //发送50个脉冲
  for(int i=0;i<50;i++)
  {
    //引用脉冲函数
    servopulse(angle);
  }

  delay(100); //only here to slow down the serial print

}

void setupHMC5883L(){
  //Setup the HMC5883L, and check for errors
  int error;
  error = compass.SetScale(1.3); //Set the scale of the compass.
  if(error != 0) Serial.println(compass.GetErrorText(error)); //check if there
is an error, and print if so

  error = compass.SetMeasurementMode(Measurement_Continuous); // Set the
measurement mode to Continuous
  if(error != 0) Serial.println(compass.GetErrorText(error)); //check if there
is an error, and print if so
}

float getHeading(){
  //Get the reading from the HMC5883L and calculate the heading
  MagnetometerScaled scaled = compass.ReadScaledAxis(); //scaled values from
compass.
  float heading = atan2(scaled.YAxis, scaled.XAxis);

  // Correct for when signs are reversed.
  if(heading < 0) heading += 2*PI;
  if(heading > 2*PI) heading -= 2*PI;

  return heading * RAD_TO_DEG; //radians to degrees
}

void servopulse(int angle)//定义一个脉冲函数
{
  int pulsewidth=(angle*11)+500;  //将角度转化为500-2480的脉宽值
  digitalWrite(servopin,HIGH);    //将舵机接口电平至高
  delayMicroseconds(pulsewidth);  //延时脉宽值的微秒数
  digitalWrite(servopin,LOW);     //将舵机接口电平至低
  delayMicroseconds(20000-pulsewidth);
}
#Result:
The servo will change direction according to the compass’s direction. because the compass’s range is from 0 to 360, while Servo could only serve for 180 degrees, we need to change th input parameter of compass by divide 2.
Nov 17, 2013
LifeXuanwuLake:

BaiMa Park:

Shoes:

Leaves:

Trees in night:

Nov 16, 2013
Technology###Make sure you have installed i2c tools
Install i2c-tools via:
	# apt-get install i2c-tools
	# apt-cache search i2c-tools
	i2c-tools - heterogeneous set of I2C tools for Linux
Check if spi and i2c has been blacklisted in system:
	# cat  /etc/modprobe.d/raspi-blacklist.conf
	# blacklist spi and i2c by default (many users don't need them)

	blacklist spi-bcm2708
	blacklist i2c-bcm2708
Comment out them, now your i2c will not be blacklisted.
Add following items into /etc/modules:
	i2c-bcm2708
	i2c-dev
Enable the user to access i2c equipments in user space:
	root@rasp:~# cat /etc/udev/rules.d/99-i2c.rules
	SUBSYSTEM==”i2c-dev”, MODE=”0666″
Reboot and check the result.
	root@rasp:~# ls /dev/i2c*
	/dev/i2c-0  /dev/i2c-1
Now your i2c equipments become available. Detect the attached equipments:
	root@rasp:~# i2cdetect -y 0
	     0  1  2  3  4  5  6  7  8  9  a  b  c  d  e  f
	00:          -- -- -- -- -- -- -- -- -- -- -- -- --
	10: -- -- -- -- -- -- -- -- -- -- -- -- -- -- 1e --
	20: -- -- -- -- -- -- -- -- -- -- -- -- -- -- -- --
	30: -- -- -- -- -- -- -- -- -- -- -- -- -- -- -- --
	40: -- -- -- -- -- -- -- -- -- -- -- -- -- -- -- --
	50: -- -- -- -- -- -- -- -- -- -- -- -- -- -- -- --
	60: -- -- -- -- -- -- -- -- -- -- -- -- -- -- -- --
	70: -- -- -- -- -- -- -- --
###Install Think Bowl I2C libraries for Python
For setting up the python library please input following lines:
	cd code/
	mkdir i2c
	cd i2c/
	git clone https://github.com/quick2wire/quick2wire-python-api.git
	export QUICK2WIRE_API_HOME=~/code/i2c/quick2wire-python-api/
	export PYTHONPATH=$PYTHONPATH:$QUICK2WIRE_API_HOME
	mkdir pythoncode
	cd pythoncode/
	git clone https://bitbucket.org/thinkbowl/i2clibraries.git
###Wiring:
| Pi pin number | Pi pin name 	| HMC5883L pin name  	|
| ------ 	| ------	| -----: 		|
|  1		|  3V3		|   VCC			|
|  6		|  Ground	|   GND			|
|  3		|  SDA		|   SDA			|
|  5		|  SCL		|   SCL			|
###Python code
	vim test-sensor.py
	python3 test-sensor.py
test-sensor.py should be like following:
#!/usr/bin/python3
from i2clibraries import i2c_hmc5883l
hmc5883l = i2c_hmc5883l.i2c_hmc5883l(0)
hmc5883l.setContinuousMode()
hmc5883l.setDeclination(9,54)
print(hmc5883l)
Result should be shown as following:
	root@rasp:~/code/i2c/pythoncode# python3 test-sensor.py
	Axis X: 311.88
	Axis Y: 160.08
	Axis Z: -300.84
	Declination: 9° 54'
	Heading: 37° 4'
Nov 16, 2013
TechnologyEdit the file /etc/init.d/vmware with your favorite text editor, change the definition:
vmwareLoadModule "$mod"
Change this line to
vmwareLoadModule "$vmci"
Then Navigate to the other function vmwareLoadModule “$mod” Under the function definition.
vmwareLoadModule "$mod"
Change this line to
vmwareLoadModule "$vsock"
Now we need to find the corresponding Module Unload functions Under the Function vmwareStopVmci()
Change
vmwareUnloadModule "${mod}"
to
vmwareUnloadModule "${vmci}"
Under the function vmwareStopVsock() Change
vmwareUnloadModule "$mod"
to
vmwareUnloadModule "$vsock"
Once done I would suggest reboot your machine although not necessary.
Post that run sudo /etc/init.d/vmware start
	Starting VMware services:
	   Virtual machine monitor                                             done
	   Virtual machine communication interface                             done
	   VM communication interface socket family                            done
	   Blocking file system                                                done
	   Virtual ethernet                                                    done
	   VMware Authentication Daemon                                        done
	   Shared Memory Available                                             done
and now you can see vmware workstation works fine and you are able to power on your virtual machines, and connect to network fine.
