Nov 20, 2024
TechnologyBuilding 5.15 kernel for ubuntu:
wget https://mirrors.ustc.edu.cn/kernel.org/linux/kernel/v5.x/linux-5.15.168.tar.xz
tar xJvf linux-5.15.168.tar.xz
patch -p1 < ../0001-xxxxxx.patch
sudo apt install git fakeroot build-essential ncurses-dev xz-utils libssl-dev bc flex libelf-dev bison liblz4-tool dwarves
cd linux-5.15.168
mkdir build
cp ~/config_backuprocky8 build/.config
make menuconfig O=./build
make LOCALVERSION="-rain" -j `nproc` O=./build bindeb-pkg
Change to 510:
The same building steps as above.
disable CONFIG_FORTIFY=y, when you want to enable xxx_mac
Nov 14, 2024
TechnologyInstall lxc:
# apt install -y lxc lxcfs
Edit common configuration:
$ sudo vim /usr/share/lxc/config/common.conf
#lxc.cgroup.devices.deny = a
lxc.cgroup.devices.allow = a
......
### /dev/random
lxc.cgroup.devices.allow = c 1:8 rwm
### tty0, tty1, tty7, tty8
lxc.cgroup.devices.allow = c 4:0 rwm
lxc.cgroup.devices.allow = c 4:1 rwm
lxc.cgroup.devices.allow = c 4:7 rwm
lxc.cgroup.devices.allow = c 4:8 rwm
......
lxc.cgroup2.devices.allow = c *:* m
lxc.cgroup2.devices.allow = b *:* m
......
### fuse
lxc.cgroup2.devices.allow = c 10:229 rwm
### customization
## graphics. /dev/dri
lxc.cgroup2.devices.allow = c 226:0 rwm
lxc.cgroup2.devices.allow = c 226:128 rwm
## graphics. /dev/fb0
lxc.cgroup2.devices.allow = c 29:0 rwm
## tty0, 1, 7, 8
lxc.cgroup2.devices.allow = c 4:0 rwm
lxc.cgroup2.devices.allow = c 4:1 rwm
lxc.cgroup2.devices.allow = c 4:7 rwm
lxc.cgroup2.devices.allow = c 4:8 rwm
......
# Setup the default mounts
#lxc.mount.auto = cgroup:mixed proc:mixed sys:mixed
lxc.mount.auto = cgroup:mixed proc:rw sys:mixed
Prepare the environment:
chmod 777 /dev/tty* && chmod 777 -R /dev/dri/ && chmod 777 /dev/fb0
Create the uos lxc instance:
lxc-create -t local -n uoslxc -- -m /root/meta.tar.xz -f /root/uoslxc.tar.xz
Edit the lxc config:
# vim /var/lib/lxc/uoslxc/config

......
lxc.mount.entry = /dev/fb0 dev/fb0 none bind,optional,create=file
lxc.mount.entry = /dev/dri dev/dri none bind,optional,create=dir
lxc.mount.entry = /dev/dri/renderD128 dev/renderD128 none bind,optional,create=file
### allow tty8
lxc.mount.entry = /dev/tty7 dev/tty7 none bind,optional,create=file
lxc.mount.entry = /dev/tty8 dev/tty8 none bind,optional,create=file
lxc.mount.entry = /dev/tty0 dev/tty0 none bind,optional,create=file
#lxc.mount.entry = /dev/tty1 dev/tty1 none bind,optional,create=file
#lxc.mount.entry = /dev/tty2 dev/tty2 none bind,optional,create=file
#lxc.mount.entry = /dev/tty3 dev/tty3 none bind,optional,create=file
### allow all of the input
lxc.mount.entry = /dev/input dev/input none bind,optional,create=dir
### allow all of the snd
lxc.mount.entry = /dev/snd dev/snd none bind,optional,create=dir
Edit the lxc guest configuration:
root@zkfdhost:~# vim /var/lib/lxc/uoslxc/rootfs/etc/fstab
# /dev/vda1 LABEL=EFI
#UUID=5474-499A      	/boot/efi 	vfat      	rw,relatime,fmask=0022,dmask=0022,codepage=437,iocharset=iso8859-1,shortname=mixed,utf8,errors=remount-ro	0 2

root@zkfdhost:~# vim /var/lib/lxc/uoslxc/rootfs/etc/lightdm/lightdm.conf
...
[LightDM]
.....
minimum-vt=8
...
Start the instance:
# lxc-start -n uoslxc
X crash because xorg is not compatible with xorg:
$ cat /var/log/lightdm/x-0.log
...
(==) Log file: "/var/log/Xorg.0.log", Time: Thu Nov 14 09:35:42 2024
(==) Using config directory: "/etc/X11/xorg.conf.d"
(==) Using system config directory "/usr/share/X11/xorg.conf.d"
(EE)
(EE) Backtrace:
(EE) 0: /usr/lib/xorg/Xorg (OsLookupColor+0x1a8) [0x599130]
(EE)
(EE) Segmentation fault at address 0x0
(EE)
Fatal server error:
(EE) Caught signal 11 (Segmentation fault). Server aborting
(EE)
(EE)
...
Solution, changes to Ramfb:
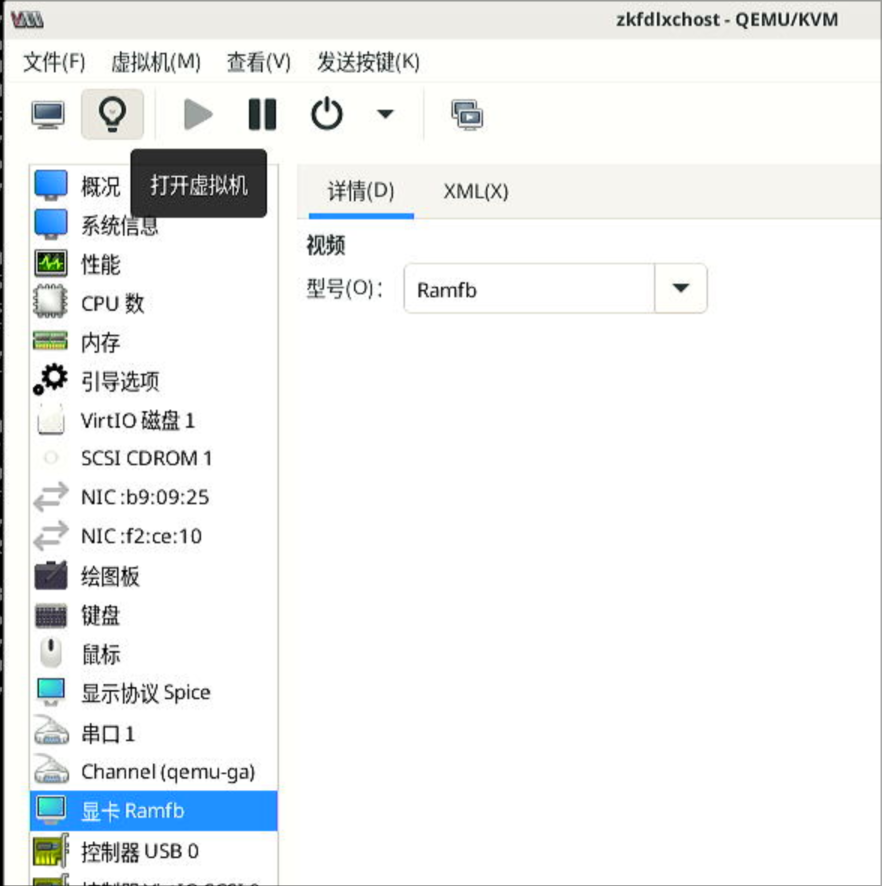
Successful screenshot:
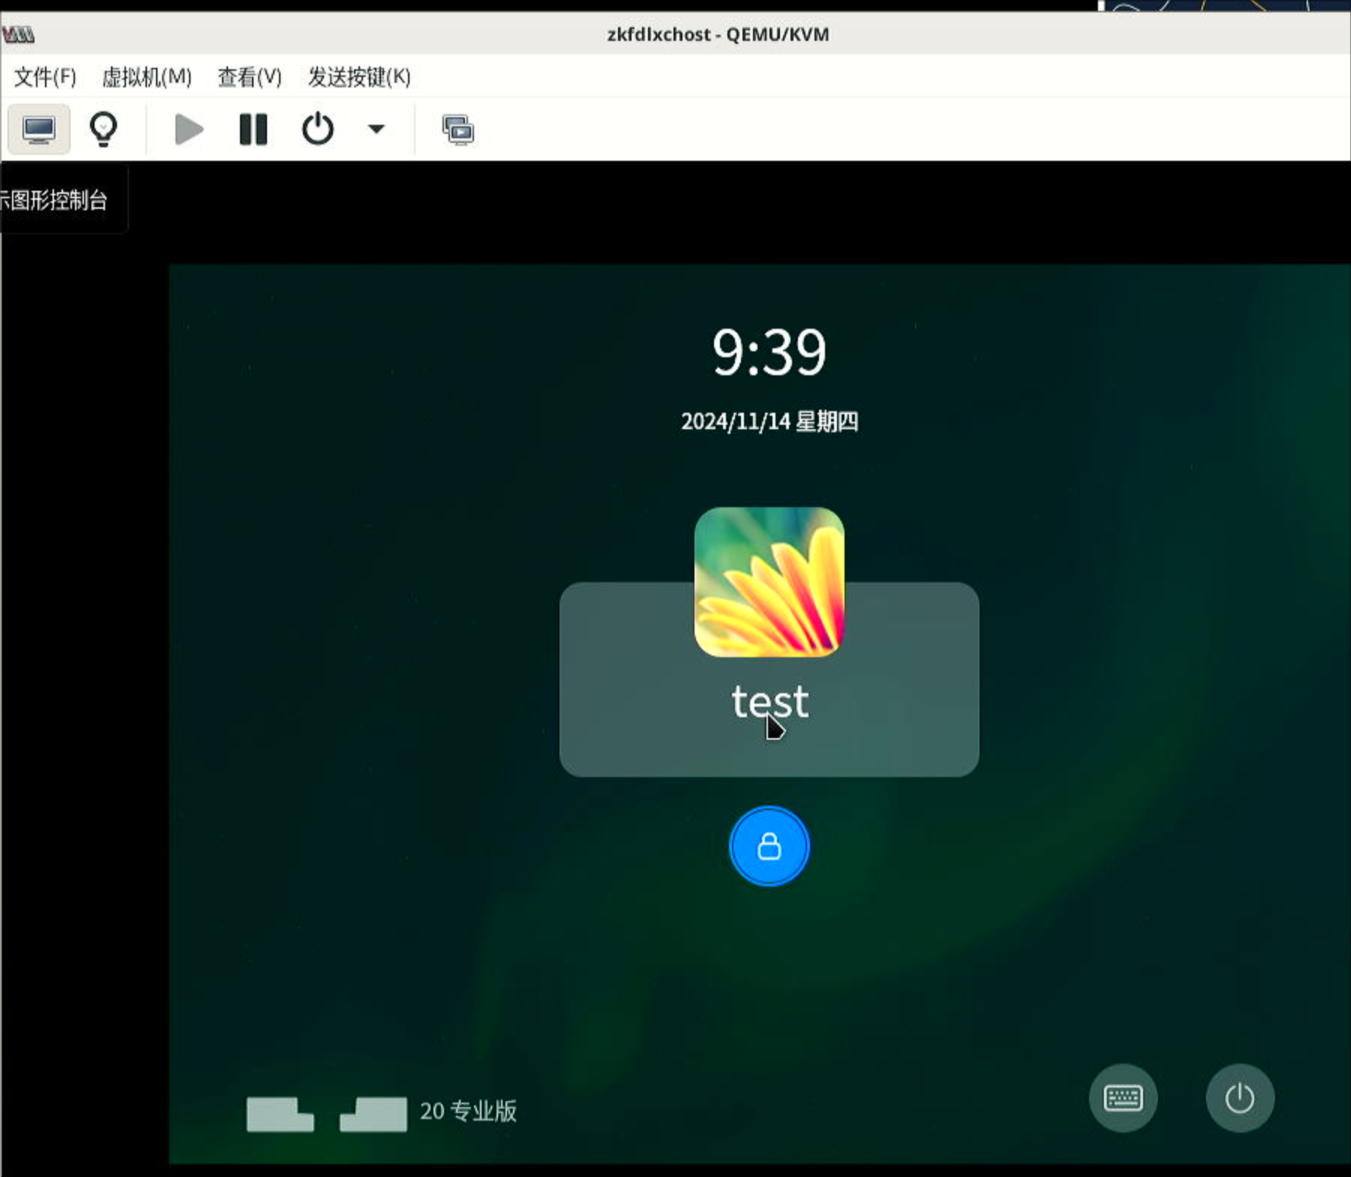
kylin lxc
Create via:
root@zkfdhost:~# lxc-create -t local -n kylinlxc -- -m /root/meta.tar.xz -f /root/kylinv10arm.tar.xz
problem:
root@zkfdhost:~# lxc-start -n kylinlxc -F
[!!!!!!] Kylin kernel check failed!, freezing.
Freezing execution.
因为kylin是基于ubuntu16.04来做的,可以尝试将systemd替换,直接替换.
Nov 13, 2024
TechnologySteps:
apt install -y lxc lxcfs
reboot
cp /usr/share/lxc/config/common.conf /usr/share/lxc/config/common.conf.back
cp common.conf /usr/share/lxc/config/common.conf
lxc-create -t local -n  zkfdlxc -- -m /root/meta.tar.xz -f /root/zkfdlxc1.tar.xz
vim /var/lib/lxc/zkfdlxc/config
Added:
lxc.mount.entry = /dev/fb0 dev/fb0 none bind,optional,create=file
lxc.mount.entry = /dev/dri dev/dri none bind,optional,create=dir
lxc.mount.entry = /dev/dri/renderD128 dev/renderD128 none bind,optional,create=file
### allow tty8
lxc.mount.entry = /dev/tty7 dev/tty7 none bind,optional,create=file
lxc.mount.entry = /dev/tty8 dev/tty8 none bind,optional,create=file
lxc.mount.entry = /dev/tty0 dev/tty0 none bind,optional,create=file
#lxc.mount.entry = /dev/tty1 dev/tty1 none bind,optional,create=file
#lxc.mount.entry = /dev/tty2 dev/tty2 none bind,optional,create=file
#lxc.mount.entry = /dev/tty3 dev/tty3 none bind,optional,create=file
### allow all of the input
lxc.mount.entry = /dev/input dev/input none bind,optional,create=dir
### allow all of the snd
lxc.mount.entry = /dev/snd dev/snd none bind,optional,create=dir
Start:
chmod 777 /dev/tty* && chmod 777 /dev/fb0  && chmod 777 /dev/dri/*
lxc-ls -f
lxc-start -n zkfdlxc
Nov 7, 2024
TechnologySteps:
sudo yum update -y
sudo yum install bc bison dwarves flex git ncurses-devel.x86_64 rpm-build rsync wget -y
sudo yum groupinstall "Development Tools" -y
sudo yum install openssl perl -y
yum install -y openssl-dev
Get the source code:
     wget https://mirrors.ustc.edu.cn/kernel.org/linux/kernel/v5.x/linux-5.15.tar.xz
tar xJvf linux-5.15.tar.xz
cd linux-5.15
cp -v /boot/config-$(uname -r)* .config
make menuconfig
scripts/config --disable DEBUG_INFO
scripts/config --set-str SYSTEM_TRUSTED_KEYS ""
scripts/config --set-str SYSTEM_REVOCATION_KEYS ""
make menuconfig
Using old version of pahole(1.23):
yum remove dwarves
wget https://git.kernel.org/pub/scm/devel/pahole/pahole.git/snapshot/pahole-1.23.tar.gz
tar xzvf pahole-1.23.tar.gz
cd pahole-1.23
cd lib/bpf
wget https://github.com/libbpf/libbpf/archive/refs/tags/v0.6.0.zip
unzip libbpf-0.6.0.zip
mv libbpf-0.6.0/* .
cd ../../
mkdir build
cd build
 cmake -D__LIB=lib -DCMAKE_INSTALL_PREFIX=/usr -DBUILD_SHARED_LIBS=ON ..
make install
cp /usr/lib/libdwarves* /usr/lib64/
[root@localhost build]# which pahole
/usr/local/bin/pahole
[root@localhost build]# pahole --version
v1.23
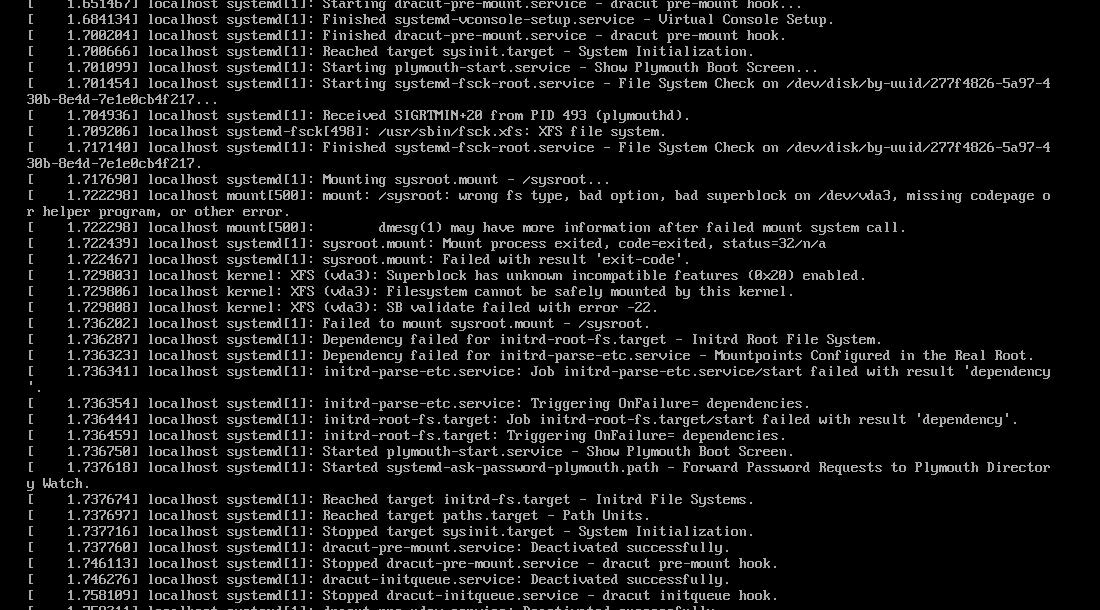
Now rebuild the kernel, enable the option:
make -j12 binrpm-pkg LOCALVERSION=-test
Get the rpm:
# find /root/rpmbuild/ | grep rpm$
/root/rpmbuild/RPMS/x86_64/kernel-headers-5.15.0_test-1.x86_64.rpm
/root/rpmbuild/RPMS/x86_64/kernel-5.15.0_test-1.x86_64.rpm
/root/rpmbuild/RPMS/x86_64/kernel-headers-5.15.0_test-3.x86_64.rpm
/root/rpmbuild/RPMS/x86_64/kernel-5.15.0_test-3.x86_64.rp
Install(remove and re-install):
[root@localhost linux-5.15]# yum remove kernel-5.15.0_test-1.x86_64
[root@localhost linux-5.15]# yum install -y /root/rpmbuild/RPMS/x86_64/kernel-5.15.0_test-3.x86_64.rpm
# reboot
Oct 15, 2024
Technologytips
Adjust the memory for incus instance:
incus launch images:ubuntu/22.04 first
incus config set first limits.memory=8GiB
# free -m shows 8192
incus config unset first limits.memory
# free -m shows the host memory size
view the config via:
incus config show first
