Nov 21, 2013
Technology###Download the toolchain
We should download the toolchain from the ARM employee maintained website, the download address is located at: https://launchpad.net/gcc-arm-embedded, use following command:
$ wget https://launchpad.net/gcc-arm-embedded/4.7/4.7-2013-q3-update/+download/gcc-arm-none-eabi-4_7-2013q3-20130916-linux.tar.bz2
untar the downloaded package and then add it to your system path, my solution is directly add some alias into ~/.bashrc:
	### Add Cross_Compiler for eclipse based stm32
	#export PATH="/media/y/embedded/cortex/gcc-arm-none-eabi-4_7-2013q3/bin:$PATH"
	alias setstm='export PATH="/media/y/embedded/cortex/gcc-arm-none-eabi-4_7-2013q3/bin:$PATH"'
###Eclipse Configuration
We have to install zylin for flashing the stm32 board. After installation, eclipse will be rebooted.

###OpenOCD
OpenOCD is a open-source hardware debugger.
	community/openocd 0.7.0-2
	    Debugging, in-system programming and boundary-scan testing for embedded target devices
	[root@XXXyyy capscr]# pacman -S openocd
###Template prepration
Download the template from :
$ git clone https://github.com/JorgeAparicio/bareCortexM.git
Nov 21, 2013
Technology###Disable the vim wraping
There is a line in ~/.vimrc:
autocmd FileType text setlocal textwidth=78
comment this line then everything goes OK.
###Change Awesome theme and change the titlebar width
Download the 3rd party themes from https://github.com/Morley93/awesome-themes-3.5, then copy them to your own theme location, normally under the “/usr/share/awesome/themes/", Choose whatever you want, and edit the ~/.config/awesome/default.rc.lua:
beautiful.init("/usr/share/awesome/themes/wabbit/theme.lua")
Save and exit then you got the new theme.
How to change the title bar?
In /usr/share/awesome/themes/wabbit/theme.lua, edit the following lines:
--theme.font          = "MonteCarlo medium 11"
theme.font          = "MonteCarlo medium 9"
I think 9 is good for me, but change this to 11 or bigger will make old men happy.
You can change this number into a very big or very small number, then some funny things will happen :)
Nov 21, 2013
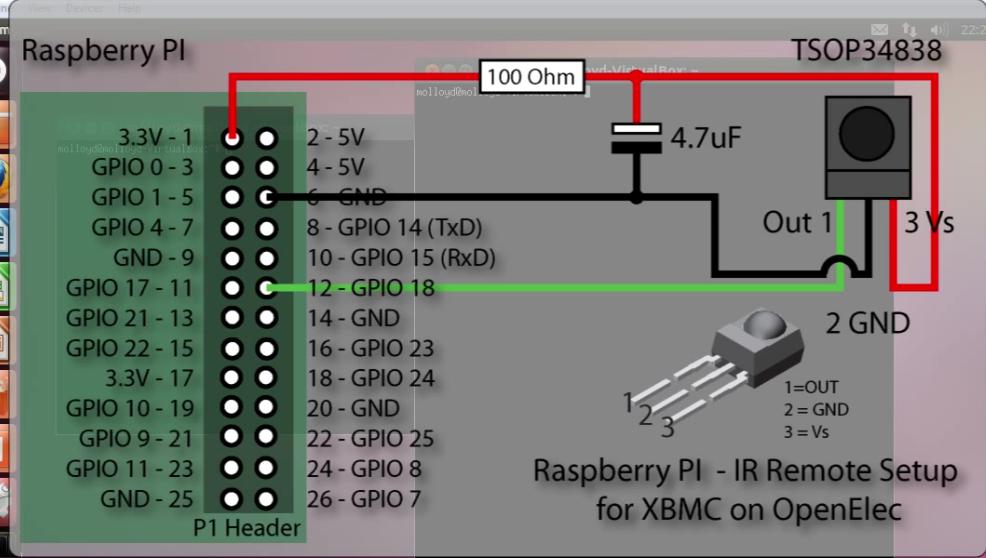
Technology###Wiring
The Wiring is listed as following Picture, You got your IR receiver’s pins to corresponding pins on raspberry PI. Positive to Pin1(3.3v), negative to Pin6(GND), the signal pins to Pin12(GPIO 18).
 ###Check the Kernel information
Log on to the raspberry PI, then input dmesg to view the startup information, we can see the lirc has been added to kernel.
###Check the Kernel information
Log on to the raspberry PI, then input dmesg to view the startup information, we can see the lirc has been added to kernel.
	$ dmesg
	[    4.976752] systemd-udevd[822]: starting version 208
	[    7.121052] lirc_dev: IR Remote Control driver registered, major 248
	[    7.187858] lirc_rpi: module is from the staging directory, the quality is unknown, you have been warned.
	[    7.234864] lirc_rpi lirc_rpi.0: lirc_dev: driver lirc_rpi registered at minor = 0
	[    7.234894] lirc_rpi: driver registered!
	[    8.191460] lirc_rpi: auto-detected active low receiver on GPIO pin 18
	[    8.981462] input: lircd as /devices/virtual/input/input3
Now Let’s check the GPIO status:
	OpenELEC:~ # cat /sys/kernel/debug/gpio
	GPIOs 0-53, bcm2708_gpio:
	 gpio-16  (led0                ) out hi
	 gpio-17  (lirc_rpi ir/out     ) in  lo
	 gpio-18  (lirc_rpi ir/in      ) in  hi
If it didn’t appear, using:
modprobe lirc_rpi gpio_in_pin=18 gpio_out_pin=1
###Getting your own remote controller’s codes
Now let’s kill all of the lircd related process, then use mode2 to detect the infra-red remote input.
	OpenELEC:~ # ps -ef | grep lirc
	1016 root       0:00 eventlircd --evmap=/etc/eventlircd.d --socket=/var/run/lirc/lircd --release=_UP
	1035 root       0:00 /usr/sbin/lircd --driver=default --device=/dev/lirc0 --uinput --output=/var/run/lirc/lircd-lirc0 --pidfile=/var/run/lirc/lircd-lirc0.pid /etc/lirc/lircd.conf.rpi
	1070 root      16:02 /usr/lib/xbmc/xbmc.bin --standalone -fs --lircdev /var/run/lirc/lircd
	1146 root       0:00 grep lirc
	OpenELEC:~ # killall lirc
What is mode2?
	Trusty@SomethingMissing:~$ apt-cache search mode2
	lirc-x - infra-red remote control support - X utilities
Then Let’s listen the infra_remote’s input.The input is quite strange:
	space 4501241
	pulse 8917
	space 4415
	pulse 577
###Catching the code using irrecord
The next step is turns these message into some code.
	OpenELEC:~/.config # pwd
	/storage/.config
	OpenELEC:~/.config # ls
	aacs                 samba.conf.sample    vpn-config
	hosts.conf           sysctl.conf.sample
	remote.conf          udev.rules.d.sample
Use irrecord for recording some signals and transform them into code:
	NAME
	       irrecord - application for recording IR-codes for usage with LIRC

	OpenELEC:~/.config # irrecord -d /dev/lirc0 lircd.conf
The method is, first long-press some keys, the result on screen will be several dots, then the program will change to another line, this time when you press some key, it only has one dot. Keep pressing keys until the irrecord tells you successful. Then you should input make some keys meaningful to the following images, when you feel satisfied, press enter to endup the program.

Now your lircd.conf file is generated, let see what’s in it.
	$ cat lircd.conf
	begin remote

	  name  lircd.conf
	  flags RAW_CODES|CONST_LENGTH
	  eps            30
	  aeps          100

	  gap          106707

	      begin raw_codes

	          name KEY_UP
	             8953    4401     581     527     595     503
	              613     506     588     539     581     510
If you want to use the pre-defined files, simply go to the lirc.sourceforge.net/remotes you can find almost all of the remote control information.
###Using the infra-remote for controlling
Now call irw, but irw stunned with doing nothing. This command will show you all of the input signal
	OpenELEC:~ # irw
	6a 0 KEY_RIGHT devinput
	6a 0 KEY_RIGHT_UP devinput
	69 0 KEY_LEFT devinput
	69 0 KEY_LEFT_UP devinput
	6c 0 KEY_DOWN devinput
	6c 0 KEY_DOWN_UP devinput
Now in your XBMC window, you will see you can navigate and select something using your remote control.
Nov 20, 2013
Technology###Using Wget to fetching the webpages
wget could be used to fetch the webpages from a specified website, using following command could fetch all of the wiki related 1st layer pages from “awesome Wiki”
$ wget -r -l 1 http://awesome.naquadah.org/wiki/Main_Page
After wget finished, you will found the 1st layer webpatges under your directory.
###Decide which you want for generating the book
There are some rubbish pages in downloaed pages, thus we have to write a script for fetching the valuable ones, my script is listed as following:
[Trusty@DashArch wget]$ pwd
/home/Trusty/wget
[Trusty@DashArch wget]$ cd awesome.naquadah.org/
[Trusty@DashArch awesome.naquadah.org]$ ls
doc  download  images  index.html  robots.txt  wiki
[Trusty@DashArch awesome.naquadah.org]$ cd wiki
[Trusty@DashArch wiki]$ cat listitem.sh
#!/bin/sh
for file in `ls `
do
	#echo $file
	type=`file $file | awk {'print $2'}`
	#echo $type
	if [ "$type" = "HTML" ]
	then
		#echo $file
		#echo $type
		echo "<a href=\"$file\">$file</a><br/>"
	fi
done
simply run listitem.sh, we will get the file list tables like following:
<a href="Automounting">Automounting</a><br/>
<a href="Autostart">Autostart</a><br/>
<a href="Autostart_with_consolekit">Autostart_with_consolekit</a><br/>
<a href="Autostop">Autostop</a><br/>
<a href="Awesome_3.0_to_3.1">Awesome_3.0_to_3.1</a><br/>
..........................................
Add them into the html like:
<html>
   <body>
     <h1>Table of Contents</h1>
     <p style="text-indent:0pt">
	<a href="Automounting">Automounting</a><br/>
	<a href="Autostart">Autostart</a><br/>
......
	<a href="XRandR_Screen_Table">XRandR_Screen_Table</a><br/>
	<a href="Xscreensaver">Xscreensaver</a><br/>
     </p>
   </body>
</html>
###Generate the ebook
Use Calibre, click “Add Book”, navigate to your directory which contains “index.html”, choose it, and now you can do whatever you want to generate epub, mobi, or 6 inch pdf. Just enjoy your ebook!!!
	[Trusty@DashArch Awesome (5)]$ ls -l -h
	total 4.5M
	-rw-r--r-- 1 Trusty root 887K Nov 20 21:07 Awesome - Dash.epub
	-rw-r--r-- 1 Trusty root 511K Nov 20 21:19 Awesome - Dash.mobi
	-rw-r--r-- 1 Trusty root 2.6M Nov 20 21:10 Awesome - Dash.pdf
	-rw-r--r-- 1 Trusty root 560K Nov 20 21:06 Awesome - Dash.zip
	-rw-r--r-- 1 Trusty root 1.1K Nov 20 21:18 metadata.opf
Depending on your settings, your generated ebook could be read on NOOK, Kindle, or other mobile equipment.
Nov 20, 2013
TechnologyImage1:
Image2:
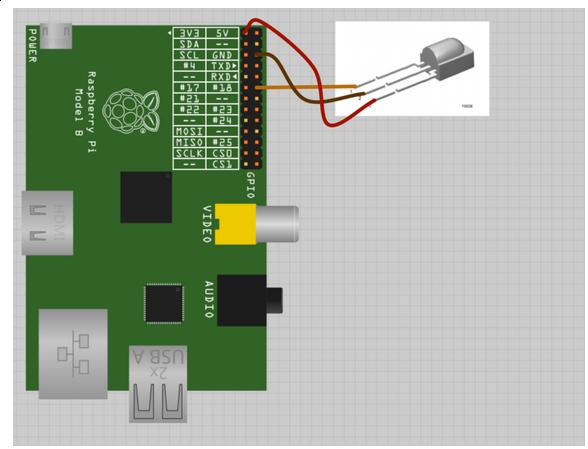
Image3:
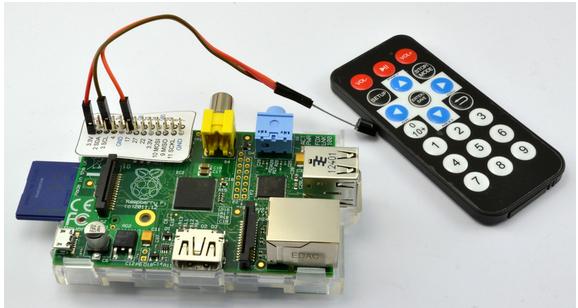
Image4:
Image5: