Sep 14, 2017
TechnologyThe kernel should be newer than 4.9, then you could enable BBR algorithm.
Take v4.12 for example, visit
http://kernel.ubuntu.com/~kernel-ppa/mainline/v4.12/ for getting the daily
build kernel:
wget http://kernel.ubuntu.com/~kernel-ppa/mainline/v4.12/linux-headers-4.12.0-041200-generic_4.12.0-041200.201707022031_amd64.deb
wget http://kernel.ubuntu.com/~kernel-ppa/mainline/v4.12/linux-headers-4.12.0-041200_4.12.0-041200.201707022031_all.deb
wget http://kernel.ubuntu.com/~kernel-ppa/mainline/v4.12/linux-image-4.12.0-041200-generic_4.12.0-041200.201707022031_amd64.deb
Install debs via dpkg -i *.deb, reboot the machine.
Change in sysctl:
echo "net.core.default_qdisc=fq" >> /etc/sysctl.conf
echo "net.ipv4.tcp_congestion_control=bbr" >> /etc/sysctl.conf
sysctl -p
Verification:
# sysctl net.ipv4.tcp_available_congestion_control
net.ipv4.tcp_available_congestion_control = bbr cubic reno
# lsmod | grep bbr
tcp_bbr                20480  0
Now the bbr algorithm for tcp is enabled, enjoy the high speed.
https://github.com/iMeiji/shadowsocks_install/wiki/%E5%BC%80%E5%90%AFTCP-BBR%E6%8B%A5%E5%A1%9E%E6%8E%A7%E5%88%B6%E7%AE%97%E6%B3%95
Sep 14, 2017
TechnologyTips
Delete the pods forcely:
// kubectl >= 1.5
# kubectl delete pods <pod> --grace-period=0 --force
// kubectl < 1.4
# kubectl delete pods <pod> --grace-period=0
Install jq(Command-line JSON processor) :
wget -O jq https://github.com/stedolan/jq/releases/download/jq-1.5/jq-linux64
chmod +x ./jq
cp jq /usr/bin
px volume operation:
# pxctl v l
# pxctl v d XXXXXXX
Before you run px on k8s(offline), you have to manually install following
packages:
# yum install -y linux-headers linux-devel gcc
kubectl get pods failure:
Change the hostname from: like k8sMaster->k8smaster
Mark node as unschedulable/schedulable.
kubectl cordon NODE
kubectl uncordon NODE
Delete pod issue:
# journalctl -lfu kubelet
# lsattr /var/lib/kubelet/pods/2176d3a8-984f-11e7-98c4-5254004b207b/volumes/kubernetes.io~portworx-volume
# chattr -i /var/lib/kubelet/pods/2176d3a8-984f-11e7-98c4-5254004b207b/volumes/kubernetes.io~portworx-volume/pvc-21522191-984f-11e7-98c4-5254004b207b
Aug 29, 2017
TechnologyAIM
Recently I am working in a network isolated environment, this means, I am
unable to connect to internet freely. But I have to finish my working using
some specific docker images, how? So I have to build them locally using iso.
Preparation
Download debian dvds from internet and tranfer them into the intranet:
# ls -l debian*
-rw-r--r-- 1 dash root 3.6G Jul 21 00:59 debian-9.0.0-amd64-DVD-1.iso
-rw-r--r-- 1 dash root 4.4G Jul 21 01:57 debian-9.0.0-amd64-DVD-2.iso
-rw-r--r-- 1 dash root 4.4G Jul 21 02:52 debian-9.0.0-amd64-DVD-3.iso
Install debian in virtualbox using debian-9.0.0-amd64 DVD1 iso. Using basic
desktop with sshd server.
Repository
Change the repository with following command:
# mount -t iso9660 -o loop /media/sdb/iso/debian-9.0.0-amd64-DVD-1.iso /media/sdb/debianrepo/cd1/
# mount -t iso9660 -o loop /media/sdb/iso/debian-9.0.0-amd64-DVD-2.iso /media/sdb/debianrepo/cd2/
# mount -t iso9660 -o loop /media/sdb/iso/debian-9.0.0-amd64-DVD-3.iso /media/sdb/debianrepo/cd3/
While the directory /media/sdb/debianrepo/ is the directory under the web server. Thus we could change the apt’s source file pointint to this webserver.
# vim /etc/apt/sources.list
deb http://192.168.56.1/debianrepo/cd1/	stable main contrib
deb http://192.168.56.1/debianrepo/cd2/	stable main contrib
deb http://192.168.56.1/debianrepo/cd3/	stable main contrib
Enable the Unauthenticated installation, and install vim for testing:
# vim /etc/apt/apt.conf.d/99myown
APT::Get::AllowUnauthenticated "true";
# apt-get update
# apt-get -y install vim
BootStrap
Standard Bootstrap won’t be used, so we have to use a tool called demoostrap.
Download position:
# git clone https://github.com/jwilk/demoostrap.git
Install some necessray packages:
# apt-get install -y python3-debian apt-utils debootstrap dpkg-repack
demoostrap the basic filesystem via:
# mkdir docker_root
# ./demoostrap docker_root/
# du -hs docker_root/
179M	docker_root/
In next step we will chroot into this new filesystem and install some necessary package.
chroot
The filesystem under docker_root only contains basic filesystem. In order to work properly we have to install at least minimum apt-get, so following are the steps:
# mount -t devpts devpts docker_root/dev/pts
# mount -t proc proc docker_root/proc
# mount -t sysfs sysfs docker_root/sys
Before chroot into the system we have to download some packages manually into the docker_root folder, because in chrooted system we could only use dpkg for installation.
# mkdir -p docker_root/install
# cd docker_root/install
# wget http://192.192.192.91/debianrepo/cd1/debian/debian/pool/main/a/apt/apt_1.4.6_amd64.deb
# wget http://192.192.192.91/debianrepo/cd1/debian/pool/main/a/apt/libapt-pkg5.0_1.4.6_amd64.deb
# wget http://192.192.192.91/debianrepo/cd1/debian//pool/main/g/gcc-6/libstdc++6_6.3.0-18_amd64.deb
# wget http://192.192.192.91/debianrepo/cd1/debian/pool/main/a/adduser/adduser_3.115_all.deb
# wget http://192.192.192.91/debianrepo/cd1/debian/pool/main/d/debian-archive-keyring/debian-archive-keyring_2017.5_all.deb
# wget http://192.192.192.91/debianrepo/cd1/debian//pool/main/g/gnupg2/gpgv_2.1.18-6_amd64.deb
Now chroot in, and manually install these packages:
# chroot docker_root/
#  cd /install
# dpkg -i gpgv_2.1.18-6_amd64.deb
# dpkg -i libstdc++6_6.3.0-18_amd64.deb
# dpkg -i libapt-pkg5.0_1.4.6_amd64.deb
# dpkg -i debian-archive-keyring_2017.5_all.deb
# dpkg -i adduser_3.115_all.deb
# dpkg -i apt_1.4.6_amd64.deb
# which apt-get
/usr/bin/apt-get
Further Modification
In host machine, we manually change the sources.list file and
Now we could exit the chroot system, and tar docker_root directory,
# vim etc/apt/sources.list
deb http://192.168.56.1/debianrepo/cd1/	stable main contrib
deb http://192.168.56.1/debianrepo/cd2/	stable main contrib
deb http://192.168.56.1/debianrepo/cd3/	stable main contrib
Enable the Unauthenticated installation:
# vim etc/apt/apt.conf.d/99myown
APT::Get::AllowUnauthenticated "true";
zip and import
tar the directory using following command:
# tar czvf docker_root.tar.gz docker_root/
Then in the untared directory you could import it into docker repository via:
# tar -c * | docker import - myowndebian:raw
# docker images | grep myowndebian
myowndebian                                                    raw                 909759ad7fad        23 seconds ago      189MB
# docker run -it myowndebian:raw /bin/bash
root@f95e7f8d6427:/# ls
bin   dev  home     lib    media  opt	root  sbin  sys  usr
boot  etc  install  lib64  mnt	  proc	run   srv   tmp  var
At this point, you have a selt-built docker box, from this start point you could add more packages into your docker images and form your own images offline. Just enjoy it!
Aug 24, 2017
TechnologyBackground
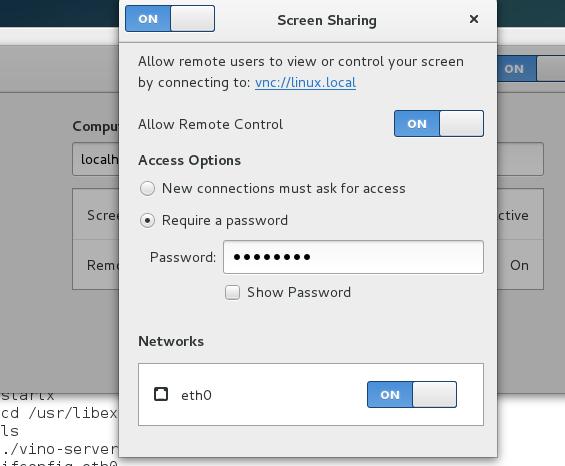
For enable rdp server, but I installed vino server for vncserver, faint.
CentOS Configuration
Install Gnome Desktop.
Enable root autologin(This is pretty dangerous):
# vim /etc/gdm/custom.conf

[daemon]
AutomaticLoginEnable=true
AutomaticLogin=username
So next time you will login to the desktop automatically.
Vino Server
Vino will be automatically installed for gnome desktop ,config it via:
# gsetting set org.gnome.Vino require-encryption false
Also setting up the password.

Now reboot the machine you could enjoy the vncserver.
xrdp
Install xrdp via epel:
# yum install -y xrdp
# systemctl enable xrdp.service
# systemctl start xrdp.service
# echo "mate-session" > ~/.Xclients
# chmod +x ~/.Xclients
# sudo systemctl restart xrdp.service
Then using some rdp clients for connecting to desktop.
Finding minimal packages
# /bin/bash
for i in `cat xrdp.txt`
do
	find_or_not=`find /media/sdb/centos73-isorepo/Packages/ | grep $i`
	if  [ $? == 1 ]
	then
		echo $i
	fi
done
Aug 22, 2017
TechnologyDirect Read From Serial Port
Arduino mega2560 Code:
void setup() {
  pinMode(0,INPUT_PULLUP);
  pinMode(1,INPUT_PULLUP);
}

void loop() {
}
This code will turn mega2560 into a USB-TTL transmitter, thus you could
directly read from the serial port and display them in hex mode:
# cat /dev/ttyACM0 | xxd -p -c 9
ffff01270005020534
ffff01270005020534
ffff01270005020534
ffff01270005020534
....
According to the reference manual,

we know the air is 0.05 mg/m3.
Read From Arduino Mega2560
Code:
void setup() {
  // initialize both serial ports:
  Serial.begin(9600);
  Serial2.begin(9600,SERIAL_8N1);

    while (!Serial) {
    ; // wait for serial port to connect. Needed for native USB port only
  }


    while (!Serial2) {
    ; // wait for serial port to connect. Needed for native USB port only
  }

  // prints title with ending line break
  Serial.println("ASCII Table ~ Character Map");
}

void loop() {


   for (int i=0; i<9; i++) {

    while(!Serial2.available()); // wait for a character
    int incomingByte = Serial2.read();
    Serial.print(incomingByte,HEX);
    Serial.print(' ');

   }
   Serial.println();
}
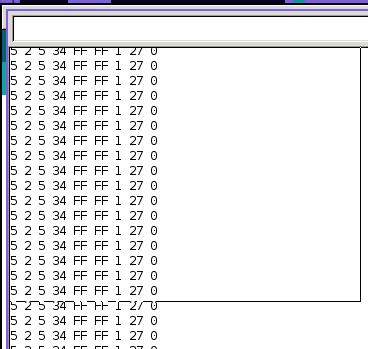
Result:

Problem
How to detect the result? Start from FF FF?
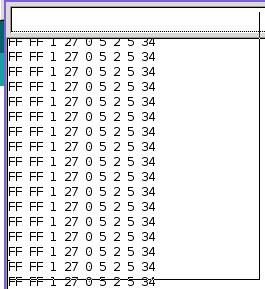
Should be

Fixed-Bug
Every time it will print starting with FF FF:
int incomingByte=0;
int vanishByte=0;

void setup() {
  // initialize both serial ports:
  Serial.begin(9600);
  Serial2.begin(9600,SERIAL_8N1);

    while (!Serial) {
    ; // wait for serial port to connect. Needed for native USB port only
  }


    while (!Serial2) {
    ; // wait for serial port to connect. Needed for native USB port only
  }

  // prints title with ending line break
  Serial.println("ASCII Table ~ Character Map");
}

void loop() {

    //Serial.println();
   //for (int i=0; i<9; i++) {
    while(!Serial2.available()); // wait for a character
    vanishByte = incomingByte;
    incomingByte = Serial2.read();
    if((incomingByte == 0xFF) && (vanishByte != 0xFF))
    {
      Serial.println();
    }
    Serial.print(incomingByte,HEX);
    Serial.print(' ');
   //}
   //Serial.println();
}


