Oct 30, 2017
LinuxTips1. pigz for multi-core compression
In case you need multi-core compression for speeding up compression procedure,
please do following steps:
# pacman -S pigz
# tar -c transfer/ | pigz -c | split -a 5 -d -b 1650m - mysplit
# ls -l
total 8296652
-rw-r--r-- 1 root root 1730150400 Oct 30 09:20 mysplit00000
-rw-r--r-- 1 root root 1730150400 Oct 30 09:20 mysplit00001
-rw-r--r-- 1 root root 1730150400 Oct 30 09:22 mysplit00002
-rw-r--r-- 1 root root 1730150400 Oct 30 09:23 mysplit00003
-rw-r--r-- 1 root root 1575143431 Oct 30 09:23 mysplit00004
drwxr-xr-x 3 root root       4096 Oct 30 08:59 transfer
Decompression these files:
# cat mysplit*>mysplit
# tar xzvf mysplit
After decompression you got the same directory shows the same as the origin
one.
2. Skip Checksum check in yaourt
Via yaourt --m-arg --skipchecksums --m-arg --skippgpcheck -Sb, you could
skip checksum check in yaourt package.
3. yaourt hivex and libguestfs
In hivex:
Since some users may have set INSTALL_BASE in PERL_MM_OPT, you should consider adding 'unset PERL_MM_OPT' before configuring.

Compiles with line 23 in PKGBUILD changed from

./configure\
to...
./configure --disable-ocaml\
In libguestfs, simply ignore the checksum checking for source code.
4. virt-resize bug
In CentOS 7, you have to upgrading the lvm2, then you get libguestfs working
properly.
To enable the debug, do following: export LIBGUESTFS_DEBUG=1
List all of the ip address via:
# virsh net-dhcp-leases $network
5. Add user to sudo
First you create user via adduser YourName, then you add user to sudo group
via: adduser YourName sudo.
6. linuxkit
http://collabnix.com/getting-started-with-multi-node-kubernetes-cluster-using-linuxkit/
7. teamviewer on rpi
Search rpi’s teamviewer solution.
8. bash debugging
If you have a bash script, simply use bash -x xxx.sh for debugging this
script, it will display all of the excution steps.
9. RaspberryPi Keyboard layout
Configure them via:
# dpkg-reconfigure keyboard-configuration
10. sonoff
use sonoff for controlling the electricity at home.
11. Debian QTcreator
Just for writing the software for managing the sd card writer.
12. hugo issue
via some mis-typing I commited some files into master branch(.travis.yml),
thus every time’s commitment will trigger 2 building in travisCI!!!
Solution:
# git checkout master
# git rm .travis.yml
# git commit -m "remove travis yml"
# git push origin master
# git checkout source
Continue to edit and publish in source tree, now your commitment will be OK.
13. gitk
For viewing all of the changing of your git branch, use gitk for viewing the
code changes and branches.
14. pyinstaller to exe
Windows terminal, press following:
# pyinstaller.exe ThinClientSDWriter.py
After pyinstall.exe, it will build the output in dist directory.
Debugging, for
import sip
sip.setapi(u'QString',2)
sip.setapi(u'QVariable',2)
If you encounter the api version 1 has been set, simply add 3 lines in:
support/rthooks/pyi_rth_qt4plugins.py in PyInstaller
https://github.com/pyinstaller/pyinstaller/wiki/Recipe-PyQt4-API-Version
15. sip setapi
Detailed explanation:
sip.setapi("QString" ,2)

的意义就是取消掉 PyQt 里面 QString 的使用,原来凡是接受 QString 参数的地方,都变成了接受 Python 的 unicode 类型。原来返回 QString 的函数也变成返回 unicode 类型。

这个行为在 PyQt5 里面是默认行为。而且使用上也方便非常多,推荐新代码里面尽量使用这个行为。

同样的还有

sip.setapi("QDateTime", 2)
sip.setapi("QDate", 2)
sip.setapi("QVariant", 2)
#QTextStream的第一个版本会导致Python的hex(),bin()被PyQt覆盖
sip.setapi("QTextStream", 2)
sip.setapi("QUrl", 2)

在使用这个 setapi() 调用的时候,建议包在 try/except 块里面,因为不能调用两次。并且不能在导入 PyQt 之后使用,所以应该放在程序的最开始处。

try:
     sip.setapi("QString", 2)
     sip.setapi(...)
except ValueError:
     pass
from PyQt4.QtCore import *
16. rdesktop enable remote
Via following command:
# rdesktop -r disk:share=/xxxx/yyy/ccc
17. debian VBox Guest Additional installation
# apt-get install build-essential linux-headers-amd64 linux-source
$ ./autorun.sh
18. tune linpack
http://www.advancedclustering.com/act_kb/tune-hpl-dat-file/
19. docker restart policy
Change restart policy from always to no:
# docker update --restart=no my-container
20. apt-mirror configuration for arm64
The configuration file is listed as following:
# vim /etc/apt/mirror.list
#
set base_path    /var/spool/apt-mirror
#
# set mirror_path  $base_path/mirror
# set skel_path    $base_path/skel
# set var_path     $base_path/var
# set cleanscript $var_path/clean.sh
set defaultarch  arm64
# set postmirror_script $var_path/postmirror.sh
# set run_postmirror 0
set nthreads     20
set _tilde 0

deb http://ports.ubuntu.com xenial main restricted universe multiverse
deb http://ports.ubuntu.com xenial-security main restricted universe multiverse
deb http://ports.ubuntu.com xenial-updates main restricted universe multiverse
deb http://ports.ubuntu.com xenial-proposed main restricted universe multiverse
deb http://ports.ubuntu.com xenial-backports main restricted universe multiverse
clean http://ports.ubuntu.com
21. Boot into console(Ubuntu)
Simply via following command:
$ sudo systemctl set-default multi-user.target
22. Disable dhcpd
Via following command:
# sudo systemctl disable isc-dhcpd-server.service
23. CentOS73 upgrading to CentOS74
Install via (usbmuxd prevents its upgrading):
# yum remove usbmuxd
# yum update
Via following command:
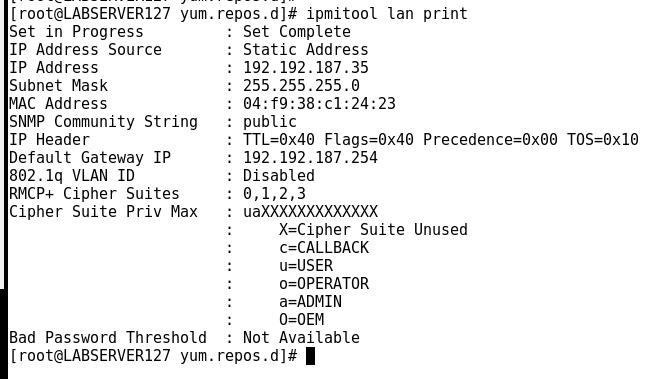
$ sudo ipmitool lan print
25. Quickly setup stretch
Beware, the debian docker image will automatically remove the installed
pkgs!!!!
# echo deb http://mirrors.aliyun.com/debian/ stretch main non-free contrib >sources.list
# echo deb http://mirrors.aliyun.com/debian/ stretch-proposed-updates main non-free contrib >>sources.list
# apt-get update
# apt-get install -y apt-transport-https ca-certificates curl gnupg2 software-properties-common
# curl -fsSL https://download.docker.com/linux/$(. /etc/os-release; echo "$ID")/gpg |  apt-key add -
#  add-apt-repository \
   "deb [arch=amd64] https://download.docker.com/linux/$(. /etc/os-release; echo "$ID") \
   $(lsb_release -cs) \
   stable"
# apt-get update
# apt-get install -y docker-ce
26. xrdp on stretch
Install via:
# apt install -y xrdp tigervnc-standalone-server
# vim /etc/xrdp/xrdp.ini
###### diff file listed as following:
--- a/xrdp.ini     2017-06-19 14:05:53.290490260 +0900
+++ b/xrdp.ini  2017-06-19 14:11:17.788557402 +0900
@@ -147,15 +147,6 @@ tcutils=true
 ; Session types
 ;

-[Xorg]
-name=Xorg
-lib=libxup.so
-username=ask
-password=ask
-ip=127.0.0.1
-port=-1
-code=20
-
 [Xvnc]
 name=Xvnc
 lib=libvnc.so
@@ -166,6 +157,15 @@ port=-1
 #xserverbpp=24
 #delay_ms=2000

+[Xorg]
+name=Xorg
+lib=libxup.so
+username=ask
+password=ask
+ip=127.0.0.1
+port=-1
+code=20
+
 [console]
 name=console
 lib=libvnc.so
Restart xrdp via sudo systemctl restart xrdp.
27. rpi wifi reference
http://blog.itist.tw/2016/03/using-raspberry-pi-3-as-wifi-ap-with-raspbian-jessie.html
28. tectonic
Working tips on tectonic sandbox:
$  unzip tectonic-sandbox-1.7.5-tectonic.1.zip
$  cd tectonic-sandbox-1.7.5-tectonic.1
$  vagrant plugin repair
$  vagrant plugin expunge --reinstall
$  vagrant up --provider=virtualbox
29. nfs-server and Vagrant
Issue: my coreos cluster’s vagrant configuration won’t get in touch with my
archlinux’s nfs server, the debugging steps are listed as following:
mount -o vers=3,udp,nolock,vers=4,udp,noatime 172.17.8.1:/media/sda5/DevOps/kubernetes-vagrant-coreos-cluster /vagrant

Stdout from the command:


Stderr from the command:

mount.nfs: requested NFS version or transport protocol is not supported
Archlinux nfs server configuration:
# vim /etc/nfs.conf

....
[nfsd]
# debug=0
# threads=8
# host=
# port=0
# grace-time=90
# lease-time=90
udp=y
tcp=y
vers2=n
vers3=y
vers4=y
vers4.0=y
vers4.1=y
vers4.2=y
# rdma=n
....
Enable the udp and tcp, also all of the nfs versions.
Vagrant configuration:
# vim Vagrantfile
          if File.exist?(File.expand_path("#{mount['source']}"))
            if mount['destination']
              kHost.vm.synced_folder "#{mount['source']}", "#{mount['destination']}",
                id: "#{mount['name']}",
                disabled: disabled,
                mount_options: ["#{mount_options}"],
                nfs: nfs,
	        nfs_version: 4,
		nfs_udp: false
            end
Try to specify the nfs version and udp version.
By doint this you could reach the servers, but before the mount version,
simply run showmount -e ServerIP.
30. ruby-libvirt
Solved via reinstall vagrant-libvirt, then you could ignore this issue:
Ignoring ruby-libvirt-0.7.0 because its extensions are not built.  Try: gem pristine ruby-libvirt --version 0.7.0

libruby.so.2.2: cannot open shared object file: No such file or directory - /opt/vagrant/embedded/gems/gems/ruby-libvirt-0.7.0/lib/_libvirt.so
31. docker certification for archlinux
Get the self-signed certification , and then you could do following:
root@archiso ~ # cp devdockerCA.crt /etc/ca-certificates/trust-source/anchors
root@archiso ~ # update-ca-trust
root@archiso ~ # trust extract-compat
thus you docker login xxx.xxx.xxx.com, with your username and password, then
you could push to the right position.
32. Docker Save to xz
via following commands:
# docker pull quay.io/pires/docker-elasticsearch-kubernetes:5.5.0 && docker save quay.io/pires/docker-elasticsearch-kubernetes:5.5.0|xz>elastic.tar.xz
33. For loop for docker save
Use a for loop for saving the docker images.
dockerimages=(bde2020/spark-master:2.2.1-hadoop2.7 docker1 docker2 docker3 docker4)
j=1
for i in ${dockerimages[@]}
do
	echo $i
	echo $j

	#docker pull $i && docker save $i | xz $j.tar.xz
	#docker rmi $i
	let j+=1
done
34. libvirt network filter
How to do libvirt forwarding all of the traffics to redsocks?
https://libvirt.org/firewall.html
Also setup your own custom nat based network:
https://jamielinux.com/docs/libvirt-networking-handbook/custom-nat-based-network.html
35. libvirt net definition
net definition from isolated networking to nat based networking:
virsh # net-dumpxml default
<network>
  <name>default</name>
  <uuid>bb24f0ba-754c-4f00-b16b-5e7dbb35807e</uuid>
  <forward mode='nat'>
    <nat>
      <port start='1024' end='65535'/>
    </nat>
  </forward>
  <bridge name='virbr0' stp='on' delay='0'/>
  <mac address='52:54:00:df:ee:b7'/>
  <ip address='192.168.122.1' netmask='255.255.255.0'>
    <dhcp>
      <range start='192.168.122.2' end='192.168.122.254'/>
    </dhcp>
  </ip>
</network>

virsh # net-dumpxml kismatic
<network connections='1'>
  <name>kismatic</name>
  <uuid>19756f27-9d8f-4120-be34-bb238215e28a</uuid>
  <bridge name='virbr11' stp='on' delay='0'/>
  <mac address='52:54:00:5e:8a:18'/>
  <domain name='kismatic'/>
  <ip address='10.15.205.1' netmask='255.255.255.0'>
    <dhcp>
      <range start='10.15.205.128' end='10.15.205.254'/>
    </dhcp>
  </ip>
</network>
See the differences? Then you should edit this network, destroy it, start it
again, thus you get the working nat-based networking.
virsh # net-edit kismatic
Network kismatic XML configuration edited.

virsh # net-destroy kismatic
Network kismatic destroyed

virsh # net-start kismatic
Network kismatic started
36. minikube boot
with larger disk minikube could run like following:
# minikube start --disk-size 30g
37. helm issue
Encounter issue:
# helm install --name "tkt" .
Error: release tkt failed: pods "tkt-oracledb" already exists
use lint for viewing the issue:
# helm lint .
==> Linting .
[INFO] Chart.yaml: icon is recommended
[ERROR] templates/_helpers.tpl~: file extension '.tpl~' not valid. Valid extensions are .yaml, .tpl, or .txt
[ERROR] templates/oracledb-pod.yaml~: file extension '.yaml~' not valid. Valid extensions are .yaml, .tpl, or .txt
Error: 1 chart(s) linted, 1 chart(s) failed
Problem-solving: just remove all of the ~ files under all of the directories
and sub-directories.
38. kubectl proxy issue
Not serving in 127.0.0.1, but on its public address:
# kubectl proxy --disable-filter=true --address=0.0.0.0
But I faced another issue, that I can’t login with the same certifications. for localhost, it’s ok, but for public address, failed.
39. awk combine
combine the field1 and field2 via:
# cat ttt.txt | awk '{print $1":"$2}'
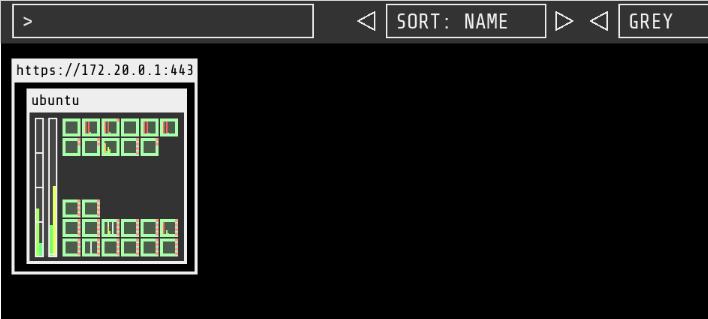
40. kube-ops-view
A good kube-ops view:
41. lvm resize
Via qemu-img resize, then use gparted, for resize the partition:
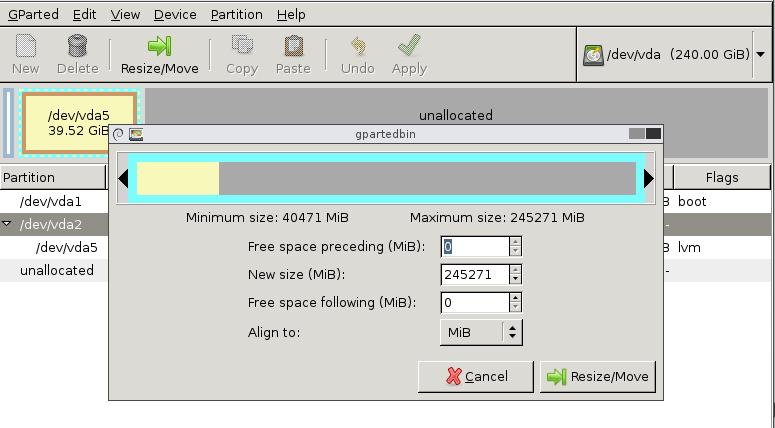
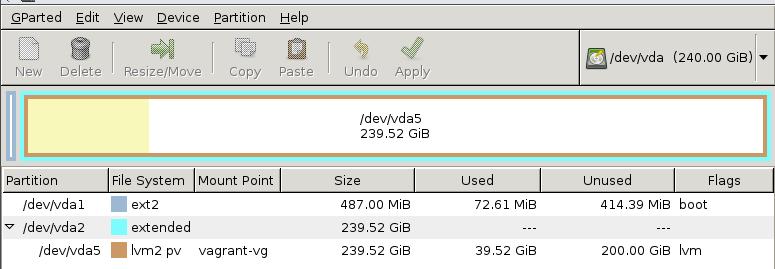
Now you could extend via:
lvextend -l +100%FREE /dev/vagrant-vg/root
resize2fs /dev/vagrant-vg/root
https://fsdev.io/how-to-install-secure-private-docker-registry-harbor-and-use-it/
RBAC based, so you won’t directly push to harbor, should create project
at first.
43. redhat suberscription
via following command:
# subscription-manager register
# subscription-manager refresh
# subscription-manager list --available --matches '*OpenShift*'
# subscription-manager attach --pool=<pool_id>
44. delete last line using sed
Via following command:
$ sed -i '$ d' foo.txt
45. View dnsmasq leased ip
View the dnsmasq leased ip:
/var/lib/misc/dnsmasq.leases
46. tiller offline
Via following command, you could install helm/tiller offline:
# helm init --service-account=tiller -i="gcr.io/kubernetes-helm/tiller:v2.6.1" --upgrade --skip-refresh
47. arch efi issue
The configuration for arch efi:
➜  entries cat arch_back.conf
title	ArchLinux
linux	/vmlinuz-linux
initrd	/initramfs-linux.img
options	root=/dev/sdb2 rw
➜  entries cat arch.conf
title	ArchLinux
linux	/vmlinuz-linux-lts
initrd	/initramfs-linux-lts.img
options	root=/dev/sdb2 rw
➜  entries pwd
/boot/EFI/loader/entries
48. whatpulse priviledge
Add user to the input group via:
# sudo usermod -a -G input dash
49. Disable subscription notice
Disable the yum plugin for detecting subsciption:
# vim /etc/yum/pluginconf.d/subscription-manager.conf
[main]
enabled=0
50. battery indicator
In awesome, using cbatticon for displaying the acpi items.
51. file belongs to which rpm
Via following command:
# rpm -qf /usr/bin/kill
util-linux-xxxxx
52. fio tips
http://www.ywnds.com/?p=8419
54. Disable balloon on windows
Run gpedit.msc, choose user configuration, templates, startup menu, close
all of the balloon, enable, then you won’t be annoyed by these fucking
balloons!

Refers to:
https://github.com/lcpz/awesome-freedesktop
$ git clone https://github.com/lcpz/awesome-freedesktop.git ~/.config/awesome/freedesktop
rc.lua configuration:
local freedesktop = require("freedesktop")


-- replace the origin items with the following items.

myawesomemenu = {
    { "hotkeys", function() return false, hotkeys_popup.show_help end },
    { "manual", terminal .. " -e man awesome" },
    { "edit config", string.format("%s -e %s %s", terminal, editor, awesome.conffile) },
    { "restart", awesome.restart },
    { "quit", function() awesome.quit() end }
}
mymainmenu = freedesktop.menu.build({
    before = {
        { "Awesome", myawesomemenu, beautiful.awesome_icon },
        -- other triads can be put here
    },
    after = {
        { "Open terminal", terminal },
        -- other triads can be put here
    }
})
56. system tray issue
For whatpulse, if the desktop startups too fast, it will complain:
Couldn't detect any system tray on this system.
So you have to add some time-delay for its startup:
run_once("sleep 3 && env LD_LIBRARY_PATH=/usr/lib/openssl-1.0 whatpulse &")
57. crontab issue
My crontab won’t execute after re-installing system, correct via following
command(need X):
59 9-18 * * * bash -c "export DISPLAY=:0.0;/bin/notify.sh"
58. kubernetes influxdb pvc
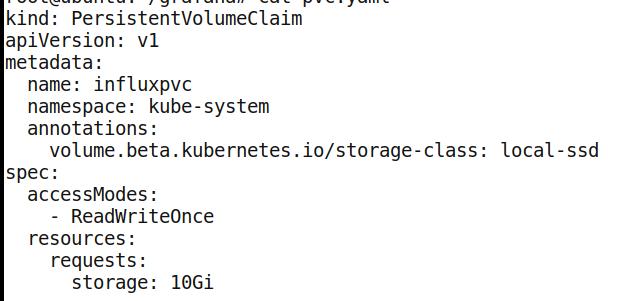
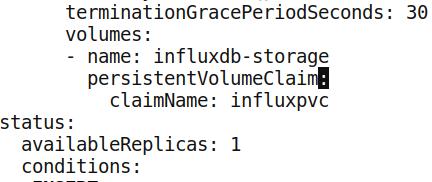
Then you have to edit the corresponding deployment:
$ kubectl edit deployment heapster-influxdb -n kube-syste
59. sleep millisecond
Via following command:
# sleep 0.01
60. curl issue
in linkerd chapters:
# wget http://curl.haxx.se/ca/cacert.pem
# curl -k --cacert cacert.pem.1 -H "Host: world.v2" https://hello.world
61. enable swap
Install arch-install-scripts, then genfstab to get the swap partition. Add
this line into /etc/fstab then you got the swap enabled in every
system-startup.
62. sync folder in windows
Via software: DSynchronize.Zip
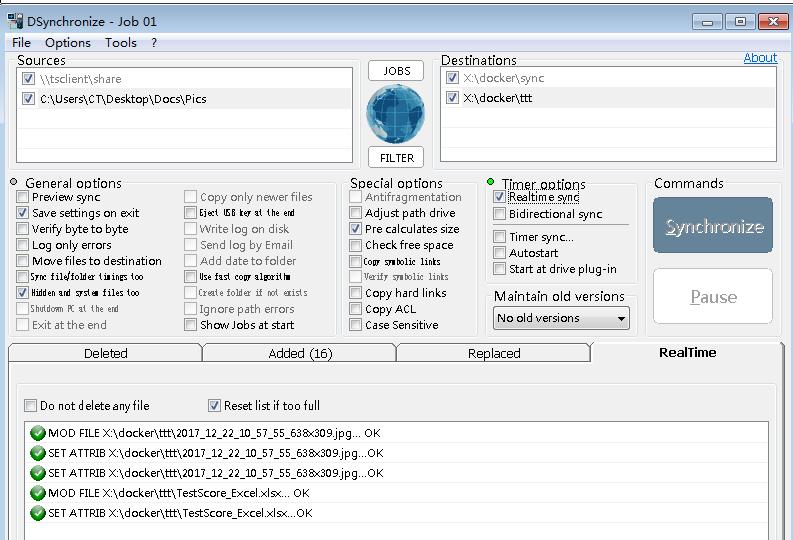
But the rdesktop related folders could not be synced.
63. list all of the services
Via following command you could see all of the enabled services.
# systemctl list-unit-files | grep enabled
64. Install mate on centos
via following commands:
Install MATE Desktop Environment on here.

# yum --enablerepo=epel -y groups install "MATE Desktop"
Input a command like below after finishing installation:

# echo "exec /usr/bin/mate-session" >> ~/.xinitrc
# startx
MATE Desktop Environment starts.
65. play-on-docker issue
install dep and `dep ensure` for getting the dependencies.
66. add modprobe.d
For enable overlay and
# echo "overlay" > /etc/modules-load.d/overlay.conf
# echo "xt_ipvs">/etc/modules-load.d/xt_ipvs.conf
67. docker full output
Via following command:
# docker ps -a --no-trunc
68. View docker address
Via docker inspect dockerid you could see the ip address of the running
docker instance.
69. translation under term
Install trans program via following commands:
$ git clone https://github.com/soimort/translate-shell
$  cd translate-shell
$  make
$  sudo make install
Translate the markdown via:
$ cat 2016-10-25-beginner-linux.markdown| trans -t zh-CN -show-original=n -b
Todo:
Write a python script for automatically recognize markdown syntax and by-pass
some parts of the article.
70. delete all of the soft-linked files
via find -type l -deletefind -type l -delete
71. specify image-pull-policy
If the image is present on the machine, then:
# kubectl run nginx --image=nginx --image-pull-policy=IfNotPresent
72. redsocks on rhel74
manually download the following packages, and install them, then make for the
redsocks:
# ls *.rpm
libevent-2.0.21-4.el7.x86_64.rpm  libevent-devel-2.0.21-4.el7.x86_64.rpm
# rpm -ivh libevent-2.0.21-4.el7.x86_64.rpm
# rpm -ivh libevent-devel-2.0.21-4.el7.x86_64.rpm
73. kubernetes dashboard access
By creating a new cluster rool, then you could view the dashboard:
#  kubectl create clusterrolebinding cluster-admin-fordashboard --clusterrole=cluster-admin --user=system:serviceaccount:kube-system:kubernetes-dashboard
clusterrolebinding "cluster-admin-fordashboard" created
74. service graph for istio
Example:
http://192.192.189.104:31635/force/forcegraph.html
http://192.192.189.104:31635/dotviz
75. libvirt priveledge
By editing following configuration files:
# vim /etc/libvirt/qemu.conf
user="root"
group="root"
# systemctl restart libvirt
76. Disable Subscription service
You could do this via following steps:
# service rhsmcertd stop
# chkconfig rhsmcertd off
Or disable Subscription Manager plugins by :-
# sed -i 's/enabled=1/enabled=0/g' /etc/yum/pluginconf.d/subscription-manager.conf
# sed -i 's/enabled=1/enabled=0/g' /etc/yum/pluginconf.d/product-id.conf
# rm -rf /etc/yum.repods.d/redhat.repo
77. hostPort example
influxdb-hostport.yml definition:
apiVersion: v1
kind: Pod
metadata:
  name: influxdb
spec:
  containers:
    - name: influxdb
      image: influxdb
      ports:
        - containerPort: 8086
          hostPort: 8086
Then curl -v http://kubenode01.example.com:8086/ping
78. kismatic 110 and istio-sidecar
Edit: ./install/kubernetes/webhook-create-signed-cert.sh:
# create the secret with CA cert and server cert/key
echo "apiVersion: v1" > ${tmpdir}/create-secret.yaml
echo "kind: Secret" >> ${tmpdir}/create-secret.yaml
kubectl create secret generic ${secret} \
        --from-file=key.pem=${tmpdir}/server-key.pem \
        --from-file=cert.pem=${tmpdir}/server-cert.pem \
        --dry-run -o yaml >> ${tmpdir}/create-secret.yaml
kubectl -n ${namespace} apply -f ${tmpdir}/create-secret.yaml
79. rhel7 nfs issue
The nfs and rpcbind won’t act normarly, so we have to correct them via:
edit /etc/default/grub

add ipv6.disable=1 to GRUB_CMDLINE_LINUX

sudo /usr/sbin/grub2-mkconfig -o /boot/grub2/grub.cfg

reboot
Remove the ::1 items in /etc/hosts.
80. nfs server on rhel7
Install and configure via:
# yum install nfs-utils rpcbind
# mkdir -p /opt/nfs
# vim /etc/exports
/opt/nfs *(no_root_squash,rw,sync)
# service rpcbind start; service nfs start
# systemctl enable nfs-server
so next time you will get your nfs server running defaultly.
81. debian version
Via cat /etc/os-release or cat /etc/debian_version.
82. Download packages
Via following commands:
# sudo apt-get install --download-only
# aptitude clean
# aptitude --download-only install <your_package_here>
# cp /var/cache/apt/archives/*.deb <your_directory_here>
83. grub issue
Store grub configuration after next configuration:
After struggling for 2 hours, I have found a much easier way to achieve this. I just RTFM. ;)

Add two lines to /etc/default/grub

GRUB_SAVEDEFAULT=true
GRUB_DEFAULT=saved


