Jan 7, 2018
Technology网络规划
为了模拟kismatic完全离线安装,我们创建一个完全隔离的网络如下:
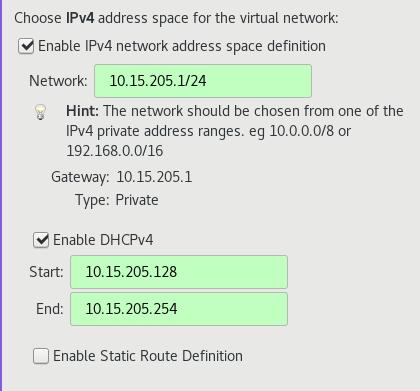
详细信息如下:
10.15.205.1/24
dhcp: 10.15.205.128 ~ 10.15.205.254
部署节点:  10.15.205.2
etcd01:
master01:
worker01:
说明:
设置dhcp是为了让虚拟机在启动的时候自动获得一个地址,实际上在部署过程中我们都会手动修改节点的
IP地址以与kismatic的配置相匹配。
准备工作
CentOS7 Base镜像
- CentOS 7:
CentOS-7-x86_64-Minimal-1708.iso 最小化安装.
安装时注意事项: 不要选择swap分区,否则在默认部署kismatic时会提示失败。
安装完毕后,关闭selinux, 关闭firewalld服务。
将kismaticuser.key.pub注入到系统目录下,
这里的系统目录指的是/root/.ssh/authorized_keys,
或者自己用户的/home/xxxxxx/.ssh/authorized_keys.
准备完毕后,关闭此虚拟机,将其虚拟磁盘作为base盘, 用于创建其他节点。
部署节点(仓库+Registry)
镜像节点是部署成功与否的关键,在这个节点上,我们将创建用于部署kismatic的所有
CentOS仓库镜像,并搭建基于Docker Registry的私有仓库。
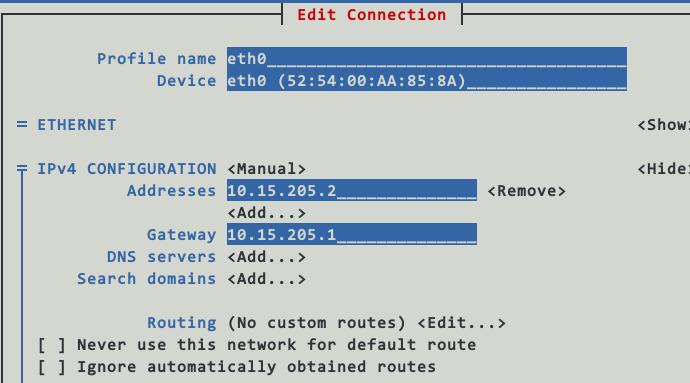
该节点设置为1核cpu,1G内存, IP为10.15.205.2。
$ qemu-img create -f qcow2 -b CentOS7_Base/CentOS7Base.qcows2 Deployment.qcow2
Formatting 'Deployment.qcow2', fmt=qcow2 size=214748364800 backing_file=CentOS7_Base/CentOS7Base.qcows2 cluster_size=65536 lazy_refcounts=off refcount_bits=16
$ ls
CentOS7_Base  Deployment.qcow2
可以使用nmtui来更改其Ip地址/网关等, 注意地址填写为10.15.205.2/24.
在主机(10.15.205.1,即我们运行libvirt/kvm的机器)上,从镜像回来的仓库目录下,用python建立一个简单的http服务器,用于初始化安装:
$ ls
base  docker  gluster  kubernetes  updates
$ python2 -m SimpleHTTPServer 8666
进入到虚拟机里,更改repo配置:
[root@deployment yum.repos.d]# mkdir back
[root@deployment yum.repos.d]# mv * back
mv: cannot move ‘back’ to a subdirectory of itself, ‘back/back’
[root@deployment yum.repos.d]# vim base.repo
[base]
name=Base
baseurl=http://10.15.205.1:8666/base
enabled=1
gpgcheck=0
gpgkey=file:///etc/pki/rpm-gpg/RPM-GPG-KEY-CentOS-7

[updates]
name=Updates
baseurl=http://10.15.205.1:8666/updates
enabled=1
gpgcheck=0
gpgkey=file:///etc/pki/rpm-gpg/RPM-GPG-KEY-CentOS-7

[docker]
name=Docker
baseurl=http://10.15.205.1:8666/docker
enabled=1
gpgcheck=0
gpgkey=file:///etc/pki/rpm-gpg/RPM-GPG-KEY-CentOS-7

[kubernetes]
name=Kubernetes
baseurl=http://10.15.205.1:8666/kubernetes
enabled=1
gpgcheck=0
gpgkey=file:///etc/pki/rpm-gpg/RPM-GPG-KEY-CentOS-7

[gluster]
name=gluster
baseurl=http://10.15.205.1:8666/gluster
enabled=1
gpgcheck=0
gpgkey=file:///etc/pki/rpm-gpg/RPM-GPG-KEY-CentOS-7

[root@deployment yum.repos.d]# yum makecache
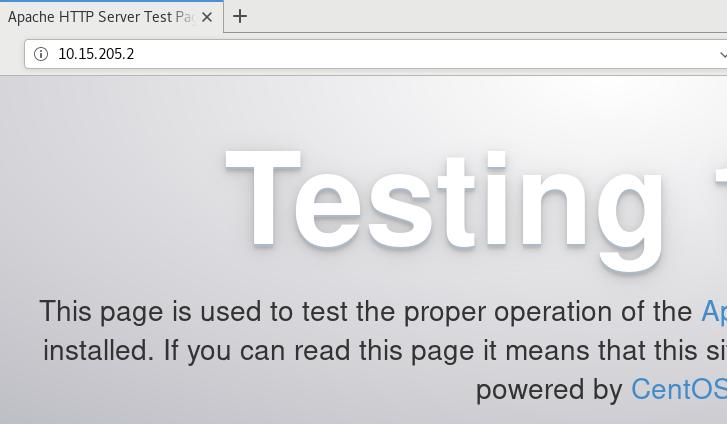
该台服务器需担任两个角色,镜像服务器和仓库服务器,首先我们来配置仓库服务器:
# yum install yum-utils httpd createrepo
# systemctl enable httpd
# systemctl start httpd
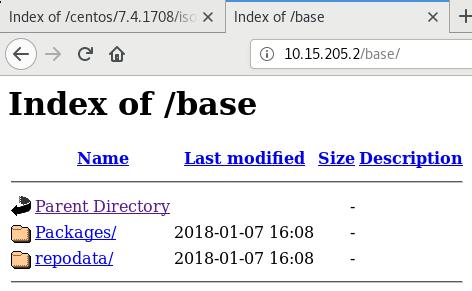
host机器上打开http://10.15.205.2, 看到以下画面说明仓库服务器安装成功:
建立仓库很简单,参考:
https://github.com/apprenda/kismatic/blob/master/docs/disconnected_install.md
使用reposync将远端仓库的内容镜像到本地即可。
例如:
[root@deployment html]# ls
base  docker  gluster  kubernetes  updates
[root@deployment html]# ls base/
Packages  repodata
则看到的仓库如下:
接下来开始创建registry仓库,这里有一个bug,就是需要container-selinux-2.21-1.el7.noarch.rpm这个包。
我们手动从网站下载,然后安装之:
# yum install -y container-selinux-2.21-1.el7.noarch.rpm
# yum install -y docker-ce
因为我们的服务需要用到docker-compose,短时间连通网络并安装docker-compose:
# wget -O /etc/yum.repos.d/epel.repo http://mirrors.aliyun.com/repo/epel-7.repo
# yum install -y python-pip
# pip install docker-compose
预装入本地镜像(以下的命令并不能真正运行,是我自己的批量导入脚本)。
for i in `ls *.tar`
do
	docker load<$i
	docker tag.....
done
我们将参考这篇文章来设置好docker-registry mirror:
https://www.digitalocean.com/community/tutorials/how-to-set-up-a-private-docker-registry-on-ubuntu-14-04
配置好以后的文件夹直接就可以迁移到别的机器上,事实上,我的位于Centos7服务器上的目录正是从一台Ubuntu
机器上迁移过来的,注意在配置签名的时候需要指定域名,而后,在需使用该docker registry的机器上需要对应添加/etc/hosts中的条目:
# vim /etc/hosts
10.15.205.2 mirror.xxxx.com
# docker login mirror.xxxx.com
Username (clouder): clouder
Password:
Login Succeeded
确认服务可用以后,我们可以使用systemd将docker-compose启动的服务添加为系统服务,这样每次重新
启动机器后,我们的registry服务也将随机器启动而启动:
# vim /etc/systemd/system/docker-compose.service
[Unit]
Description=DockerCompose
After=docker.service
Requires=docker.service

[Service]
ExecStart=/usr/bin/docker-compose -f /docker-registry/docker-compose.yml up -d

[Install]
WantedBy=multi-user.target
# systemctl enable docker-compose.service
# systemctl start docker-compose.service
节点机准备
需要准备三台节点机,创建如下:
# qemu-img create -f qcow2 -b CentOS7_Base/CentOS7Base.qcows2 etcd01.qcow2
# qemu-img create -f qcow2 -b CentOS7_Base/CentOS7Base.qcows2 master01.qcow2
# qemu-img create -f qcow2 -b CentOS7_Base/CentOS7Base.qcows2 worker01.qcow2
可以在已有的虚拟机基础上稍加修改,即可得到新的三台机器:
# sudo virsh dumpxml kismatic_deployment>template.xml
# cp template.xml etcd01.xml
# vim etcd01.xml
# sudo virsh define etcd01.xml
Domain kismatic_etcd01 defined from etcd01.xml
进入到系统后,配置仓库,配置好/etc/hosts下的条目,节点机即做完准备。
部署
配置过程以后再写。
使用集群
集群部署完成后,使用./kismatic dashboard来访问kubernetes的dashboard:
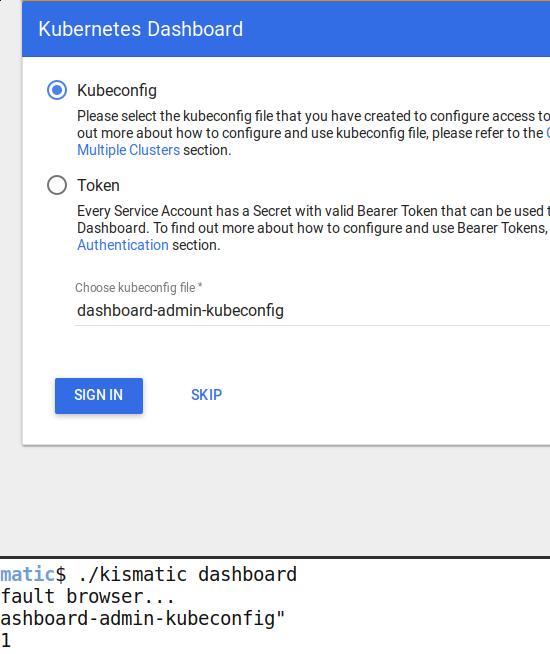
根据提示配置好kubeconfig文件即可。
镜像仓库使用
要使用镜像仓库作为集群的中心仓库,外围机器(用于上传和管理镜像的机器)需要做以下设置(以DEBIAN为例):
# mkdir -p /usr/local/share/ca-certificates/docker-dev-cert/
# cp KISMATIC_FOLDER/devdockerCA.crt /usr/local/share/ca-certificates/docker-dev-cert/
# update-ca-certificates
# systemctl restart docker
# echo "10.15.205.113 mirror.xxxx.com">>/etc/hosts
# docker login mirror.xxxxx.com
Username: clouder
Password:
Login Succeeded
Thus you could directly push images to the registry mirror.
Jan 5, 2018
TechnologyFor avoiding dns resolving pollution, I need to configure pdnsd for my
archlinux workstation, following are the steps:
# pacman -S pdnsd
# cp /usr/share/doc/pdnsd/pdnsd.conf /etc
# vim /etc/pdnsd.conf
The configuration file is listed as:
global {
	perm_cache=10240;
	cache_dir="/var/cache/pdnsd";
#	pid_file = /var/run/pdnsd.pid;
	run_as="pdnsd";
	server_ip = 127.0.0.1;  # Use eth0 here if you want to allow other
				# machines on your network to query pdnsd.
	server_port=53;
	status_ctl = on;
#	paranoid=on;       # This option reduces the chance of cache poisoning
	                   # but may make pdnsd less efficient, unfortunately.
	query_method=tcp_only;
	#min_ttl=15m;       # Retain cached entries at least 15 minutes.
	#max_ttl=1w;        # One week.
	#timeout=10;        # Global timeout option (10 seconds).
	#neg_domain_pol=on;
	#udpbufsize=1024;   # Upper limit on the size of UDP messages.
    neg_domain_pol = off;
    paranoid = on;
    par_queries = 1;
    min_ttl = 1d;
    max_ttl = 5d;
    timeout = 10;
}

# The following section is most appropriate if you have a fixed connection to
# the Internet and an ISP which provides good DNS servers.
server {
	label= "routine";
	ip = 223.5.5.5;  # Put your ISP's DNS-server address(es) here.
#	proxy_only=on;     # Do not query any name servers beside your ISP's.
	                   # This may be necessary if you are behind some
	                   # kind of firewall and cannot receive replies
	                   # from outside name servers.
	timeout=5;         # Server timeout; this may be much shorter
			   # that the global timeout option.
#	uptest=if;         # Test if the network interface is active.
#	interface=eth0;    # The name of the interface to check.
#	interval=10m;      # Check every 10 minutes.
#	purge_cache=off;   # Keep stale cache entries in case the ISP's
#			   # DNS servers go offline.
#	edns_query=yes;    # Use EDNS for outgoing queries to allow UDP messages
#			   # larger than 512 bytes. May cause trouble with some
#			   # legacy systems.
#	exclude=.thepiratebay.org,  # If your ISP censors certain names, you may
#		.thepiratebay.se,   # want to exclude them here, and provide an
#		.piratebay.org,	    # alternative server section below that will
#		.piratebay.se;	    # successfully resolve the names.
   reject = 74.125.127.102,
       74.125.155.102,
       74.125.39.102,
       74.125.39.113,
       209.85.229.138,
       128.121.126.139,
       159.106.121.75,
       169.132.13.103,
       192.67.198.6,
       202.106.1.2,
       202.181.7.85,
       203.161.230.171,
       203.98.7.65,
       207.12.88.98,
       208.56.31.43,
       209.145.54.50,
       209.220.30.174,
       209.36.73.33,
       211.94.66.147,
       213.169.251.35,
       216.221.188.182,
       216.234.179.13,
       243.185.187.39,
       37.61.54.158,
       4.36.66.178,
       46.82.174.68,
       59.24.3.173,
       64.33.88.161,
       64.33.99.47,
       64.66.163.251,
       65.104.202.252,
       65.160.219.113,
       66.45.252.237,
       69.55.52.253,
       72.14.205.104,
       72.14.205.99,
       78.16.49.15,
       8.7.198.45,
       93.46.8.89,
       37.61.54.158,
       243.185.187.39,
       190.93.247.4,
       190.93.246.4,
       190.93.245.4,
       190.93.244.4,
       65.49.2.178,
       189.163.17.5,
       23.89.5.60,
       49.2.123.56,
       54.76.135.1,
       77.4.7.92,
       118.5.49.6,
       159.24.3.173,
       188.5.4.96,
       197.4.4.12,
       220.250.64.24,
       243.185.187.30,
       249.129.46.48,
       253.157.14.165;
   reject_policy = fail;
   exclude = ".google.com",
       ".cn",
       ".baidu.com",
       ".qq.com",
       ".gstatic.com",
       ".googleusercontent.com",
       ".googlepages.com",
       ".googlevideo.com",
       ".googlecode.com",
       ".googleapis.com",
       ".googlesource.com",
       ".googledrive.com",
       ".ggpht.com",
       ".youtube.com",
       ".youtu.be",
       ".ytimg.com",
       ".twitter.com",
       ".facebook.com",
       ".fastly.net",
       ".akamai.net",
       ".akamaiedge.net",
       ".akamaihd.net",
       ".edgesuite.net",
       ".edgekey.net";
}

server {
   # Better setup dns server(DON'T USE PORT 53) on your own vps for faster proxying
   label = "special";
   ip = 208.67.222.222,208.67.220.220;
   port = 5353;
   proxy_only = on;
   timeout = 5;
}
Then you have to enable and start the pdnsd service via:
# systemctl enable pdnsd
# systemctl start pdnsd
# vim /etc/resolv.con
nameserver 127.0.0.1
# chattr +i /etc/resolv.conf
you could use dig for testing your pdnsd configuration.
Jan 4, 2018
TechnologyIf I’d wanna to run the same tasks on several machine at the certain time, I
could do following tricks:
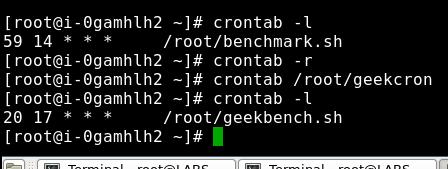
# crontab -l
# crontab /root/mycron
While you could set non-password login among those machines, and transfer the
same crontab files to these machine.
scp /root/mycron root@192.168.10.22:/root
scp /root/mycron root@192.168.10.2X:/root
scp /root/mycron root@192.168.10.2X:/root
scp /root/mycron root@192.168.10.2X:/root
scp /root/mycron root@192.168.10.2X:/root
You cron file would be seen like following:
# cat /root/mycron
59 14 * * * /root/benchmark.sh
this means the scripts of /root/benchmark.sh would be run at 14:59 AM. In
this file you could do whatever you want.
SomeTips For Virtualbox
https://www.virtualbox.org/manual/ch09.html
9.11.4. Binding NAT sockets to a specific interface
By default, VirtualBox's NAT engine will route TCP/IP packets through the default interface assigned by the host's TCP/IP stack. (The technical reason for this is that the NAT engine uses sockets for communication.) If, for some reason, you want to change this behavior, you can tell the NAT engine to bind to a particular IP address instead. Use the following command:

VBoxManage modifyvm "VM name" --natbindip1 "10.45.0.2"
After this, all outgoing traffic will be sent through the interface with the IP address 10.45.0.2. Please make sure that this interface is up and running prior to this assignment.
Some reference topics:
https://forums.virtualbox.org/viewtopic.php?f=6&t=81631
https://forums.virtualbox.org/viewtopic.php?f=1&t=38879
Jan 3, 2018
Technologyhugo
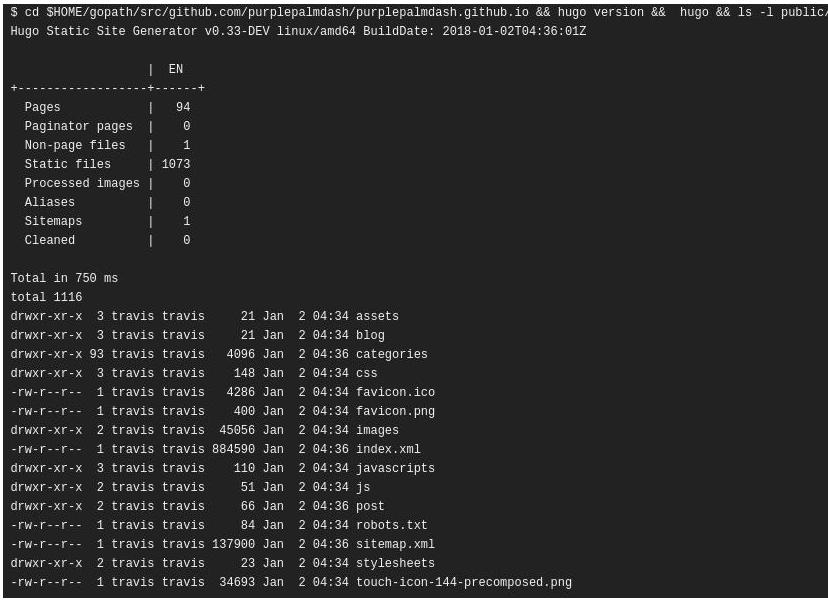
升级到v0.33后,生成的静态网站里缺少了index.html等HTML文件,原因不明。恰好我在travis上的编译流程有些繁琐,每次都需要花费5分钟以上生成整个网站,于是我调研了一下更好的解决方案,用于生成博客静态网站。
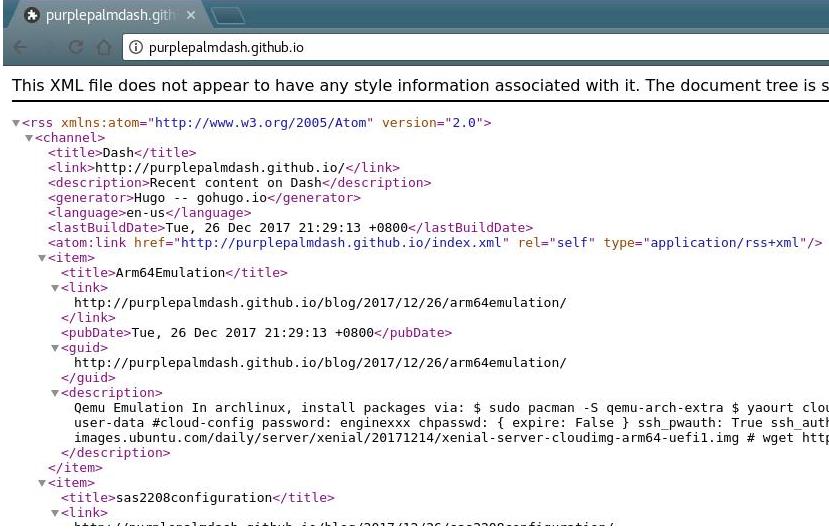
Issue:
无法正常显示的网页:
准备
以前的hugo源代码我直接放在某个仓库里,建了两个分支source和master,
source用于存放源代码,master则是编译后的静态网站结果,编译完成以后,直接发布在github
page上。
每一次编译都需要推送代码到travis上,在travis的容器里安装好hugo,
安装hugo的方式是直接go get -u -v,
这样相当于每次编译网站都需要预先编译出来一个hugo,因而比较耗时。
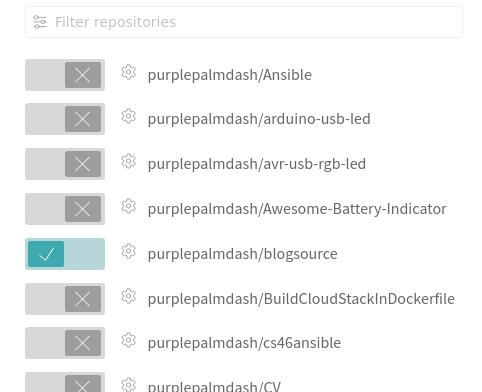
为了避免这种繁琐的过程,我建立一个新的仓库,blogsource,将以前的仓库清空,
重新组织目录结构.
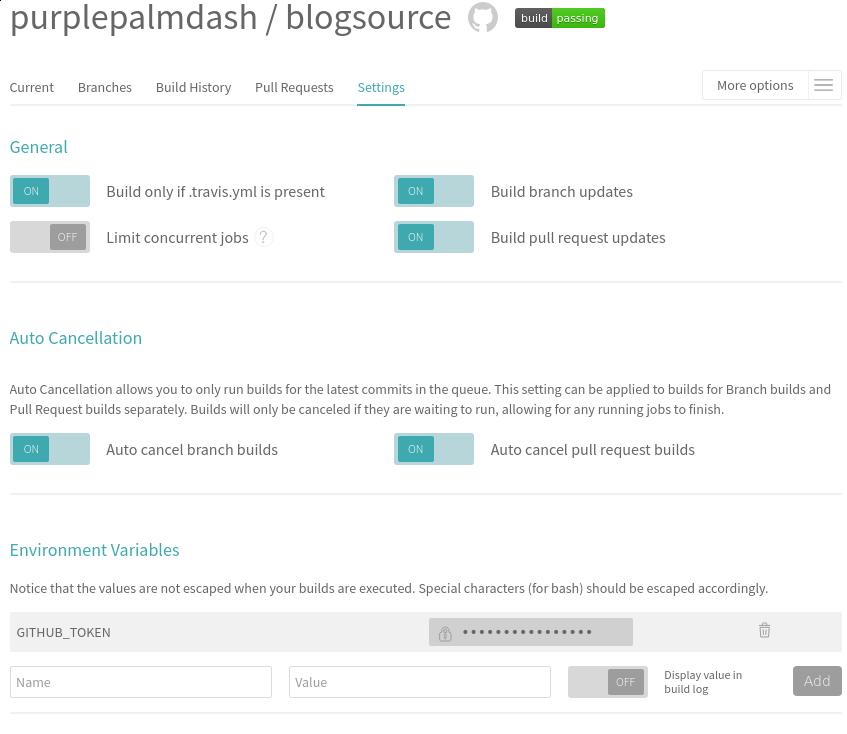
在github上建立一个token, 注意选中其repo选项:
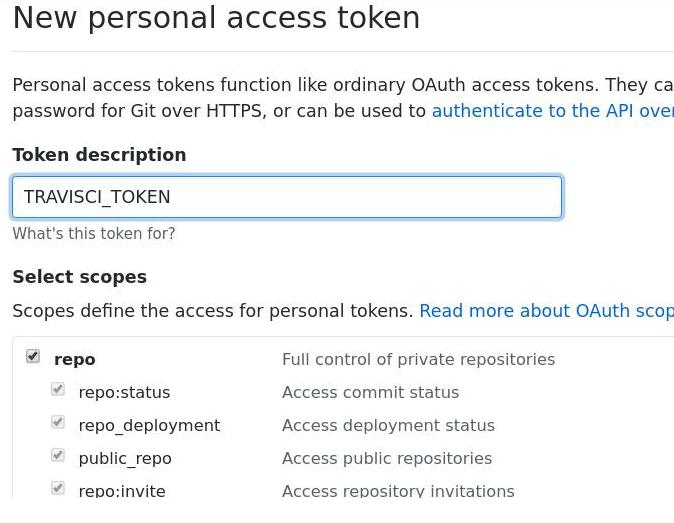
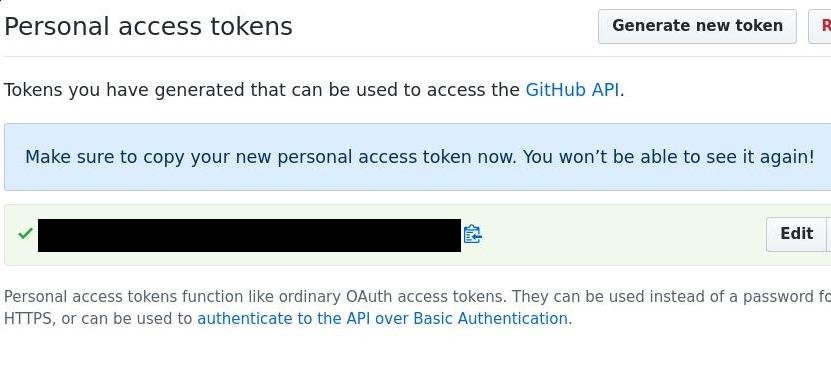
得到的token如下,我们将复制这个数值,后面在travisCI中需要填到:
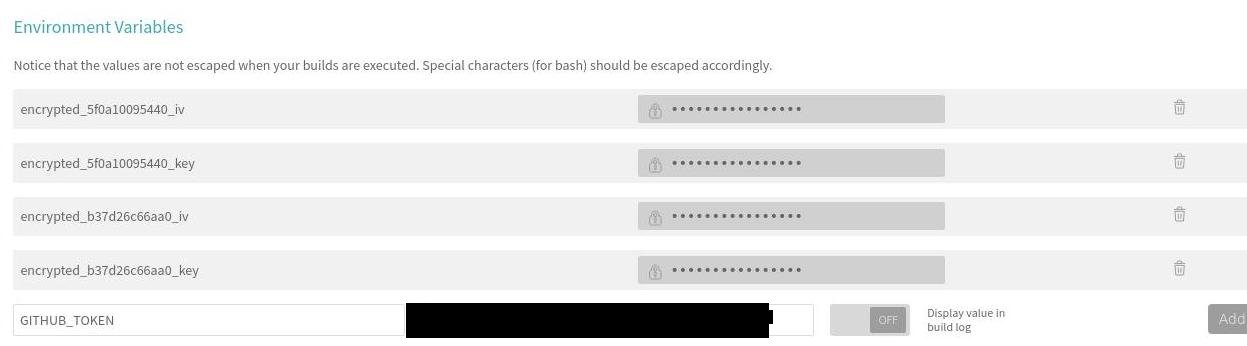
在travisci的环境变量中,手动添加我们刚才生成的token:
代码重架构
目录架构如下:
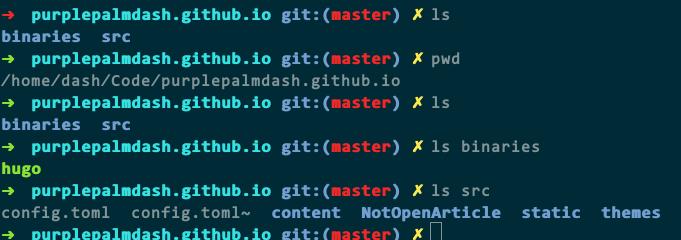
其中binaries下是我们手动下载的hugo可执行文件,下载地址在:
https://github.com/gohugoio/hugo/releases
我这里选择的是v31.1的Linux-64.tar.gz, 下载完毕后,直接解压到此目录下即可。
hugo原有的配置文件不需要变化,所需要变化的是我们的.travis.yaml文件。
travis配置文件
简单起见,下面直接贴出源代码。
addons:
  apt:
    packages:
      - python-pygments

install:
  - rm -rf public || exit 0

script:
  - cd src
  - ../binaries/hugo --theme=hyde-a

deploy:
  provider: pages
  skip_cleanup: true
  local_dir: public
  github_token: $GITHUB_TOKEN # Set in travis-ci.org dashboard
  on:
    branch: master
  repo: purplepalmdash/purplepalmdash.github.io
  target_branch: master
注意到上面的deploy环节,使用到了我们上面生成的token,
而每次编译完成以后,直接推送到purplepalmdash/purplepalmdash.github.io仓库的master分支,按照github的说明,这个分支直接提供了博客网站。
更改一些源文件
现在github
page已经完全支持https了,而之前我们的网站使用的是http方式,为此,我们的css文件配置需要有以下的修改,主要是在我的模板文件中定义:
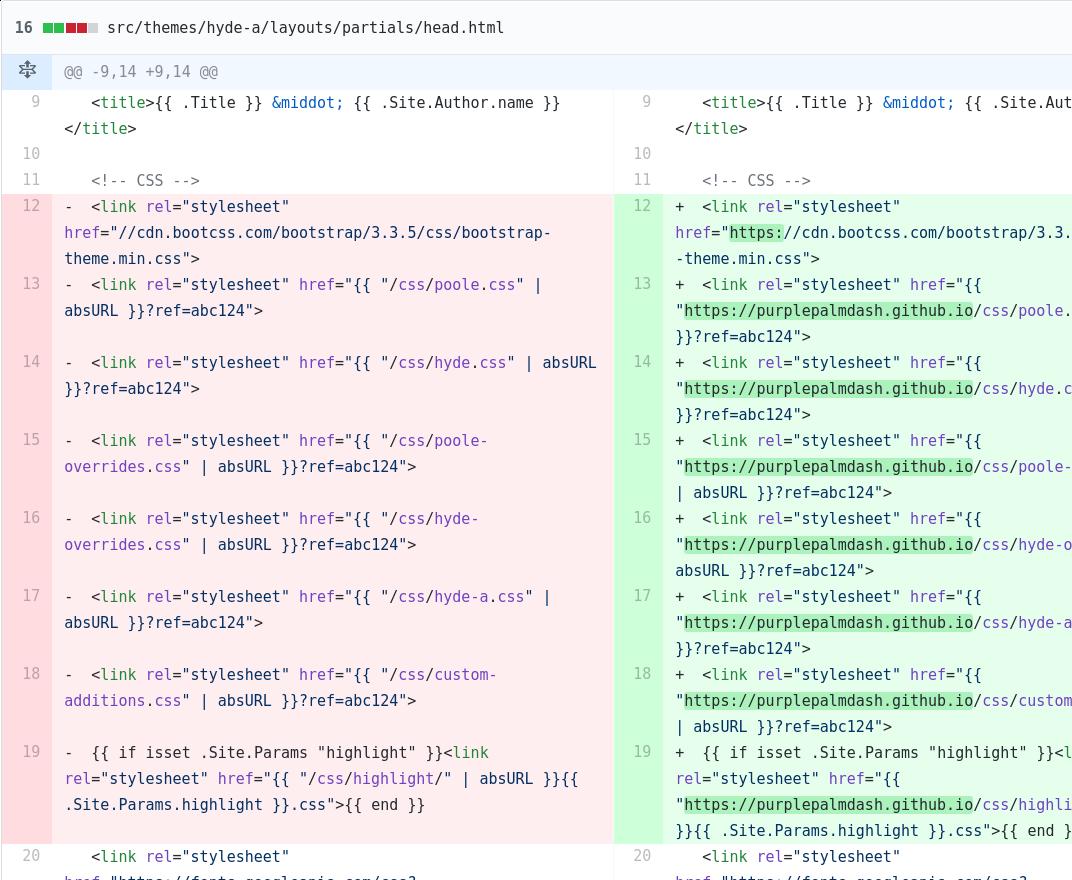
更改完毕以后,每次就可以使用https来访问网站了。
travisCI自编译
去掉以前的travisCI配置,更新一个新的配置.
完整的配置应该如下:
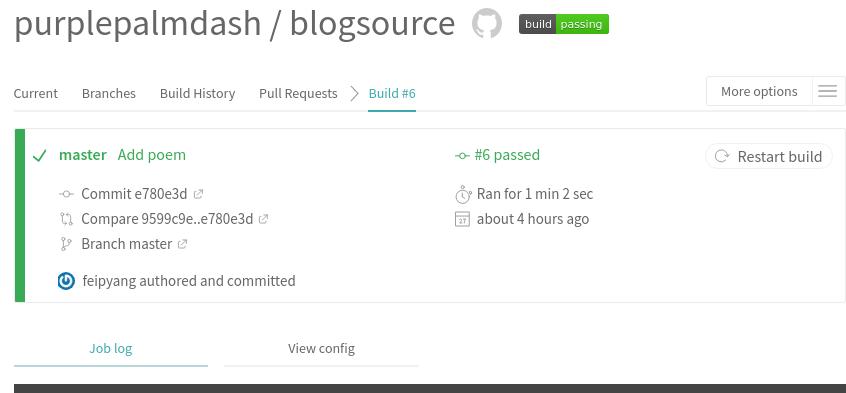
现在每次针对代码库blogsource的提交,将自动触发博客的编译,并自动更新最终的页面。
时间
每次的编译时间差不多在一分钟之内。
Jan 3, 2018
Technology昨天的开发者头条年度开篇,用到了这首诗歌。这几年的时间里,大家知道的,国内的气氛每况愈
下,查点像样的资料,没个像样的梯子压根都到达不了公正一点的搜索引擎。房价高企,每次路过
像样点的小区都不敢看。这是我们所希望的将来吗?不是的。
所以,我只能坚定地相信未来,相信不屈不挠的努力,相信战胜死亡的年轻。相信未来、热爱生命
。2018年我将迎来小生命的诞生,希望我的努力能给ta拼出一片像样的天空。
当蜘蛛网无情地查封了我的炉台
当灰烬的余烟叹息着贫困的悲哀
我依然固执地铺平失望的灰烬
用美丽的雪花写下:相信未来

当我的紫葡萄化为深秋的露水
当我的鲜花依偎在别人的情怀
我依然固执地用凝霜的枯藤
在凄凉的大地上写下:相信未来

我要用手指那涌向天边的排浪
我要用手掌那托住太阳的大海
摇曳着曙光那枝温暖漂亮的笔杆
用孩子的笔体写下:相信未来

我之所以坚定地相信未来
是我相信未来人们的眼睛
她有拨开历史风尘的睫毛
她有看透岁月篇章的瞳孔

不管人们对于我们腐烂的皮肉
那些迷途的惆怅、失败的苦痛
是寄予感动的热泪、深切的同情
还是给以轻蔑的微笑、辛辣的嘲讽

我坚信人们对于我们的脊骨
那无数次的探索、迷途、失败和成功
一定会给予热情、客观、公正的评定
是的,我焦急地等待着他们的评定

朋友,坚定地相信未来吧
相信不屈不挠的努力
相信战胜死亡的年轻
相信未来、热爱生命
