Jan 15, 2018
Technology主要记录生产环境的迁移,后期可以作为实际部署和安装时的文档参考。
网络准备
创建一个10.15.205.0/24网络:
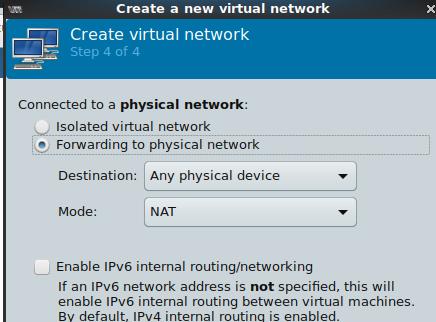
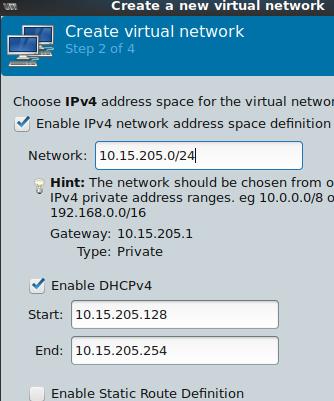 由于在内网,故指定NAT与否都无所谓,
在有Internet的环境中,可以指定为隔离环境,以模拟实际的现网环境:
由于在内网,故指定NAT与否都无所谓,
在有Internet的环境中,可以指定为隔离环境,以模拟实际的现网环境:
镜像准备
直接将镜像拷贝到内网,建立aptly虚拟机、registry
mirror虚拟机即可。未来将对aptly虚拟机和registry虚拟机做合并操作。
基础镜像准备, 使用Ubuntu1604_base.qcow2镜像文件,做以下操作:
0. qemu-system-x86_64 -net nic -net user,hostfwd=tcp::2288-:22 -hda xxxx.qcow2
   -m 1024 --enable-kvm
1. root密码修改
2. root远程登录(/etc/ssh/sshd_config)
3. /etc/hosts中添加`10.15.205.2	mirror.xxxx.com`条目,以使用registry mirror.
4. 将免密码登录的公钥插入到操作系统中
5. 配置aptly的镜像服务器
vim /etc/apt/sources.list
deb http://10.15.205.3 xenial main
deb http://10.15.205.3 kubernetes-xenial main
deb [arch=amd64] http://10.15.205.3 xenial stable
6. 导入aptly所需的签名
cat mykey.asc | apt-key add -
做完此操作后,保存基础镜像,创建出来相应的虚拟机。

Jan 15, 2018
TechnologySteps
Create first chart named nginxfirst like following:
# mkdir nginxfirst
# cd nginxfirst/
# ls
# helm create nginxfirst
Creating nginxfirst
# tree
.
└── nginxfirst
    ├── charts
    ├── Chart.yaml
    ├── templates
    │   ├── deployment.yaml
    │   ├── _helpers.tpl
    │   ├── ingress.yaml
    │   ├── NOTES.txt
    │   └── service.yaml
    └── values.yaml

3 directories, 7 files
Edit the values.yaml file:
replicaCount: 1
image:
  repository: mirror.teligen.com/nginx
  tag: 1.7.9
  pullPolicy: IfNotPresent
service:
  name: nginx
  type: ClusterIP
  externalPort: 80
  internalPort: 80
Keep others the same.
--dry-run means you want to verificate the configuration.
Install this chart book via:
# helm install --name firstnginx . --set service.type=NodePort
Get the URL via following command:
NOTES:
1. Get the application URL by running these commands:
  export NODE_PORT=$(kubectl get --namespace default -o jsonpath="{.spec.ports[0].nodePort}" services firstnginx-nginxfirst)
  export NODE_IP=$(kubectl get nodes --namespace default -o jsonpath="{.items[0].status.addresses[0].address}")
  echo http://$NODE_IP:$NODE_PORT
Finally you will see a running nginx instance.
Package and Serve
Package the modified package via following command:
[root@DashSSD nginxfirst]# helm package .
Successfully packaged chart and saved it to: /home/dash/Code/tmp/nginxfirst/nginxfirst/nginxfirst-0.1.0.tgz
[root@DashSSD nginxfirst]# ls
charts  Chart.yaml  nginxfirst-0.1.0.tgz  templates  values.yaml  values.yaml~
[root@DashSSD nginxfirst]# helm lint
==> Linting .
[INFO] Chart.yaml: icon is recommended

1 chart(s) linted, no failures
Jan 12, 2018
Technology这几天在试用helm,很有意思的包管理系统,让容器解决方案的落地门槛一下降了很多。然后我在搭建前端可视化的仓库解决方案,用到了monocular,
百思不得其解的是,在minikube上可以顺利部署成功的monocular,
在自己搭建的基于Ubuntu搭建的k8s集群上就是不行。
解决方法: 用kubectl get pods来看,总是mongodb部署不成功。
用kubernetes dashboard查看pod失败的原因在与persistence volume mount不成功。
在minikube上用kubectl get pv和kubectl get pvc是可以看到完整的结果的,而且可以看到它使用的是hostpath的格式。
下载monocular的charts到本地,查看目录结构:
# helm fetch monocular/monocular
# tree
.
├── charts
│   └── mongodb
│       ├── Chart.yaml
│       ├── README.md
│       ├── templates
│       │   ├── deployment.yaml
│       │   ├── _helpers.tpl
│       │   ├── NOTES.txt
│       │   ├── pvc.yaml
│       │   ├── secrets.yaml
│       │   └── svc.yaml
│       └── values.yaml
├── Chart.yaml
├── README.md
├── requirements.lock
而后我们查看charts里关于持久化存储的声明,发现是在charts/mongodb下所设置的,
# cat values.yaml  | grep -i persistence -A5
    ## Enable persistence using Persistent Volume Claims
    ## ref: http://kubernetes.io/docs/user-guide/persistent-volumes/
    ##
    persistence:
      enabled: true
      ## mongodb data Persistent Volume Storage Cla
于是我们用以下的命令来重新安装此包:
# helm ls
.... // panda stands for the installed helm instance
# helm delete panda
# helm install --name=monkey --set "persistence.enabled=false,mongodb.persistence.enabled=false"  monocular/monocular
现在刷新系统,发现已经安装成功了:
# kubectl get pods
NAME                                                        READY     STATUS    RESTARTS   AGE
monkey-mongodb-66fd888d4-k66tg                              1/1       Running   0          19m
monkey-monocular-api-5fd987957-rtmqq                        1/1       Running   6          19m
monkey-monocular-api-5fd987957-wqxds                        1/1       Running   6          19m
monkey-monocular-prerender-6b7cb5cc98-gxs8b                 1/1       Running   0          19m
monkey-monocular-ui-8c776fd89-5hbcg                         1/1       Running   0          19m
monkey-monocular-ui-8c776fd89-gz8jm                         1/1       Running   0          19m
my-release-nginx-ingress-controller-74c748b9fb-9xtfv        1/1       Running   7          17h
my-release-nginx-ingress-default-backend-64f764b667-gxkht   1/1       Running   4          17h
# kubectl get ingress
NAME               HOSTS     ADDRESS         PORTS     AGE
monkey-monocular   *         10.15.205.200   80        20m
打开网页,发现可以访问到monocular, 然而其charts列表暂时无法显示, why?
迅速部署应用,避免每次重新拉取镜像:
# helm install --name=tiger --set "persistence.enabled=false,mongodb.persistence.enabled=false,pullPolicy=IfNotPresent,api.image.pullPolicy=IfNotPresent,ui.image.pullPolicy=IfNotPresent,prerender.image.pullPolicy=IfNotPresent" monocular/monocular
Jan 11, 2018
Technologyminikube
Install and initialization:
$ sudo cp /media/sda5/kismatic/allinone/helm /usr/bin
$ sudo chmod 777 /usr/bin/helm
$ helm version
Client: &version.Version{SemVer:"v2.7.2", GitCommit:"8478fb4fc723885b155c924d1c8c410b7a9444e6", GitTreeState:"clean"}
Error: cannot connect to Tiller
$ helm init
$HELM_HOME has been configured at /home/xxxx/.helm.

Tiller (the Helm server-side component) has been installed into your Kubernetes Cluster.
Happy Helming!
$ helm repo update
Hang tight while we grab the latest from your chart repositories...
...Skip local chart repository
...Successfully got an update from the "stable" chart repository
Update Complete. ⎈ Happy Helming!⎈
$ helm ls
$ helm search
monocular
In minikube, we should use hostNetwork mode:
Prerequisites:
$ helm install stable/nginx-ingress --set controller.hostNetwork=true
If on kismatic, run following:
$ helm install stable/nginx-ingress --set controller.hostNetwork=true,rbac.create=true
Then install the mocular via following commands:
$ helm repo add monocular https://kubernetes-helm.github.io/monocular
$ helm install monocular/monocular
Check the installed packages and its running status:
$ helm ls
NAME             	REVISION	UPDATED                 	STATUS  	CHART               	NAMESPACE
fallacious-jaguar	1       	Thu Jan 11 11:56:21 2018	DEPLOYED	nginx-ingress-0.8.23	default
incindiary-prawn 	1       	Thu Jan 11 11:58:42 2018	DEPLOYED	monocular-0.5.0     	default
$ kubectl get pods
NAME                                                              READY     STATUS              RESTARTS   AGE
fallacious-jaguar-nginx-ingress-controller-55cd4578cb-vpn2q       1/1       Running             0          3m
fallacious-jaguar-nginx-ingress-default-backend-5b7d684c6fdzk2m   1/1       Running             0          3m
hello-minikube-7844bdb9c6-596f9                                   1/1       Running             4          11d
incindiary-prawn-mongodb-5d96bdcbc5-47js2                         0/1       ContainerCreating   0          37s
incindiary-prawn-monocular-api-7758c78d8f-j64qx                   0/1       ContainerCreating   0          37s
incindiary-prawn-monocular-api-7758c78d8f-kb7nq                   0/1       ContainerCreating   0          37s
incindiary-prawn-monocular-prerender-65b576dd76-jwvmc             0/1       ContainerCreating   0          37s
incindiary-prawn-monocular-ui-5545f44ffb-7557l                    0/1       ContainerCreating   0          37s
incindiary-prawn-monocular-ui-5545f44ffb-bltmc                    0/1       ContainerCreating   0          37s
Get the deployment:
# kubectl get pods --watch
# kubectl get ingress
NAME                         HOSTS     ADDRESS          PORTS     AGE
incindiary-prawn-monocular   *         192.168.99.100   80        2h
# firefox 192.168.99.100
Displayed image:
Deploy Wordpress
Deploy with following commands:
# helm install --name=wordpress-test1 --set "persistence.enabled=false,mariadb.persistence.enabled=false,serviceType=ClusterIP" stable/wordpress
Examine the deployment:
# kubectl get pods | grep wordpress
wordpress-test1-mariadb-56c66786cc-2nj8c                          0/1       PodInitializing     0          25s
wordpress-test1-wordpress-6c949bdcb4-22fk4                        0/1       ContainerCreating   0          25s
Jan 10, 2018
TechnologyStart
Build an virtual machine with 4-core/8G, change its ip address to
10.15.205.100, hostname allinone.
# cd /etc/yum.repos.d/
# mkdir back
# mv *.repo back
# curl http://10.15.205.2/base.repo>base.repo
# yum makecache
Notice the base.repo is the repositories we get from the internet.
Edit the hostfile for adding the registry item(domain name to ip address).
# vim /etc/hosts
10.15.205.2	mirror.xxxx.com
Make sure you public key has been inserted into the
/root/.ssh/authorized_keys, then create the directory for deployment:
$ sudo cp -r kismatic_for_1015205 allinone
$ cd allinone
$ sudo rm -rf generated*
Configuration
The example configuration file is listed as following:
cluster:
  name: kubernetes

  # Set to true if the nodes have the required packages installed.
  disable_package_installation: false

  # Set to true if you are performing a disconnected installation.
  disconnected_installation: true

  # Networking configuration of your cluster.
  networking:

    # Kubernetes will assign pods IPs in this range. Do not use a range that is
    # already in use on your local network!
    pod_cidr_block: 172.16.0.0/16

    # Kubernetes will assign services IPs in this range. Do not use a range
    # that is already in use by your local network or pod network!
    service_cidr_block: 172.20.0.0/16

    # Set to true if your nodes cannot resolve each others' names using DNS.
    update_hosts_files: true

    # Set the proxy server to use for HTTP connections.
    http_proxy: ""

    # Set the proxy server to use for HTTPs connections.
    https_proxy: ""

    # List of host names and/or IPs that shouldn't go through any proxy.
    # All nodes' 'host' and 'IPs' are always set.
    no_proxy: ""

  # Generated certs configuration.
  certificates:

    # Self-signed certificate expiration period in hours; default is 2 years.
    expiry: 17520h

    # CA certificate expiration period in hours; default is 2 years.
    ca_expiry: 17520h

  # SSH configuration for cluster nodes.
  ssh:

    # This user must be able to sudo without password.
    #user: kismaticuser
    user: root

    # Absolute path to the ssh private key we should use to manage nodes.
    ssh_key: /media/sda5/kismatic/allinone/kismaticuser.key
    ssh_port: 22

  # Override configuration of Kubernetes components.
  kube_apiserver:
    option_overrides: {}

  kube_controller_manager:
    option_overrides: {}

  kube_scheduler:
    option_overrides: {}

  kube_proxy:
    option_overrides: {}

  kubelet:
    option_overrides: {}

  # Kubernetes cloud provider integration
  cloud_provider:

    # Options: 'aws','azure','cloudstack','fake','gce','mesos','openstack',
    # 'ovirt','photon','rackspace','vsphere'.
    # Leave empty for bare metal setups or other unsupported providers.
    provider: ""

    # Path to the config file, leave empty if provider does not require it.
    config: ""

# Docker daemon configuration of all cluster nodes
docker:
  logs:
    driver: json-file
    opts:
      max-file: "1"
      max-size: 50m

  storage:

    # Configure devicemapper in direct-lvm mode (RHEL/CentOS only).
    direct_lvm:
      enabled: false

      # Path to the block device that will be used for direct-lvm mode. This
      # device will be wiped and used exclusively by docker.
      block_device: ""

      # Set to true if you want to enable deferred deletion when using
      # direct-lvm mode.
      enable_deferred_deletion: false

# If you want to use an internal registry for the installation or upgrade, you
# must provide its information here. You must seed this registry before the
# installation or upgrade of your cluster. This registry must be accessible from
# all nodes on the cluster.
docker_registry:

  # IP or hostname and port for your registry.
  server: "mirror.teligen.com"

  # Absolute path to the certificate authority that should be trusted when
  # connecting to your registry.
  CA: "/home/dash/devdockerCA.crt"

  # Leave blank for unauthenticated access.
  username: "clouder"

  # Leave blank for unauthenticated access.
  password: "engine"

# Add-ons are additional components that KET installs on the cluster.
add_ons:
  cni:
    disable: false

    # Selecting 'custom' will result in a CNI ready cluster, however it is up to
    # you to configure a plugin after the install.
    # Options: 'calico','weave','contiv','custom'.
    provider: calico
    options:
      calico:

        # Options: 'overlay','routed'.
        mode: overlay

        # Options: 'warning','info','debug'.
        log_level: info

        # MTU for the workload interface, configures the CNI config.
        workload_mtu: 1500

        # MTU for the tunnel device used if IPIP is enabled.
        felix_input_mtu: 1440

  dns:
    disable: false

  heapster:
    disable: false
    options:
      heapster:
        replicas: 2

        # Specify kubernetes ServiceType. Defaults to 'ClusterIP'.
        # Options: 'ClusterIP','NodePort','LoadBalancer','ExternalName'.
        service_type: ClusterIP

        # Specify the sink to store heapster data. Defaults to an influxdb pod
        # running on the cluster.
        sink: influxdb:http://heapster-influxdb.kube-system.svc:8086

      influxdb:

        # Provide the name of the persistent volume claim that you will create
        # after installation. If not specified, the data will be stored in
        # ephemeral storage.
        pvc_name: ""

  dashboard:
    disable: false

  package_manager:
    disable: false

    # Options: 'helm'
    provider: helm

  # The rescheduler ensures that critical add-ons remain running on the cluster.
  rescheduler:
    disable: false

# Etcd nodes are the ones that run the etcd distributed key-value database.
etcd:
  expected_count: 1

  # Provide the hostname and IP of each node. If the node has an IP for internal
  # traffic, provide it in the internalip field. Otherwise, that field can be
  # left blank.
  nodes:
  - host: "allinone"
    ip: "10.15.205.100"
    internalip: ""
    labels: {}

# Master nodes are the ones that run the Kubernetes control plane components.
master:
  expected_count: 1

  # If you have set up load balancing for master nodes, enter the FQDN name here.
  # Otherwise, use the IP address of a single master node.
  load_balanced_fqdn: "10.15.205.100"

  # If you have set up load balancing for master nodes, enter the short name here.
  # Otherwise, use the IP address of a single master node.
  load_balanced_short_name: "10.15.205.100"
  nodes:
  - host: "allinone"
    ip: "10.15.205.100"
    internalip: ""
    labels: {}

# Worker nodes are the ones that will run your workloads on the cluster.
worker:
  expected_count: 1
  nodes:
  - host: "allinone"
    ip: "10.15.205.100"
    internalip: ""
    labels: {}

# Ingress nodes will run the ingress controllers.
ingress:
  expected_count: 0
  nodes: []
#  - host: ""
#    ip: ""
#    internalip: ""
#    labels: {}
#
# Storage nodes will be used to create a distributed storage cluster that can
# be consumed by your workloads.
storage:
  expected_count: 0
  nodes: []

# A set of NFS volumes for use by on-cluster persistent workloads
nfs:
  nfs_volume: []
Deploy the whole cluster:
sudo bash
[root@xxxxxx allinone]# ./kismatic install apply

Validating==========================================================================
Reading installation plan file "kismatic-cluster.yaml"                          [OK]
Validating installation plan file                                               [OK]
Validating SSH connectivity to nodes                                            [OK]
Configure Cluster Prerequisites                                                 [OK]
Gather Node Facts
Then you could get the running kubernetes.
helm
helm, translation for chinese: 舵.
Get started with helm:
# curl https://raw.githubusercontent.com/kubernetes/helm/master/scripts/get > get_helm.sh
# chmod 777 get_helm.sh
# ./get_helm.sh
[root@allinone ~]# which helm
/usr/local/bin/helm
[root@allinone ~]# helm version
Client: &version.Version{SemVer:"v2.7.2", GitCommit:"8478fb4fc723885b155c924d1c8c410b7a9444e6", GitTreeState:"clean"}
Error: cannot connect to Tiller
This error message is because my k8s cluster is not stable. so re-install a
new one.
Ubuntu ways
For syncing the packages from the internet, then create a gpg key for
publishing the repository:
# apt-get install -y haveged
# gpg --gen-key
gpg (GnuPG) 1.4.20; Copyright (C) 2015 Free Software Foundation, Inc.
This is free software: you are free to change and redistribute it.
There is NO WARRANTY, to the extent permitted by law.

Please select what kind of key you want:
   (1) RSA and RSA (default)
   (2) DSA and Elgamal
   (3) DSA (sign only)
   (4) RSA (sign only)
Your selection? 1
RSA keys may be between 1024 and 4096 bits long.
What keysize do you want? (2048)
Requested keysize is 2048 bits
Please specify how long the key should be valid.
         0 = key does not expire
      <n>  = key expires in n days
      <n>w = key expires in n weeks
      <n>m = key expires in n months
      <n>y = key expires in n years
Key is valid for? (0)
Key does not expire at all
Is this correct? (y/N) y

You need a user ID to identify your key; the software constructs the user ID
from the Real Name, Comment and Email Address in this form:
    "Heinrich Heine (Der Dichter) <heinrichh@duesseldorf.de>"

Real name: dashyang
Email address: xxxx@gmail.com
Comment: somecommentshere
You selected this USER-ID:
    "dashyang (somecommentshere) <xxxx@gmail.com>"

Change (N)ame, (C)omment, (E)mail or (O)kay/(Q)uit? O
You need a Passphrase to protect your secret key.

gpg: gpg-agent is not available in this session
We need to generate a lot of random bytes. It is a good idea to perform
some other action (type on the keyboard, move the mouse, utilize the
disks) during the prime generation; this gives the random number
generator a better chance to gain enough entropy.
..+++++
..+++++
We need to generate a lot of random bytes. It is a good idea to perform
some other action (type on the keyboard, move the mouse, utilize the
disks) during the prime generation; this gives the random number
generator a better chance to gain enough entropy.
+++++
..+++++
gpg: key F5510098 marked as ultimately trusted
public and secret key created and signed.

gpg: checking the trustdb
gpg: 3 marginal(s) needed, 1 complete(s) needed, PGP trust model
gpg: depth: 0  valid:   1  signed:   0  trust: 0-, 0q, 0n, 0m, 0f, 1u
pub   2048R/F5510098 2018-01-10
      Key fingerprint = 7F4C 405A F6EB B25D DEDF  10C9 9CAC DC20 F551 0098
uid                  dashyang (somecommentshere) <xxxx@gmail.com>
sub   2048R/7FE934CA 2018-01-10
# gpg --list-keys
/home/vagrant/.gnupg/pubring.gpg
--------------------------------
pub   2048R/F5510098 2018-01-10
uid                  dashyang (somecommentshere) <feipyang@gmail.com>
sub   2048R/7FE934CA 2018-01-10
# aptly serve
Serving published repositories, recommended apt sources list:

# ./xenial [amd64, arm64, armhf, i386] publishes {main: [xenial-repo]: Merged from sources: 'ubuntu-main', 'gluster', 'docker'}
deb http://vagrant:8080/ xenial main

Starting web server at: :8080 (press Ctrl+C to quit)...
Added it to systemd files:
# cat /etc/systemd/system/aptly.service
[Service]
Type=simple
ExecStart=/usr/bin/aptly -config /home/vagrant/.aptly.conf serve -listen=:80
User=root
# systemctl daemon-reload
# systemctl enable aptly
# systemctl start aptly
Failed, why aptly could not be run.
Client usage:
# sudo vim /etc/ssh/sshd_config
PermitRootLogin yes
# vim /etc/network/interfaces
Change ip addresss
First in server, export keys:

    # gpg --export --armor >mypublic.pub
    # cat mypublic.pub
    # scp mypublic.pub  root@10.15.205.200:/root/

Then in clients import the keys:


        # cat mypublic.pub |apt-key add -
        OK
        root@ubuntu:/root# apt-key list
        /etc/apt/trusted.gpg
Then sudo apt-get update won’t get any errors.
Thus you could have a server at the certain vm, convert this vm from
virtualbox into qcow2 via following command.
# qemu-img convert -f vmdk -O qcow2 box-disk001.vmdk aptly_ubuntu.qcow2
Start the registry server.
Create a new ubuntu server, enable the sshd login of root. Add repository, add
following definition of the registry:
# vim /etc/hosts
10.15.205.2	mirror.xxxxx.com
Then add the kismaticuser.key.pub into the server’s
/root/.ssh/authorized_keys.
helm
# helm search
# helm list
# helm install --name wordpress-test --set "persistence.enabled=false,mariadb.persistence.enabled=false" stable/wordpress
# helm list
[root@DashSSD ubuntuone]# ./helm list
NAME          	REVISION	UPDATED                 	STATUS  	CHART          	NAMESPACE
wordpress-test	1       	Wed Jan 10 17:30:29 2018	DEPLOYED	wordpress-0.7.9	default
