Jan 25, 2018
TechnologyArchLinux
Trust the ca certifications via:
cp xxx.xxx.com.crt /etc/ca-certificates/trust-source/anchors/
update-ca-trust
trust extract-compat
add xxx.xxx.com into /etc/hosts, then restart docker service, login with:
# docker login xxx.xxx.com
Ubuntu
Change the certifications via:
# cp xxx.xxx.com.crt /usr/local/share/ca-certificates
# update-ca-certificates
# service docker restart
Now you could docker login into the new web server.
RHEL
update the ca, then docker login .
cp certs/domain.crt /etc/pki/ca-trust/source/anchors/myregistrydomain.com.crt
update-ca-trust
Jan 24, 2018
Technology
一幅题为《宗教的本质》的漫画。
本来想讽刺几句的,后面想想没有必要。也许那个砍了苹果树的人,他祈求的是芒果呢?而芒果是不能生长在温带或者寒带地域的。
宗教有其正面的意义。大多数人在世间,难免会有脆弱的时候,于是祈求于神灵。而后更加勇敢的去面对现实,最终得到了他梦寐以求的梨子,或是芒果。
从这种意义上来说,宗教也未尝不是好事一桩呀!?
Jan 23, 2018
Technology环境准备
三台机器(可为虚拟机或物理机):
aptly部署节点(部署完毕后可关机): 192.192.189.110
镜像仓库部署节点(部署完毕后可关机): 192.192.189.111
k8s节点机: 192.192.189.125
操作系统:
节点机,安装Ubuntu16.04,
这里我们采用Base镜像的方式,即时启动一台虚拟机,首先更改其用户名/密码配置及host文件:
# passwd
输入想输入的密码
# vim /etc/ssh/sshd_config
PermitRootLogin yes
# systemctl restart sshd
# reboot
# vim /etc/apt/sources.list
deb http://192.192.189.110	xenial main
deb http://192.192.189.110	kubernetes-xenial main
deb [arch=amd64] http://192.192.189.110	xenial stable
# cat mykey.asc | apt-key add -
# vim /etc/hosts
192.192.189.111	mirror.xxxxxx.com
说明: 上述过程中的mykey.asc来自于aptly服务器,
/etc/apt/sources.list里的IP地址为aptly服务器的IP地址。
由上述修改过的基础镜像创建出实际的虚拟机可用镜像:
# qemu-img create -f qcow2 -b Base/Ubuntu1604_base.qcow2 RHPT.qcow2
创建一台虚拟机,桥接模式,16核,64G内存:
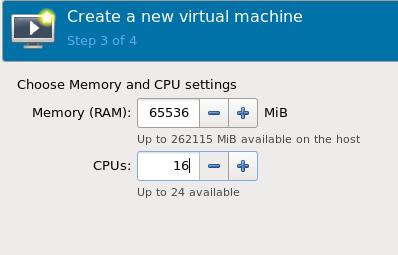
配置桥接模式:
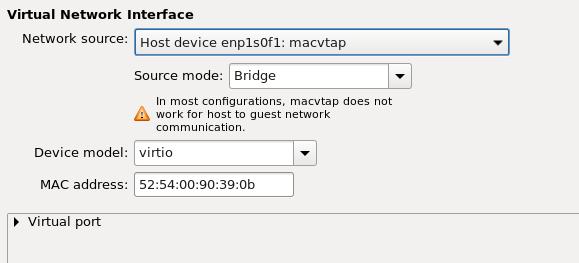
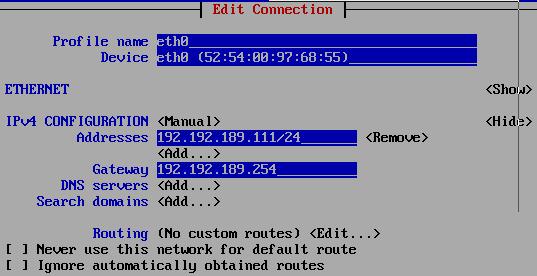
配置IP地址/子网/网关等:
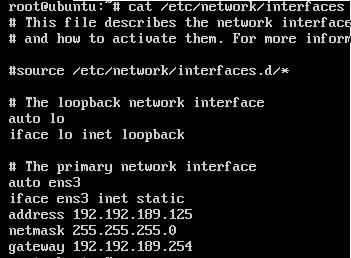
另外的一些优化配置在这里不详细提到。
注意: registry-mirror机器是CentOS7环境, 相应镜像中的IP地址修改如图:
kismatic部署
在原有的配置中,直接拷贝一个出来:
# cp -r ubuntuone RongHePingTai
# cd RongHePingTai
# rm -rf generated
# cp kismatic-cluster.yaml kismatic-cluster.yaml.back
# vim kismatic-cluster.yaml
这里作相应的修改,修改过的文件不详细列举
安装过程:
# ./kismatic install apply
安装过程大约需要10分钟,耐心等候。
配置
本地工具配置
配置本地工具helm和kubectl:
# cp kubectl /usr/bin
# mkdir -p ~/.kube
# cp generated/kubeconfig ~/.kube/config
# cp helm /usr/bin/
# kubectl version
host-path存储配置
在本地的initial/k8s-hostpath-provisioner目录下,上传两个tar文件到k8s节点机,load,
而后执行:
# cd examples
# # kubectl create -f sa.yaml -f cluster-roles.yaml -f cluster-role-bindings.yaml -f ds.yaml
# kubectl get ds -n kube-system | grep hostpath
hostpath-provisioner   0         0         0         0            0           nailgun.name/hostpath=enabled   16s
定义节点ubuntu为可以部署hostPath volumes的节点, 并检查label是否被设置成功:
# kubectl get nodes
NAME      STATUS    ROLES     AGE       VERSION
ubuntu    Ready     master    7d        v1.9.0
# kubectl label node ubuntu nailgun.name/hostpath=enabled
node "ubuntu" labeled
# kubectl get nodes ubuntu --show-labels
NAME      STATUS    ROLES     AGE       VERSION   LABELS
ubuntu    Ready     master    7d        v1.9.0    beta.kubernetes.io/arch=amd64,beta.kubernetes.io/os=linux,kismatic/cni-provider=calico,kismatic/kube-proxy=true,kubernetes.io/hostname=ubuntu,nailgun.name/hostpath=enabled,node-role.kubernetes.io/master=
在节点上注明可用的存储:
# kubectl annotate node ubuntu hostpath.nailgun.name/ssd=/data
node "ubuntu" annotated
接着创建sc(StorageClass), 并检查之:
# kubectl create -f sc.yaml
storageclass "local-ssd" created
# kubectl get sc
NAME                  PROVISIONER             AGE
local-ssd (default)   nailgun.name/hostpath   10s
nginx-ingress controller
运行如下命令部署之:
# cd initial/nginx-ingress-images
上传tar文件至k8s工作节点上,手动load之
# cd initial/nginx-ingress
# helm install --name "ingressenter" .
运行后截图如下:

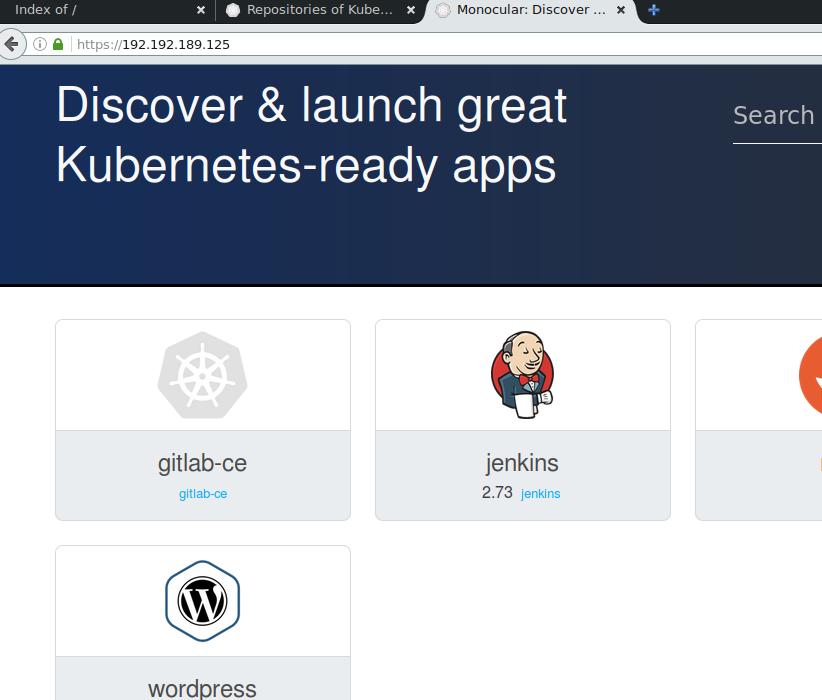
monocular(可选)
上传镜像,并安装之:
# cd monocular-images
将所有的image上传到k8s节点上,安装之。
安装monocular charts:
# cd initial/monocular
# helm install --name "xxxxxxx" .
安装完毕后:
Jan 22, 2018
TechnologyAIM
Combine the tomcat and oracle db apps.
tomcat -> war -> oracleDB.
Directory Stucture
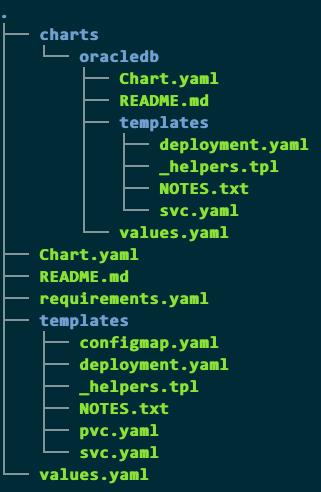
values.yaml definition for oracle db:
oracledb:
  enabled: true
requirements.yaml:
requirements.yaml
dependencies:
- name: oracledb
  version: 0.1.0
  repository: http://192.xxx.xxx.xxx/k8s/oracledb/
Charts.yaml, very simple:
appVersion: 0.1.0
description: Chart for something
home: http://192.xxx.xxx.xxx/k8s/xxx
name: xxx
sources:
  - http://192.xxx.xxx.xxx/k8s/xxx
version: 0.1.0
configmap.yaml:
jdbc.url=jdbc:oracle:thin:@{{ template "oracledb.fullname" . }}:1521/xe\r\njdbc.username=xxx\r\njdbc.password=xxx\r\n\r\n
oracledb definition:
values.yaml
serviceType: ClusterIP
deployment.yaml:
    spec:
      containers:
      - name: {{ template "fullname" . }}
        image: "{{ .Values.image }}"
        imagePullPolicy: {{ .Values.imagePullPolicy | quote }}
        ports:
        - name: oracle
          containerPort: 1521
svc.yaml:
spec:
  type: {{ .Values.serviceType }}
  ports:
  - name: oracle
    port: 1521
    targetPort: oracle
  selector:
Jan 21, 2018
TechnologyCreate service
Create a service of nginx via following steps:
# kubectl run my-nginx --image=nginx --replicas=2 --port=80
# kubectl expose deployment my-nginx --port=8080 --target-port=80 --external-ip=x.x.x.168
Verify the service via:
kubectl get svc | grep my-nginx
my-nginx                             ClusterIP      172.20.236.170   10.15.205.200   8080/TCP                     3h
nginx-ingress
Use helm for installing nginx-ingress
# helm fetch stable/nginx-ingress
# tar xzvf nginx-ingress-0.8.23.tgz
# cd nginx-ingress
Made modifications to following items:
controller:

//........

	hostNetwork: true
Because in our environment we have to use hostNetwork for a real ip address
mapping.
expose to nginx
Define an yaml via:
apiVersion: extensions/v1beta1
kind: Ingress
metadata:
  name: dashboard-kibana-ingress
  namespace: default
spec:
  rules:
  - host: ubuntu.xxxxx.com
    http:
      paths:
      - backend:
          serviceName: my-nginx
          servicePort: 8080
Visit your ubuntu.xxxxx.com, you will get the nginx service webpage.
Config examples
For monocular, do following:
# vim custom-domains.yaml
ingress:
  hosts:
  - monocular.xxxxxx.com
# helm install --name=gou -f custom-domains.yaml .
Now adding monocular.xxxxxx.com into your /etc/hosts file, you could
directly access monocular UI using domain name.
For wordpress:
# vim values.yaml
ingress:
  ## Set to true to enable ingress record generation
  enabled: true

  ## The list of hostnames to be covered with this ingress record.
  ## Most likely this will be just one host, but in the event more hosts are needed, this is an array
  hosts:
  - name: wordpress.xxxxxx.com
The same as before, you could use wordpress.xxxxxx.com for accessing
wordpress.
