Jun 20, 2018
TechnologyProjects list:

We will let kismatic_source trigger buildiso.
The .gitlab-ci.yml listed is:
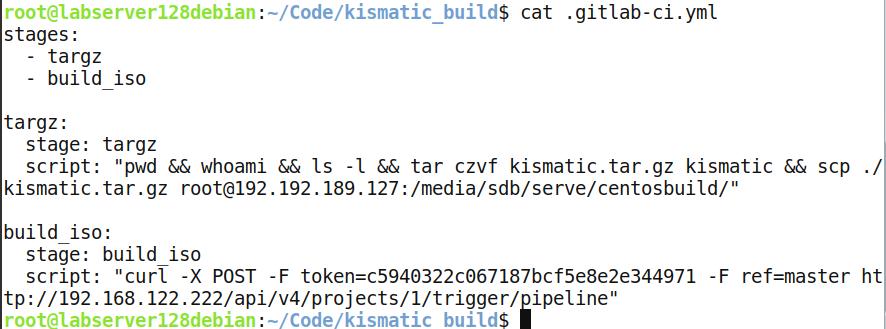
The build-iso’s .gitlab-ci.yml is listed as:

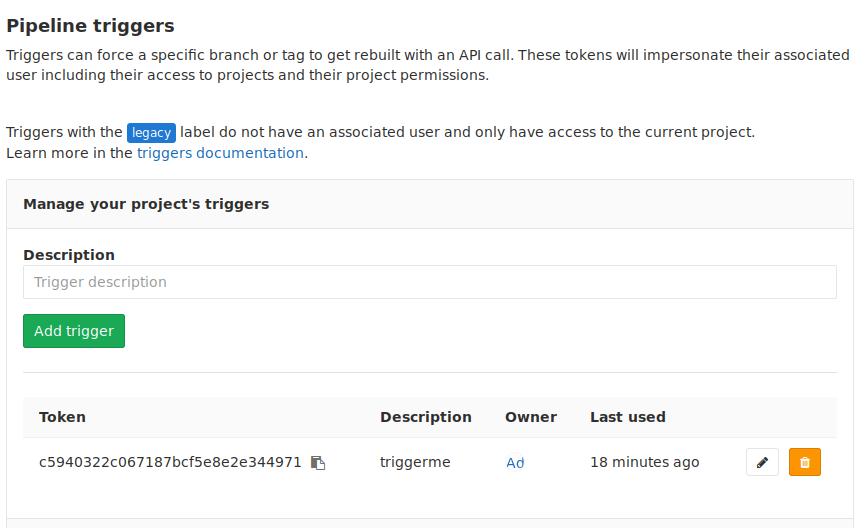
Settings->CI/CD->Pipeline triggers,
Then you could trigger the building iso via push sources to kismatic_images.
Jun 11, 2018
TechnologyInstall
Install under archlinux:
# curl -L https://github.com/jenkins-x/jx/releases/download/v1.2.120/jx-linux-amd64.tar.gz | tar xzv
# sudo mv jx /usr/local/bin
upgrading minikube:
# docker-machine-driver-kvm2
Now create the cluster via:
# jx create cluster minikube
? cpu (cores) 3
? Select driver: kvm2
WARNING: We cannot yet automate the installation of KVM with KVM2 driver - can you install this manually please?
Please see: https://www.linux-kvm.org/page/Downloads and https://github.com/kubernetes/minikube/blob/master/docs/drivers.md#kvm2-driver
Creating Minikube cluster...
chartmusuem
Install local executable file:
# curl -LO https://s3.amazonaws.com/chartmuseum/release/latest/bin/linux/amd64/chartmuseum
# chmod +x ./chartmuseum
# mv ./chartmuseum /usr/local/bin
Initialize with the local filesystem storage:
# sudo mkdir chartstorage
# sudo chartmuseum --debug --port=8988 --storage="local" --storage-local-rootdir="./chartstorage"
Now visit your http://localhost:8988 you could reach the chartmusuem.
Using chartmusuem:
# helm repo add chartmuseum http://localhost:8988
# helm update
Upload chart:
# git clone https://github.com/stakater/chart-mysql.git
# cd chart-mysql
# cd mysql
# helm lint
# helm package .
# curl -L --data-binary "@mysql-1.0.1.tgz" http://localhost:8988/api/charts
Now you could see the chart has been uploaded to your own chartmusuem.
Jun 4, 2018
TechnologyPreparation
A. Create local repository for centos installation:
Install createrepo_con archlinux:
# yaout createrepo_c
Create the repo for local installation:
# sudo mount -t iso9660 -o loop CentOS-7-x86_64-Everything-1804.iso /mnt2
# cd /mnt2
# find . | grep rpm$ | xargs -I % cp % /var/download/centos1804rpms
# cd /var/download/centos1804rpms
# createrepo_c .
Use this repo:
# mkdir /etc/yum.repos.d/back && mv /etc/yum.repos.d/*.repo /etc/yum.repos.d/back/
# vim /etc/yum.repos.d/base.repo
[base]
name=base
baseurl=http://192.168.122.1/centos1804rpms
enabled=1
gpgcheck=0
B. Prepare kickstart repository
# git clone https://github.com/CentOS/sig-core-livemedia.git
# cd sig-core-livemedia
# cd kickstarts
# wget https://gist.githubusercontent.com/lunatilia/8a195ccb0b415cbbd94f/raw/e8ede17f331dc8fe43012e7e4f8123a02e6bedc8/centos-7-livedvd-jp.cfg
C. Edit the cfg file, the modified file is listed in following position:
Make system
In chroot terminal, do following:
#  yum remove -y libreoffice-gtk3-5.3.6.1-10.el7.x86_64 libreoffice-draw-5.3.6.1-10.el7.x86_64 libreoffice-ure-5.3.6.1-10.el7.x86_64 libreoffice-pyuno-5.3.6.1-10.el7.x86_64 libreoffice-xsltfilter-5.3.6.1-10.el7.x86_64 libreoffice-gtk2-5.3.6.1-10.el7.x86_64 libreoffice-graphicfilter-5.3.6.1-10.el7.x86_64 libreoffice-math-5.3.6.1-10.el7.x86_64 libreoffice-filters-5.3.6.1-10.el7.x86_64 libreoffice-data-5.3.6.1-10.el7.noarch libreoffice-core-5.3.6.1-10.el7.x86_64 libreoffice-pdfimport-5.3.6.1-10.el7.x86_64 libreoffice-calc-5.3.6.1-10.el7.x86_64 libreofficekit-5.3.6.1-10.el7.x86_64 libreoffice-ure-common-5.3.6.1-10.el7.noarch libreoffice-langpack-en-5.3.6.1-10.el7.x86_64 libreoffice-impress-5.3.6.1-10.el7.x86_64 libreoffice-opensymbol-fonts-5.3.6.1-10.el7.noarch libreoffice-x11-5.3.6.1-10.el7.x86_64 libreoffice-writer-5.3.6.1-10.el7.x86_64
# yum remove -y cheese
# cd /usr/local/
# scp root@192.192.189.128:/media/sdd/kvm_storage/ansible_kismatic/ansible_kismatic1110/compose.tar.gz .
# scp root@192.192.189.128:/media/sdd/kvm_storage/ansible_kismatic/ansible_kismatic1110/kismaticpkgs.tar.gz .
# scp root@192.192.189.128:/media/sdd/kvm_storage/ansible_kismatic/ansible_kismatic1110/images.tar.gz .
# cd /var/lib
# scp root@192.192.189.128:/media/sdd/kvm_storage/ansible_kismatic/ansible_kismatic1110/portus.tar.gz .
# tar xzvf portus.tar.gz
# rm -f portus.tar.gz
# cd /usr/local/
# tar xzvf compose.tar.gz
# tar xzvf images.tar.gz
# tar xzvf kismaticpkgs.tar.gz
# rm -f *.tar.gz
# cd /root/
# scp root@192.192.189.128:/media/sdd/kvm_storage/ansible_kismatic/ansible_kismatic1110/pipcache.tar.gz .
# tar xzvf pipcache.tar.gz
# pip install --no-index --find-links /root/pipcache docker-compose
# rm -f pipcache.tar.gz
# rm -rf pipcache/
# cd /bin/
# scp root@192.192.189.128:/media/sdb/docker/loaddocker.sh .
# chmod 777 loaddocker.sh
# cat loaddocker.sh
    if [[ $(sudo docker images | grep registry) ]]; then
        echo "there are files"
    else
        docker load</usr/local/images/nginx.tar.bz2
        docker load</usr/local/images/1.tar
        docker load</usr/local/images/2.tar
        docker load</usr/local/images/3.tar
        docker load</usr/local/images/4.tar
        docker run --name docker-nginx -p 8888:80 -d -v /usr/local/kismaticpkgs:/usr/share/nginx/html jrelva/nginx-autoindex
        sed -i s/10.168.100.145/`hostname -I|awk '{print $1}'`/g /usr/local/compose/docker-compose.yml
    fi

# cd /etc/systemd/system/
# scp root@192.192.189.128:/media/sdd/kvm_storage/ansible_kismatic/ansible_kismatic1110/mynginx.service .
# scp root@192.192.189.128:/media/sdd/kvm_storage/ansible_kismatic/ansible_kismatic1110/docker-infra.service .
# systemctl enable sshd.service
# cd /root
# scp root@192.192.189.128:/media/sdd/kvm_storage/ansible_kismatic/ansible_kismatic1110/kismatic.tar.gz .
# yum install -y ntp
# vim /etc/ntp.conf
# systemctl enable ntpd
# systemctl disable chronyd
# systemctl disable firewalld
# vi /etc/selinux/config
     disable the selinux configuration
Exit the chroot, the program will continue to build the iso.
boot-up the system
After bootup the system, install the os via clicking the live install icon on the desktop.
In newly installed system, do following things:
# systemctl enable docker
# systemctl start docker
# /bin/loaddocker.sh
# systemctl enable mynginx.service
# systemctl enable docker-infra.service
# reboot
Now you could check your installation.
Sometimes the boot will fail, I don’t know why, maybe because of the dracut issue?
May 30, 2018
Technology搭建完Portus镜像后,如何重新初始化,并获得更新的kismatic镜像?这里记录了步骤。
清空已有镜像
运行以下命令,可以得到一个全新的portus镜像仓库:
# systemctl stop docker-infra.service
# cd /usr/local/compose
# docker-compose down
Stopping compose_nginx_1      ... done
Stopping compose_background_1 ... done
Stopping compose_registry_1   ... done
Stopping compose_portus_1     ... done
Stopping compose_db_1         ... done
Removing compose_nginx_1      ... done
Removing compose_background_1 ... done
Removing compose_registry_1   ... done
Removing compose_portus_1     ... done
Removing compose_db_1         ... done
Removing network compose_default
# cd /var/lib
# mv portus portus.back
# mkdir portus
# docker volume rm compose_static
# systemctl start docker-infra.service
配置新仓库
在打开浏览器访问portus仓库前,手动添加条目至/etc/hosts文件,IP地址需手动更改 :
$ sudo echo "192.192.189.53 portus.xxxx.com">>/etc/hosts
打开浏览器访问 https://portus.xxxx.com:
在页面弹出的提示中,填入以下参考值:
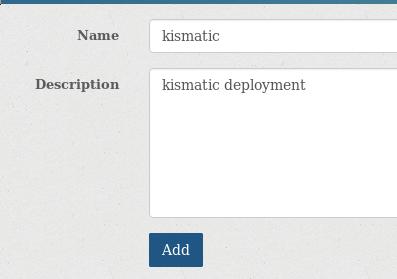
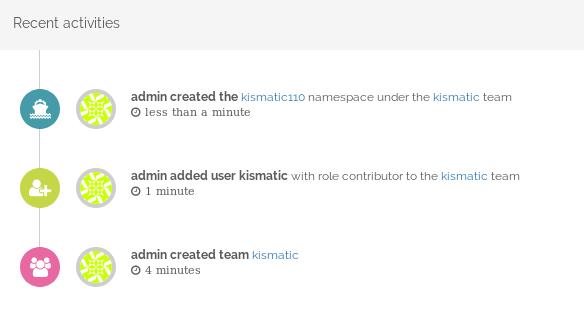
Team->Create new team, 创建一个名为 kismatic 的团队:
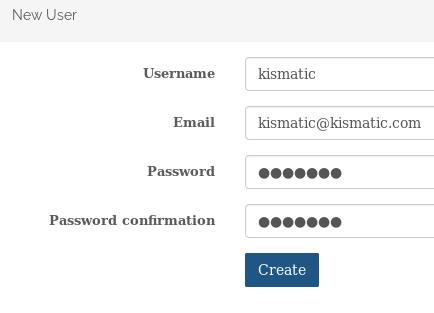
Admin->User->Create new user, 创建一个名为kismatic的用户:
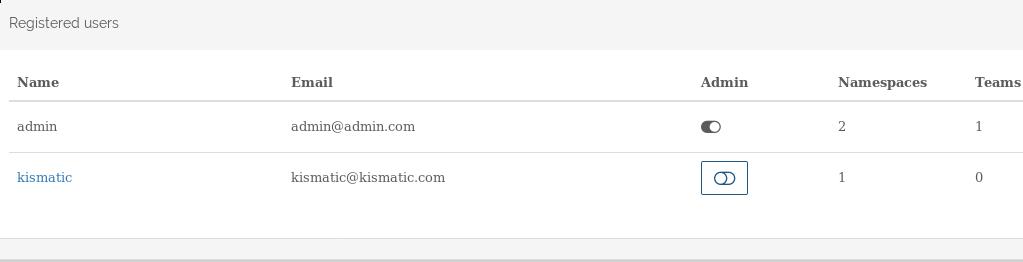
创建好的用户如下所示:
Team->members->Add members,
添加kismatic用户到kismatic组里,定义其角色为Contributer, 即可push/pull镜像:

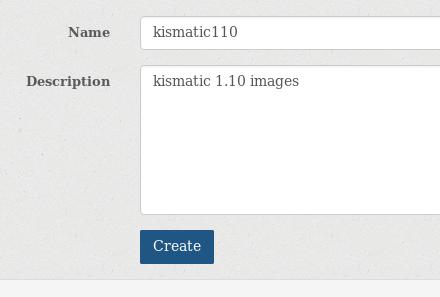
创建一个新的命名空间,并绑定到kismatic组:
执行的步骤可以在portus的logs里看到:
kismatic v1.10同步镜像
到https://github.com/apprenda/kismatic/releases下载kismatic对应的版本.
解压后的情况:
# pwd
/home/xxxx/code/kismatic1110
# ls
ansible  helm  kismatic  kubectl  provision
创建plan文件:
 ./kismatic install plan
Plan your Kubernetes cluster:
=> Number of etcd nodes [3]: 1
=> Number of master nodes [2]: 1
=> Number of worker nodes [3]: 1
=> Number of ingress nodes (optional, set to 0 if not required) [2]: 0
=> Number of storage nodes (optional, set to 0 if not required) [0]: 0
=> Number of existing files or directories to be copied [0]: 0
由此则产生了kismatic-cluster.yaml文件,
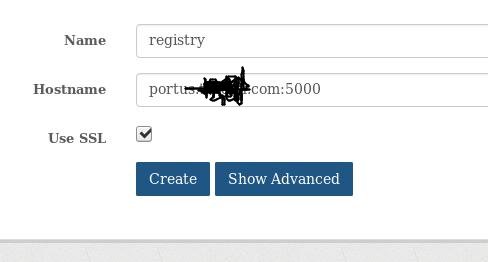
编辑对应的IP配置,可以参考已有的配置, 其中仓库的配置部分如下:
# vim kismatic-cluster.yaml
docker_registry:

  # IP or hostname and port for your registry.
  server: "portus.xxxx.com:5000/kismatic110"

  # Absolute path to the certificate authority that should be trusted when
  # connecting to your registry.
  CA: "/home/xxxxx/portus.xxxx.com.crt"

  # Leave blank for unauthenticated access.
  username: "kismatic"

  # Leave blank for unauthenticated access.
  password: "xxxxxxxx"
同步仓库:
# ./kismatic seed-registry --verbose
同步完毕以后,取回镜像包:
# systemctl stop docker-infra.service
# cd /var/lib/
# tar czvf portus.tar.gz portus/
rpm包取回
设置节点机的/etc/yum.conf下为保存rpm包,一次在线安装后,即可获得所有的rpm包。createrepo
后直接取回。
重组安装源
一次详细的重组步骤如下:
# 复制旧版本框架
cp -r ansible ansible_kismatic1110
cd ansible_kismatic1110
# 更新docker镜像源
rm -f portus.tar.gz
scp root@10.168.100.150:/var/lib/portus.tar.gz .
rm -f kismaticpkgs.tar.gz
# 更新rpm源
scp -r root@10.168.100.150:/usr/local/kismaticpkgs.tar.gz .
# 更新kismatic部署框架
tar xzvf kismatic.tar.gz
cd kismatic/cluster00
rm -rf ./*
sudo cp -ar /media/sda5/Code/kismatic1110/* .
sudo rm -rf generated
sudo rm -rf ./runs/apply/*
sudo rm -rf ./runs/preflight/*
sudo rm -rf ./runs/smoketest/*
rm -f kismatic.tar.gz
sudo tar czvf kismatic.tar.gz kismatic
sudo rm -rf kismatic
重组后的大小:
# du -hs ansible_kismatic1110
1.2G	ansible_kismatic1110
现在就可以用原有方法进行系统的部署了。
May 24, 2018
TechnologyBasic Environment
Ubuntu 18.04, minimum installation.
# vim /etc/netplan/01-netcfg.yaml
	# This file describes the network interfaces available on your system
	# For more information, see netplan(5).
	network:
	 version: 2
	 renderer: networkd
	 ethernets:
	   eth0:
	     dhcp4: no
	     dhcp6: no
	     addresses: [192.192.189.114/24]
	     gateway4: 192.192.189.1
	     nameservers:
	       addresses: [223.5.5.5,180.76.76.76]
# sudo netplan --debug apply
# apt-get update && apt-get install -y docker.io docker-compose
Disable systemd-resolved:
# systemctl disable systemd-resolved.service
# systemctl stop systemd-resolved.service
# echo nameserver 192.168.0.15>/etc/resolv.conf
# chattr -e /etc/resolv.conf
# chattr +i /etc/resolv.conf
