Aug 13, 2024
TechnologyLoad and push images:
 nerdctl load<nginxslim.tar
 nerdctl tag gcr.io/google_containers/nginx-slim:0.8 localhost:35000/nginx-slim:0.8
 nerdctl push localhost:35000/nginx-slim:0.8
Create the deployment:
# cat nginx01.yaml
apiVersion: apps/v1
kind: Deployment
metadata:
  labels:
    app: nginx01
  name: nginx01
spec:
  replicas: 1
  selector:
    matchLabels:
      app: nginx01
  template:
    metadata:
      labels:
        app: nginx01
    spec:
      containers:
      - image: 192.168.1.11:35000/nginx-slim:0.8
        name: nginx01
# kubectl create -f nginx01.yaml
# kubectl expose deployment nginx01 --name=nginx01-svr --type=ClusterIP --port=80
Create ingress:
# cat ingress_nginx.yaml
apiVersion: networking.k8s.io/v1
kind: Ingress
metadata:
  name: nginx-ingress
  annotations:
    nginx.ingress.kubernetes.io/rewrite-target: /
spec:
  ingressClassName: nginx
  rules:
    - host: securebrowser.example
      http:
        paths:
          - path: /nginx
            pathType: Prefix
            backend:
              service:
                name: nginx01-svr
                port:
                  number: 80
# kubectl create -f ingress_nginx.yaml
Test:
$ cat /etc/hosts  | grep secure
192.168.1.11	securebrowser.example
$ curl securebrowser.example/nginx
Jul 26, 2024
TechnologyUbuntu22.04 Install desktop version.
sudo apt update -y
sudo apt upgrade -y
sudo apt install -y openssh-server tigervnc-standalone-server tigervnc-xorg-extension lxqt vim net-tools curl
sudo systemctl set-default multi-user.target
sudo reboot
Configure vnc:
$ vncpasswd
Configure the vnc:
test@jumper:~$ cat ~/.vnc/config
session=lxqt
geometry=1920x1080
localhost=no
alwaysshared
test@jumper:~$ cat /etc/tigervnc/vncserver.users
# TigerVNC User assignment
#
# This file assigns users to specific VNC display numbers.
# The syntax is <display>=<username>. E.g.:
#
# :2=andrew
# :3=lisa
:1=test
test@jumper:~$ sudo systemctl enable tigervncserver@:1
Created symlink /etc/systemd/system/multi-user.target.wants/tigervncserver@:1.service → /lib/systemd/system/tigervncserver@.service.
download the citrix workspace from websiste, and install them via:
sudo dpkg -i icaclient_24.5.0.76_amd64.deb
sudo dpkg -i ctxusb_24.5.0.76_amd64.deb
Configure network in network manager.
ens160: static ip 192.168.1.33
ens192: dhcp from company networking.
Add crontab for sharing:
root@jumper:/home/test# crontab -l
@reboot sleep 10 && /usr/bin/startsharing.sh
root@jumper:/home/test# cat /usr/bin/startsharing.sh
#!/bin/sh -e
iptables -t nat -A POSTROUTING -o ens192 -j MASQUERADE
iptables -A FORWARD -m conntrack --ctstate RELATED,ESTABLISHED -j ACCEPT
iptables -A FORWARD -i ens160 -o ens192 -j ACCEPT
echo "1" > /proc/sys/net/ipv4/ip_forward
Jul 18, 2024
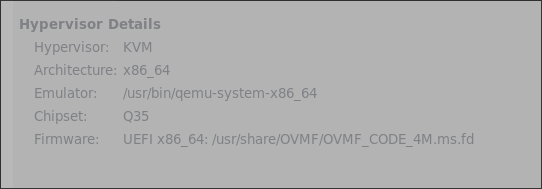
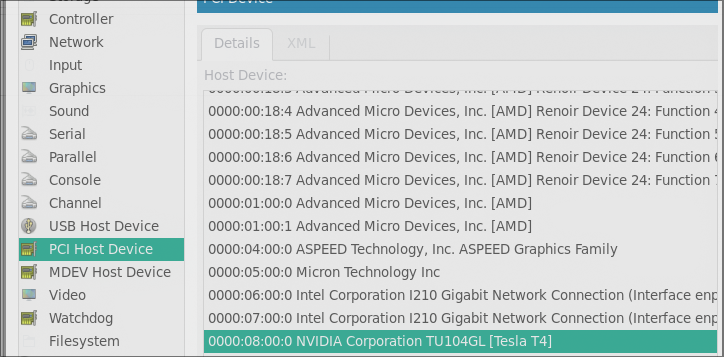
TechnologyHost Preparation
Hardware information:
root@hope:/etc/libvirt# sudo lspci -nn| grep -i nvidia
08:00.0 3D controller [0302]: NVIDIA Corporation TU104GL [Tesla T4] [10de:1eb8] (rev a1)
root@hope:/etc/libvirt# lscpu | grep -i model
Model:                              96
Model name:                         AMD Ryzen 5 4500 6-Core Processor
Edit the grub configuration:
$ sudo vim /etc/default/grub
GRUB_CMDLINE_LINUX_DEFAULT="amd_iommu=on iommu=pt kvm.ignore_msrs=1 video=efifb:off vfio-pci.ids=10de:1eb8"
$ sudo update-grub2
$ sudo vim /etc/initramfs-tools/modules
vfio
vfio_iommu_type1
vfio_pci
vfio_virqfd
Specify the vfio driver for nvidia t4:
$ sudo vim /etc/modprobe.d/vfio.conf
options vfio-pci ids=10de:1eb8
$ sudo update-initramfs -u -k all
Download the vbios for nvidia t4 from https://www.techpowerup.com/vgabios/259926/259926.
After reboot, check the driver status:
dash@hope:~$ lspci -vvnn -s 08:00.0
08:00.0 3D controller [0302]: NVIDIA Corporation TU104GL [Tesla T4] [10de:1eb8] (rev a1)
	Subsystem: NVIDIA Corporation TU104GL [Tesla T4] [10de:12a2]
	Control: I/O- Mem- BusMaster- SpecCycle- MemWINV- VGASnoop- ParErr- Stepping- SERR- FastB2B- DisINTx-
	Status: Cap+ 66MHz- UDF- FastB2B- ParErr- DEVSEL=fast >TAbort- <TAbort- <MAbort- >SERR- <PERR- INTx-
	Interrupt: pin A routed to IRQ 255
	Region 0: Memory at fb000000 (32-bit, non-prefetchable) [disabled] [size=16M]
	Region 1: Memory at ffc0000000 (64-bit, prefetchable) [disabled] [size=256M]
	Region 3: Memory at fff0000000 (64-bit, prefetchable) [disabled] [size=32M]
	Capabilities: <access denied>
	Kernel driver in use: vfio-pci
	Kernel modules: nvidiafb, nouveau
vm setup
UEFI setting:
Continue for installation, until it finished.
sudo apt install -y libevent-dev build-essential vim
sudo apt-get upgrade
sudo shutdown -h now
Shutdown and add the tesla t4:
Change the video to none:
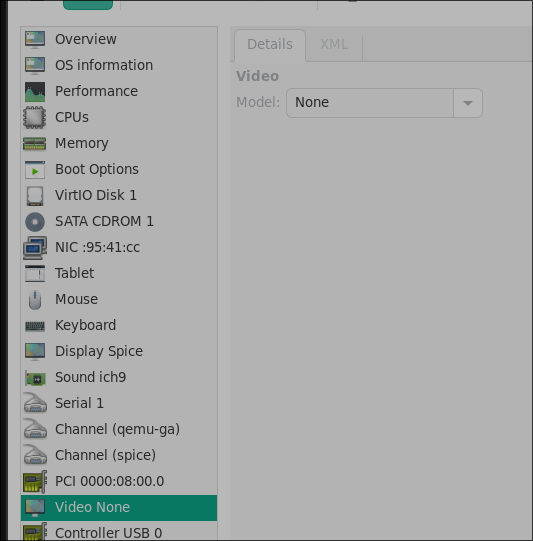
Start, and from now on, you could only ssh into the machine.
nvidia driver installation
Steps are listed as following:
distro=ubuntu2204
arch=x86_64
wget https://developer.download.nvidia.com/compute/cuda/repos/$distro/$arch/cuda-keyring_1.1-1_all.deb
sudo dpkg -i cuda-keyring_1.1-1_all.deb
sudo apt-get install cuda-toolkit
sudo apt-get install nvidia-gds
sudo ubuntu-drivers autoinstall
sudo apt-get install --install-recommends linux-generic-hwe-22.04
Only in hwe kernel, nvidia-smi could be running properly.
$ vim ~/.bashrc
# cuda related
export PATH=/usr/local/cuda-12.5/bin${PATH:+:${PATH}}
export LD_LIBRARY_PATH=/usr/local/cuda-12.5/lib64\
                         ${LD_LIBRARY_PATH:+:${LD_LIBRARY_PATH}}
Examine the nvcc version:
$ nvcc --version
nvcc: NVIDIA (R) Cuda compiler driver
Copyright (c) 2005-2024 NVIDIA Corporation
Built on Thu_Jun__6_02:18:23_PDT_2024
Cuda compilation tools, release 12.5, V12.5.82
Build cuda_12.5.r12.5/compiler.34385749_0
Examine the card info:
$ sudo nvidia-smi
Thu Jul 18 12:09:39 2024
+-----------------------------------------------------------------------------------------+
| NVIDIA-SMI 555.42.06              Driver Version: 555.42.06      CUDA Version: 12.5     |
|-----------------------------------------+------------------------+----------------------+
| GPU  Name                 Persistence-M | Bus-Id          Disp.A | Volatile Uncorr. ECC |
| Fan  Temp   Perf          Pwr:Usage/Cap |           Memory-Usage | GPU-Util  Compute M. |
|                                         |                        |               MIG M. |
|=========================================+========================+======================|
|   0  Tesla T4                       Off |   00000000:07:00.0 Off |                    0 |
| N/A   35C    P8              9W /   70W |       1MiB /  15360MiB |      0%      Default |
|                                         |                        |                  N/A |
+-----------------------------------------+------------------------+----------------------+

+-----------------------------------------------------------------------------------------+
| Processes:                                                                              |
|  GPU   GI   CI        PID   Type   Process name                              GPU Memory |
|        ID   ID                                                               Usage      |
|=========================================================================================|
|  No running processes found                                                             |
+-----------------------------------------------------------------------------------------+
ComfyUI Setup
Install git-lfs:
$ sudo apt install -y git git-lfs
$ git lfs install
Install miniconda:
mkdir -p ~/miniconda3
wget https://repo.anaconda.com/miniconda/Miniconda3-latest-Linux-x86_64.sh -O ~/miniconda3/miniconda.sh
bash ~/miniconda3/miniconda.sh -b -u -p ~/miniconda3
rm -rf ~/miniconda3/miniconda.sh
~/miniconda3/bin/conda init bash
Relogin the terminal.
Install ComfyUI:
$ cd Code
$ git clone https://github.com/comfyanonymous/ComfyUI.git
$ conda create -n comfyui python=3.10
$ pip config set global.index-url https://pypi.tuna.tsinghua.edu.cn/simple
$ pip3 install torch torchvision torchaudio
Install :
git clone https://github.com/Limitex/ComfyUI-Diffusers.git
cd ComfyUI-Diffusers
pip install -r requirements.txt
git clone https://github.com/cumulo-autumn/StreamDiffusion.git
python -m streamdiffusion.tools.install-tensorrt
Configure:
$ sudo apt-get install -y nfs-common
$ sudo mkdir -p /media/nfs
$ sudo mount model_on_nfs /media/nfs
$ cd ~/Code/ComfyUI
$ cp extra_model_paths.yaml.example extra_model_paths.yaml
$ vim extra_model_paths.yaml
a111:
    base_path: /media/nfs/stable-diffusion-webui/
goto ComfyUI/custom_nodes dir in terminal(cmd)
$ git clone https://github.com/ltdrdata/ComfyUI-Manager.git
Restart ComfyUI
$ python main.py --port 8188 --listen 192.168.1.60
Jul 17, 2024
TechnologyInstallation
Ubuntu22.04, with a6000, install steps:
git clone https://github.com/comfyanonymous/ComfyUI.git
cd ComfyUI
conda create -n comfyui python=3.10
conda activate comfyui
pip config set global.index-url https://pypi.tuna.tsinghua.edu.cn/simple
pip3 install torch torchvision torchaudio
pip install -r requirements.txt
 cp extra_model_paths.yaml.example extra_model_paths.yaml
 vim extra_model_paths.yaml
 cd models/
 ls
 cd ..
 vim extra_model_paths.yaml
 python main.py --port 8188 --listen 192.168.1.7
Install :
sudo apt install nvidia-cudnn
Install ComfyUI manager:
goto ComfyUI/custom_nodes dir in terminal(cmd)
git clone https://github.com/ltdrdata/ComfyUI-Manager.git
Restart ComfyUI
Jul 9, 2024
Technology1. 安装
启动光盘引导系统,进入到安装界面,更换nixos用户的密码后,远程ssh进入到安装界面后:
nix-channel --add https://mirrors.ustc.edu.cn/nix-channels/nixpkgs-unstable nixpkgs
nix-channel --add https://mirrors.ustc.edu.cn/nix-channels/nixos-24.05 nixos
nix-channel --list
nix-channel --update
nixos-rebuild --option substituters http://mirror.sjtu.edu.cn/nix-channels/store switch --upgrade
对512G的nvme ssd进行分区:
parted /dev/nvme0n1
(可选) rm 2
(可选) rm 1
mklabel gpt
mkpart ESP fat32 1MiB 256MiB
set 1 esp on
mkpart primary 256MiB -2GiB
unit s
mkpart primary linux-swap 972580864 100%
quit
磁盘分区如下:
nvme0n1     259:0    0 465.8G  0 disk
├─nvme0n1p1 259:4    0   255M  0 part
├─nvme0n1p2 259:5    0 463.5G  0 part
└─nvme0n1p3 259:6    0     2G  0 part
创建文件系统:
mkfs.fat -F32 /dev/nvme0n1p1
mkfs.btrfs -L nixos /dev/nvme0n1p2
mkswap -L swap /dev/nvme0n1p3
创建btrfs的子卷:
mount /dev/nvme0n1p2 /mnt
btrfs subvolume create /mnt/root
btrfs subvolume create /mnt/home
btrfs subvolume create /mnt/nix
umount /mnt
mount -o compress=zstd,subvol=root /dev/nvme0n1p2 /mnt
mkdir /mnt/{home,nix,boot}
mount -o compress=zstd,subvol=home /dev/nvme0n1p2 /mnt/home/
mount -o compress=zstd,noatime,subvol=nix  /dev/nvme0n1p2  /mnt/nix
mount /dev/nvme0n1p1 /mnt/boot
swapon /dev/nvme0n1p3
创建硬件配置文件并修改之:
nixos-generate-config --root /mnt
vim /mnt/etc/nixos/hardware-configuration.nix, 更改以下的几行:
19c19
<       options = [ "subvol=root" "compress=zstd"];
---
>       options = [ "subvol=root" ];
25c25
<       options = [ "subvol=home" "compress=zstd"];
---
>       options = [ "subvol=home" ];
31c31
<       options = [ "subvol=nix" "compress=zstd" "noatime"];
---
>       options = [ "subvol=nix" ];
配置configuration.nix文件,下面记录它的内容,值得注意的是,这里禁用了某些后面需要打开的选项,因为如果一开始打开,则有可能安装失败:
# Edit this configuration file to define what should be installed on
# your system. Help is available in the configuration.nix(5) man page, on
# https://search.nixos.org/options and in the NixOS manual (`nixos-help`).

{ config, lib, pkgs, ... }:

{
  imports =
    [ # Include the results of the hardware scan.
      ./hardware-configuration.nix
    ];

  # Use the systemd-boot EFI boot loader.
  boot.loader.systemd-boot.enable = true;
  boot.loader.efi.canTouchEfiVariables = true;

  networking.hostName = "gen11"; # Define your hostname.
  # Pick only one of the below networking options.
  # networking.wireless.enable = true;  # Enables wireless support via wpa_supplicant.
  networking.networkmanager.enable = true;  # Easiest to use and most distros use this by default.

  # Set your time zone.
  time.timeZone = "Asia/Shanghai";

  # Configure network proxy if necessary
  # networking.proxy.default = "http://user:password@proxy:port/";
  # networking.proxy.noProxy = "127.0.0.1,localhost,internal.domain";

  # Select internationalisation properties.
  i18n.defaultLocale = "en_US.UTF-8";
  # console = {
  #   font = "Lat2-Terminus16";
  #   keyMap = "us";
  #   useXkbConfig = true; # use xkb.options in tty.
  # };

  # Enable the X11 windowing system.
  services.xserver.enable = true;
  # Autologin for user dash
  services.displayManager.sddm.enable = true;
  services.displayManager.sddm.wayland.enable = true;
  #services.displayManager.autoLogin.enable = true;
  #services.displayManager.autoLogin.user = "dash";
  # Hyprland
  #programs.hyprland.enable = true;
  # zsh
  programs.zsh.enable = true;
  users.defaultUserShell = pkgs.zsh;

  # Configure keymap in X11
  # services.xserver.xkb.layout = "us";
  # services.xserver.xkb.options = "eurosign:e,caps:escape";

  # Enable CUPS to print documents.
  services.printing.enable = true;

  # Enable sound.
  # hardware.pulseaudio.enable = true;
  # OR
  services.pipewire = {
    enable = true;
    pulse.enable = true;
  };

  # Enable touchpad support (enabled default in most desktopManager).
  # services.libinput.enable = true;

  # Define a user account. Don't forget to set a password with ‘passwd’.
  users.users.dash = {
    isNormalUser = true;
    extraGroups = [ "wheel" ]; # Enable ‘sudo’ for the user.
    packages = with pkgs; [
      firefox
      tree
    ];
  };

  security.sudo.extraRules= [
    {  users = [ "dash" ];
      commands = [
         { command = "ALL" ;
           options= [ "NOPASSWD" ]; # "SETENV" # Adding the following could be a good idea
        }
      ];
    }
  ];

  # List packages installed in system profile. To search, run:
  # $ nix search wget
  environment.systemPackages = with pkgs; [
    vim # Do not forget to add an editor to edit configuration.nix! The Nano editor is also installed by default.
    wget
    git
    dconf
  ];

  # Some programs need SUID wrappers, can be configured further or are
  # started in user sessions.
  # programs.mtr.enable = true;
  # programs.gnupg.agent = {
  #   enable = true;
  #   enableSSHSupport = true;
  # };

  # List services that you want to enable:

  # Enable the OpenSSH daemon.
  services.openssh.enable = true;

  # Open ports in the firewall.
  # networking.firewall.allowedTCPPorts = [ ... ];
  # networking.firewall.allowedUDPPorts = [ ... ];
  # Or disable the firewall altogether.
  # networking.firewall.enable = false;

  # Copy the NixOS configuration file and link it from the resulting system
  # (/run/current-system/configuration.nix). This is useful in case you
  # accidentally delete configuration.nix.
  # system.copySystemConfiguration = true;

  # This option defines the first version of NixOS you have installed on this particular machine,
  # and is used to maintain compatibility with application data (e.g. databases) created on older NixOS versions.
  #
  # Most users should NEVER change this value after the initial install, for any reason,
  # even if you've upgraded your system to a new NixOS release.
  #
  # This value does NOT affect the Nixpkgs version your packages and OS are pulled from,
  # so changing it will NOT upgrade your system - see https://nixos.org/manual/nixos/stable/#sec-upgrading for how
  # to actually do that.
  #
  # This value being lower than the current NixOS release does NOT mean your system is
  # out of date, out of support, or vulnerable.
  #
  # Do NOT change this value unless you have manually inspected all the changes it would make to your configuration,
  # and migrated your data accordingly.
  #
  # For more information, see `man configuration.nix` or https://nixos.org/manual/nixos/stable/options#opt-system.stateVersion .
  system.stateVersion = "24.11"; # Did you read the comment?

  nix.settings.substituters = [
    "http://mirror.sjtu.edu.cn/nix-channels/store"
  ];

  nixpkgs.config.allowUnfree = true;
  nixpkgs.config.permittedInsecurePackages = [
  #  "qtwebkit-5.212.0-alpha4"
  ];
#
#  home-manager.users.dash = { pkgs, ... }: {
#  home.stateVersion = "24.11";
#  home.packages = [ ];
#  };

}
执行以下命令开始安装到磁盘:
nixos-install --option substituters https://mirror.sjtu.edu.cn/nix-channels/store
创建用户的密码:
nixos-enter
passwd dash
2. 配置
更改configuration.nix,并从历史文件中拷贝相关文件到/etc/nixos 目录下:
 vim configuration.nix
 cp /home/dash/nixos/flake.nix .
 cp /home/dash/nixos/hyprland.nix .
 cp /home/dash/nixos/home.nix .
 cp /home/dash/nixos/zsh.nix .
使用以下命令重新编译出新环境
dash@gen11:~/ > sudo nixos-rebuild switch --option substituers https://mirror.sjtu.edu.cn/nix-channels/store
3. 桌面切换(awesome-hyprland)
