Apr 12, 2019
Technology问题
文章来源:
https://blog.csdn.net/horsefoot/article/details/51577402
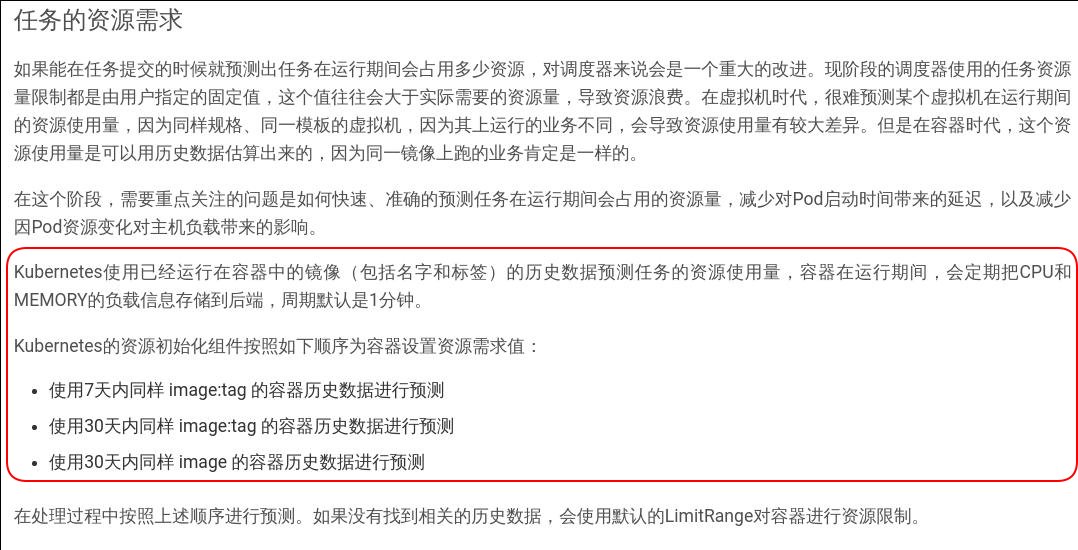
印象中我没有见过K8S中有这样的调度策略,那这个博客的提法是从何而来?
追溯
Google关键字,看到这个比较类似:
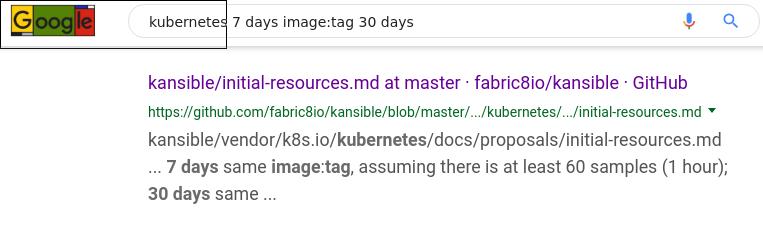
fabric8(一个基于k8s的CI/CD平台)里的条目, 时间维度是16年3月:
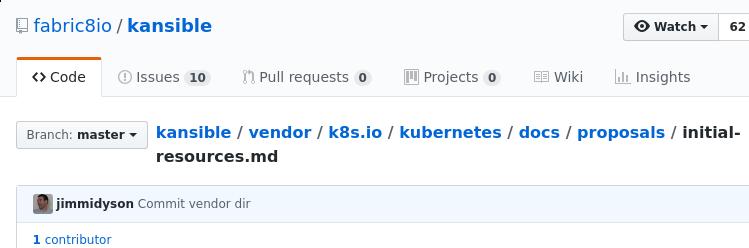
内中条目:
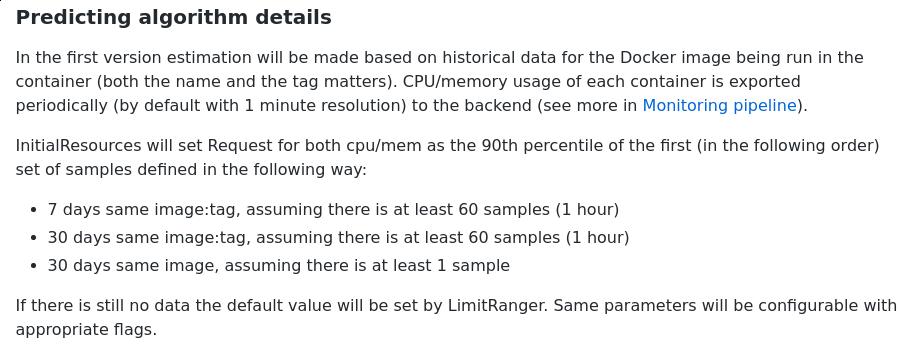
看来k8s的proposal文档中确实有过这个条目,继续用不同关键字搜索,
找到一个相关issue:
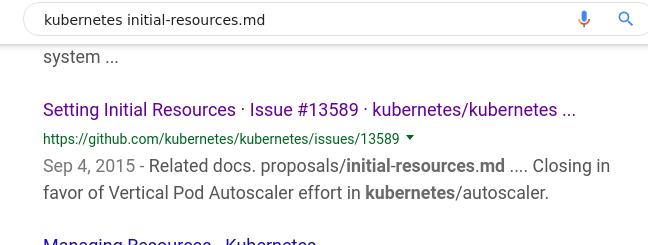
点进去阅读此issue:
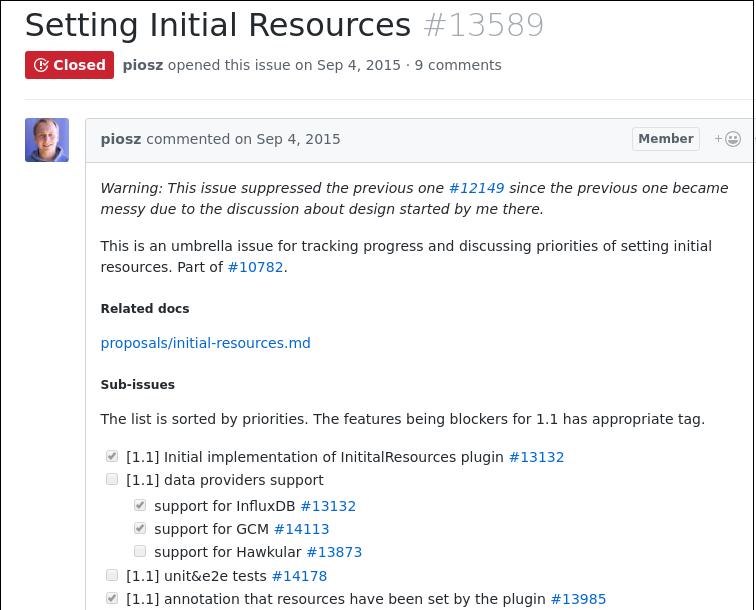
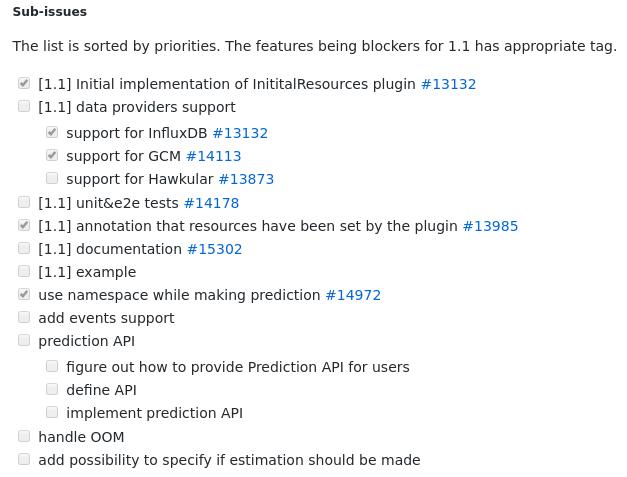
半成品状态:
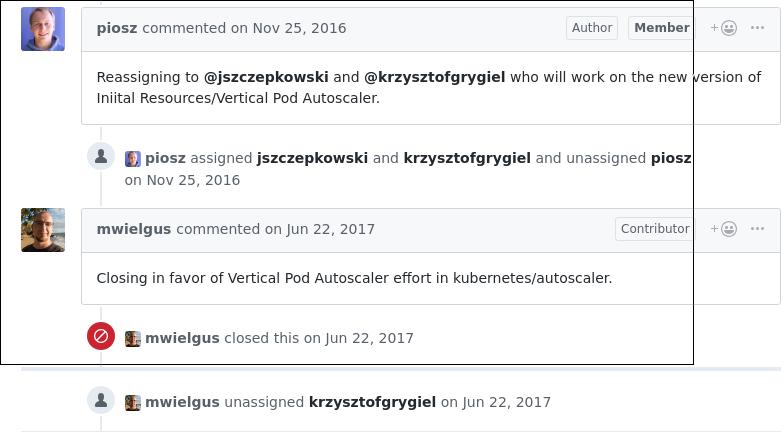
issue被re-assign给另外的开发者, 最终被关闭:
回到其父issue:
问题提出:
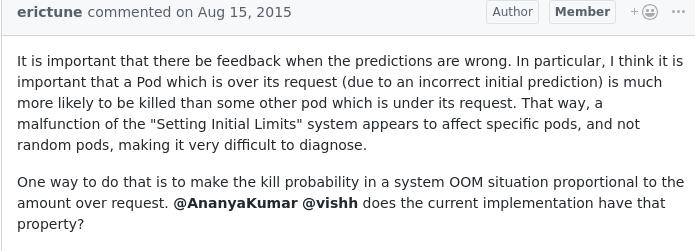
当预测错误时,必须有反馈。特别是,我认为重要的是,
超过其请求的Pod(由于不正确的初始预测)比其请求下的
其他pod更可能被杀死。这样,“设置初始限制”系统的故障
似乎会影响特定的pod,而不是随机的pod,这使得诊断非常困难。

一种方法是使系统OOM情况下的终止概率与请求量成比例。
 @AnanyaKumar @vishh目前的实施有没有这个属性?
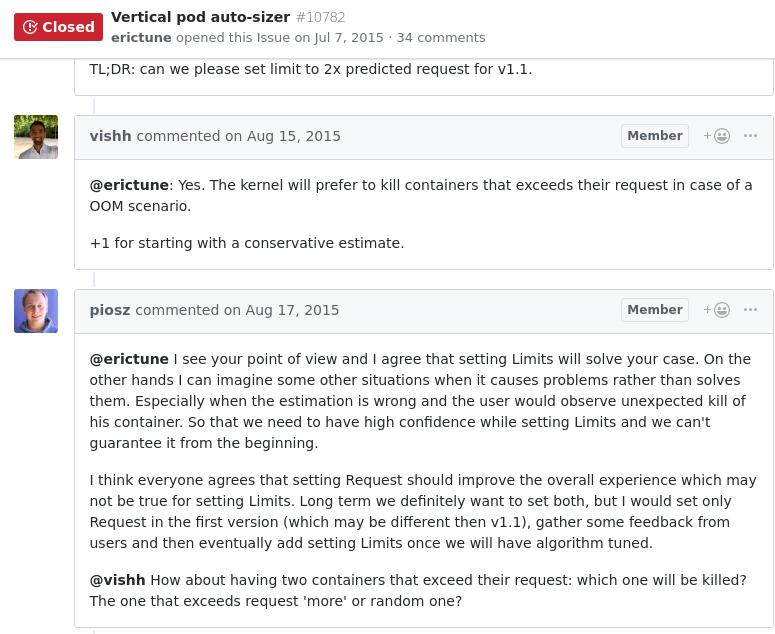
以上讨论解释了为何设置初始资源用量会带来更多问题:
@erictune我看到你的观点,我同意设置限制会解决你的情况。
 另一方面,我可以想象一些其他情况,它将带来更多的麻烦。
 特别是当预先估计错误的时候,用户会观察到调度程序将意
外杀死他的容器时。 因此,对资源的分配,采用设置限制的
方式会带来更高的可靠性,我们无法从一开始就保证它。

我认为每个人都同意设置请求(Request)应该改善整体体验,
这可能不适用于设置限制(Limits)。 从长远来看,我们肯
定想要设置两者,但我只会在第一个版本中设置Request(可
能与v1.1不同),从用户收集一些反馈,然后在我们调整算法
后最终添加设置限制。

@vishh如果有两个容器超出他们的要求:哪一个将被杀死?
超过请求'更多'或随机的一个?
至此,即可以看到,作者文章中的提法应该是理解错误了,使用7天/30天等历史数据预估资源使用只是为了完成Vertical pod auto-sizer这个特性的开发,而提出的一种备选方案。
作者可能当时仅仅是看了Kubernetes社区开发中的一个开发特性的建议文档,就认为Kubernetes拥有了"预测资源需求量"的功能,事实上K8s的调度引擎从来不会去预估资源需求量。
“vertical pod auto-sizer"这一特性一直到18年底才进入到alpha阶段,vpa特性的实现也不再是依靠16年时定义而实现。 在作者写文章的2016年,vpa试图根据当时用于收集容器指标的influxdb来实现预估代码,结果失败了;而influxdb+heapster应该是18年就被metric
server所替代。当前处于alpha阶段的vpa特性也就依赖于metric server而实现。我们可以看到以下列出的代码变更:
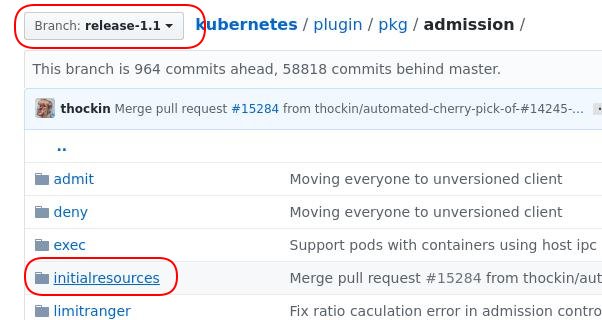
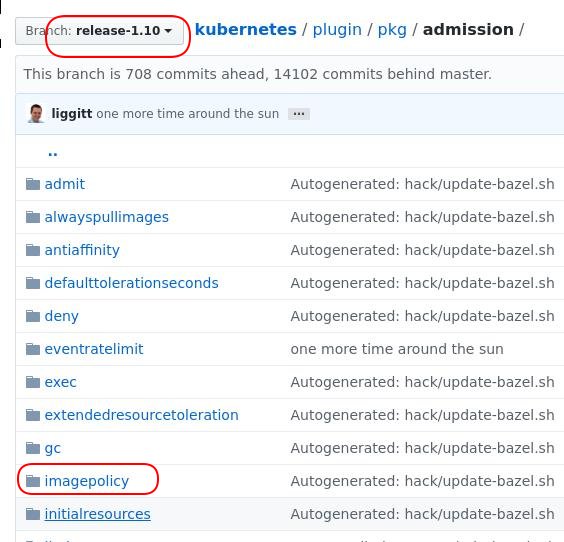
含有文章中提法的代码目录于v1.1版中被引入,至v1.11版被删除。
v1.10版后被从主线删除:
总结
从对issue的跟踪来看,应该是作者理解错了。预先估计资源用量从来不是Kubernetes定义资源需求的正确方法。
对于Kubernetes调度讲得比较好的一篇文章如下:
http://dockone.io/article/2885
官方对资源限制的参考页面如下:
https://kubernetes.io/zh/docs/tasks/administer-cluster/cpu-memory-limit/
如果需要在生产环境中优化资源的使用,可以参考:
https://www.yangcs.net/posts/optimizing-kubernetes-resource-allocation-production/
参考
Vertical pod auto-sizer, issue #10782:
https://github.com/kubernetes/kubernetes/issues/10782
Setting Initial Resources, issue #12149:
https://github.com/kubernetes/kubernetes/issues/12149
initial-resources.md:
https://github.com/fabric8io/kansible/blob/master/vendor/k8s.io/kubernetes/docs/proposals/initial-resources.md
vpa 官方仓库:
https://github.com/kubernetes/autoscaler/tree/master/vertical-pod-autoscaler
Apr 11, 2019
TechnologyFollowing is the tips:
Create the minikube environment, and enable the helm/charts:
#  minikube start --cpus 4 --memory 8192 --disk-size 60g
# helm init
Download the prometheus-operator from the official github repository, use
dependency update for updating the dependency locally:
# cd prometheus-operator
# helm dependency update
Record the docker images before deployment:
# eval $(minikube docker-env)
# docker images>before.txt
Now deploy the helm/charts using:
# helm install --name newprom .
When all of the items were deployed, record the images via:
# docker images>after.txt
With the helm/charts folder and the before.txt and after.txt you could
making this helm/charts working offline.
# docker save -o prometheus-operator.tar grafana/grafana:6.0.2 kiwigrid/k8s-sidecar:0.0.13 quay.io/coreos/prometheus-config-reloader:v0.29.0 quay.io/coreos/prometheus-operator:v0.29.0 quay.io/prometheus/alertmanager:v0.16.1 quay.io/prometheus/prometheus:v2.7.1 k8s.gcr.io/kube-state-metrics:v1.5.0 quay.io/prometheus/node-exporter:v0.17.0 quay.io/coreos/configmap-reload:v0.0.1
# xz prometheus-operator.tar
# tag and push
Apr 10, 2019
TechnologyVagrantBox
ToBeAdded
Offline
Steps:
# wget ....../kubespray-2.8.4.tar.gz .
# tar xzvf kubespray-2.8.4.tar.gz
# cd kubespray-2.8.4
# vim inventory/sample/group_vars/k8s-cluster/addons.yml
helm_enabled: true
metrics_server_enabled: true
# vim inventory/sample/hosts.ini
[all]
node ansible_host=10.0.2.15  # ip=10.0.2.15 etcd_member_name=etcd1

[kube-master]
node

[etcd]
node

[kube-node]
node

[k8s-cluster:children]
kube-master
kube-node
# cat /etc/apt/sources.list
deb http://mirrors.163.com/ubuntu/ xenial main restricted universe multiverse
deb http://mirrors.163.com/ubuntu/ xenial-security main restricted universe multiverse
deb http://mirrors.163.com/ubuntu/ xenial-updates main restricted universe multiverse
deb http://mirrors.163.com/ubuntu/ xenial-proposed main restricted universe multiverse
deb http://mirrors.163.com/ubuntu/ xenial-backports main restricted universe multiverse
# apt-add-repository ppa:ansible/ansible
# apt-get update
# apt-get install -y ansible python-pip python ntp dbus python-apt
# ansible --version
ansible 2.7.10
  config file = /root/kubespray-2.8.4/ansible.cfg
  configured module search path = [u'/root/kubespray-2.8.4/library']
  ansible python module location = /usr/lib/python2.7/dist-packages/ansible
  executable location = /usr/bin/ansible
  python version = 2.7.12 (default, Nov 12 2018, 14:36:49) [GCC 5.4.0 20160609
# vim /etc/ssh/sshd_config
PermitRootLogin yes
# systemctl restart sshd
# ssh-keygen
# ssh-copy-id root@10.0.2.15
# apt-get install -y bind9 bind9utils ntp nfs-common nfs-kernel-server python-netaddr nethogs iotop
#### find all of the debs and upload it to deployment directory for replacing 1604debs.tar.xz
# ansible-playbook  -i inventory/sample/hosts.ini cluster.yml
Apr 1, 2019
TechnologyConoha ipv6
Find the ipv6 addresses(should have 17 ipv6 addresses together):

Network Configuration
Edit the networking via:
#  vim /etc/network/interfaces
# The primary network interface
auto ens3
iface ens3 inet dhcp
iface ens3 inet6 dhcp
accept_ra 1

# IPv6 configuration
iface ens3 inet6 static
  pre-up modprobe ipv6
  address xxxxxx
  netmask 64
Restart the networking via service networking restart, then you will get the
ipv6 address via:
# ifconfig | grep inet6
shadowsocks configuration
Edit the configuration :
# cat shadowsocks.json
{
"server":"::",

.....

"prefer_ipv6": true
}
Now restart the service of sss
Mar 22, 2019
TechnologyPrerequites
System infos:
# cat /etc/redhat-release
CentOS Linux release 7.6.1810 (Core)
# vi /etc/yum.conf
keepcache=1
#### Configure yum.conf and install some packages
# yum install -y wget vim net-tools gcc
#  vim /etc/seliconfig/config
SELINUX=disabled
# systemctl diable firewalld
Install foreman
Configure host first:
# hostnamectl set-hostname foreman.fuck.com
# vim /etc/hosts
10.192.192.2	foreman.fuck.com
Networking configuration like following(using nmtui):
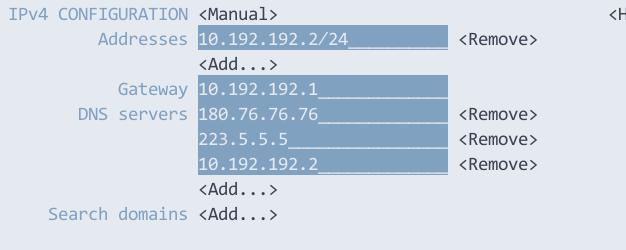
Install via:
# sudo yum -y install https://yum.puppetlabs.com/puppet5/puppet5-release-el-7.noarch.rpm
# wget -O /etc/yum.repos.d/epel.repo http://mirrors.aliyun.com/repo/epel-7.repo
# sudo yum -y install https://yum.theforeman.org/releases/1.21/el7/x86_64/foreman-release.rpm
# sudo yum -y install foreman-installer
