TipsOnAIMachine

硬件环境

新购的神舟, Z7-KP7GH, CPU, i7-8750H, 内存24G, 显卡Nvidia GTX1060 6G.
8G 优盘用于系统安装.

软件安装及适配

ubuntu-18.04.2-desktop-amd64.iso, 写入优盘:

# sudo dd if=./ubuntu-18.04.2-desktop-amd64.iso of=/dev/sdc bs=1M && sudo sync

笔记本开机按DEL进入BIOS配置,选择U盘启动,遇到安装卡住的问题,解决方案如下:

GRUB choose the Ubuntu, or Install Ubuntu (it depends, you will see it hopefully), go to it with the arrows and press the 'e' key.
Here go to the line which contains quiet splash at the end and add  acpi=off after these words.
Then press F10 to boot with these settings.

安装中需要重新分区, 参考:

/images/2019_05_24_10_41_45_771x380.jpg 
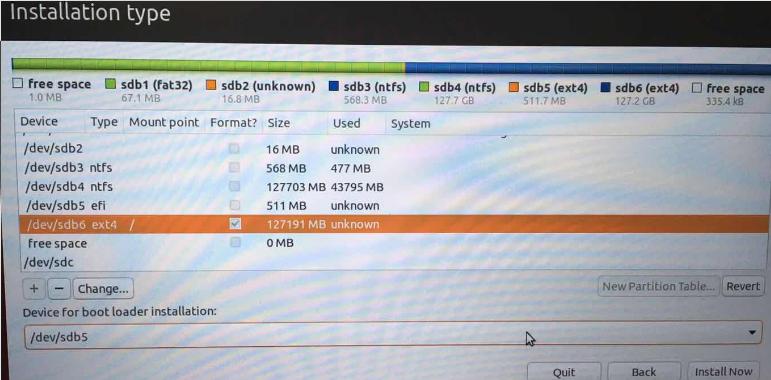
这里新建了efi分区,并使用新建的分区用于安装操作系统,同时保留了原有的Windows操作系统,特别要注意的是关于bootloader的安装位置。

安装完毕后,由于是nvidia卡的原因,首次进入系统会卡住,这里我们需要再次修改GRUB进入系统:

When you are in the GRUB menu, press E to enter the GRUB editor. Add nouveau.modeset=0 to the end of the line that starts with linux. After you've added it, press F10 to boot. Your system should start. After that, go to System Settings > Software & Updates > Additional Drivers and then select the NVIDIA driver. Right now I'm using NVIDIA binary driver- version 367.57 from nvidia-367 (proprietary, tested).

当前(2019-05-24)时,nvidia的驱动是nvida-driver-390.

现在重新启动机器,就可以正常进入系统并执行操作了。
显卡的测试可以参考https://linuxconfig.org/benchmark-your-graphics-card-on-linux 时间的关系这里我就不做了。

系统适配

安装必要的包:

# apt-get install -y openssh-server vim net-tools virt-manager vagrant
vagrant-libvirt meld lm_sensors

Install cuda:

# systemctl stop gdm
# ./cuda_10.0.130_410.48_linux.run
# vim ~/.bashrc
export PATH=/usr/local/cuda-10.0/bin:$PATH
# source ~/.bashrc
# nvidia-smi 
Mon May 27 08:40:56 2019       
+-----------------------------------------------------------------------------+
| NVIDIA-SMI 410.48                 Driver Version: 410.48                    |
|-------------------------------+----------------------+----------------------+
| GPU  Name        Persistence-M| Bus-Id        Disp.A | Volatile Uncorr. ECC |
| Fan  Temp  Perf  Pwr:Usage/Cap|         Memory-Usage | GPU-Util  Compute M. |
|===============================+======================+======================|
|   0  GeForce GTX 1060    Off  | 00000000:01:00.0 Off |                  N/A |
| N/A   55C    P0    25W /  N/A |      0MiB /  6078MiB |      0%      Default |
+-------------------------------+----------------------+----------------------+
                                                                               
+-----------------------------------------------------------------------------+
| Processes:                                                       GPU Memory |
|  GPU       PID   Type   Process name                             Usage      |
|=============================================================================|
|  No running processes found                                                 |
+-----------------------------------------------------------------------------+
# nvcc --version
nvcc: NVIDIA (R) Cuda compiler driver
Copyright (c) 2005-2018 NVIDIA Corporation
Built on Sat_Aug_25_21:08:01_CDT_2018
Cuda compilation tools, release 10.0, V10.0.130
# wget xxxxxxxxhttps://developer.nvidia.com/rdp/cudnn-archive
# Get the following packages: cudnn-10.0-linux-x64-v7.5.0.56.tgz
#  tar -zxvf cudnn-10.0-linux-x64-v7.4.2.24.tgz
# 拷贝
$ cd cudnn-10.0-linux-x64-v7.4.2.24
$ sudo cp cuda/include/cudnn.h /usr/local/cuda-10.0/include
$ sudo cp cuda/lib64/libcudnn* /usr/local/cuda-10.0/lib64
# 修改权限
$ sudo chmod a+r /usr/local/cuda-10.0/include/cudnn.h /usr/local/cuda-10.0/lib64/libcudnn*
$ vim ~/.bashrc
export LD_LIBRARY_PATH=/usr/local/cuda-10.0/lib64:$LD_LIBRARY_PATH
export CUDNN_PATH="/usr/local/cuda-10.0/lib64/libcudnn.so"
$ source ~/.bashrc
$ echo -e '#include"cudnn.h"\n void main(){}' | nvcc -x c - -o /dev/null -lcudnn
$ echo $?
0

Now upgrading your nvidia driver:

$ sudo add-apt-repository ppa:graphics-drivers/ppa
$ sudo apt update
$ ubuntu-drivers devices
$ sudo ubuntu-drivers autoinstall 
$ sudo reboot
After reboot....
$ nvidia-smi 
Mon May 27 09:07:16 2019       
+-----------------------------------------------------------------------------+
| NVIDIA-SMI 430.14       Driver Version: 430.14       CUDA Version: 10.2     |
|-------------------------------+----------------------+----------------------+
| GPU  Name        Persistence-M| Bus-Id        Disp.A | Volatile Uncorr. ECC |
| Fan  Temp  Perf  Pwr:Usage/Cap|         Memory-Usage | GPU-Util  Compute M. |
|===============================+======================+======================|
|   0  GeForce GTX 1060    Off  | 00000000:01:00.0 Off |                  N/A |
| N/A   49C    P0    26W /  N/A |    166MiB /  6078MiB |      0%      Default |
+-------------------------------+----------------------+----------------------+
                                                                               
+-----------------------------------------------------------------------------+
| Processes:                                                       GPU Memory |
|  GPU       PID   Type   Process name                             Usage      |
|=============================================================================|
|    0      1970      G   /usr/lib/xorg/Xorg                            94MiB |
|    0      2148      G   /usr/bin/gnome-shell                          69MiB |
+-----------------------------------------------------------------------------+

Now your cuda and cudnn is installed OK. Cause nvidia’s cuda will be older than the ppa’s and will cause problems, we need to install driver after cuda installation.

tensorflow

Install pip and use pip for installing tensorflow:

$ sudo apt-get install -y python-pip
$ pip install tensorflow-gpu
$ vim test.py
import tensorflow as tf
hello = tf.constant('Hello, TensorFlow!')
sess = tf.Session()
print(sess.run(hello))
$ python test.py
2019-05-27 09:35:27.847206: I tensorflow/core/platform/cpu_feature_guard.cc:141] Your CPU supports instructions that this TensorFlow binary was not compiled to use: AVX2 FMA
2019-05-27 09:35:27.952455: I tensorflow/stream_executor/cuda/cuda_gpu_executor.cc:998] successful NUMA node read from SysFS had negative value (-1), but there must be at least one NUMA node, so returning NUMA node zero
2019-05-27 09:35:27.953302: I tensorflow/compiler/xla/service/service.cc:150] XLA service 0x5643333f0dc0 executing computations on platform CUDA. Devices:
2019-05-27 09:35:27.953344: I tensorflow/compiler/xla/service/service.cc:158]   StreamExecutor device (0): GeForce GTX 1060, Compute Capability 6.1
2019-05-27 09:35:27.974107: I tensorflow/core/platform/profile_utils/cpu_utils.cc:94] CPU Frequency: 2208000000 Hz
2019-05-27 09:35:27.975517: I tensorflow/compiler/xla/service/service.cc:150] XLA service 0x564333ab33b0 executing computations on platform Host. Devices:
2019-05-27 09:35:27.975563: I tensorflow/compiler/xla/service/service.cc:158]   StreamExecutor device (0): <undefined>, <undefined>
2019-05-27 09:35:27.977344: I tensorflow/core/common_runtime/gpu/gpu_device.cc:1433] Found device 0 with properties: 
name: GeForce GTX 1060 major: 6 minor: 1 memoryClockRate(GHz): 1.6705
pciBusID: 0000:01:00.0
totalMemory: 5.94GiB freeMemory: 5.68GiB
2019-05-27 09:35:27.977382: I tensorflow/core/common_runtime/gpu/gpu_device.cc:1512] Adding visible gpu devices: 0
2019-05-27 09:35:27.979140: I tensorflow/core/common_runtime/gpu/gpu_device.cc:984] Device interconnect StreamExecutor with strength 1 edge matrix:
2019-05-27 09:35:27.979179: I tensorflow/core/common_runtime/gpu/gpu_device.cc:990]      0 
2019-05-27 09:35:27.979193: I tensorflow/core/common_runtime/gpu/gpu_device.cc:1003] 0:   N 
2019-05-27 09:35:27.979313: I tensorflow/core/common_runtime/gpu/gpu_device.cc:1115] Created TensorFlow device (/job:localhost/replica:0/task:0/device:GPU:0 with 5517 MB memory) -> physical GPU (device: 0, name: GeForce GTX 1060, pci bus id: 0000:01:00.0, compute capability: 6.1)
Hello, TensorFlow!

remote machine

Settings-> Sharing-> Screen Sharing:
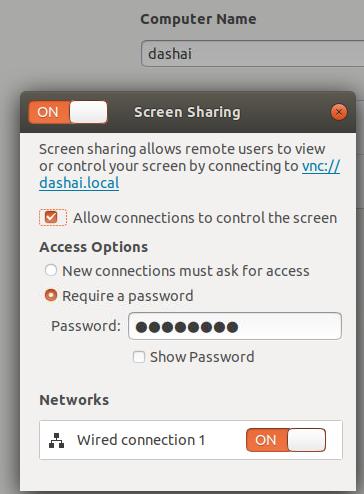
/images/2019_05_27_10_23_29_364x494.jpg

then setting:

$ gsettings set org.gnome.Vino require-encryption false

Now use vncviewer for viewing the 5900 port, you will get the remote screen.

ZFS

Purpose

ZFS On proxmox, performance issue.

Steps

1. megaclisas-status

The proxmox is in offline environment, so need to get the megaclisas-status packages installed ready.

# sudo docker run -it debian:9.4 /bin/bash
root@f427df462cbd:/# cat /etc/debian_version 
9.4
root@f427df462cbd:/# apt-get install -y vim
root@f427df462cbd:/# vim apt.conf.d/docker-clean 
Comment all
root@f427df462cbd:/# apt-get install -y wget gnupg2
# wget -O - https://hwraid.le-vert.net/debian/hwraid.le-vert.net.gpg.key | apt-key add -
# cat /etc/apt/sources.list
deb http://deb.debian.org/debian stretch main
deb http://security.debian.org/debian-security stretch/updates main
deb http://deb.debian.org/debian stretch-updates main
deb http://hwraid.le-vert.net/debian stretch main
# apt-get update -y
# apt-get install megaclisas-status
# cd /var/cache/
# find . | grep deb$ | xargs -I % cp % /root/deb/

Transfer the debs into the promox machine, install it via:

# cd /root/deb/
# dpkg -i daemon_0.6.4-1+b2_amd64.deb megacli*
root@ks:~/deb# megaclisas-status 
-- Controller information --
-- ID | H/W Model | RAM    | Temp | BBU    | Firmware     
c0    | SAS3108 | 1024MB | 64C  | Absent | FW: 24.7.0-0057 

-- Array information --
-- ID | Type   |    Size |  Strpsz |   Flags | DskCache |   Status |  OS Path | CacheCade |InProgress   
c0u0  | RAID-1 |    558G |  256 KB |   RA,WT |  Default |  Optimal | /dev/sda | None      |None         
c0u1  | RAID-5 |   7271G |  256 KB | ADRA,WT |  Default |  Optimal | /dev/sdb | None      |None         
c0u2  | RAID-5 |   7271G |  256 KB | ADRA,WT |  Default |  Optimal | /dev/sdc | None      |None         
c0u3  | RAID-5 |   7271G |  256 KB | ADRA,WT |  Default |  Optimal | /dev/sdd | None      |None         
c0u4  | RAID-5 |   7271G |  256 KB | ADRA,WT |  Default |  Optimal | /dev/sde | None      |No

Change the properties:

root@ks:~/deb# megacli -LDGetProp -Cache -LALL -a0
                                     
Adapter 0-VD 0(target id: 0): Cache Policy:WriteThrough, ReadAhead, Direct, No Write Cache if bad BBU
Adapter 0-VD 1(target id: 1): Cache Policy:WriteThrough, ReadAdaptive, Direct, No Write Cache if bad BBU
Adapter 0-VD 2(target id: 2): Cache Policy:WriteThrough, ReadAdaptive, Direct, No Write Cache if bad BBU
Adapter 0-VD 3(target id: 3): Cache Policy:WriteThrough, ReadAdaptive, Direct, No Write Cache if bad BBU
Adapter 0-VD 4(target id: 4): Cache Policy:WriteThrough, ReadAdaptive, Direct, No Write Cache if bad BBU

Exit Code: 0x00
root@ks:~/deb# megacli -LDSetProp NORA -LALL -a0
                                     
Set Read Policy to NoReadAhead on Adapter 0, VD 0 (target id: 0) success
Set Read Policy to NoReadAhead on Adapter 0, VD 1 (target id: 1) success
Set Read Policy to NoReadAhead on Adapter 0, VD 2 (target id: 2) success
Set Read Policy to NoReadAhead on Adapter 0, VD 3 (target id: 3) success
Set Read Policy to NoReadAhead on Adapter 0, VD 4 (target id: 4) success

Exit Code: 0x00
root@ks:~/deb# megacli -LDGetProp -Cache -LALL -a0
                                     
Adapter 0-VD 0(target id: 0): Cache Policy:WriteThrough, ReadAheadNone, Direct, No Write Cache if bad BBU
Adapter 0-VD 1(target id: 1): Cache Policy:WriteThrough, ReadAheadNone, Direct, No Write Cache if bad BBU
Adapter 0-VD 2(target id: 2): Cache Policy:WriteThrough, ReadAheadNone, Direct, No Write Cache if bad BBU
Adapter 0-VD 3(target id: 3): Cache Policy:WriteThrough, ReadAheadNone, Direct, No Write Cache if bad BBU
Adapter 0-VD 4(target id: 4): Cache Policy:WriteThrough, ReadAheadNone, Direct, No Write Cache if bad BBU

Exit Code: 0x00

Hope this will greately improve performance.

Notice(For disk cache):

Optional toppings for most LD configurations:
WT :      WriteThrough   safer.  Only returns once data is written to disk.
WB:       WriteBack       faster.  Returns as soon as data is is written to cache
NORA :  No Read Ahead   vs
RA:        ReadAhead   vs
ADRA :   Adaptive ReadAhead where if the previous two requests were sequential, it pre-loads the next in sequence.
Cached:  Cache reads.
Direct:    Only the previous read is cached.
-strpszM      : Stripe size      so -strpsz64 means 64kb stripe size.
Hsp[E0:S0] : Choose this drive to be a hot-spare

WorkingTipsOnFfDL

StartPoint

Working directory:

# /home/xxxx/Code/vagrant/ai_k8s/RONG/package/files/Rong
# vagrant status
Current machine states:

outnode-1                 running (libvirt)

A running k8s cluster:

[root@outnode-1 ~]# cat /etc/redhat-release 
Red Hat Enterprise Linux Server release 7.4 (Maipo)
[root@outnode-1 ~]# kubectl get nodes
NAME        STATUS   ROLES    AGE   VERSION
outnode-1   Ready    master   32m   v1.14.1

Configure repository:

# mount /dev/sr0 /mnt
# cd /etc/yum.repos.d
# mv *.repo /root/
# vim cdrom.repo
[local]
name=local
baseurl=file:///mnt
enabled=1
gpgcheck=0
# yum makecache
# yum install -y vim git nfs-utils rpcbind

Configure nfs server:

# mkdir -p /opt/nfs
# vim /etc/exports
/opt/nfs  *(rw,async,no_root_squash,no_subtree_check)
# service rpcbind start
# service nfs start
# systemctl enable nfs-server
# systemctl start nfs-server
# systemctl enable nfs.service
# systemctl enable rpcbind

Configure helm via:

# helm repo add stable https://kubernetes-charts.storage.googleapis.com
# helm install stable/nfs-client-provisioner --set nfs.server=10.142.108.191 --set nfs.path=/opt/nfs
# kubectl get sc
nfs-client   cluster.local/righteous-condor-nfs-client-provisioner   7m8s
# kubectl edit sc nfs-client
kind: StorageClass
metadata:
  annotations:
    storageclass.kubernetes.io/is-default-class: "true"

Install

Clone the source code from github:

# git clone https://github.com/IBM/FfDL.git
# 

TOO many errors here. To be continue.

ThinkingOnK8s

上午想了一下关于开发后续要努力的方向。

K8S去中心化

早先做的关于Rong的方案都是中心化的,各个组件依赖于一个中心化的kube-deploy节点,当然这个节点也是我对于kubespray项目的一个拓展吧,把dns服务器/secure-registry/harbor服务都落地于一个中心化的节点来做。好处是做到了中心化管理,同时通过欺骗各个节点签名档的方式,无缝衔接了docker.io/gcr.io/quay.io等的pull/push请求。坏处是无法做到高可用,或者说如果做高可用,该如何来设计这个节点呢?

思路:

1. registry on k8s?   
2. harbor on k8s?   

AI on K8s

有不错的起点,就是Ffdl这个平台。
但问题是我需要一个去中心化后的节点来做为起步。

眼下不管是Rong的内网版或者是去中心化的外网版本看来都不是特别理想的实现平台。

clearLinux

这个可以作为后续的起点系统,深入研究。

TipsOnLocalStorage

Background

For enabling local storage provision on kubespray, and make use of the local disk for pod storage usage.

Enable

Enable the local storage pool via:

# vim inventory/sample/group_vars/k8s-cluster/addons.yml
	# Rancher Local Path Provisioner
	local_path_provisioner_enabled: true
	
	# Local volume provisioner deployment
	local_volume_provisioner_enabled: true
	local_volume_provisioner_namespace: kube-system
	local_volume_provisioner_storage_classes:
	  local-storage:
	    host_dir: /mnt/disks
	    mount_dir: /mnt/disks
	  fast-disks:
	    host_dir: /mnt/fast-disks
	    mount_dir: /mnt/fast-disks
	    block_cleaner_command:
	      - "/scripts/shred.sh"
	      - "2"
	    volume_mode: Filesystem
	    fs_type: ext4

Prepare

Prepare the local storage via:

# 
# mkdir -p  /mnt/fast-disks/vol-alertmanager-res-alertmanager-0
# mkdir -p  /mnt/fast-disks/vol-prometheus-res-prometheus-0
# mkdir -p  /mnt/fast-disks/es-data-es-data-efk-cluster-default-0
# mkdir -p  /mnt/fast-disks/es-data-es-master-efk-cluster-default-0
# truncate /mnt/vol-alertmanager-res-alertmanager-0 --size 20G
# truncate /mnt/vol-prometheus-res-prometheus-0 --size 20G
# truncate /mnt/es-data-es-data-efk-cluster-default-0 --size 10G
# truncate /mnt/es-data-es-master-efk-cluster-default-0 --size 10G
# mkfs.ext4 /mnt/vol-alertmanager-res-alertmanager-0
# mkfs.ext4 /mnt/vol-prometheus-res-prometheus-0
# mkfs.ext4 /mnt/es-data-es-data-efk-cluster-default-0
# mkfs.ext4 /mnt/es-data-es-master-efk-cluster-default-0

Edit the /etc/fstab for mounting them automatically:

/mnt/vol-alertmanager-res-alertmanager-0	/mnt/fast-disks/vol-alertmanager-res-alertmanager-0 ext4	rw 0	1	
/mnt/vol-prometheus-res-prometheus-0	/mnt/fast-disks/vol-prometheus-res-prometheus-0	ext4	rw	0	1
/mnt/es-data-es-data-efk-cluster-default-0	/mnt/fast-disks/es-data-es-data-efk-cluster-default-0	ext4	rw	0	1
/mnt/es-data-es-master-efk-cluster-default-0	/mnt/fast-disks/es-data-es-master-efk-cluster-default-0	ext4	rw	0	1

Usage

I prepare the storage for I use them in helm/charts, and helm/charts automatically request the storage from storage class, thus I have to make /mnt/fast-disks as the default storage class.

# kubectl edit sc fast-disks
kind: StorageClass
metadata:
  annotations:
    kubectl.kubernetes.io/last-applied-configuration: |
      {"apiVersion":"storage.k8s.io/v1","kind":"StorageClass","metadata":{"annotations":{},"name":"fast-disks"},"provisioner":"kubernetes.io/no-provisioner","volumeBindingMode":"WaitForFirstConsumer"}
+    storageclass.kubernetes.io/is-default-class: "true"

verify:

root@localnode-1:/mnt# kubectl get pvc --all-namespaces
NAMESPACE    NAME                                      STATUS   VOLUME              CAPACITY   ACCESS MODES   STORAGECLASS   AGE
logging      es-data-es-data-efk-cluster-default-0     Bound    local-pv-7d48bf57   20Gi       RWO            fast-disks     4h17m
logging      es-data-es-master-efk-cluster-default-0   Bound    local-pv-64a35d15   20Gi       RWO            fast-disks     4h17m
monitoring   vol-alertmanager-res-alertmanager-0       Bound    local-pv-24ed6560   20Gi       RWO            fast-disks     4h21m
monitoring   vol-prometheus-res-prometheus-0           Bound    local-pv-e998c4c2   20Gi       RWO            fast-disks     4h21m

TBD

  1. Now to enlarge the disk?