Aug 24, 2024
TechnologySteps
Change hostname and print system info:
# hostnamectl set-hostname multiubuntu
# exit
logout
Connection to 192.168.1.52 closed.
$ ssh root@192.168.1.52
root@multiubuntu:~# uname -a
Linux multiubuntu 5.15.0-117-generic #127-Ubuntu SMP Fri Jul 5 20:13:28 UTC 2024 x86_64 x86_64 x86_64 GNU/Linux
root@multiubuntu:~# cat /etc/issue
Ubuntu 22.04.4 LTS \n \l
Install xfce4(Using xfce4 for demo):
# apt install -y xfce4
Create 10 test users, change shell, change passwd:
$ for i in {1..10}; do useradd -m test$i; done
$ sudo ls /home
test  test1  test10  test2  test3  test4  test5  test6  test7  test8  test9
$ for i in {1..10}; do chsh -s /bin/bash test$i; done
$ vim bulkpasswords
$ chpasswd < bulkpasswords
Define every user’s .xinitrc:
# cp /etc/X11/xinit/xinitrc .
# vim xinitrc
    ......
    # invoke global X session script
    #. /etc/X11/Xsession
    XDG_SESSION_TYPE=x11
    exec dbus-run-session -- startxfce4
# for i in {1..10}; do  cp xinitrc /home/test$i/.xinitrc; done
Change the available ttys:
# vim /etc/systemd/logind.conf
[Login]
NAutoVTs=50
ReserveVT=50
Change the bash profile for each user:
# cat bash_profile_example
#
# ~/.bash_profile
#

[[ -f ~/.bashrc ]] && . ~/.bashrc
if [ -z "$DISPLAY" ] && [ "$XDG_VTNR" = TOBEREPLACED ]; then
  exec startx &>/dev/null
fi
# for i in {1..10}; do cp /root/bash_profile_example /home/test$i/.bash_profile; sed -i "s/TOBEREPLACED/$i/g" /home/test$i/.bash_profile; chown -R test$i /home/test$i/.bash_profile; done
Add all user to autologin:
# groupadd -r autologin
# for i in {1..10}; do gpasswd -a test$i autologin; done
autologin template file:
[Service]
Type=simple
ExecStart=
Environment=XDG_SESSION_TYPE=x11
ExecStart=-/usr/sbin/agetty --skip-login --nonewline --noissue --autologin TOBEREPLACED --noclear %I $TERM
Add autologin service:
root@multi:~# cat autologin.conf
[Service]
Type=simple
ExecStart=
ExecStart=-/usr/bin/agetty --skip-login --nonewline --noissue --autologin TOBEREPLACED --noclear %I $TERM
# for i in {1..50}; do mkdir -p /etc/systemd/system/getty\@tty$i.service.d/; done
for i in {1..50}; do cp autologin.conf /etc/systemd/system/getty\@tty$i.service.d/; sed -i "s/TOBEREPLACED/test$i/g" /etc/systemd/system/getty\@tty$i.service.d/autologin.conf; done
Now add autologin crontab:
# crontab -e
@reboot sleep 10 && /usr/bin/chvtsh.sh
Create chvtsh.sh:
#!/bin/bash
while ! ps -p $(pgrep Xorg) > /dev/null; do
  echo "Waiting for xorg to start...">>/tmp/waitdone.txt
  sleep 1
done
echo "xorg started, switching to console 2">>/tmp/waitdone.txt
sleep 5
for i in {2..50}
do
	chvt $i
	systemctl start getty@tty$i
	sleep 5
done
Enable the getty@tty1:
# systemctl set-default multi-user.target
# systemctl enable getty@tty1
Aug 23, 2024
TechnologyCreate users:
for i in {1..20}; do useradd -m test$i; done
Create a bulkpasswords file:
test1: goeugoogue
test2: gowguowgow
.....
Change password:
chpasswd < bulkpasswords
Copy the getty service:
for i in {7..21}; do cp -r getty\@tty6.service.d/ getty\@tty$i.service.d; done
change the systemd files:
[root@archremote system]# vim getty\@tty7.service.d/autologin.conf
[root@archremote system]# vim getty\@tty6.service.d/autologin.conf
[root@archremote system]# vim getty\@tty8.service.d/autologin.conf
[root@archremote system]# vim getty\@tty9.service.d/autologin.conf
[root@archremote system]# vim getty\@tty10.service.d/autologin.conf
[root@archremote system]# vim getty\@tty11.service.d/autologin.conf
[root@archremote system]# vim getty\@tty12.service.d/autologin.conf
[root@archremote system]# vim getty\@tty13.service.d/autologin.conf
[root@archremote system]# vim getty\@tty14.service.d/autologin.conf
[root@archremote system]# vim getty\@tty15.service.d/autologin.conf
[root@archremote system]# vim getty\@tty16.service.d/autologin.conf
[root@archremote system]# vim getty\@tty17.service.d/autologin.conf
[root@archremote system]# vim getty\@tty18.service.d/autologin.conf
[root@archremote system]# vim getty\@tty19.service.d/autologin.conf
[root@archremote system]# vim getty\@tty20.service.d/autologin.conf
[root@archremote system]# vim getty\@tty6.service.d/autologin.conf
[root@archremote system]# cat getty\@tty6.service.d/autologin.conf
[Service]
Type=simple
ExecStart=
#ExecStart=-/sbin/agetty -o '-p -f -- \\u' --noclear --autologin dash %I $TERM
ExecStart=-/usr/bin/agetty --skip-login --nonewline --noissue --autologin test6 --noclear %I $TERM
for i in {6..20}; do cp /home/test1/.bash_profile /home/test$i/.bash_profile && chown -R test$i /home/test$i/.bash_profile; done
vim /home/test6/.bash_profile
vim /home/test7/.bash_profile
vim /home/test8/.bash_profile
vim /home/test9/.bash_profile
vim /home/test10/.bash_profile
vim /home/test11/.bash_profile
vim /home/test12/.bash_profile
vim /home/test13/.bash_profile
vim /home/test14/.bash_profile
vim /home/test15/.bash_profile
vim /home/test16/.bash_profile
vim /home/test17/.bash_profile
vim /home/test18/.bash_profile
vim /home/test19/.bash_profile
vim /home/test20/.bash_profile
for i in {6..20}; do cp /home/test1/.xinitrc /home/test$i/.xinitrc; chmod 777 /home/test$i/.xinitrc; done
Example for bash_profile:
[root@archremote ~]# cat /home/test18/.bash_profile
#
# ~/.bash_profile
#

[[ -f ~/.bashrc ]] && . ~/.bashrc
if [ -z "$DISPLAY" ] && [ "$XDG_VTNR" = 18 ]; then
  exec startx &>/dev/null
fi
Added autologin:
 gpasswd -a test7 autologin
 for i in {8..20}; do gpasswd -a test$i autologin; done
crontab for activating this:
[root@archremote ~]# cat /usr/bin/chvtsh.sh
#!/bin/bash
while ! ps -p $(pgrep Xorg) > /dev/null; do
  echo "Waiting for xorg to start...">>/tmp/waitdone.txt
  sleep 1
done
echo "xorg started, switching to console 2">>/tmp/waitdone.txt
sleep 15
chvt 2
sleep 5
chvt 3
sleep 5
chvt 4
sleep 5
chvt 5
sleep 5
chvt 6
sleep 5
chvt 7
systemctl start getty@tty7
sleep 5
chvt 8
systemctl start getty@tty8
sleep 5
chvt 9
systemctl start getty@tty9
[root@archremote ~]# crontab -l
@reboot sleep 10 && /usr/bin/chvtsh.sh
Aug 20, 2024
TechnologyModification on grub default parameters:
GRUB_CMDLINE_LINUX_DEFAULT="quiet splash iommu=pt amd_iommu=on initcall_blacklist=sysfb_init pcie_acs_override=downstream,multifunction"
Remove some items in nova:
$ vim /etc/nova/nova.conf
[libvirt]
virt_type = kvm
cpu_mode = host-passthrough
qemu_envs = QEMU_AUDIO_DRV=pa,QEMU_PA_SERVER=/run/user/1000/pulse/native
#qemu_envs = QEMU_AUDIO_DRV=pa
#qemu_args = -set,device.hostdev0.x-igd-opregion=on, -set,device.hostdev0.x-igd-gms=2, -set,device.hostdev0.romfile=/usr/share/OVMF/adls-1085.rom, -set,device.hostdev0.multifunction=on
Modification on libvirt hooks:
$ vim /etc/libvirt/hook/vfio-startup
......
# 1. find the graphical card and its associated devices in the same pci slot, record its pci id
# 1.1 find vgaid via lspci
vgaid=`lspci | grep -i vga | awk {'print $1'}`
# 1.2 find iommu file in /sys
vgaiommufile=`find /sys/kernel/iommu_groups/ -type l | grep $vgaid`
# 1.3 retrieve the iommu fold, which contains other device which should be processed in next step
vgaiommudir=`dirname $vgaiommufile`
# 1.4 record the system device driver in dic devicedriver
declare -A devicedriver
for i in `ls $vgaiommudir`; do devicedriver[$i]=`lspci -v -s $i | grep 'Kernel driver in use' | awk -F ': ' {'print $2'}`;done
# 1.5 record the pciid in dic pciid
declare -A pciid
for i in `ls $vgaiommudir`; do pciid[$i]=`lspci -n -s $i | awk -F ' ' {'print $3'}`;done
# 1.6 write devicedriver and pciid in /tmp
rm -f /tmp/devicedriver
rm -f /tmp/pciid
for i in `echo "${!devicedriver[@]}"`; do echo $i "${devicedriver[$i]}">>/tmp/devicedriver;done
for i in `echo "${!pciid[@]}"`; do echo $i "${pciid[$i]}">>/tmp/pciid;done

# 2.  unbind the current activated device driver mode
# example: echo "0000:06:00.0" > /sys/bus/pci/drivers/amdgpu/unbind
while IFS= read -r line; do
  pci_no=$(echo "$line" | cut -d' ' -f1)
  driver_name=$(echo "$line" | cut -d' ' -f2)
  echo $pci_no > /sys/bus/pci/drivers/$driver_name/unbind
done < /tmp/devicedriver

# 3. echo new_id to vfio-pci
# example echo $igd_id > /sys/bus/pci/drivers/vfio-pci/new_id
while IFS= read -r line; do
  pci_id=$(echo "$line" | cut -d' ' -f2)
  echo $pci_id > /sys/bus/pci/drivers/vfio-pci/new_id
done < /tmp/pciid

# Old Logical for gen10/gen12
#igd_id="8086 $(lspci -n|grep '0:02.0'|cut -d ':' -f4|cut -c 1-4)"
#echo 0000:00:02.0 > /sys/bus/pci/drivers/i915/unbind
#if ! lsmod | grep "vfio_pci" &> /dev/null ; then
#    modprobe vfio-pci
#fi
#echo $igd_id > /sys/bus/pci/drivers/vfio-pci/new_id
#echo $usb_id > /sys/bus/pci/drivers/vfio-pci/new_id
Also change teardown hook:
$ vim /etc/libvirt/hook/vfio-teardown.sh


# 1. unbind all of the vfio-pci items
# Example:  echo $igd_id > /sys/bus/pci/drivers/vfio-pci/remove_id
while IFS= read -r line; do
  pci_id=$(echo "$line" | cut -d' ' -f2)
  echo $pci_id > /sys/bus/pci/drivers/vfio-pci/remove_id
done < /tmp/pciid
# 2. re-bind system device driver
# example: echo "0000:06:00.0" > /sys/bus/pci/drivers/radeon/unbind
while IFS= read -r line; do
  pci_no=$(echo "$line" | cut -d' ' -f1)
  driver_name=$(echo "$line" | cut -d' ' -f2)
  echo $pci_no > /sys/bus/pci/drivers/$driver_name/bind
done < /tmp/devicedriver
Change the nova’s libvirt items:
$ vim /usr/lib/python2.7/dist-packages/nova/virt/libvirt/driver.py
else:
with open('/tmp/pciid', 'r') as f:
for line in f:
#print(line.strip().split(' ')[0])
pci = vconfig.LibvirtConfigGuestHostdevPCI()
pci_addr = (line.strip().split(' ')[0])
pci.address = pci_addr
dbs, sep, pci.function = pci_addr.partition('.')
pci.domain, pci.bus, pci.slot = dbs.split(':')
if CONF.libvirt.virt_type in ('xen', 'parallels',):
pci.managed = 'no'
if CONF.libvirt.virt_type in ('kvm', 'qemu'):
pci.managed = 'yes'
guest.add_device(pci)
$ vim /usr/lib/python2.7/dist-packages/nova/virt/libvirt/config.py
def _format_os(self, root):
os = etree.Element("os")
type_node = self._text_node("type", self.os_type)
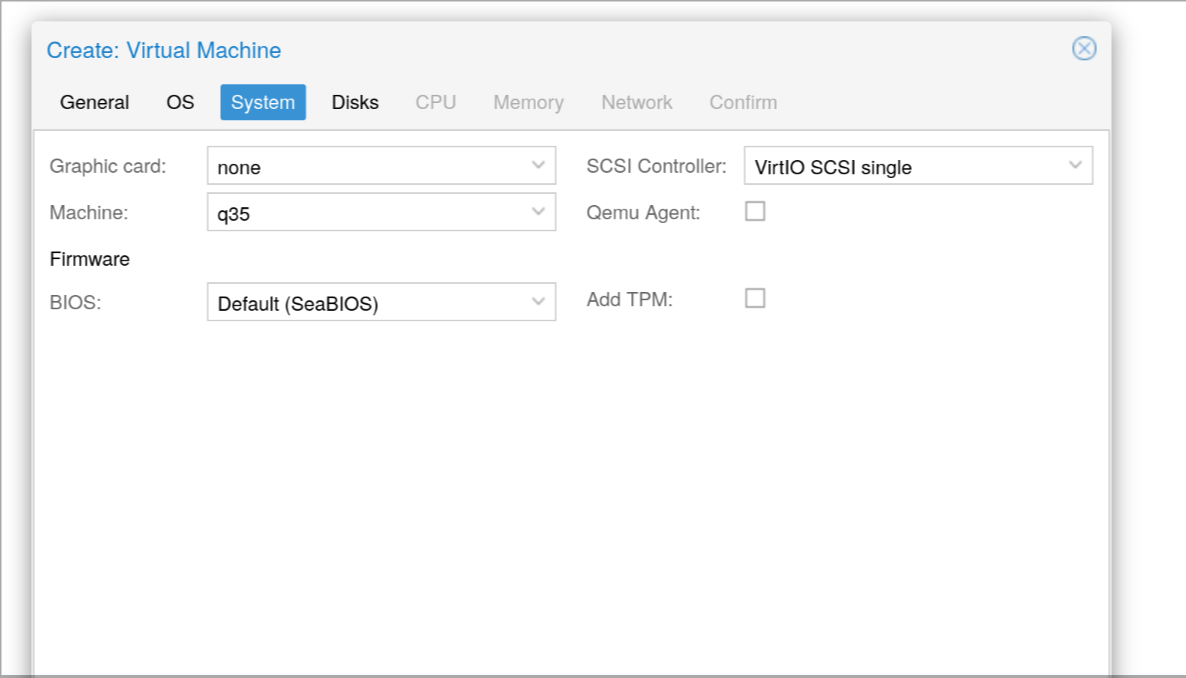
type_node.set("machine", "pc-q35-8.0")
# rm -f /usr/lib/python2.7/dist-packages/nova/virt/libvirt/driver.pyc
# rm -f /usr/lib/python2.7/dist-packages/nova/virt/libvirt/config.pyc
But this will cause the libvirt won’t startup, cause it will need /tmp/pciid file available before creating vms, so we have to change the items for generating pciids:
$ sudo vim /bin/detectgpu.sh

#!/bin/bash
# 1. find the graphical card and its associated devices in the same pci slot, record its pci id
# 1.1 find vgaid via lspci
vgaid=`lspci | grep -i vga | awk {'print $1'}`
# 1.2 find iommu file in /sys
vgaiommufile=`find /sys/kernel/iommu_groups/ -type l | grep $vgaid`
# 1.3 retrieve the iommu fold, which contains other device which should be processed in next step
vgaiommudir=`dirname $vgaiommufile`
# 1.4 record the system device driver in dic devicedriver
declare -A devicedriver
for i in `ls $vgaiommudir`; do devicedriver[$i]=`lspci -v -s $i | grep 'Kernel driver in use' | awk -F ': ' {'print $2'}`;done
# 1.5 record the pciid in dic pciid
declare -A pciid
for i in `ls $vgaiommudir`; do pciid[$i]=`lspci -n -s $i | awk -F ' ' {'print $3'}`;done
# 1.6 write devicedriver and pciid in /tmp
rm -f /tmp/devicedriver
rm -f /tmp/pciid
for i in `echo "${!devicedriver[@]}"`; do echo $i "${devicedriver[$i]}">>/tmp/devicedriver;done
for i in `echo "${!pciid[@]}"`; do echo $i "${pciid[$i]}">>/tmp/pciid;done
Now remove items in hooks’s vfio-startup.sh.
Add this script in crontab:
crontab -e
added:
@reboot /bin/detectgpu.sh
Finally we will get the amd 520 running on hygon machine.
Aug 19, 2024
TechnologyBasic System Configuration Steps
Install some necessary packages:
$ sudo vi /etc/apt/sources.list.d/ubuntu.sources
$ sudo apt update -y
$ sudo apt upgrade -y
$ sudo apt install -y virt-manager vim ovmf
$ qemu-system-x86_64 --version
QEMU emulator version 8.2.2 (Debian 1:8.2.2+ds-0ubuntu1)
Copyright (c) 2003-2023 Fabrice Bellard and the QEMU Project developers
$ sudo reboot
OS infos:
idv@idv-P860:~$ uname -a
Linux idv-P860 6.8.0-40-generic #40-Ubuntu SMP PREEMPT_DYNAMIC Fri Jul  5 10:34:03 UTC 2024 x86_64 x86_64 x86_64 GNU/Linux
idv@idv-P860:~$ cat /etc/issue
Ubuntu 24.04 LTS \n \l
Unset some configuration under gnome:
set Autologin
auto sleep, off
auto lock , off
Virtualization Steps
Configure as following steps:
# vim /etc/default/grub
GRUB_CMDLINE_LINUX_DEFAULT="quiet iommu=pt amd_iommu=on initcall_blacklist=sysfb_init pcie_acs_override=downstream,multifunction"
# vim /etc/initramfs-tools/modules
vfio
vfio_iommu_type1
vfio_pci
vfio_virqfd
# vim /etc/modprobe.d/vfio.conf
options vfio-pci ids=1002:6611,1002:aab0
options vfio-pci disable_idle_d3=1
# update-initramfs -u -k all && update-grub2 && reboot
VM Preparation(Win7-bios-q35)
Image creation:
# qemu-img create -f qcow2 win7_bios_q35.qcow2 60G
Formatting 'win7_bios_q35.qcow2', fmt=qcow2 cluster_size=65536 extended_l2=off compression_type=zlib size=64424509440 lazy_refcounts=off refcount_bits=16
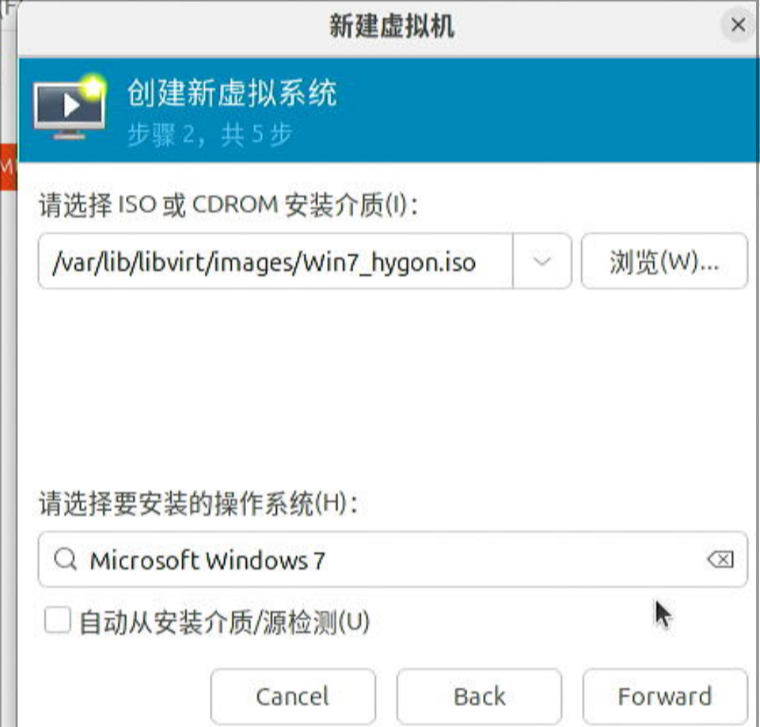


Install windows 7 as the default configuration.
VM Preparation(Win7-uefi-q35)
Create the disk via:
# qemu-img create -f qcow2 win7_uefi_q35.qcow2 60G
Formatting 'win7_uefi_q35.qcow2', fmt=qcow2 cluster_size=65536 extended_l2=off compression_type=zlib size=64424509440 lazy_refcounts=off refcount_bits=16


Change the boot configuration:
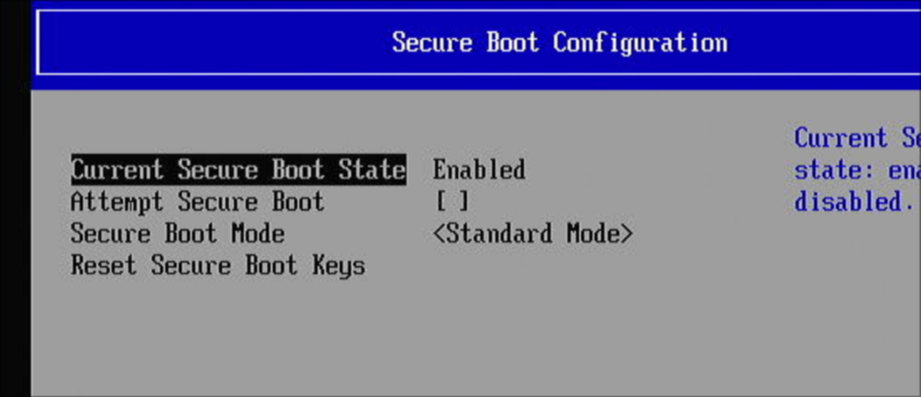
Using Win7_Hygon.iso we got abolve result.
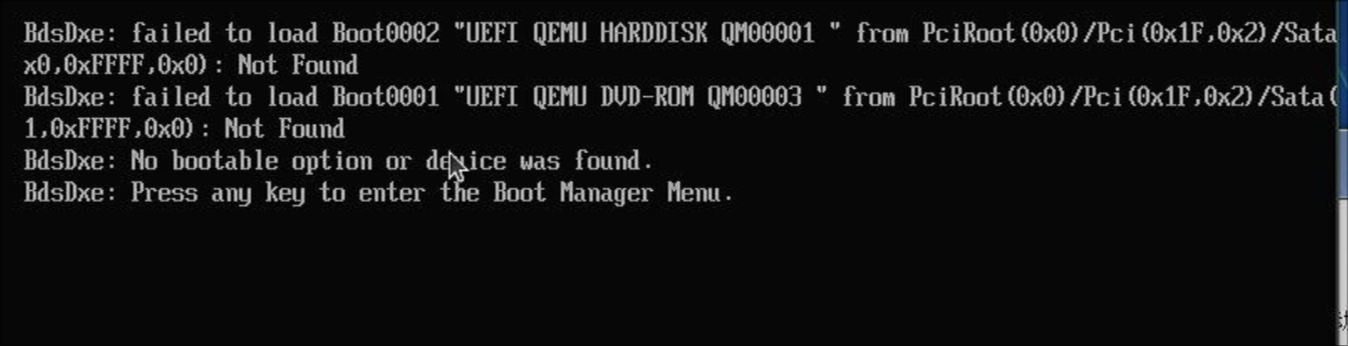
change to another iso, en_windows_7_ultimate_with_sp1_x64_dvd_u_677332.iso:
hang at following graphic:

libvirt hooks
After added vfio hooks, the command is listed as:
/usr/bin/qemu-system-x86_64 -name guest=win7_bios_q35,debug-threads=on -S -object {"qom-type":"secret","id":"masterKey0","format":"raw","file":"/var/lib/libvirt/qemu/domain-2-win7_bios_q35/master-key.aes"} -machine pc-q35-8.2,usb=off,vmport=off,dump-guest-core=off,memory-backend=pc.ram,hpet=off,acpi=on -accel kvm -cpu host,migratable=on,hv-time=on,hv-relaxed=on,hv-vapic=on,hv-spinlocks=0x1fff -m size=4194304k -object {"qom-type":"memory-backend-ram","id":"pc.ram","size":4294967296} -overcommit mem-lock=off -smp 4,sockets=4,cores=1,threads=1 -uuid 6cbf3243-78a1-4daa-816a-d9702c143735 -no-user-config -nodefaults -chardev socket,id=charmonitor,fd=30,server=on,wait=off -mon chardev=charmonitor,id=monitor,mode=control -rtc base=localtime,driftfix=slew -global kvm-pit.lost_tick_policy=delay -no-shutdown -global ICH9-LPC.disable_s3=1 -global ICH9-LPC.disable_s4=1 -boot strict=on -device {"driver":"pcie-root-port","port":16,"chassis":1,"id":"pci.1","bus":"pcie.0","multifunction":true,"addr":"0x2"} -device {"driver":"pcie-root-port","port":17,"chassis":2,"id":"pci.2","bus":"pcie.0","addr":"0x2.0x1"} -device {"driver":"pcie-root-port","port":18,"chassis":3,"id":"pci.3","bus":"pcie.0","addr":"0x2.0x2"} -device {"driver":"pcie-root-port","port":19,"chassis":4,"id":"pci.4","bus":"pcie.0","addr":"0x2.0x3"} -device {"driver":"pcie-root-port","port":20,"chassis":5,"id":"pci.5","bus":"pcie.0","addr":"0x2.0x4"} -device {"driver":"pcie-root-port","port":21,"chassis":6,"id":"pci.6","bus":"pcie.0","addr":"0x2.0x5"} -device {"driver":"pcie-root-port","port":22,"chassis":7,"id":"pci.7","bus":"pcie.0","addr":"0x2.0x6"} -device {"driver":"pcie-root-port","port":23,"chassis":8,"id":"pci.8","bus":"pcie.0","addr":"0x2.0x7"} -device {"driver":"pcie-root-port","port":24,"chassis":9,"id":"pci.9","bus":"pcie.0","multifunction":true,"addr":"0x3"} -device {"driver":"pcie-root-port","port":25,"chassis":10,"id":"pci.10","bus":"pcie.0","addr":"0x3.0x1"} -device {"driver":"pcie-root-port","port":26,"chassis":11,"id":"pci.11","bus":"pcie.0","addr":"0x3.0x2"} -device {"driver":"pcie-root-port","port":27,"chassis":12,"id":"pci.12","bus":"pcie.0","addr":"0x3.0x3"} -device {"driver":"pcie-root-port","port":28,"chassis":13,"id":"pci.13","bus":"pcie.0","addr":"0x3.0x4"} -device {"driver":"pcie-root-port","port":29,"chassis":14,"id":"pci.14","bus":"pcie.0","addr":"0x3.0x5"} -device {"driver":"ich9-usb-ehci1","id":"usb","bus":"pcie.0","addr":"0x1d.0x7"} -device {"driver":"ich9-usb-uhci1","masterbus":"usb.0","firstport":0,"bus":"pcie.0","multifunction":true,"addr":"0x1d"} -device {"driver":"ich9-usb-uhci2","masterbus":"usb.0","firstport":2,"bus":"pcie.0","addr":"0x1d.0x1"} -device {"driver":"ich9-usb-uhci3","masterbus":"usb.0","firstport":4,"bus":"pcie.0","addr":"0x1d.0x2"} -device {"driver":"virtio-serial-pci","id":"virtio-serial0","bus":"pci.2","addr":"0x0"} -blockdev {"driver":"file","filename":"/var/lib/libvirt/images/win7_bios_q35.qcow2","node-name":"libvirt-2-storage","auto-read-only":true,"discard":"unmap"} -blockdev {"node-name":"libvirt-2-format","read-only":false,"driver":"qcow2","file":"libvirt-2-storage","backing":null} -device {"driver":"ide-hd","bus":"ide.0","drive":"libvirt-2-format","id":"sata0-0-0","bootindex":1} -blockdev {"driver":"file","filename":"/var/lib/libvirt/images/Win7_hygon.iso","node-name":"libvirt-1-storage","auto-read-only":true,"discard":"unmap"} -blockdev {"node-name":"libvirt-1-format","read-only":true,"driver":"raw","file":"libvirt-1-storage"} -device {"driver":"ide-cd","bus":"ide.1","drive":"libvirt-1-format","id":"sata0-0-1"} -netdev {"type":"tap","fd":"31","id":"hostnet0"} -device {"driver":"e1000e","netdev":"hostnet0","id":"net0","mac":"52:54:00:91:60:61","bus":"pci.1","addr":"0x0"} -chardev pty,id=charserial0 -device {"driver":"isa-serial","chardev":"charserial0","id":"serial0","index":0} -chardev spicevmc,id=charchannel0,name=vdagent -device {"driver":"virtserialport","bus":"virtio-serial0.0","nr":1,"chardev":"charchannel0","id":"channel0","name":"com.redhat.spice.0"} -device {"driver":"usb-tablet","id":"input0","bus":"usb.0","port":"1"} -audiodev {"id":"audio1","driver":"spice"} -spice port=5900,addr=127.0.0.1,disable-ticketing=on,image-compression=off,seamless-migration=on -device {"driver":"ich9-intel-hda","id":"sound0","bus":"pcie.0","addr":"0x1b"} -device {"driver":"hda-duplex","id":"sound0-codec0","bus":"sound0.0","cad":0,"audiodev":"audio1"} -global ICH9-LPC.noreboot=off -watchdog-action reset -chardev spicevmc,id=charredir0,name=usbredir -device {"driver":"usb-redir","chardev":"charredir0","id":"redir0","bus":"usb.0","port":"2"} -chardev spicevmc,id=charredir1,name=usbredir -device {"driver":"usb-redir","chardev":"charredir1","id":"redir1","bus":"usb.0","port":"3"} -device {"driver":"vfio-pci","host":"0000:06:00.0","id":"hostdev0","bus":"pci.4","addr":"0x0"} -device {"driver":"vfio-pci","host":"0000:06:00.1","id":"hostdev1","bus":"pci.5","addr":"0x0"} -device {"driver":"usb-host","hostdevice":"/dev/bus/usb/005/004","id":"hostdev2","bus":"usb.0","port":"4"} -device {"driver":"usb-host","hostdevice":"/dev/bus/usb/005/005","id":"hostdev3","bus":"usb.0","port":"5"} -device {"driver":"virtio-balloon-pci","id":"balloon0","bus":"pci.3","addr":"0x0"} -sandbox on,obsolete=deny,elevateprivileges=deny,spawn=deny,resourcecontrol=deny -msg timestamp=on
Added following items:
<domain type='kvm' id='1' xmlns:qemu='http://libvirt.org/schemas/domain/qemu/1.0'>
......
  </seclabel>
  <qemu:override>
    <qemu:device alias='hostdev0'>
      <qemu:frontend>
        <qemu:property name='x-vga' type='bool' value='true'/>
      </qemu:frontend>
    </qemu:device>
  </qemu:override>
</domain>
Aug 19, 2024
TechnologyHost configuration
Hardware Info:
# cat /proc/cpuinfo | grep -i "model name"
model name	: Hygon C86 3350  8-core Processor
Os Info:
root@pve:~# cat /etc/debian_version
12.4
root@pve:~# uname -a
Linux pve 6.5.11-8-pve #1 SMP PREEMPT_DYNAMIC PMX 6.5.11-8 (2024-01-30T12:27Z) x86_64 GNU/Linux
Modifications :
# cat /etc/default/grub | grep amd_iommu
GRUB_CMDLINE_LINUX_DEFAULT="quiet iommu=pt amd_iommu=on initcall_blacklist=sysfb_init pcie_acs_override=downstream,multifunction"
# cat /etc/modules
vfio
vfio_iommu_type1
vfio_pci
vfio_virqfd
# cat /etc/modprobe.d/vfio.conf
options vfio-pci ids=1002:6611,1002:aab0
options vfio-pci disable_idle_d3=1
# update-initramfs -u -k all && update-grub && reboot
virtualization
Win10 configuration:
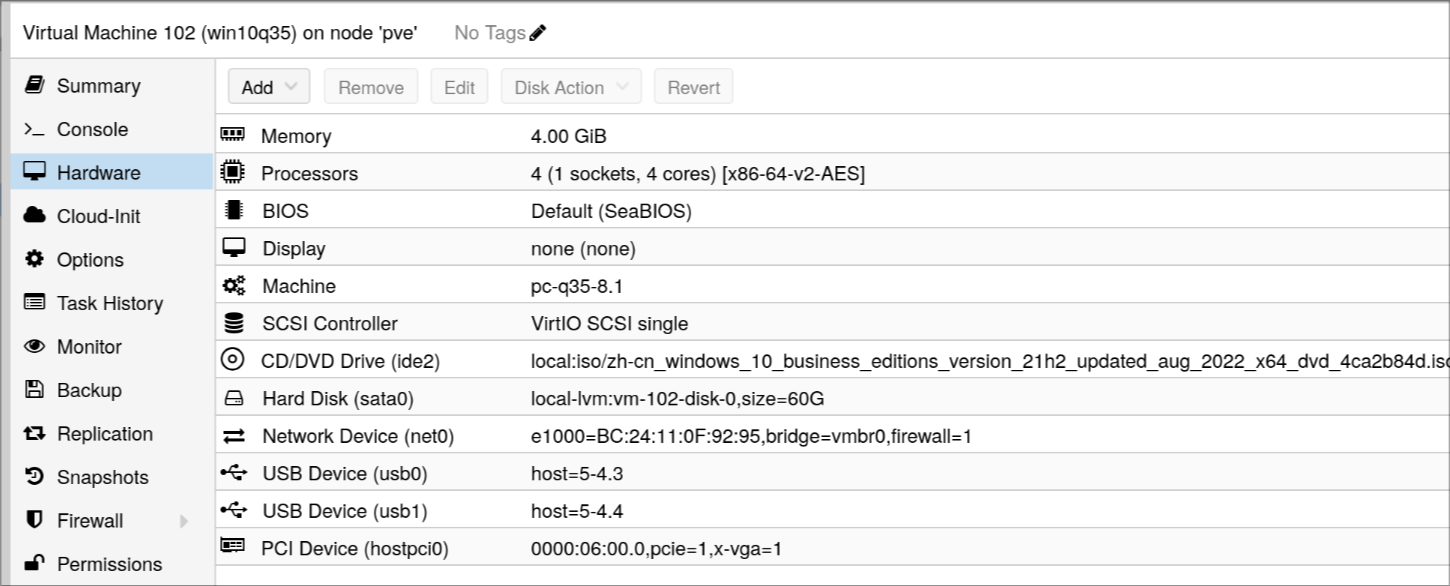
you can get win10 working properly directly, but for win7, it could only boot into system, after driver installation, it will remains black and could not startup.
amd radeon 550
Added more vfio items:
# cat /etc/modprobe.d/vfio.conf
options vfio-pci ids=1002:6611,1002:aab0,1002:699f,1002:aae0
options vfio-pci disable_idle_d3=1
# update-initramfs -u -k all && update-grub && reboot
The same result as radeon 520.
Changed back to an old driver, OK.
-rw-rw-r-- 1 dash dash 478517432 8月 19 09:27 non-whql-win7-64bit-radeon-software-crimson-relive-17.5.1-may4.exe
Re-installation
commands:
root 1308 1 80 15:40 ? 00:01:22 /usr/bin/kvm -id 107 -name 107107,debug-threads=on -no-shutdown -chardev socket,id=qmp,path=/var/run/qemu-server/107.qmp,server=on,wait=off -mon chardev=qmp,mode=control -chardev socket,id=qmp-event,path=/var/run/qmeventd.sock,reconnect=5 -mon chardev=qmp-event,mode=control -pidfile /var/run/qemu-server/107.pid -daemonize -smbios type=1,uuid=67b73609-9afe-4dd0-93b8-df42b3e114b5 -smp 2,sockets=1,cores=2,maxcpus=2 -nodefaults -boot menu=on,strict=on,reboot-timeout=1000,splash=/usr/share/qemu-server/bootsplash.jpg -vga none -nographic -cpu qemu64,+aes,enforce,hv_ipi,hv_relaxed,hv_reset,hv_runtime,hv_spinlocks=0x1fff,hv_stimer,hv_synic,hv_time,hv_vapic,hv_vendor_id=proxmox,hv_vpindex,kvm=off,+kvm_pv_eoi,+kvm_pv_unhalt,+pni,+popcnt,+sse4.1,+sse4.2,+ssse3 -m 3072 -readconfig /usr/share/qemu-server/pve-q35-4.0.cfg -device vmgenid,guid=cb144ce1-60a1-4af3-8842-6b47fa91f4df -device usb-tablet,id=tablet,bus=ehci.0,port=1 -device vfio-pci,host=0000:06:00.0,id=hostpci0,bus=pcie.0,addr=0x10,x-vga=on -device usb-host,vendorid=0x30fa,productid=0x0300,id=usb0 -device usb-host,hostbus=1,hostport=1.1,id=usb1 -device virtio-balloon-pci,id=balloon0,bus=pci.0,addr=0x3,free-page-reporting=on -iscsi initiator-name=iqn.1993-08.org.debian:01:ba1fd0778bd -drive file=/var/lib/vz/template/iso/Win7_hygon.iso,if=none,id=drive-ide2,media=cdrom,aio=io_uring -device ide-cd,bus=ide.1,unit=0,drive=drive-ide2,id=ide2,bootindex=101 -device ahci,id=ahci0,multifunction=on,bus=pci.0,addr=0x7 -drive file=/dev/pve/vm-107-disk-0,if=none,id=drive-sata0,format=raw,cache=none,aio=io_uring,detect-zeroes=on -device ide-hd,bus=ahci0.0,drive=drive-sata0,id=sata0,bootindex=100 -netdev type=tap,id=net0,ifname=tap107i0,script=/var/lib/qemu-server/pve-bridge,downscript=/var/lib/qemu-server/pve-bridgedown -device e1000,mac=BC:24:11:9A:C1:70,netdev=net0,bus=pci.0,addr=0x12,id=net0,bootindex=102 -rtc driftfix=slew,base=localtime -machine hpet=off,smm=off,type=pc-q35-8.1+pve0 -global kvm-pit.lost_tick_policy=discard
