WorkingTipsOnOfflineKubeFlow
Jun 3, 2019Technology
0. 目的
设置离线环境下的kubeflow环境,用于给AI组提供开发环境,优化并整合其开发流程。
1. 环境
基础环境配置如下:
# kubectl get nodes
NAME          STATUS   ROLES    AGE   VERSION
localnode-1   Ready    master   19d   v1.14.1
localnode-2   Ready    <none>   19d   v1.14.1
localnode-3   Ready    <none>   19d   v1.14.1
# cat /etc/issue
Ubuntu 18.04.2 LTS \n \l
2. 部署KubeFlow
2.1 什么是Kubeflow?
Kubeflow项目致力于使用Kubernetes轻松设置机器学习,便携且可扩展。 Kubeflow的目标不是重新创建其他服务,而是提供一种直接的方式来启动最佳的OSS解决方案。 Kubernetes是一个开源平台,用于自动化容器化应用程序的部署,扩展和管理。
由于Kubeflow依赖于Kubernetes,因此它可以在Kubernetes运行的任何地方运行,例如裸机服务器或云提供商(如Google)。 有关该项目的详细信息,请访问https://github.com/kubeflow/kubeflow
2.2 Kubeflow组件
Kubeflow有三个核心组件。
TF Job Operator和Controller:Kubernetes扩展,用于简化分布式TensorFlow工作负载的部署。 通过使用Operator,Kubeflow能够自动配置master, worker和以及参数化服务器配置。 可以使用TFJob部署工作负载(Workloads)。
TF Hub:运行JupyterHub实例,使您可以使用Jupyter笔记本。
Model Server(模型服务器):部署经过训练的TensorFlow模型,供客户端访问以及用于将来的预测。
这三个模型将用于在接下来的步骤中部署不同的工作负载。
2.3 部署Kubeflow
由于Kubeflow是Kubernetes的扩展,因此需要将所有组件部署到平台。
离线环境下,我们拷贝以下文件到内网离线环境:
# docker load<kubeflow.tar.xz
# docker push katacoda/tensorflow_serving:localimage
# docker push gcr.io/kubeflow-ci/pytorch-dist-mnist_test:1.0
# docker push katacoda/tensorflow_serving:latest
# docker push quay.io/external_storage/nfs-client-provisioner:v3.1.0-k8s1.11
# docker push gcr.io/kubeflow-images-public/centraldashboard:v0.2.1
# docker push gcr.io/kubeflow-images-public/tensorflow-1.8.0-notebook-cpu:v0.2.1
# docker push gcr.io/kubeflow-images-public/tf_operator:v0.2.0
# docker push gcr.io/kubeflow/jupyterhub-k8s:v20180531-3bb991b1
# docker push jgaguirr/pytorch-operator:latest
# docker push quay.io/datawire/statsd:0.30.1
# docker push quay.io/datawire/ambassador:0.30.1
# docker push gcr.io/tf-on-k8s-dogfood/tf_sample:dc944ff
# docker push gcr.io/google_containers/spartakus-amd64:v1.0.0
其他文件:
# pwd
# ls
deploy.sh  kubeflow_repo kube-manifests swagger.json nfs-client-provisioner
Kubeflow团队提供了一个安装脚本,该脚本使用Ksonnet将Kubeflow部署到现有的Kubernetes集群。 Ksonnet需要有效的Github令牌。 运行该命令以设置所需的环境变量。
运行以下命令开始部署kubeflow环境:
root@localnode-1:~#  export GITHUB_TOKEN=99510f2ccf40e496d1e97dbec9f31cb16770b884
root@localnode-1:~# ./deploy.sh
运行以下命令检查pod的运行状态:
# kubectl get pods
NAME                                        READY   STATUS    RESTARTS   AGE
ambassador-7df7dbd89b-fgl2t                 2/2     Running   0          2m40s
ambassador-7df7dbd89b-sl7mg                 2/2     Running   0          2m39s
ambassador-7df7dbd89b-wwvkq                 2/2     Running   0          2m40s
centraldashboard-5d7d79659c-tk6s4           1/1     Running   0          2m40s
spartakus-volunteer-777b5f748c-f592n        1/1     Running   0          2m40s
tf-hub-0                                    1/1     Running   0          2m39s
tf-job-dashboard-554868c978-9n6tg           1/1     Running   0          2m40s
tf-job-operator-v1alpha2-7f7cf4dc98-x5v6g   1/1     Running   0          2m40s
创建持久化存储,并通过服务类型改变服务:
# mkdir -p /opt/nfs
# chmod 777 -R /opt/nfs
# vim /etc/exports
/opt/nfs  *(rw,async,no_root_squash,no_subtree_check)
# systemctl restart nfs-server
在集群的所有节点上:
# apt-get install -y nfs-common
安装nfs-client-provisioner, 此provisioner将作为kubeflow的默认共享存储:
# cd nfs-client-provisioner
# helm install . --set nfs.server=10.142.18.191 --set nfs.path=/opt/nfs
# kubectl get pods | grep nfs
hasty-koala-nfs-client-provisioner-67bc97f6fb-75hbh   1/1     Running   0          7s
# kubectl get sc
NAME                   PROVISIONER                                        AGE
nfs-client (default)   cluster.local/hasty-koala-nfs-client-provisioner   33s
导出svc:
#  kubectl create -f env.yaml
service/tf-hub-lb-katacoda created
service/centraldashboard-katacoda created
service/ambassador-katacoda created
# kubectl get svc
NAME                        TYPE        CLUSTER-IP      EXTERNAL-IP   PORT(S)           AGE
ambassador                  ClusterIP   10.233.35.161   <none>        80/TCP            28m
ambassador-admin            ClusterIP   10.233.8.245    <none>        8877/TCP          28m
ambassador-katacoda         NodePort    10.233.38.151   <none>        30080:30396/TCP   3s
centraldashboard            ClusterIP   10.233.29.157   <none>        80/TCP            28m
centraldashboard-katacoda   NodePort    10.233.9.5      <none>        8082:31421/TCP    3s
k8s-dashboard               ClusterIP   10.233.3.208    <none>        443/TCP           28m
kubernetes                  ClusterIP   10.233.0.1      <none>        443/TCP           19d
tf-hub-0                    ClusterIP   None            <none>        8000/TCP          28m
tf-hub-lb                   ClusterIP   10.233.32.120   <none>        80/TCP            28m
tf-hub-lb-katacoda          NodePort    10.233.13.173   <none>        80:31039/TCP      3s
tf-job-dashboard            ClusterIP   10.233.22.155   <none>        80/TCP            28m
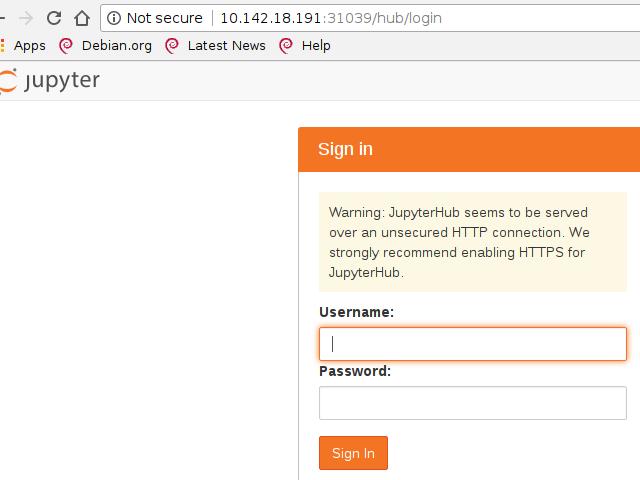
使用浏览器访问相应端口:
centraldashboard-katacoda: 31421, ambassador-katacoda: 30396:

tf-hub-lb-katacoda:
2.4 JypyterHub
Kubeflow的关键组件之一是能够通过JupyterHub运行Jupyter笔记本电脑。 Jupyter Notebook是经典的数据科学工具,用于在浏览器中记录流程时运行内联脚本和代码片段。
可以使用kubectl get svc找到Load Balancer的IP地址,
Jypyter的登录默认使用用户名admin和空白密码:

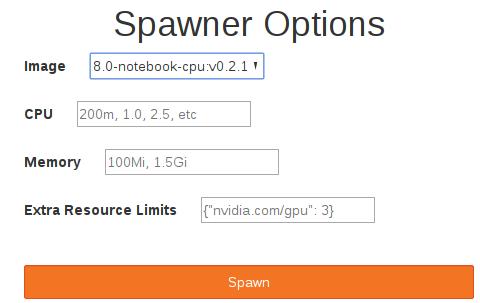
在弹出的Spawner Options中,我们填入下列字段。
Kubeflow在内部使用gcr.io/kubeflow-images-public/tensorflow-1.8.0-notebook-cpu:v0.2.1 Docker Image作为默认值。访问JupyterHub后,可以单击 Start My server按钮:
root@localnode-1:~# kubectl get pods -o wide | grep jupyter-admin
jupyter-admin                                         1/1     Running   0          39s   10.233.125.9   localnode-1   <none>           <none>
Spawn完毕后界面如下:

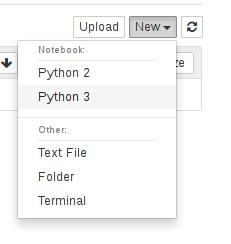
现在可以通过pod访问JupyterHub。您现在可以无缝地使用环境。例如,要创建新笔记本,请选择New下拉列表,然后选择Python 3内核,如下所示。
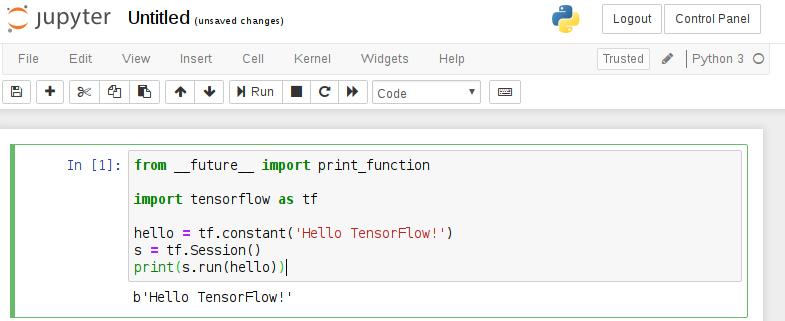
现在可以创建代码片段。要开始使用TensorFlow,请将下面的代码粘贴到第一个单元格并运行它。
from __future__ import print_function

import tensorflow as tf

hello = tf.constant('Hello TensorFlow!')
s = tf.Session()
print(s.run(hello))
运行结果如下:
2.5 部署TensorFlow Job(TFJob)
TfJob提供了一个Kubeflow自定义资源,可以在Kubernetes上轻松运行分布式或非分布式TensorFlow作业。 TFJob控制器为master,parameter servers和worker采用YAML规范来帮助运行分布式计算。
自定义资源定义(CRD)提供了以与内置Kubernetes资源相同的方式创建和管理TF作业的功能。 部署后,CRD可以配置TensorFlow job,允许用户专注于机器学习而不是基础设施。
创建TFJob部署定义
要部署上一步中描述的TensorFlow工作负载,Kubeflow需要TFJob定义。 在这种情况下,可以通过运行cat example.yaml来查看它:
apiVersion: "kubeflow.org/v1alpha2"
kind: "TFJob"
metadata:
  name: "example-job"
spec:
  tfReplicaSpecs:
    Master:
      replicas: 1
      restartPolicy: Never
      template:
        spec:
          containers:
            - name: tensorflow
              image: gcr.io/tf-on-k8s-dogfood/tf_sample:dc944ff
    Worker:
      replicas: 1
      restartPolicy: Never
      template:
        spec:
          containers:
            - name: tensorflow
              image: gcr.io/tf-on-k8s-dogfood/tf_sample:dc944ff
    PS:
      replicas: 2
      restartPolicy: Never
      template:
        spec:
          containers:
            - name: tensorflow
              image: gcr.io/tf-on-k8s-dogfood/tf_sample:dc944ff
以上yaml定义了三个组件:
Master: 每个job必须有一个master. Master将协调workers之间的训练操作的执行.
Worker: 每个job可以有0到N个workers.
每个worker进程运行相同的模型,为参数服务器(Parameter Server)提供处理参数。
PS: 每个job可以有0到N个参数服务器(Parameter Server),
参数服务器使得用户可以将模型扩展到多台机器上。
部署TFJob
TFJob可以用以下命令来创建:
# kubectl apply -f example.yaml
通过部署job,Kubernetes将调度工作负载以跨可用节点执行。 作为部署的一部分,Kubeflow将使用所需的设置配置TensorFlow,以允许不同的组件进行通信。
检查Job进度及处理结果
可以通过kubectl get tfjob查看TensorFlow作业的状态。 完成TensorFlow作业后,Master将标记为成功。 继续运行kubectl get tfjob命令以查看它何时完成。
Master负责协调作业的执行,并汇总结果。可以使用kubectl get pods| grep completed列出已完成的工作负载。
# kubectl get pods | grep Completed
example-job-master-0                                  0/1     Completed   0          7m36s
在此示例中,结果输出到STDOUT,可使用kubectl日志查看。
以下命令将输出结果:
# kubectl logs $(kubectl get pods | grep Completed | tr -s ' ' | cut -d ' ' -f 1)
INFO:root:Tensorflow version: 1.3.0-rc2
INFO:root:Tensorflow git version: v1.3.0-rc1-27-g2784b1c
INFO:root:tf_config: {u'cluster': {u'worker': [u'example-job-worker-0.default.svc.cluster.local:2222'], u'ps': [u'example-job-ps-0.default.svc.cluster.local:2222', u'example-job-ps-1.default.svc.cluster.local:2222'], u'master': [u'example-job-master-0.default.svc.cluster.local:2222']}, u'task': {u'index': 0, u'type': u'master'}}
可以在master, worker以及parameter servers上看到工作负载的执行结果。
2.6 访问Model Server
一旦训练完成,该模型可用于在新数据发布时对其进行预测。 通过使用Kubeflow,可以通过将作业部署到Kubernetes基础结构,从而使得Model Server变得可用.
部署Trained Model Server
Kubeflow tf-serving提供了服务TensorFlow模型的模板。 这可以通过使用Ksonnet定制和部署,并根据您的模型定义参数。
使用环境变量,我们定义了训练模型所在的名称和路径。
MODEL_COMPONENT=model-server
MODEL_NAME=inception
MODEL_PATH=/serving/inception-export
使用Ksonnet,可以扩展Kubeflow服务组件以匹配模型的要求。
cd ~/kubeflow_ks_app
ks generate tf-serving ${MODEL_COMPONENT} --name=${MODEL_NAME}
ks param set ${MODEL_COMPONENT} modelPath $MODEL_PATH

ks param set ${MODEL_COMPONENT} modelServerImage katacoda/tensorflow_serving
可以使用ks param list来查看定义好的参数。
这提供了一个脚本,可以部署到环境中并使我们的模型可供客户端使用。
您可以将模板部署到定义的Kubernetes集群。
ks apply default -c ${MODEL_COMPONENT}
客户端可以链接并访问到trained data(训练好的数据), 可以查看pod信息:
kubectl get pods

......

inception-v1-d66f8848-gq8hh                           1/1     Running     0          7m2s

......
上面的inception就是我们训练好的模型.
图像分类
在这个例子中,我们使用预先训练的Inception V3模型。 这是在ImageNet数据集上训练的架构。 ML任务是图像分类,而模型服务器及其客户端由Kubernetes处理。
要使用已发布的模型,您需要设置客户端。 这可以通过与其他工作相同的方式实现。 用于部署客户端的YAML文件可以通过cat ~/model-client-job.yaml来查看。 要部署它,请使用以下命令:
kubectl apply -f ~/model-client-job.yaml
文件内容:
# cat model-client-job.yaml
apiVersion: batch/v1
kind: Job
metadata:
  name: model-client-job-katacoda
spec:
  template:
    metadata:
      name: model-client-job-katacoda
    spec:
      containers:
      - name: model-client-job-katacoda
        image: katacoda/tensorflow_serving:localimage
        imagePullPolicy: Never
        command:
        - /bin/bash
        - -c
        args:
        - /serving/bazel-bin/tensorflow_serving/example/inception_client
          --server=inception:9000 --image=/data/katacoda.jpg
      restartPolicy: Never
如需查看model-client-job运行的状态,则运行:
kubectl get pods
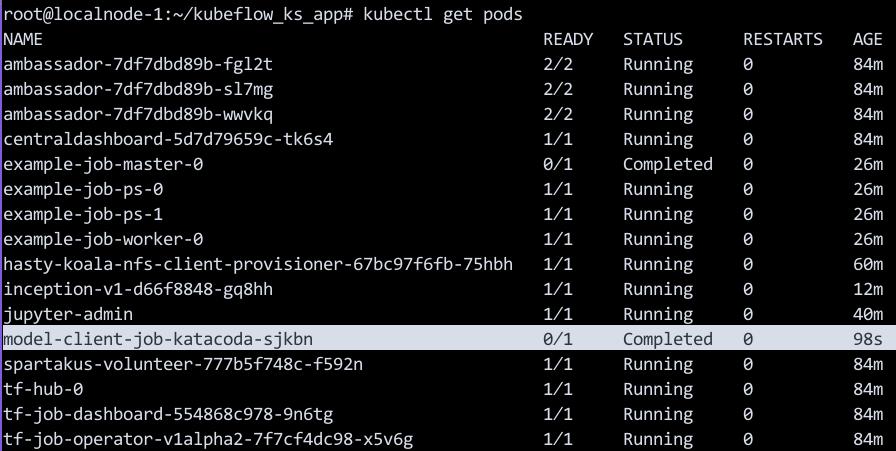
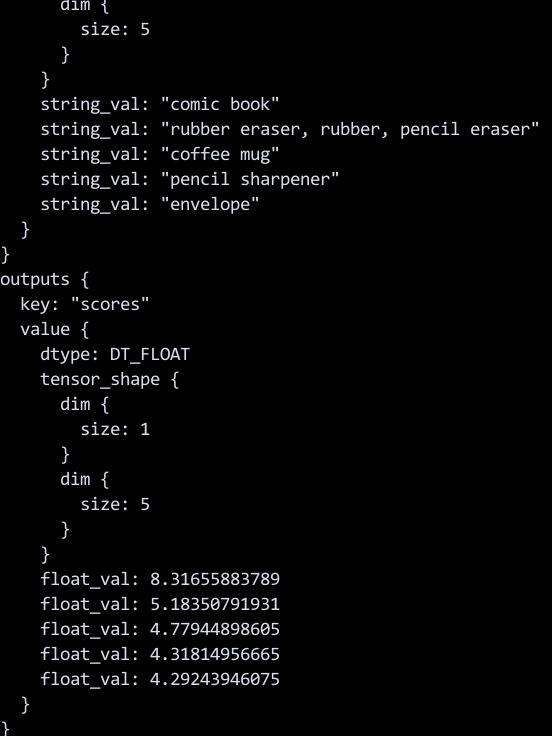
以下命令将输出图像分类的结果:
kubectl logs $(kubectl get pods | grep Completed | tail -n1 | tr -s ' ' | cut -d ' ' -f 1)
3. 部署pytorch
3.1 部署PyTorch扩展
Kubeflow使用自定义资源定义(CRD)和运算符扩展了Kubernetes。 每个自定义资源都旨在支持机器学习工作负载的部署。 定义好资源后,Operator将处理部署请求。
可以通过运行以下命令来查看可用资源:
# kubectl get crd
NAME                  CREATED AT
tfjobs.kubeflow.org   2019-06-03T02:46:43Z
PyTorch不会默认被部署,以下命令将创建出自定义资源及operator:
# cd kubeflow_ks_app/
# ks generate pytorch-operator pytorch-operator
# ks apply default -c pytorch-operator
使用kubectl get crd命令可以查看到自定义的PyTorch自定义资源已被创建:
# kubectl get crd
NAME                       CREATED AT
pytorchjobs.kubeflow.org   2019-06-03T04:19:22Z
tfjobs.kubeflow.org        2019-06-03T02:46:43Z
3.2 部署PyTorch工作负载
使用打包好的容器镜像启动PyTorch,该镜像中已打包了分布式MNIST模型。模型的python代码可以在以下链接查看:
要部署该训练模型,我们需要创建一个PyTorch Job, PyTorch Job中定义了需使用的容器镜像以及训练所需要启动的副本数, 我们用于启动训练模型的yaml定义文件如下所示:
# cat pytorch_example.yaml
apiVersion: "kubeflow.org/v1alpha1"
kind: "PyTorchJob"
metadata:
  name: "distributed-mnist"
spec:
  backend: "tcp"
  masterPort: "23456"
  replicaSpecs:
    - replicas: 1
      replicaType: MASTER
      template:
        spec:
          containers:
          - image: gcr.io/kubeflow-ci/pytorch-dist-mnist_test:1.0
            imagePullPolicy: IfNotPresent
            name: pytorch
          restartPolicy: OnFailure
    - replicas: 3
      replicaType: WORKER
      template:
        spec:
          containers:
          - image: gcr.io/kubeflow-ci/pytorch-dist-mnist_test:1.0
            imagePullPolicy: IfNotPresent
            name: pytorch
          restartPolicy: OnFailure
通过以下命令来创建训练任务:
# kubectl create -f pytorch_example.yaml
Kubeflow PyTorch Operator和Kubernetes将安排工作负载并启动所需数量的副本。 您可以使用kubectl get pods -l pytorch_job_name = distributed-mnist查看状态, 使用此命令将看到一个master和3个worker被创建。
3.3 上传模型所用数据
创建一个假的Server用于存放训练集:
# docker run --name docker-nginx1 -p 80:80 -d -v /usr/local/static:/usr/share/nginx/html jrelva/nginx-autoindex --restart=always
# cd /usr/local/static/
# scp -r root@192.1x.xx.xx:/media/sdd/off/MNIST_data .
# scp -r  root@192.xx.xx.xx8:/media/sdd/off/exdb .
#  docker restart docker-nginx1
Configure bind9:
root@localnode-1:~# cat /etc/bind/named.conf.default-zones
zone "lecun.com" {
        type master;
        file "/etc/bind/db.lecun.com";
};
# vim /etc/bind/db.lecun.com
$TTL    604800
@       IN      SOA     lecun.com. root.localhost. (
                              1         ; Serial
                         604800         ; Refresh
                          86400         ; Retry
                        2419200         ; Expire
                         604800 )       ; Negative Cache TTL
;
@       IN      NS      localhost.
@       IN      A      10.142.18.191
lecun.com IN      NS      10.142.18.191

yann     IN      A       10.142.18.191
# systemctl restart bind9
# ping yann.lecun.com
PING yann.lecun.com (10.142.18.191) 56(84) bytes of data.
64 bytes from localnode-1 (10.142.18.191): icmp_seq=1 ttl=64 time=0.082 ms
^C
3.4 查看进度
训练应该运行大约10个epochs(时期),并且在CPU群集上需要5-10分钟。可以使用以下命令检查日志以查看训练进度:
PODNAME=$(kubectl get pods -l pytorch_job_name=distributed-mnist,task_index=0 -o name)
kubectl logs ${PODNAME}
输出类似于以下内容:
Downloading http://yann.lecun.com/exdb/mnist/train-images-idx3-ubyte.gz
Downloading http://yann.lecun.com/exdb/mnist/train-labels-idx1-ubyte.gz
Downloading http://yann.lecun.com/exdb/mnist/t10k-images-idx3-ubyte.gz
Downloading http://yann.lecun.com/exdb/mnist/t10k-labels-idx1-ubyte.gz
Processing...
Done!
Rank  0 , epoch  0 :  1.2745472780232237
Rank  0 , epoch  1 :  0.5743547164872765
您可以通过在节点上使用htop来了解训练如何利用所有的CPU内核。如果我们将其他节点添加到Kubernetes集群,则三个副本将分布在节点上并加快训练时间。
随着训练的进行,可以使用Kubectl查看状态以及训练何时完成。通过以yaml输出作业,可以查看执行的内部细节。这包括状态。
kubectl get -o yaml pytorchjobs distributed-mnist
kubectl get -o json pytorchjobs distributed-mnist  | jq .status
kubectl get -o json pytorchjobs distributed-mnist  | jq .status.state
训练结束后,结果如下所示:
Downloading http://yann.lecun.com/exdb/mnist/train-images-idx3-ubyte.gz
Downloading http://yann.lecun.com/exdb/mnist/train-labels-idx1-ubyte.gz
Downloading http://yann.lecun.com/exdb/mnist/t10k-images-idx3-ubyte.gz
Downloading http://yann.lecun.com/exdb/mnist/t10k-labels-idx1-ubyte.gz
Processing...
Done!
Rank  0 , epoch  0 :  1.2745472780232237
Rank  0 , epoch  1 :  0.5743547164872765
Rank  0 , epoch  2 :  0.4351522875810737
Rank  0 , epoch  3 :  0.36984553888662536
Rank  0 , epoch  4 :  0.3216655456038045
Rank  0 , epoch  5 :  0.2951831894356813
Rank  0 , epoch  6 :  0.2750083558114448
Rank  0 , epoch  7 :  0.2595048323273659
Rank  0 , epoch  8 :  0.24862684973521526
Rank  0 , epoch  9 :  0.22692083941101393
可以看到,随着训练的进行,损失逐渐减小。

