Customize Ubuntu 18.04.2 iso

Material

Ubuntu18.04.2 amd64 installation iso, md5sum is listed as:

34416ff83179728d54583bf3f18d42d2  ubuntu-18.04.2-server-amd64.iso

Steps

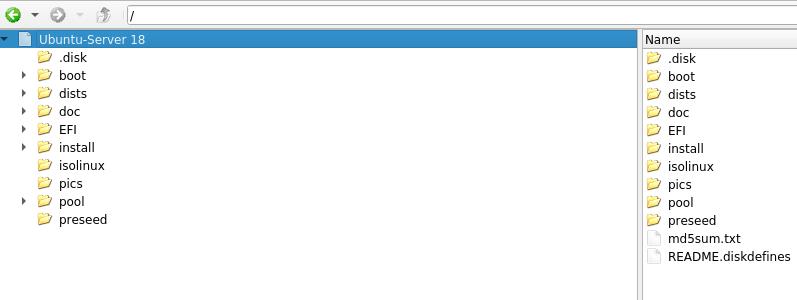
Using poweriso open this iso file:

/images/2020_02_20_21_54_17_797x300.jpg

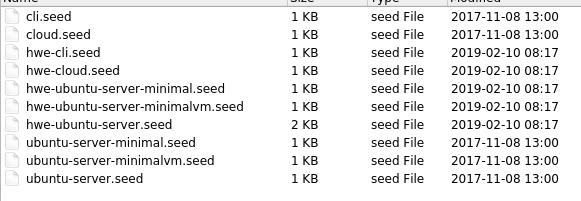
preseed directory now:

/images/2020_02_20_21_54_42_581x201.jpg

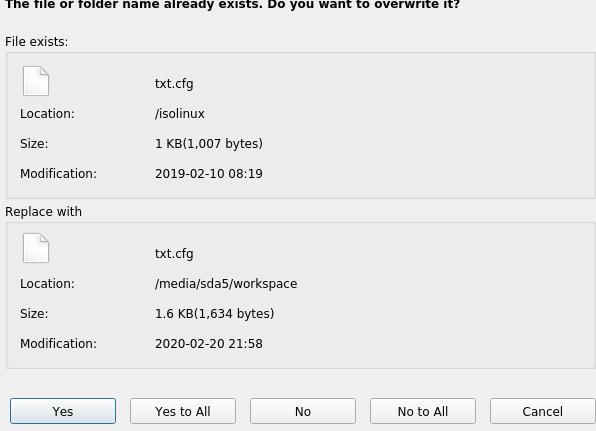
replace the txt.cfg file:

/images/2020_02_20_21_58_54_596x431.jpg

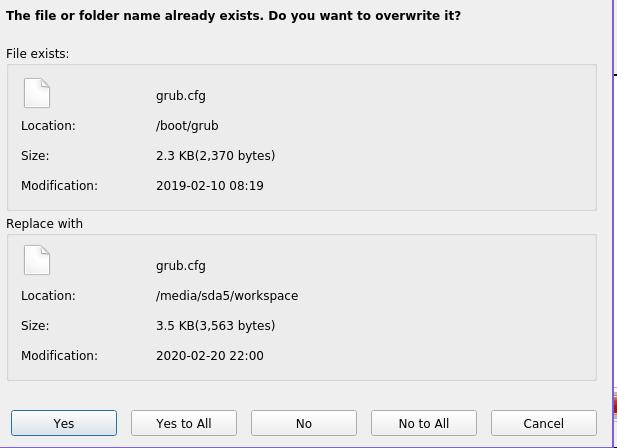
For uefi mode, just replace the boot/grub configuration file:

/images/2020_02_20_22_00_30_617x448.jpg

Save as then we could get a new iso.

Verification

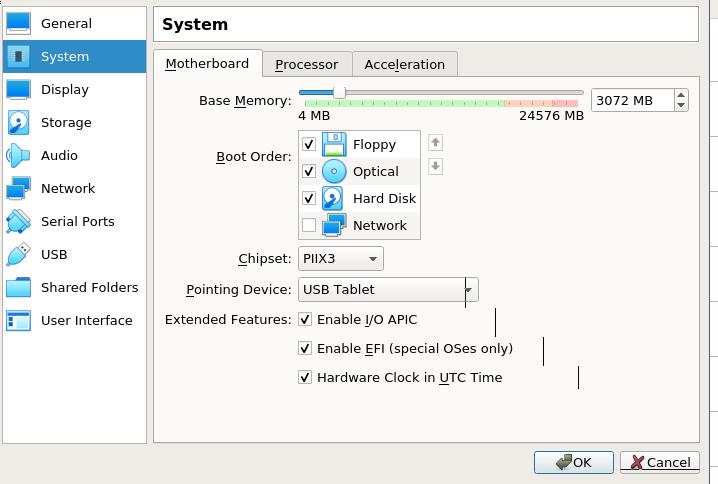
Select UEFI in system tab:

/images/2020_02_20_22_19_06_718x484.jpg

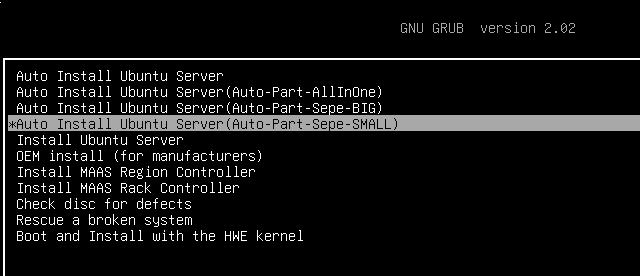
Choose sep-small, / will be 100G, /var takes the others:

/images/2020_02_20_22_19_59_640x276.jpg

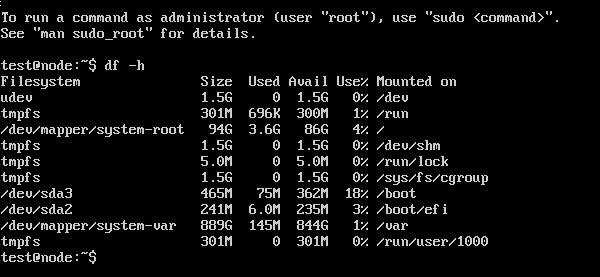
After installation, login and verify the username/password, disk layout:

/images/2020_02_20_22_26_16_600x277.jpg

定制化Ubuntu 18.04.2 iso

准备

Ubuntu18.04.2 amd64 安装 iso, md5sum:

34416ff83179728d54583bf3f18d42d2  ubuntu-18.04.2-server-amd64.iso

poweriso linux 版本:

http://www.poweriso.com/download-poweriso-for-linux.htm

创建步骤

使用 poweriso 打开原始ISO:

/images/2020_02_20_21_54_17_797x300.jpg

preseed 目录修改:

/images/2020_02_20_21_54_42_581x201.jpg

添加txt.cfg:

/images/2020_02_20_21_58_54_596x431.jpg

boot/grub配置文件更改,uefi模式需要:

/images/2020_02_20_22_00_30_617x448.jpg

编辑完毕后,另存为新文件名(`xxxx-18.04.2-server-amd64-uefi.iso )

验证(virtualbox)

虚拟机配置为uefi启动:

/images/2020_02_20_22_19_06_718x484.jpg

选择含 sep-small的选项, / 大小 100G, /var 占据剩余空间:

/images/2020_02_20_22_19_59_640x276.jpg

安装自动进行,完毕后验证用户名/密码,磁盘空间:

/images/2020_02_20_22_26_16_600x277.jpg

Re Organize My Blog Structure

Recently I find it’s necessary to re-orgnize my blog structure, for past 8 years I’ve written nearly 1000 articles in this blog, they covered so many technologies, from embedded system to cloud-computing, also with my life’s blog. So I simply use Technology and Life for classifying them. Also I have to adjust my websiste’s compatibility to newest hugo(v0.64.0), previously I use an old version(v0.31.0) for building the whole website. Following are the steps for doing such a complicated task.

1. Structure Re-Orgnization

Replace all of the md files and markdown files’s categories:

$ cd /home/xxxxx/Code/purplepalmxxxx.github.io/src/content/post
$ find . | xargs -I % sed -i 's/categories\ =.*/categories\ =\ ["Technology"]/g' %
$ find . | xargs -I % sed -i 's/categories:.*/categories:\ ["Technology"]/g' %

Some of the old markdown files didn’t have categories, manually add them:

$ sed -i '2s/$/categories:\ ["Technology"]/'  2013-07-*
$ sed -i '2s/$/categories:\ ["Technology"]/'  2013-08-*
$ sed -i '2s/$/categories:\ ["Technology"]/'  2013-09-*
$ sed -i '2s/$/categories:\ ["Technology"]/'  2013-10-*
$ sed -i '2s/$/categories:\ ["Technology"]/'  2013-11-0*
$ sed -i '2s/$/categories:\ ["Technology"]/'  2013-11-11*
$ sed -i '2s/$/categories:\ ["Technology"]/'  2013-11-12*

By-now all of the posts are Technology related, manually change some posts to LinuxTips and Life.

2. Upgrade hugo

Download the newest hugo version from official site and put it in binary directory:

$ cd binaries 
$ ls
hugo  hugo_v031
$ ./hugo version
Hugo Static Site Generator v0.64.1/extended linux/amd64 BuildDate: unknown

Adjust some for generate properly(hyde-a theme adjustment):

$ rm -f
/home/xxxx/Code/purplepalmxxxx.github.io/src/themes/hyde-a/layouts/post/post.html
$ vim
/home/xxxx/Code/purplepalmxxxx.github.io/src/themes/hyde-a/layouts/index.html 
{{ partial "head.html" . }}
<div class="content container">
  <div class="posts">
+++    {{ $paginator := .Paginate (where .Site.RegularPages "Type" "in" site.Params.mainSections) }}
    {{ range $paginator.Pages }}

Now commit all of the changes, the ci/cd for blogging will automatically use the newest version of hugo for building-out the static website.

Ovirt HyperConverged InAir-Gapped Environment

0. AIM

For deploying Ovirt HyperConverged in air-gapped environment.
For some companies, their inner environment is air-gapped, e.g OA network. In such air-gapped environment we could only use ISO and take some packages in cd-roms for taking into their intra-network. How to deploy a ovirt drivened private cloud in air-gapped room, I will take some experiment and try the solution out.

1. Environment

In this chapter the environment will be available for ovirt deployment with glusterfs.

1.1 Hardware

I use my home machine for building the environment, the hardware is listed as:

CPU: Intel(R) Core(TM) i5-4460  CPU @ 3.20GHz
Memory: DDR3 1600 32G
Disk: 1T HDD.

1.2 OS/Networking/Software

My home machine runs ArchLinux, with nested virtualization.
Use qemu and virt-manager for setting the environment.

# qemu-system-x86_64 --version                                                                                                           
QEMU emulator version 4.2.0
Copyright (c) 2003-2019 Fabrice Bellard and the QEMU Project developers
# virt-manager --version
2.2.1

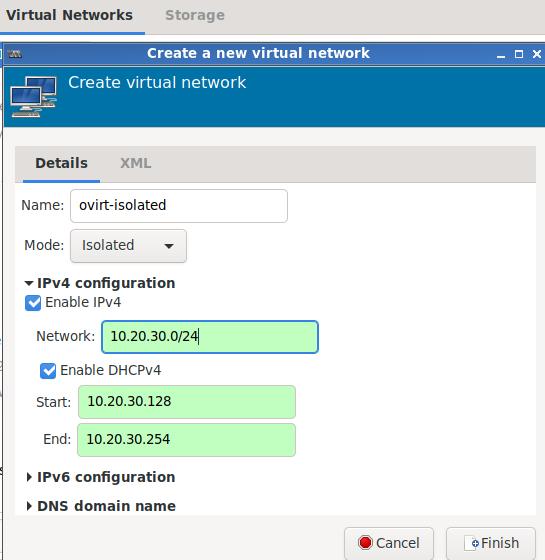
I setup a isolated networking in virt-manager, cidr is 10.20.30.0/24, 3 vms will use this isolated networking for emulating the air-gapped environment, its name is ovirt-isolated:
/images/2020_02_14_14_51_10_545x560.jpg

1.3 VMs Preparation

I use 3 vms for setting up the environment, each of them have:

2 vcpus
10240 MB memory
vda: 100 GB, for installing the system. 
vdb: 300 GB, for setting up the storage network.   
NIC: 1x, attached to ovirt-isolated networking. 

hostname - IP is listed as following:

instance1.com	10.20.30.31
instance2.com	10.20.30.32
instance3.com	10.20.30.33
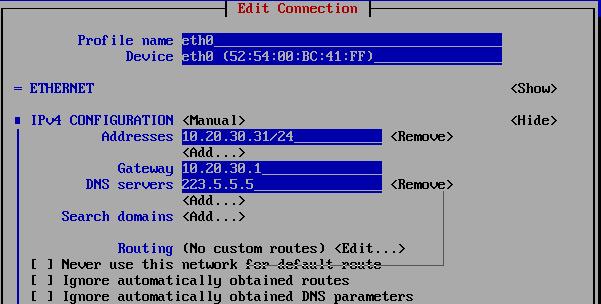
engineinstance.com	10.20.30.34

For setting up the ip address, use nmtui in terminal, take instance1.com for example:
/images/2020_02_14_15_20_56_601x304.jpg

For setting up the hostname, also use nmtui:

/images/2020_02_14_15_22_33_450x232.jpg

Login to each machine and enable the password-less login, take instance1 for example:

# ssh-keygen
# vim /etc/hosts
127.0.0.1   localhost localhost.localdomain localhost4 localhost4.localdomain4
::1         localhost localhost.localdomain localhost6 localhost6.localdomain6
10.20.30.31     instance1.com
10.20.30.32     instance2.com
10.20.30.33     instance3.com
10.20.30.34	engineinstance.com
# ssh-copy-id root@instance1.com
# ssh-copy-id root@instance2.com
# ssh-copy-id root@instance3.com

Also add following items(engine vm’s hostname and ip address) into host machine(archLinux)‘s /etc/hosts:

10.20.30.31     instance1.com
10.20.30.32     instance2.com
10.20.30.33     instance3.com
10.20.30.34	engineinstance.com

2. Deploy Glusterfs

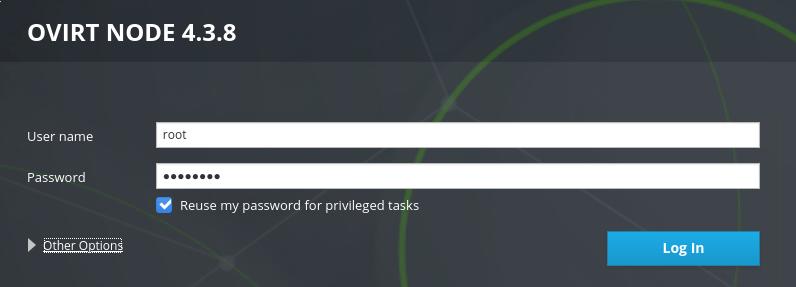
Use firefox for visiting https://10.20.30.31:9090:
/images/2020_02_14_15_39_07_796x287.jpg

use root for login, enter the instance1.com's cockpit web:
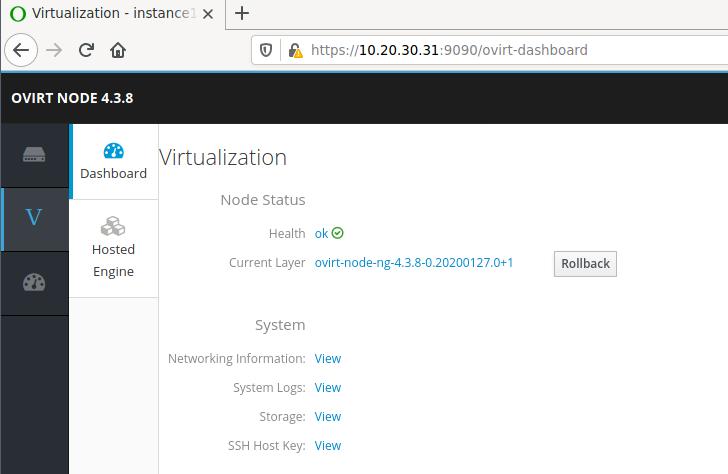
/images/2020_02_14_15_39_38_728x474.jpg

Click V->Hosted Engine, then click the start button under Hyperconverged:
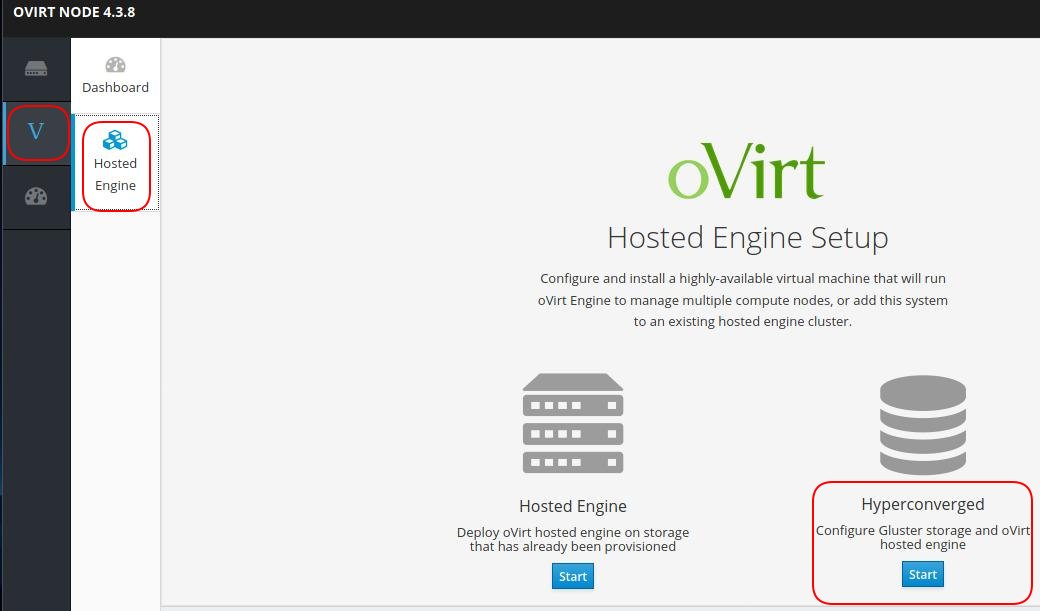
/images/2020_02_14_15_42_07_1040x611.jpg

Click Run Gluster Wizard:

/images/2020_02_14_15_43_46_665x134.jpg

Fill in 3 nodes’s hostname, click next:
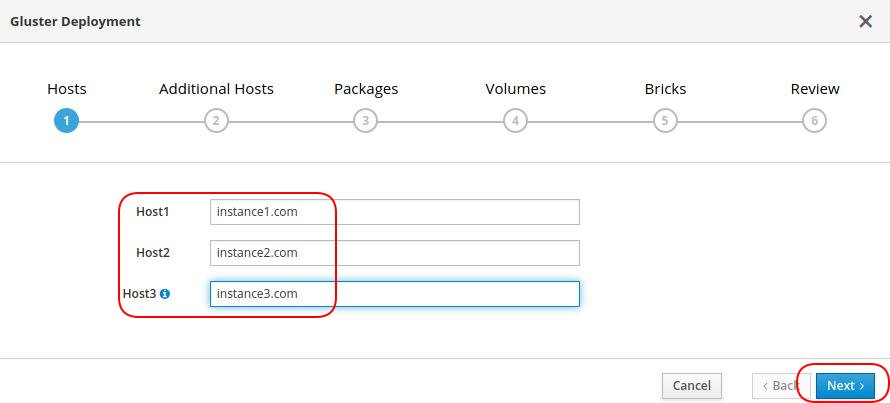
/images/2020_02_14_15_45_01_890x403.jpg

In Additional Hosts, click Use same hostnames as in previous step, thus Host2 and Hosts3 will be added automatically:
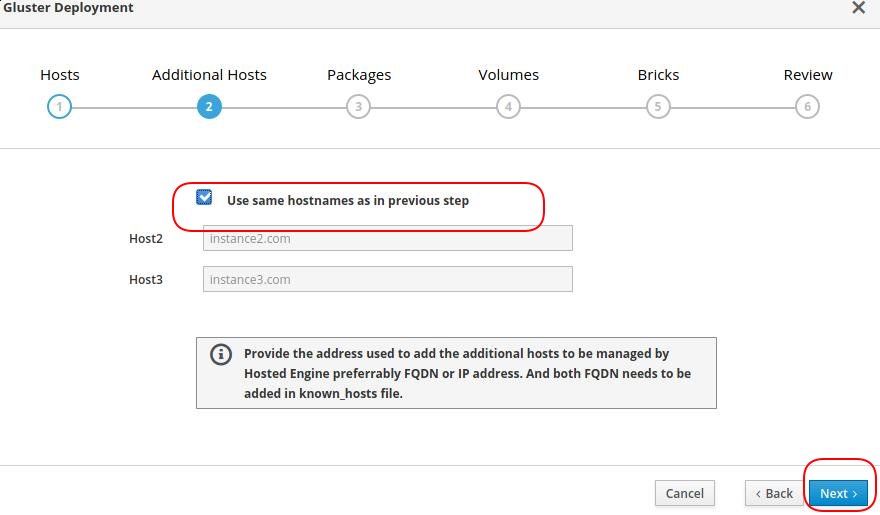
/images/2020_02_14_15_47_45_880x515.jpg

In Packages we keep the default empty items and click next for continue.

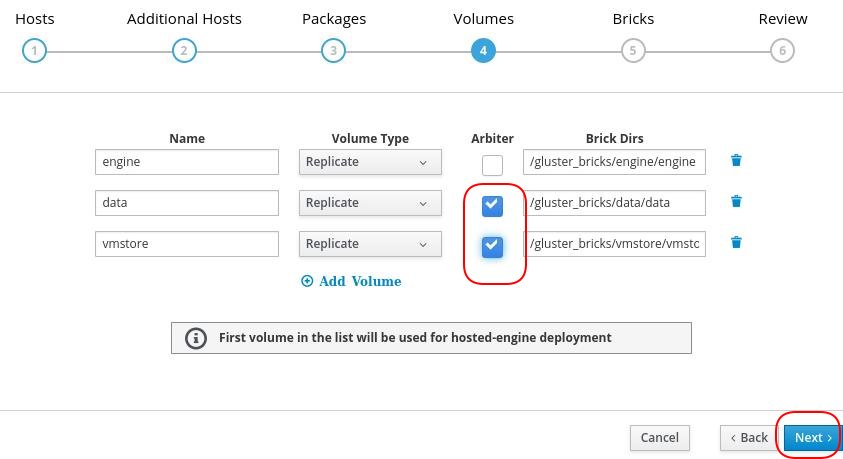
Keep the default volumn setting, and enable the Arbiter for data and vmstore:
/images/2020_02_14_15_57_02_843x459.jpg

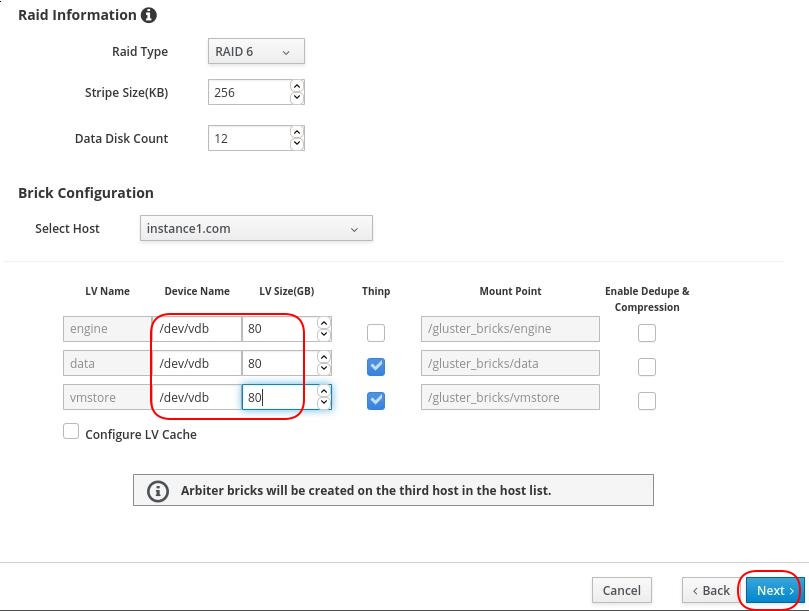
Here we adjust the LV device name to vdb, and adjust the size as 80,80,80, click next for continue:

The volume size for running engine vm should be at least 58GB(ovirt default minimum size, actually takes more than this number. )
/images/2020_02_14_16_00_34_809x611.jpg

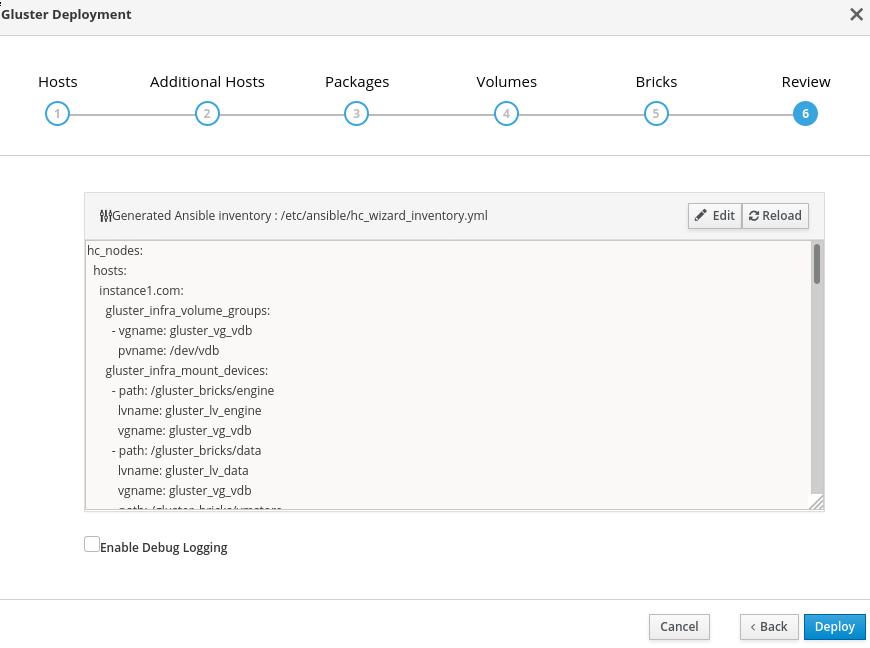
Review and click deploy:

/images/2020_02_14_16_02_53_870x648.jpg

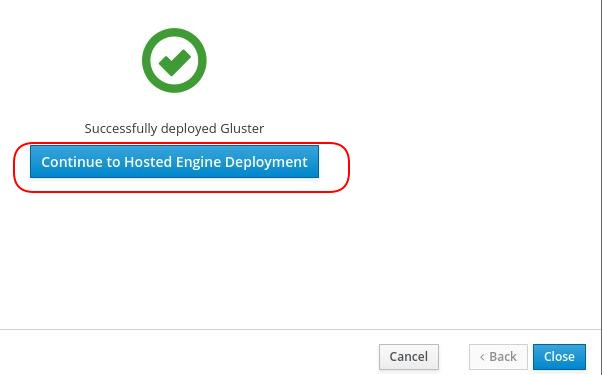
The ansible tasks will run until you see this hint:
/images/2020_02_14_16_09_18_602x375.jpg

Click Continue to hosted engine deployment to continue.

3. Hosted Engine

Before continue, manually install the rpms in instance1.com:

# yum install -y ./ovirt-engine-appliance-4.3-20200127.1.el7.x86_64.rpm
# rpm -qa | grep ovirt-engine-appliance
ovirt-engine-appliance-4.3-20200127.1.el7.x86_64

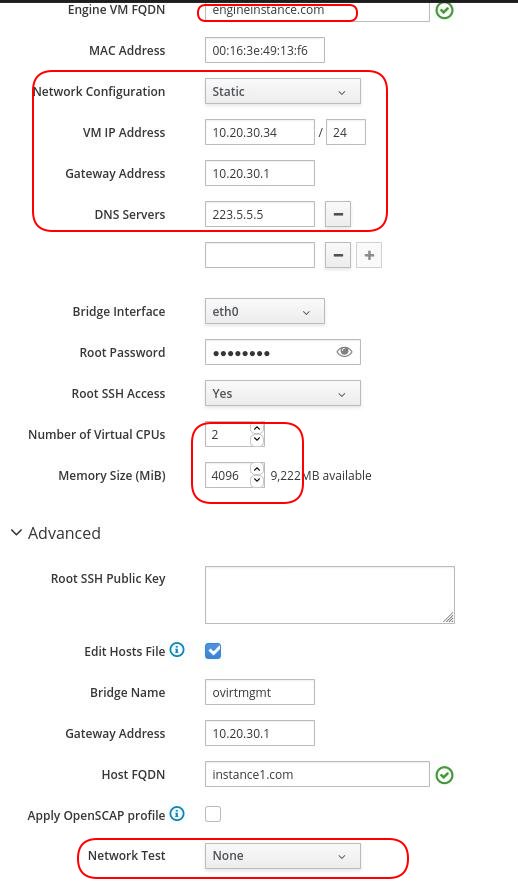
Fill the engine vm’s configuration infos:
/images/2020_02_14_16_23_51_518x881.jpg

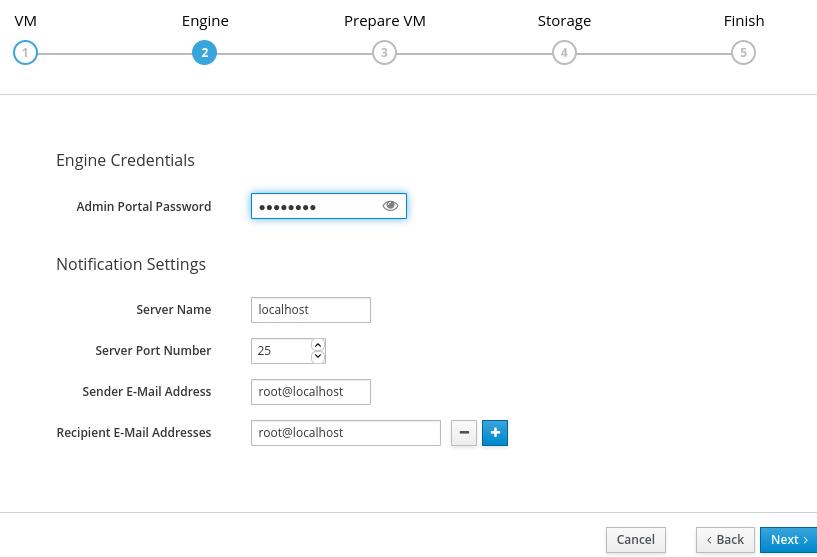
Fill in admin portal password(this password will be used in web login) and continue:
/images/2020_02_14_16_25_19_817x557.jpg

Examine the configuration and click Prepare VM:

/images/2020_02_14_16_25_19_817x557.jpg

Wait for about half an hour to see deployment successful:

/images/2020_02_14_17_00_27_713x388.jpg

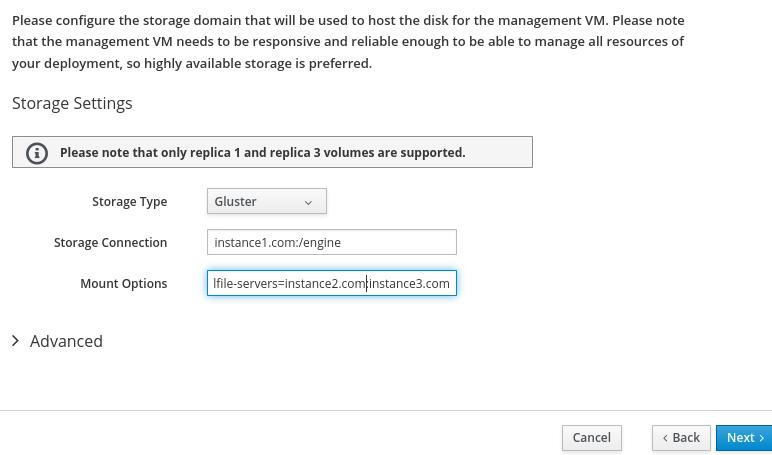
Keep the default configuration:

engine vm’s storage configuration will use Gluster, path will be Gluster’s engine volumn, and its parameter is:

backup-volfile-servers=instance2.com:instance3.com

for preventing the single-node issue for Gluster.
/images/2020_02_14_17_17_52_772x455.jpg

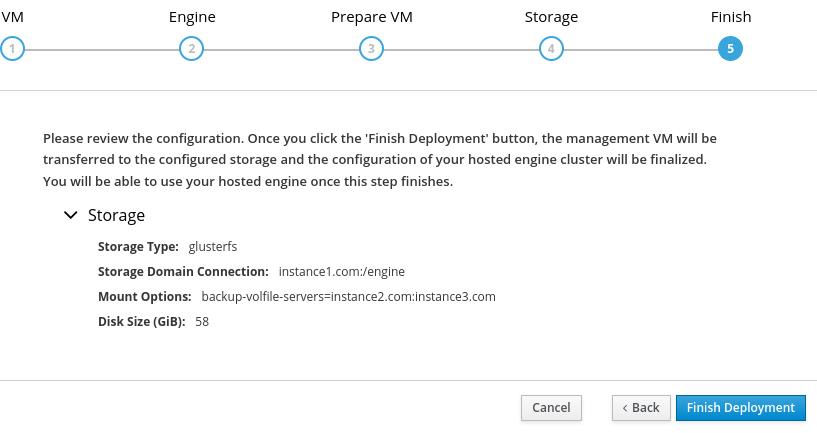
Click Finish deployment, and wait for a break:
/images/2020_02_14_17_20_30_817x433.jpg

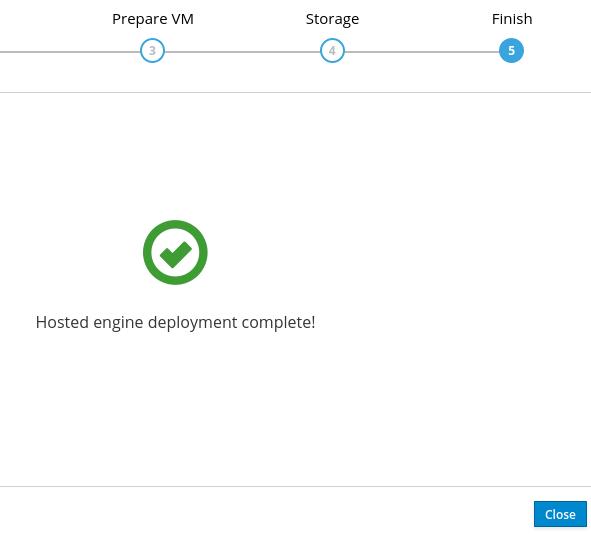
Seeing this means deploy succeeded:

/images/2020_02_14_17_40_22_591x535.jpg

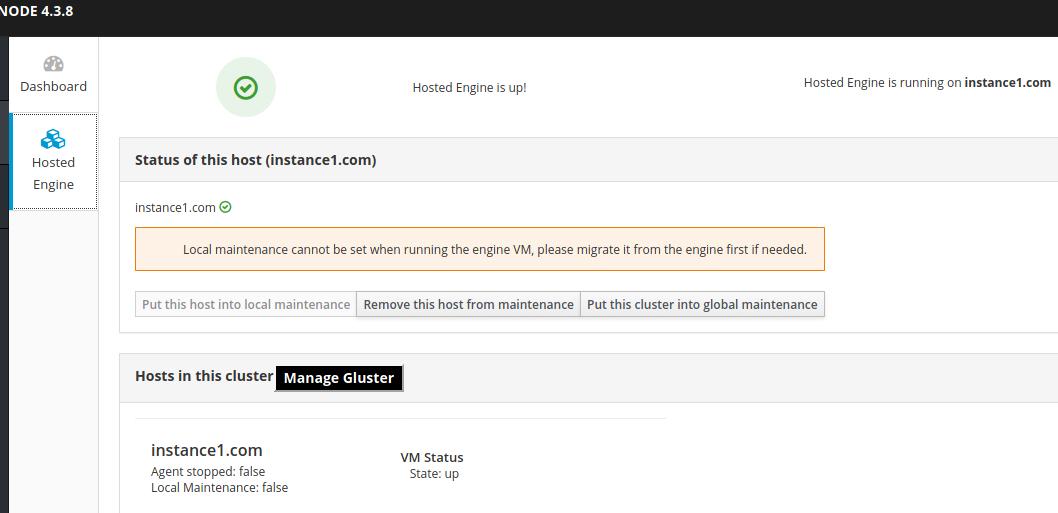
Refresh the status:

/images/2020_02_14_17_43_43_1058x513.jpg

4. Portal

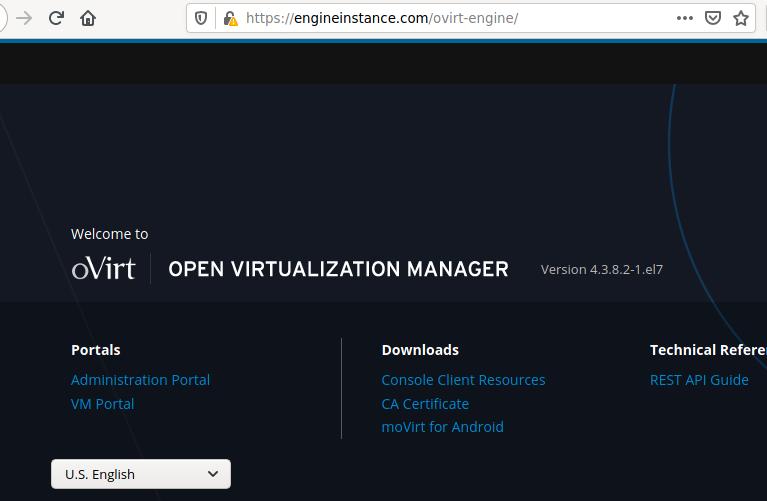
Visit engineinstance.com in host machine(ArchLinux):
/images/2020_02_14_17_47_13_767x501.jpg

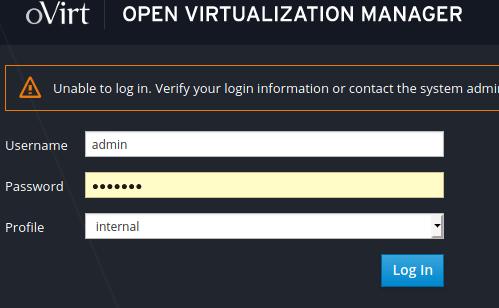
Click Administration Portal:

/images/2020_02_14_17_48_30_499x308.jpg

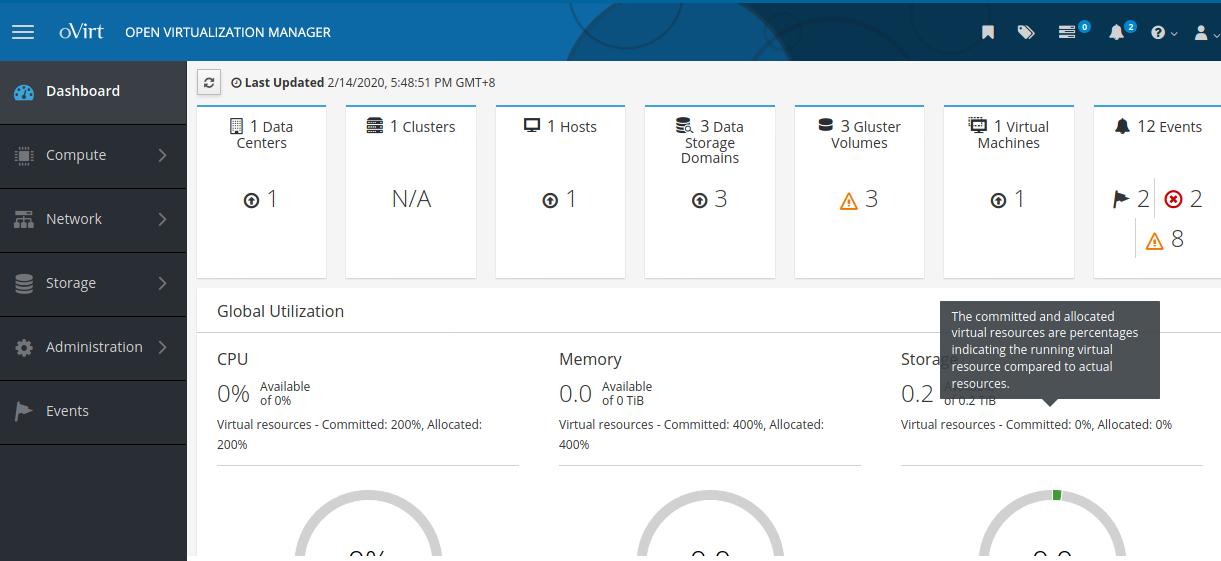
admin page is like following:

/images/2020_02_14_17_50_57_1221x561.jpg

ssh into engine vm and check the disk partitions:

# ssh root@10.20.30.34
root@10.20.30.34's password:
Last login: Fri Feb 14 17:25:51 2020 from 192.168.1.1
[root@engineinstance ~]#df -h
Filesystem               Size  Used Avail Use% Mounted on
devtmpfs                 1.9G     0  1.9G   0% /dev
tmpfs                    1.9G   12K  1.9G   1% /dev/shm
tmpfs                    1.9G  8.9M  1.9G   1% /run
tmpfs                    1.9G     0  1.9G   0% /sys/fs/cgroup
/dev/mapper/ovirt-root   8.0G  2.3G  5.8G  29% /
/dev/mapper/ovirt-home  1014M   33M  982M   4% /home
/dev/mapper/ovirt-tmp    2.0G   33M  2.0G   2% /tmp
/dev/mapper/ovirt-var     20G  437M   20G   3% /var
/dev/vda1               1014M  157M  858M  16% /boot
/dev/mapper/ovirt-log     10G   45M   10G   1% /var/log
/dev/mapper/ovirt-audit 1014M   34M  981M   4% /var/log/audit
tmpfs                    379M     0  379M   0% /run/user/0

5. Create The First VM

5.1 Add ISO storage Domain

Login in to instance1.com, configure nfs share storage for holding ISO images:

[root@instance1 ]# mkdir -p /isoimages
[root@instance1 ]# chown 36:36 -R /isoimages/
[root@instance1 ]# chmod 0755 -R /isoimages/
[root@instance1 ]# vi /etc/exports
[root@instance1 ]# cat /etc/exports
/isoimages *(rw,sync,no_subtree_check,all_squash,anonuid=36,anongid=36)
[root@instance1 ]# systemctl enable --now  nfs.service   
Created symlink from /etc/systemd/system/multi-user.target.wants/nfs-server.service to /usr/lib/systemd/system/nfs-server.service.

In ovirt manager portal , click Storage->Storage Domain, click New Domain:

/images/2020_02_14_19_29_49_1046x337.jpg

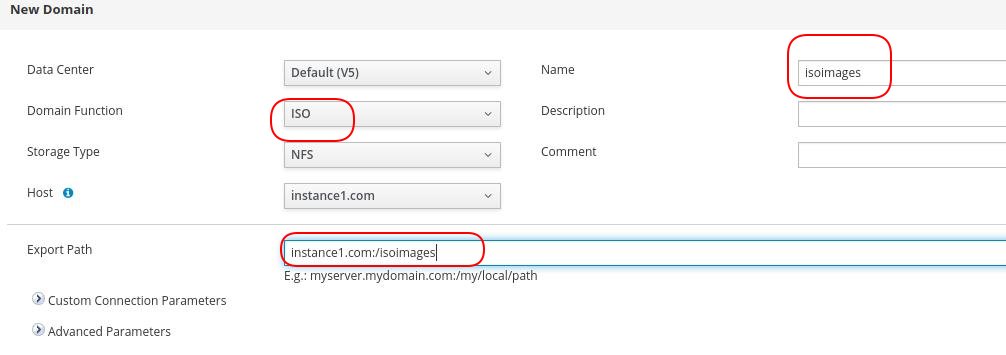
Fill in name and path information:

/images/2020_02_14_19_42_32_1006x355.jpg

Finished adding isoimages:

/images/2020_02_14_19_32_52_919x263.jpg

5.2 Upload iso

Login to engien vm(engineinstance.com), download the iso from official site, we take ubuntu16.04.6 for example:

[root@engineinstance ~]# ovirt-iso-uploader -i isoimages upload ./ubuntu-16.04.6-server-amd64.iso 
Please provide the REST API password for the admin@internal oVirt Engine user (CTRL+D to abort): 
Uploading, please wait...
INFO: Start uploading ./ubuntu-16.04.6-server-amd64.iso 
Uploading: [########################################] 100%
INFO: ./ubuntu-16.04.6-server-amd64.iso uploaded successfully

5.3 Create VM

Compute-> Virtual Machines, click new button:
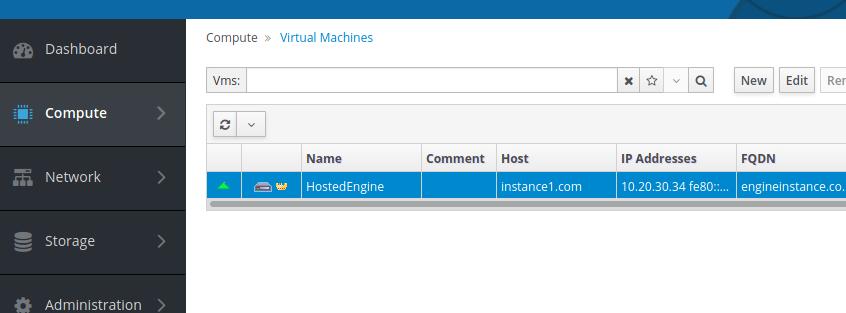
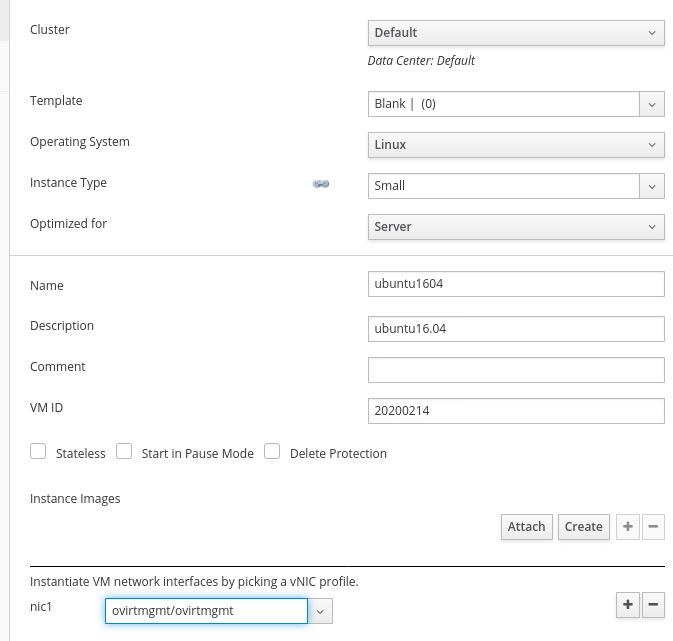
/images/2020_02_14_19_48_14_846x313.jpg Fill in informations:

/images/2020_02_14_19_50_24_673x641.jpg

Click advanced options, select Boot Options, then attach uploaded iso:
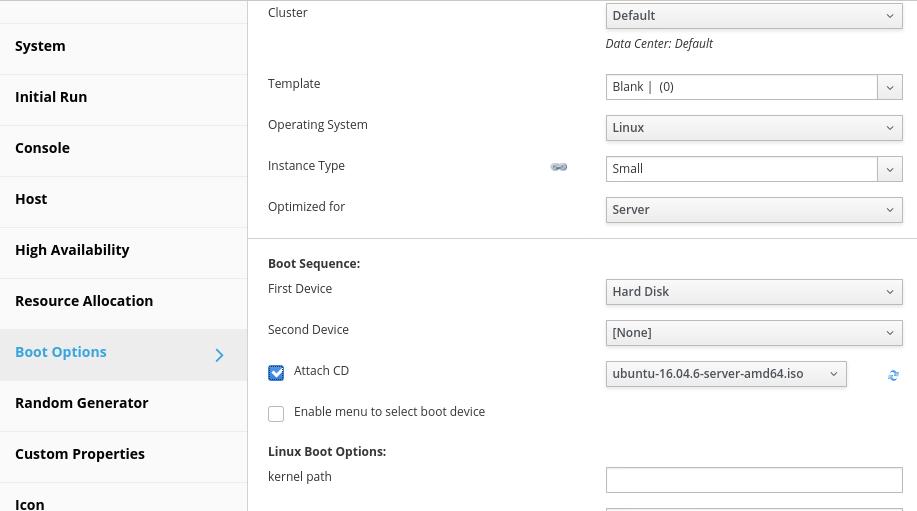
/images/2020_02_14_19_52_09_917x511.jpg

Click Disks, then click new:

/images/2020_02_14_20_00_20_1178x316.jpg

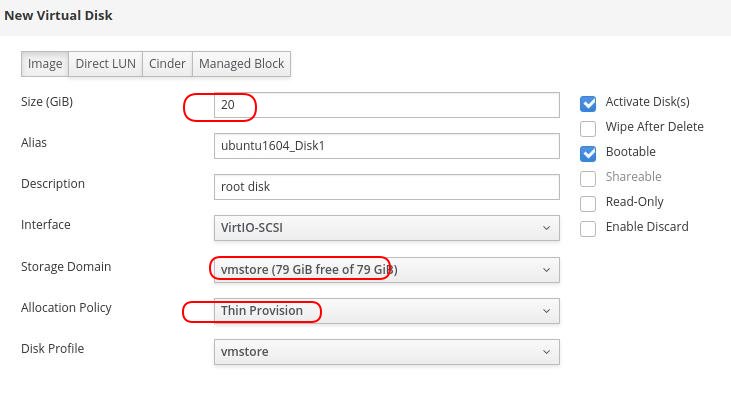
Fill in options:

/images/2020_02_14_20_01_54_731x394.jpg

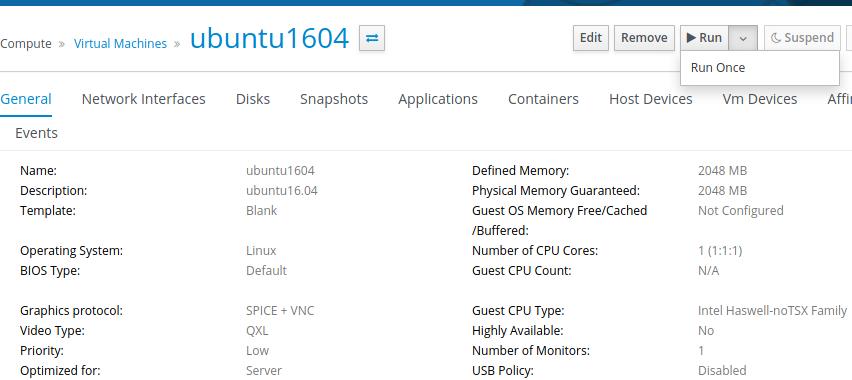
Click this new machine, and select run->run once:
/images/2020_02_14_19_53_19_852x380.jpg

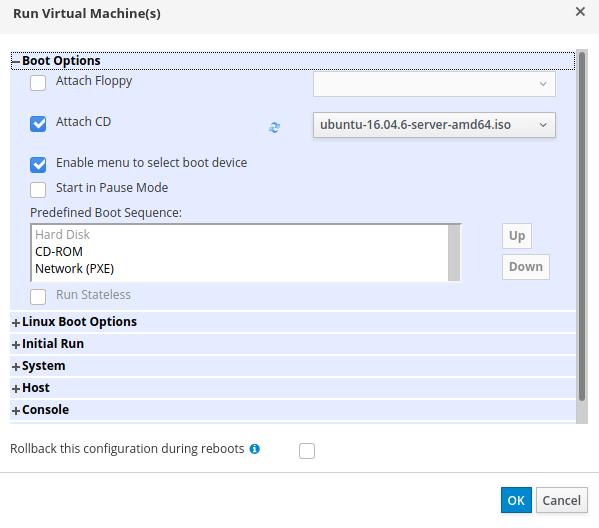
Click OK for installation:

/images/2020_02_14_19_54_06_599x528.jpg

The installation image will be shown:
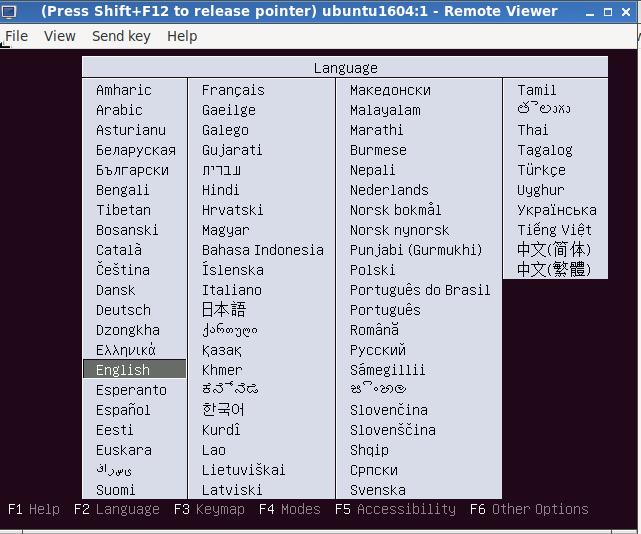
/images/2020_02_14_19_55_49_641x534.jpg

Configure installation options and wait until installation finished.
Since we use nested virtualization, the installation step will take a very long time(>1h) for installing the os. For speedup, considering use NVME ssd for locating the vm’s qcow2 files. Or use 3 physical servers.

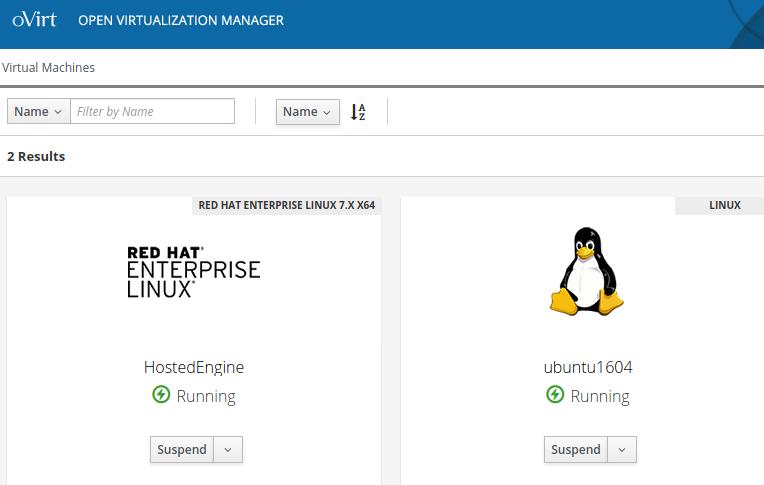
On vm portal we could see our newly created vm:
/images/2020_02_14_21_03_33_764x485.jpg

Examine the vms on instance1.com:

[root@instance1 isoimages]# virsh -r list
 Id    Name                           State
----------------------------------------------------
 2     HostedEngine                   running
 4     ubuntu1604                     running

6. Create vm using template

6.1 Create template

Create template via:
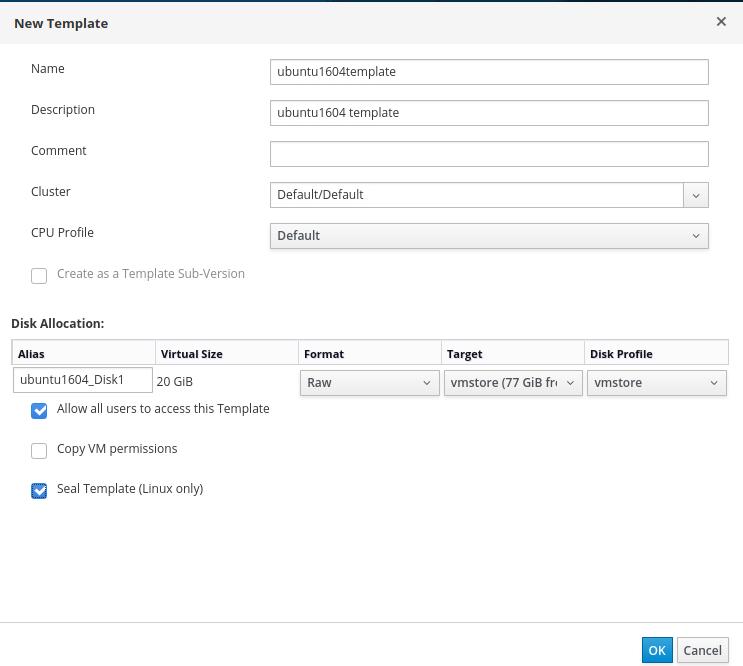
/images/2020_02_14_21_49_05_743x666.jpg

Check the status of template:

/images/2020_02_14_21_50_02_733x224.jpg

6.2 Create vm

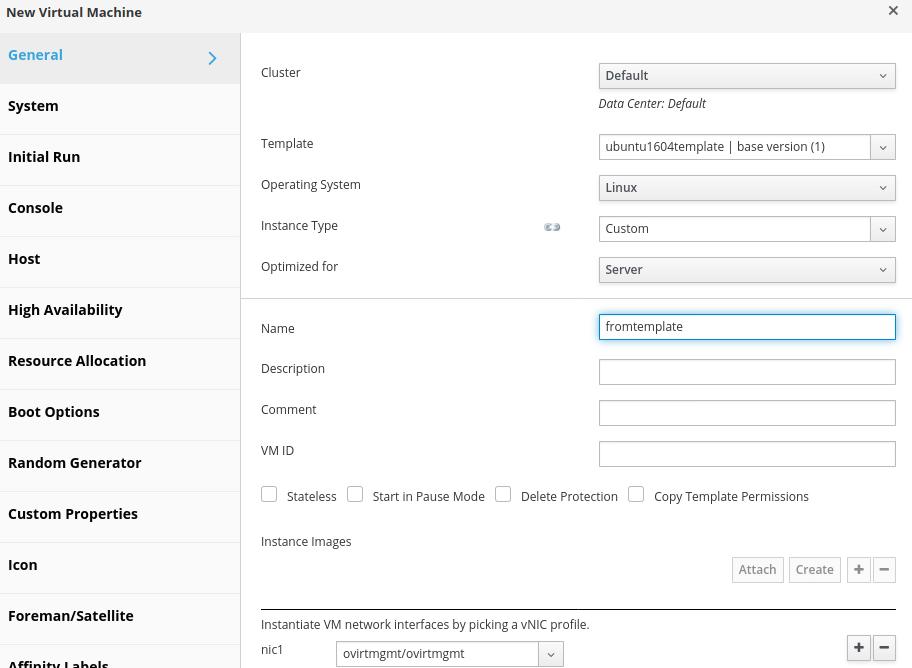
Create new vm using template:
/images/2020_02_14_21_57_36_912x668.jpg

Start the machine and check result:

/images/2020_02_14_22_05_30_1148x360.jpg

7. Add hosts

In engine vm, add following items:


Then we add hosts of instance2.com and instance3.com:
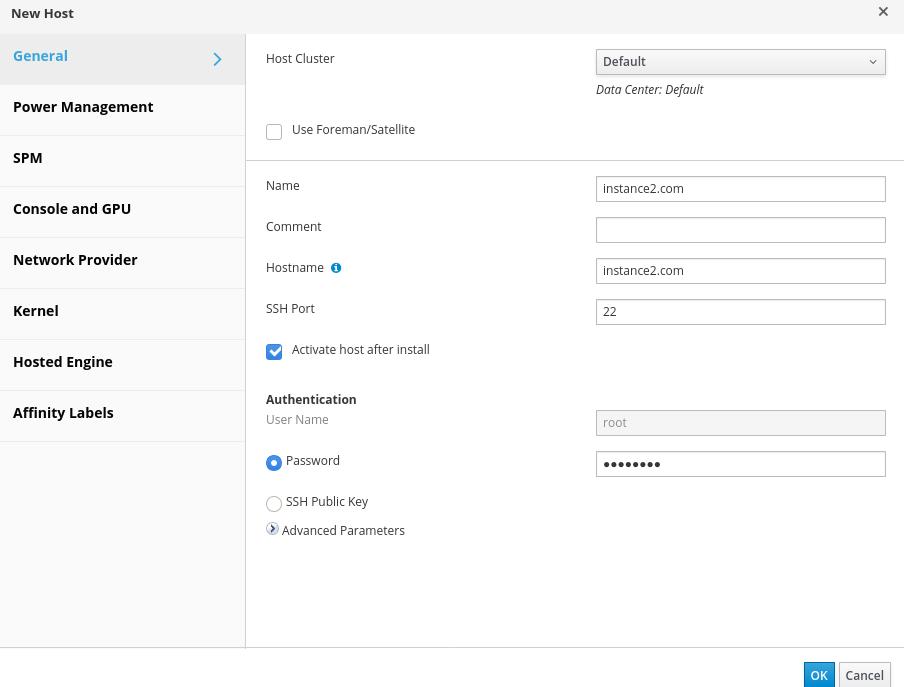
/images/2020_02_14_22_16_23_904x687.jpg

Result:
/images/2020_02_14_22_17_48_860x208.jpg

UpgradeKernelForRHEL74

Online Steps

rhel74, default kernel is:

# uname -a
Linux node 3.10.0-693.el7.x86_64 #1 SMP Thu Jul 6 19:56:57 EDT 2017 x86_64 x86_64 x86_64 GNU/Linux

Configure repo and install newer kernel:

# rpm --import https://www.elrepo.org/RPM-GPG-KEY-elrepo.org
# wget https://www.elrepo.org/elrepo-release-7.0-4.el7.elrepo.noarch.rpm
# rpm -ivh elrepo-release-7.0-4.el7.elrepo.noarch.rpm
# yum update -y
# yum --disablerepo="*" --enablerepo="elrepo-kernel" list available
Loaded plugins: product-id, search-disabled-repos, subscription-manager
This system is not registered with an entitlement server. You can use subscription-manager to register.
elrepo-kernel                                                                                                                          | 2.9 kB  00:00:00     
elrepo-kernel/primary_db                                                                                                               | 1.9 MB  00:00:58     
Available Packages
kernel-lt.x86_64                                                               4.4.213-1.el7.elrepo                                              elrepo-kernel
kernel-lt-devel.x86_64                                                         4.4.213-1.el7.elrepo                                              elrepo-kernel
kernel-lt-doc.noarch                                                           4.4.213-1.el7.elrepo                                              elrepo-kernel
kernel-lt-headers.x86_64                                                       4.4.213-1.el7.elrepo                                              elrepo-kernel
kernel-lt-tools.x86_64                                                         4.4.213-1.el7.elrepo                                              elrepo-kernel
kernel-lt-tools-libs.x86_64                                                    4.4.213-1.el7.elrepo                                              elrepo-kernel
kernel-lt-tools-libs-devel.x86_64                                              4.4.213-1.el7.elrepo                                              elrepo-kernel
kernel-ml-devel.x86_64                                                         5.5.2-1.el7.elrepo                                                elrepo-kernel
kernel-ml-doc.noarch                                                           5.5.2-1.el7.elrepo                                                elrepo-kernel
kernel-ml-headers.x86_64                                                       5.5.2-1.el7.elrepo                                                elrepo-kernel
kernel-ml-tools.x86_64                                                         5.5.2-1.el7.elrepo                                                elrepo-kernel
kernel-ml-tools-libs.x86_64                                                    5.5.2-1.el7.elrepo                                                elrepo-kernel
kernel-ml-tools-libs-devel.x86_64                                              5.5.2-1.el7.elrepo                                                elrepo-kernel
perf.x86_64                                                                    5.5.2-1.el7.elrepo                                                elrepo-kernel
python-perf.x86_64                                                             5.5.2-1.el7.elrepo                                                elrepo-kernel
# yum --enablerepo=elrepo-kernel install kernel-ml
# sudo sed -i 's/^GRUB_DEFAULT.*/GRUB_DEFAULT=0/' /etc/default/grub
# sudo grub2-mkconfig -o /boot/grub2/grub.cfg
# sudo reboot

Check the kernel version is 5.5.2-1:

# uname -a
Linux node 5.5.2-1.el7.elrepo.x86_64 #1 SMP Tue Feb 4 16:29:48 EST 2020 x86_64 x86_64 x86_64 GNU/Linux
# cat /etc/redhat-release 
Red Hat Enterprise Linux Server release 7.4 (Maipo)

Offline Steps

Scp the rpm into the server and install it via:

# scp ./kernel-ml-5.5.2-1.el7.elrepo.x86_64.rpm vagrant@xxx.xxx.xxx.xxx:/home/vagrant
# ssh into xxx.xxx.xxx.xxx
...................
$ sudo sed -i 's/^GRUB_DEFAULT.*/GRUB_DEFAULT=0/' /etc/default/grub
$ sudo grub2-mkconfig -o /boot/grub2/grub.cfg
Generating grub configuration file ...
Found linux image: /boot/vmlinuz-5.5.2-1.el7.elrepo.x86_64
Found initrd image: /boot/initramfs-5.5.2-1.el7.elrepo.x86_64.img
Found linux image: /boot/vmlinuz-3.10.0-693.el7.x86_64
Found initrd image: /boot/initramfs-3.10.0-693.el7.x86_64.img
Found linux image: /boot/vmlinuz-0-rescue-61b21bac36de423f82052de06e3a892b
Found initrd image:
/boot/initramfs-0-rescue-61b21bac36de423f82052de06e3a892b.img
done
$ sudo reboot

Check:

$ uname -a
Linux node 5.5.2-1.el7.elrepo.x86_64 #1 SMP Tue Feb 4 16:29:48 EST 2020 x86_64 x86_64 x86_64 GNU/Linux
$ cat /etc/redhat-release 
Red Hat Enterprise Linux Server release 7.4 (Maipo)

Manually download them from http://elrepo.reloumirrors.net/kernel/el7/x86_64/RPMS/, related rpms is listed as:

# pwd
/media/sda/rhel74NewKernel
# ls
kernel-ml-5.5.2-1.el7.elrepo.x86_64.rpm
kernel-ml-tools-5.5.2-1.el7.elrepo.x86_64.rpm
kernel-ml-devel-5.5.2-1.el7.elrepo.x86_64.rpm
kernel-ml-tools-libs-devel-5.5.2-1.el7.elrepo.x86_64.rpm

中文更新步骤

主线内核可从 http://elrepo.reloumirrors.net/kernel/el7/x86_64/RPMS/下载,文件列表如下:

# pwd
/media/sda/rhel74NewKernel
# ls
kernel-ml-5.5.2-1.el7.elrepo.x86_64.rpm
kernel-ml-headers-5.5.2-1.el7.elrepo.x86_64.rpm
kernel-ml-tools-libs-devel-5.5.2-1.el7.elrepo.x86_64.rpm
kernel-ml-devel-5.5.2-1.el7.elrepo.x86_64.rpm
kernel-ml-tools-5.5.2-1.el7.elrepo.x86_64.rpm

注: 如果只需要升级内核,则只需要 kernel-ml-5.5.2-1.el7.elrepo.x86_64.rpm 一个包就足够,如果编译时需要内核头文件依赖,则有可能需要其他几个包。可以根据需要自行安装。

离线更新,上传包到rhel74服务器上,:

# scp ./*.rpm vagrant@xxx.xxx.xxx.xxx:/home/vagrant
# ssh into xxx.xxx.xxx.xxx
...................
$ sudo yum install -y ./kernel-ml-5.5.2-1.el7.elrepo.x86_64.rpm
$ sudo sed -i 's/^GRUB_DEFAULT.*/GRUB_DEFAULT=0/' /etc/default/grub
$ sudo grub2-mkconfig -o /boot/grub2/grub.cfg
$ sudo reboot

检查更新后结果:

$ uname -a
Linux node 5.5.2-1.el7.elrepo.x86_64 #1 SMP Tue Feb 4 16:29:48 EST 2020 x86_64 x86_64 x86_64 GNU/Linux
$ cat /etc/redhat-release 
Red Hat Enterprise Linux Server release 7.4 (Maipo)