Sep 9, 2024
Technologysource code is listed as following:
import sys
from PyQt5.QtWidgets import QApplication, QWidget, QVBoxLayout, QPushButton, QHBoxLayout, QLabel, QRadioButton
from PyQt5.QtCore import Qt
import subprocess

class MyWidget(QWidget):
    def __init__(self):
        super().__init__()

        self.radiobuttons = []  # 在__init__中定义radiobuttons列表

        self.initUI()

    def initUI(self):
        self.setWindowTitle('IDV-Multi-kvm虚拟机管理器')
        self.showMaximized() # 初始化窗口大小并最大化

        layout = QVBoxLayout()
        self.setLayout(layout)

        radio_button_layout = QHBoxLayout()

        output = subprocess.check_output(['virsh', 'list','--all', '--name']).decode('utf-8').splitlines()

        for i, line in enumerate(output[:-1]):
            self.radiobuttons.append(QRadioButton(line))
            radio_button_layout.addWidget(self.radiobuttons[i])

        layout.addLayout(radio_button_layout)  # 将button添加到主界面中

        button_layout = QHBoxLayout()
        self.start_button = QPushButton('启动选中的虚拟机')
        self.start_button.setStyleSheet("background-color: green; color: white") # 设置背景颜色为绿色和字体颜色为白色
        self.start_button.setMinimumWidth(self.width() // 3)
        self.start_button.setMaximumWidth(self.width() // 3)
        self.start_button.clicked.connect(self.start_vmmachine)


        shutdown_button = QPushButton('IDV物理机关机', clicked=lambda: self.shutdown())
        shutdown_button.setStyleSheet("background-color: red; color: white") # 设置背景颜色为红色和字体颜色为白色
        shutdown_button.setMinimumWidth(self.width() // 3)
        shutdown_button.setMaximumWidth(self.width() // 3)
        self.start_button.clicked.connect(self.shutdown)

        close_button = QPushButton('退出IDV管理程序', clicked=self.close)
        close_button.setStyleSheet("background-color: blue; color: white") # 设置背景颜色为蓝色和字体颜色为白色
        close_button.setMinimumWidth(self.width() // 3)
        close_button.setMaximumWidth(self.width() // 3)

        button_layout.addWidget(self.start_button)
        button_layout.addWidget(shutdown_button)
        button_layout.addWidget(close_button)

        layout.addLayout(button_layout)  # 将button添加到主界面中

        self.show()

    def start_vmmachine(self):
        #selected_radio_button = [i for i in self.findChildren(QRadioButton)][0]
        for i, button in enumerate(self.findChildren(QRadioButton)):
            if button.isChecked():
                selected_radio_button = [i for i in self.radiobuttons][i]
                vm_name = selected_radio_button.text()
                print("********")
                print(vm_name)
                subprocess.run(['virsh', 'start', vm_name])
                break

    def shutdown(self):
        subprocess.run(['shutdown', '-h', 'now'])


if __name__ == '__main__':
    app = QApplication(sys.argv)
    ex = MyWidget()
    sys.exit(app.exec_())
qemu hook changes:
$ cat qemumodified_hook
#!/bin/bash
OBJECT="$1"
OPERATION="$2"
INSTANCE="instance-00000001"
#INSTANCE="win10"
if [[ $OBJECT == "$INSTANCE" || $OBJECT == "ubuntu2404" || $OBJECT == "UOS" || $OBJECT == "zkfd" || $OBJECT == "Kylin"   || $OBJECT == "Win10" || $OBJECT == "Win11" ]]; then
        case "$OPERATION" in
                "prepare")
                /bin/vfio-startup.sh 2>&1 | tee -a /var/log/libvirt/custom_hooks.log
                ;;
            "release")
                /bin/vfio-teardown.sh 2>&1 | tee -a /var/log/libvirt/custom_hooks.log
                ;;
        esac
fi
Sep 6, 2024
Technology/opt/bgok_close.py:
import sys
from PyQt5.QtWidgets import QApplication, QWidget, QPushButton, QVBoxLayout, QHBoxLayout, QLineEdit, QLabel
from subprocess import run

class MyWidget(QWidget):
    def __init__(self):
        super().__init__()

        self.initUI()

    def initUI(self):
        self.setWindowTitle('IDV-OSX-kvm虚拟机管理器')
        self.showMaximized() # 初始化窗口大小并最大化

        layout = QVBoxLayout()
        self.setLayout(layout)

        label = QLabel('IDV-OSX-kvm 虚拟机 ID:')
        layout.addWidget(label)

        self.id_input = QLineEdit('macOSrx550')
        layout.addWidget(self.id_input)

        button_layout = QHBoxLayout()
        button_layout.setContentsMargins(0, 0, 0, 50) # 调整按钮之间的间隔
        layout.addLayout(button_layout)

        start_button = QPushButton('启动IDV-OS-X虚拟机', clicked=self.start_virtmachine)
        start_button.setStyleSheet("background-color: green; color: white") # 设置背景颜色为绿色和字体颜色为白色
        start_button.setMinimumWidth(self.width() * 0.5) # 各占据屏幕宽度的50%
        start_button.setMaximumWidth(self.width() * 0.5)
        button_layout.addWidget(start_button)

        shutdown_button = QPushButton('IDV物理机关机', clicked=self.shutdown)
        shutdown_button.setStyleSheet("background-color: red; color: white") # 设置背景颜色为红色和字体颜色为白色
        shutdown_button.setMinimumWidth(self.width() * 0.5) # 各占据屏幕宽度的50%
        shutdown_button.setMaximumWidth(self.width() * 0.5)
        button_layout.addWidget(shutdown_button)

        close_button = QPushButton('退出IDV管理程序', clicked=self.close)
        close_button.setStyleSheet("background-color: blue; color: white") # 设置背景颜色为蓝色和字体颜色为白色
        close_button.setMinimumWidth(self.width() * 0.5) # 各占据屏幕宽度的50%
        close_button.setMaximumWidth(self.width() * 0.5)
        button_layout.addWidget(close_button)

    def start_virtmachine(self):
        id = self.id_input.text()
        run(['virsh', 'start', id])

    def shutdown(self):
        run(['shutdown', '-h', 'now'])

if __name__ == '__main__':
    app = QApplication(sys.argv)
    ex = MyWidget()
    sys.exit(app.exec_())
Auto start:
$ cat /etc/xdg/autostart/vmmanager.desktop
[Desktop Entry]
0=V
1=m
2=m
3=a
4=n
5=a
6=g
7=e
Name=Vmmanage
Exec=/usr/bin/python3 /opt/bgok_close.py %U
Terminal=false
Type=Application
Icon=Vmmanage
StartupWMClass=Vmmanage
Comment=Vmmanage
Categories=Utility;
Sep 5, 2024
TechnologyInstall ubuntu 22.04 server, then :
sudo apt update -y
sudo apt upgrade -y
sudo apt install -y ubuntu-desktop  nethogs
Edit:
$ sudo vim /etc/X11/Xwrapper.config
...
allowed_users=anybody
...
Edit nv_sock:
if [ ! -e /etc/modules-load.d/hv_sock.conf ]; then
	echo "hv_sock" > /etc/modules-load.d/hv_sock.conf
fi
Configure the policy xrdp session:
cat > /etc/polkit-1/rules.d/02-allow-colord.rules <<EOF
polkit.addRule(function(action, subject) {
    if ((action.id == "org.freedesktop.color-manager.create-device" ||
         action.id == "org.freedesktop.color-manager.modify-profile" ||
         action.id == "org.freedesktop.color-manager.delete-device" ||
         action.id == "org.freedesktop.color-manager.create-profile" ||
         action.id == "org.freedesktop.color-manager.modify-profile" ||
         action.id == "org.freedesktop.color-manager.delete-profile") &&
        subject.isInGroup("users"))
    {
        return polkit.Result.YES;
    }
});
EOF
Create user and edit xinitrc:
# cp /etc/X11/xinit/xinitrc ~/.xinitrc
Build xrdp and xorgxrdp:
apt install -y git make autoconf libtool intltool pkg-config nasm xserver-xorg-dev libssl-dev libpam0g-dev libjpeg-dev libfuse-dev libopus-dev libmp3lame-dev libxfixes-dev libxrandr-dev libgbm-dev libepoxy-dev libegl1-mesa-dev libx264-dev
apt install -y libcap-dev libsndfile-dev libsndfile1-dev libspeex-dev libpulse-dev

apt install -y libfdk-aac-dev
apt install pulseaudio
apt install xserver-xorg

cd Code
git clone --branch devel --recursive https://github.com/neutrinolabs/xrdp.git
cd xrdp
./bootstrap
# Build with glamor explicitly enabled (does not appear to make a difference for core xrdp, but I kept this anyway)
./configure --enable-x264 --enable-glamor --enable-rfxcodec --enable-mp3lame --enable-fdkaac --enable-opus --enable-pixman --enable-fuse --enable-jpeg --enable-ipv6
# Control build statement (also works for me in Ubuntu 22.04, since it is xorgxrdp that actually links to glamor)
#./configure --enable-x264 --enable-rfxcodec --enable-mp3lame --enable-fdkaac --enable-opus --enable-pixman --enable-fuse --enable-jpeg --enable-ipv6
make -j4

make install

cd ~/Code
git clone --branch devel --recursive https://github.com/neutrinolabs/xorgxrdp.git
cd xorgxrdp

echo "-> Building xorgxrdp:"
./bootstrap
./configure --enable-glamor
make -j4

echo "-> Installing xorgxrdp:"
make install

systemctl enable xrdp
systemctl stop xrdp
systemctl start xrdp

sudo apt install gnome-tweaks -y
# Permission weirdness fix
sudo bash -c "cat >/etc/polkit-1/localauthority/50-local.d/45-allow.colord.pkla" <<EOF
[Allow Colord all Users]
Identity=unix-user:*
Action=org.freedesktop.color-manager.create-device;org.freedesktop.color-manager.create-profile;org.freedesktop.color-manager.delete-device;org.freedesktop.color-manager.delete-profile;org.freedesktop.color-manager.modify-device;org.freedesktop.color-manager.modify-profile
ResultAny=no
ResultInactive=no
ResultActive=yes
EOF
Configure:
$ sudo vim /etc/X11/xrdp/xorg.conf
Section "Module"
.....
    Load "glamoregl"
....
Add user into render group:
sudo usermod -aG render test1
sudo usermod -aG video test1
Sep 4, 2024
TechnologyBefore building, enable all of the deb-src items.
Steps:
sudo apt build-dep linux linux-image-unsigned-$(uname -r)
sudo apt install libncurses-dev gawk flex bison openssl libssl-dev dkms libelf-dev libudev-dev libpci-dev libiberty-dev autoconf llvm
sudo apt install git

apt source linux-image-unsigned-$(uname -r)
chmod a+x debian/rules
chmod a+x debian/scripts/*
chmod a+x debian/scripts/misc/*
fakeroot debian/rules clean
Edit the items:
vim debian.xxxx/config/annotations
Change the items you want to change, for example:
 cat /boot/config-5.4.0-150-generic | grep -i module_force
CONFIG_MODULE_FORCE_LOAD=y
CONFIG_MODULE_FORCE_UNLOAD=y
Edit the configurations:
fakeroot debian/rules editconfigs
fakeroot debian/rules binary-headers binary-generic binary-perarch
Then after building you could get deb generated.
Aug 27, 2024
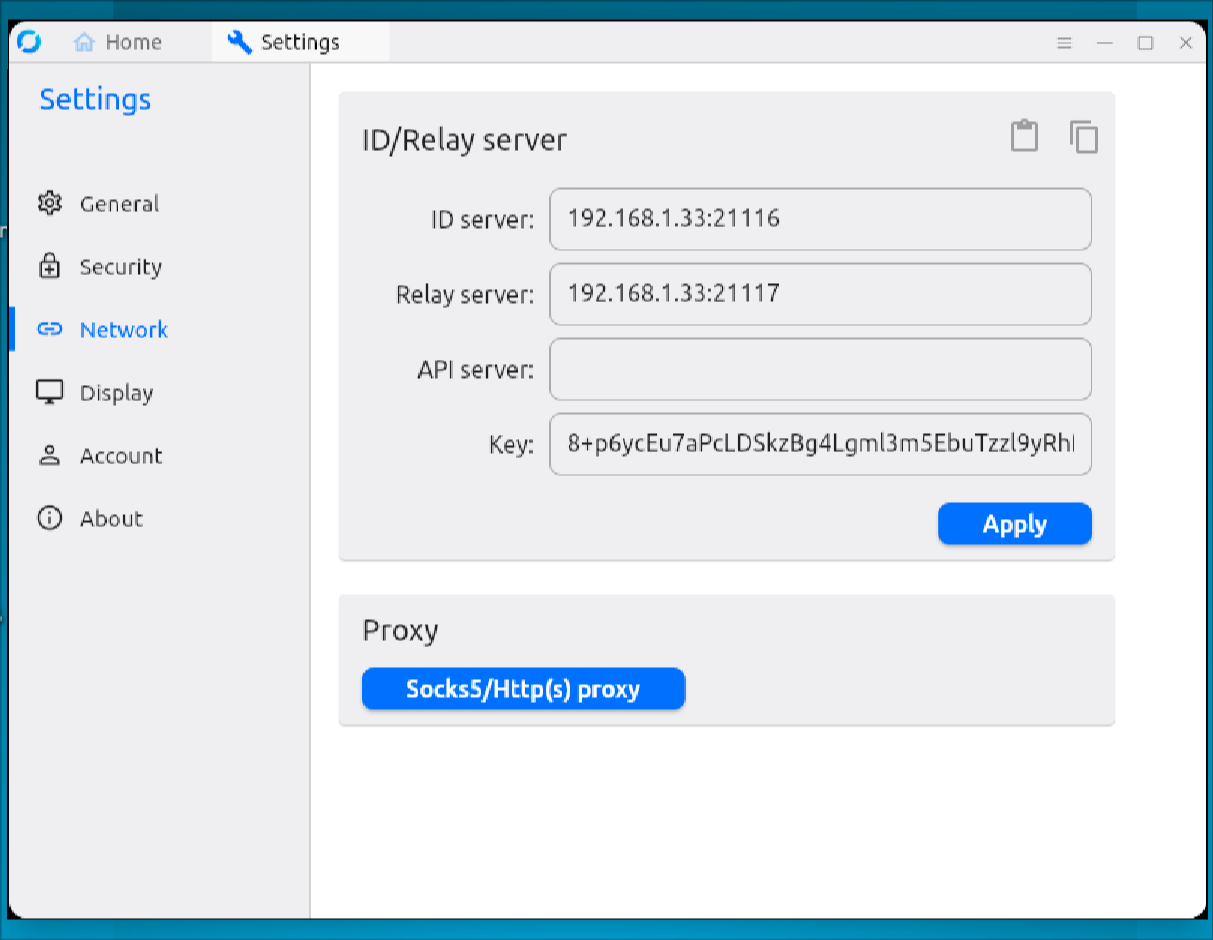
TechnologyServer startup via:
# vim docker-compose.yml
version: '3'

networks:
  rustdesk-net:
    external: false

services:
  hbbs:
    container_name: hbbs
    ports:
      - 21115:21115
      - 21116:21116
      - 21116:21116/udp
      - 21118:21118
    image: rustdesk/rustdesk-server:latest
    command: hbbs -r 127.0.0.1:21117
    volumes:
      - ./data:/root
    networks:
      - rustdesk-net
    depends_on:
      - hbbr
    restart: unless-stopped

  hbbr:
    container_name: hbbr
    ports:
      - 21117:21117
      - 21119:21119
    image: rustdesk/rustdesk-server:latest
    command: hbbr
    volumes:
      - ./data:/root
    networks:
      - rustdesk-net
    restart: unless-stopped
# docker-compose -f docker-compose.yml up -d
Inspect the running docker instance:
 sudo docker ps
CONTAINER ID   IMAGE                             COMMAND                  CREATED        STATUS       PORTS                                                                                                                                                                 NAMES
5e5ea15264d5   rustdesk/rustdesk-server:latest   "hbbs -r 127.0.0.1:2…"   2 hours ago    Up 2 hours   0.0.0.0:21115-21116->21115-21116/tcp, :::21115-21116->21115-21116/tcp, 0.0.0.0:21118->21118/tcp, :::21118->21118/tcp, 0.0.0.0:21116->21116/udp, :::21116->21116/udp   hbbs
6206c4cbb810   rustdesk/rustdesk-server:latest   "hbbr"                   2 hours ago    Up 2 hours   0.0.0.0:21117->21117/tcp, :::21117->21117/tcp, 0.0.0.0:21119->21119/tcp, :::21119->21119/tcp                                                                          hbbr
Configuration on this server:

The key is filled with following steps:
[dash@shidaarch ~]$ cd rustdeck/data/
[dash@shidaarch data]$ ls
db_v2.sqlite3  db_v2.sqlite3-shm  db_v2.sqlite3-wal  id_ed25519  id_ed25519.pub
[dash@shidaarch data]$ cat id_ed25519.pub
8+p6ycEu7aPcLDSkzBg4Lgml3m5EbuTzzl9yRhfixCE=

