Apr 1, 2020
TechnologyOn archlinux, it should be configured as following:
# sudo pacman -S terraform
$ yaourt terraform-libvirt
manually create the folder and copy some plugins into the folder:
$ mkdir -p ~/.terraform.d/plugins
$ cp xxxx ~/.terraform.d/plugins
$ ls ~/.terraform.d/plugins
terraform-provider-ansible
libvirtd configuration(Ubuntu)
qemu configuration(Or terraform will complain priviledge):
# vim /etc/libvirt/qemu.conf
security_driver = "none"
libvirtd configuration:
$ vim /etc/default/libvirtd
libvirtd_opts="-l"
$ vim /etc/libvirt/libvirtd.conf
listen_tls = 0
listen_tcp = 1
tcp_port = "16509"
listen_addr = "0.0.0.0"
auth_tcp = "none"
If you want to use bridge networking, make sure the following configuration is in
sysctl:
# cat >> /etc/sysctl.conf <<EOF
net.bridge.bridge-nf-call-ip6tables = 0
net.bridge.bridge-nf-call-iptables = 0
net.bridge.bridge-nf-call-arptables = 0
EOF
# sysctl -p /etc/sysctl.conf
dnsmasq dhcpd configuration
In order to configure the dhcpd in bridged networking , we have to configure the
dnsmasq server on gateway machine:
# vim /etc/dnsmasq.conf
bind-interfaces
dhcp-range=10.137.149.100,10.137.149.200,12h
dhcp-option=3,10.137.149.1
dhcp-authoritative
interface=enp3s0
# systemctl restart dnsmasq
Configure network parameter:
# vim main.tf
  network_interface {
		#network_name   = "default"
		bridge = "br0"
    hostname   = "${var.VM_HOSTNAME}-${count.index + 1}"
    wait_for_lease = true
  }
# terraform apply
Mar 25, 2020
Life就在刚才领导问:“XX厂商下午来交流虚拟化,想不想了解一下?”
“不想”
他当然诧异,为毛我号称云计算组的不去交流交流。于是我说在某地上的项目时我们就很了解它的技术架构了,他听了也没说什么。
真实原因是:
- 现场方案的落地权根本不在我职责范围内,各地想用什么方案恐怕连公司都没法做主。即便公司能做主,也会在事业部的层面决定选用谁家的方案。那么,这种推介直接推到我这个部门层面是否有必要?
- 放牛割草的故事。你是割草的,他是放牛的。他陪着你聊天,聊了一整天。到黄昏时候,他的牛吃饱了,你的草篓依然是空的。厂商肯上门来做技术推介的,多半是售前,售前的工作就是耗"可能的客户"的时间,某种程度上来说,售前和那些卖保险的没什么差别。他的牛吃饱了,你的草呢?站在这个角度想一想,去和人聊天不如静下心来做自己的东西。
- 国产厂商对于虚拟化/云等技术的理解及技术积累。都是靠堆人技术,把国外开源的拿过来改巴改巴。如果你有能力消化开源社区的东西,且提升成自己的方案,干嘛去听个二道贩子忽悠?
- Life is short, enjoy/play/learn more. 肺炎在外面是如此的惨烈,何必浪费宝贵时间听别人吹嘘自家产品?
- 珍惜生命。毕竟肺炎还没有过去,谁都不知道会不会有二次爆发。在太多的不确定前,尽量缩减face-to-face的所谓交流。
- 相当鄙视领导的这种安排。他妈的你说去就去啊?一次成熟的技术交流应该是: 事先沟通,主动获取相应的材料,先学习一下看有没有当面交流的必要; 若有,当面交流时再深入探讨。就你这样的,人家说要来交流你就给他机会,他过来念他不知道念了几百次的浅显易懂的PPT给你洗脑,何必呢?至于我,说句不好听的,就是你拉过去撑场面、烘托气氛的吧。我自己也没那么贱,没必要陪你去浪费时间吧。
这类技术交流我事先有听过不知道多少次,每次都让我觉得如吞苍蝇。很高兴老子今天直接说了no,life is short, enjoy/play/learn more.
Mar 20, 2020
TechnologyContent
On how to modify the chinese kl system.
This system is based on ubuntu16.04, but the manufacturer changed into a chinese version, so they could sell it at a very high price. Following are the steps for cracking this system.
Preparation
Unbox the machine, tear down its hard disk(1T), insert into as the usb disk, then dd it into a gzipped file:
sudo dd if=/dev/sdc | gzip -c > /media/sda/to_be_fucked.img
Now transfer the img into a powerful arm64 server(HW’s arm64), and gunzip it into its origin size, 1T.
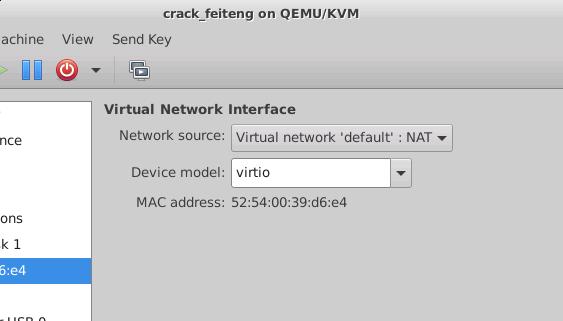
Install a clean ubuntu16.04.6 vm (arm64 version), like following:
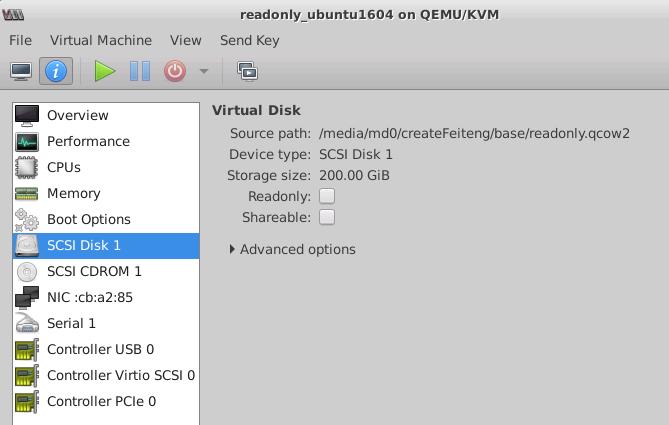
After installation, shutdown this vm, but don’t destroy it. Later we will use it, this is the crated kl system located.
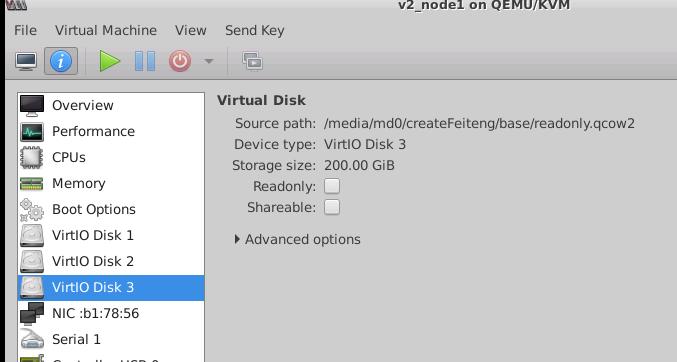
Now we will dump the kl system’s partition into our ubuntu system. Use another vm(ubuntu or centos, choose as you wish), attach the to_be_fucked.img and readonly.qcow2(previous vm image) together, then startup:
Login and check the partition,
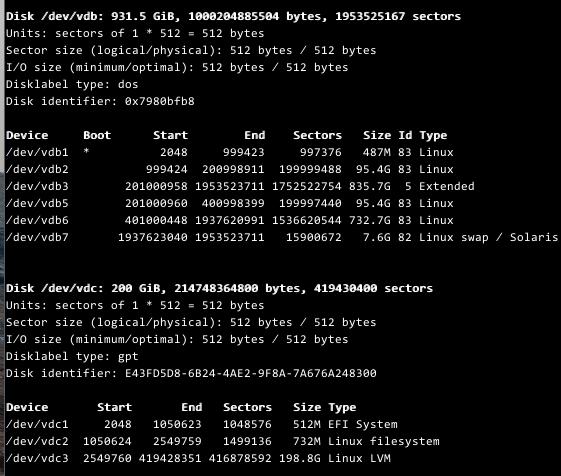
Check every partition of the /dev/vdb, we found the /dev/vdb2 is the root filesystem. so we mount it , also we mount the readonly.qcow2's root directory:
# sudo mkdir -p /media/crack /media/kl
# sudo vgscan
# sudo mount /dev/mapper/ubuntu-system-root /media/crack
# sudo mount /dev/vdb2 /media/kl
# sudo rsync -avz /media/kl /media/crack
Wait for a while, after the rsync finished, you actually got the kl system into your ubuntu16.04.6 vm.
Crack
Make sure you are in the /media/crack folder, do following steps:
Edit the etc/fstab file, in kl system its partition will be changed as we are in cracked system:
# vim /media/crack/etc/fstab
/dev/mapper/ubuntu--vg-root /               ext4    rw,noatime 0       1
Change the /boot content in cracked partition, enable the read/write for root partition, and enable the serial port output:
# mount /dev/vdc2 /mnt
# vim /mnt/grub/grub.cfg
...... find the corresponding location
		else
		  search --no-floppy --fs-uuid --set=root 39f71c29-80a2-43ad-b812-5d699ac4e94f
		fi
		echo	'Loading Linux 4.4.0-142-generic ...'
+++	        linux	/vmlinuz-4.4.0-142-generic root=/dev/mapper/ubuntu--vg-root rw  console=ttyS0,115200
		echo	'Loading initial ramdisk ...'
		initrd	/initrd.img-4.4.0-142-generic
	}
........
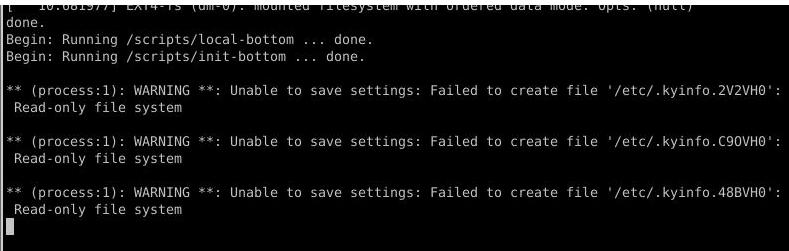
Now shutdown our 1804 vm, bootup the cracked 16.04.6 system, it will startup and hang at the very beginning.
Boot the 1804 vm, mount the cracked partition, copy the origin systemd binary file from a ubuntu16.04.6 system:
# mv /media/crack/lib/systemd/systemd /media/crack/lib/systemd/systemd.back
# cp the_origin_ubuntu16.04.6_systemd /media/crack/lib/systemd/systemd
Remove the activation check service:
root@arm01:/media/kylin/etc/systemd/system/multi-user.target.wants# pwd
/media/kylin/etc/systemd/system/multi-user.target.wants
root@arm01:/media/kylin/etc/systemd/system/multi-user.target.wants# mv kylin-activation-check.service /media/kylin/
After Cracked
Now reboot the system, this time the system will bootup and we use virsh for checking its ip address:
Get the ip address:
virsh net-dhcp-leases default |grep e4
 2020-03-23 10:45:33  52:54:00:39:d6:e4  ipv4      192.168.122.150/24        fuckgfw-os    -
Login with our physical machine’s username and password:
ssh fuckgfw@192.168.122.150
[Unauthorized System] fuckgfw@fuckgfw-os:~$
Tips for usage
to avoid the mtod, just change the /etc/motd, and use the zsh for replacing the bash.
Enable remote desktop(vncserver), using metacity for replacing the default gpu powered window manager.
# vim /etc/motd
 __________________________
< 麒麟: 我原本是Ubuntu . >
 --------------------------
        \   ^__^
         \  (oo)\_______
            (__)\       )\/\
                ||----w |
                ||     ||

 __    __   __          __    __  .______    __    __  .__   __. .___________. __    __
|  |  |  | |  |        |  |  |  | |   _  \  |  |  |  | |  \ |  | |           ||  |  |  |
|  |__|  | |  |        |  |  |  | |  |_)  | |  |  |  | |   \|  | `---|  |----`|  |  |  |
|   __   | |  |        |  |  |  | |   _  <  |  |  |  | |  . `  |     |  |     |  |  |  |
|  |  |  | |  |  __    |  `--'  | |  |_)  | |  `--'  | |  |\   |     |  |     |  `--'  |
|__|  |__| |__| (_ )    \______/  |______/   \______/  |__| \__|     |__|      \______/
                 |/
Also change the contents under this folder:

vnc server
Configure the mate session for vncserver for:
#!/bin/sh

# Uncomment the following two lines for normal desktop:
# unset SESSION_MANAGER
# exec /etc/X11/xinit/xinitrc

[ -x /etc/vnc/xstartup ] && exec /etc/vnc/xstartup
[ -r $HOME/.Xresources ] && xrdb $HOME/.Xresources
xsetroot -solid grey
vncconfig -iconic &
metacity &
exec mate-session &
Configure the configuration via dconf-editor, also configure the desktop manager via mate-tweak.
Configure the rdesktop server as:
# vim ~/.xsession
metacity&
mate-session
# apt-get install -y xrdp
Thus you could visit the remote desktop via rdesktop
Mar 17, 2020
TechnologyTips
官方默认的源是无法安装的
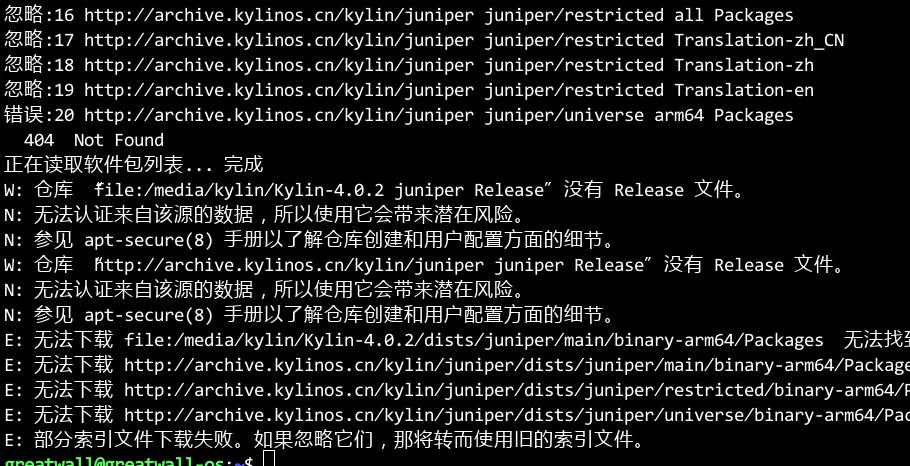 备份后换成Ubuntu官方源:
# vim /etc/apt/sources.list
deb http://mirrors.ustc.edu.cn/ubuntu-ports/ xenial main multiverse restricted universe
deb http://mirrors.ustc.edu.cn/ubuntu-ports/ xenial-backports main multiverse restricted universe
deb http://mirrors.ustc.edu.cn/ubuntu-ports/ xenial-proposed main multiverse restricted universe
deb http://mirrors.ustc.edu.cn/ubuntu-ports/ xenial-security main multiverse restricted universe
deb http://mirrors.ustc.edu.cn/ubuntu-ports/ xenial-updates main multiverse restricted universe
# sudo apt-get update -y
成功。
System
Create a vm based on Ubuntu16.04.6, thus you get the qcow2 of the basic images. Copy another:
# cp ubuntu.qcow2 crack_FT.qcow2
Create the disk image via dd:
# sudo dd if=/dev/sdc | gzip -c > /media/sda/kylin_FT.img
Then gunzip it in a very large disk system
GREEN KFZ
Working.
1. all of the binarys are in portable mode.
2. ansible in portable.
3. docker/docker-compose in binary mode.
4. install-socat in docker images, arm64 distribution.
5. ignore installing any packages.
Mar 14, 2020
TechnologyRecords the steps for generating the chinese language version of linstor documentation.
Source Code Preparation
Clone the whole source tree from github:
$ git clone https://github.com/LINBIT/linbit-documentation.git
For I want to generate chinese version, I need asciidoctorr-pdf-cjk-kai_gen_gothic to be installed and also its fonts, so I changed the Dockerfile for generating the docker images which could support chinese language pdf generation:
# vim Dockerfile
FROM debian:buster
MAINTAINER Roland Kammerer <roland.kammerer@linbit.com>
RUN groupadd --gid 1000 makedoc
RUN useradd -u 1000 -g 1000 makedoc
RUN apt-get update && apt-get install -y make inkscape ruby po4a patch
RUN gem install --pre asciidoctor-pdf
RUN gem install --pre asciidoctor-pdf-cjk
RUN gem install asciidoctor-pdf-cjk-kai_gen_gothic
RUN asciidoctor-pdf-cjk-kai_gen_gothic-install
USER makedoc
# make dockerimage
# sudo docker images | grep linbit
linbit-documentation   latest              118d89f74702        47 hours ago        902MB
Generate the po files:
# cd linbit-documentation-master
# chmod 777 -R *
# make UG9-pot-docker
# cd UG9/en
# ls *.pot
about-linstor.pot              administration-manual.pot      docker-linstor.pot    features.pot          internals.pot            lvm.pot        opennebula-linstor.pot  pacemaker.pot        recent-changes.pot   xen.pot
about.pot                      benchmark.pot                  docker.pot            fundamentals.pot      kubernetes.pot           man-pages.pot  opennebula.pot          proxmox-linstor.pot  rhcs.pot
administration-drbdmanage.pot  build-install-from-source.pot  drbdmanage-more.pot   gfs.pot               latency.pot              more-info.pot  openstack-linstor.pot   proxmox.pot          throughput.pot
administration-linstor.pot     configure.pot                  drbd-users-guide.pot  install-packages.pot  linstor-users-guide.pot  ocfs2.pot      openstack.pot           proxy.pot            troubleshooting.pot
The pot (portable object template) which holds the tranlatable items. I wrote a simple python script which uses baidu api for translating them into chinese:
# cd UG9/en
# vim autotrans.py
import re
import polib
import sys
import translators as ts

# pot files should be passed in argv, e.g python autotrans.py example.pot
print("#######################################################################3")
print("#######################################################################3")
print("#######################################################################3")
print("################# Processing "+ sys.argv[1] + "###############################")
print("#######################################################################3")
print("#######################################################################3")
print("#######################################################################3")
print("#######################################################################3")
po = polib.pofile(sys.argv[1])

for entry in po:
    # If contains '\n', then ignore translation
    print(entry.msgid)
    if "\n" in entry.msgid:
        print("********************Ignore translation***********************")
        entry.msgstr = entry.msgid
    else:
        # Normal texts should be translated.
        entry.msgstr = ts.baidu(entry.msgid, 'auto', 'zh-CN')
    print(entry.msgstr)
    # msgid is the origin one, while msgstr should be translated one.
    # << some_text_here >> should be selected out
    msgstr_links = []
    msgid_links = []
    # origin ones
    msgid_links = re.findall(r"(\<\<*.*?\>\>)", entry.msgid)
    # translated ones, needs to be recover using origin ones.
    msgstr_links = re.findall(r"(\<\<*.*?\>\>)", entry.msgstr)
    if len(msgstr_links)>0:
        ### only run in matched at least once
        for i in range(0, len(msgstr_links)):
            entry.msgstr = entry.msgstr.replace(msgstr_links[i], msgid_links[i])

po.save('./cn/' + sys.argv[1])
Use a shell wrapped commands for tranlating all of the pot files:
# for i in `ls *.pot`
do
python3 autotrans.py $i
done
The tranlation goes one-by-one, until all of the pot files has been translated.
Notice: the auto translation got many errors, you have to correct them manually.
Building steps
I use ja language for start, cause japanese version has been translated:
# cd UG9
# cp -r ja cn
# cd cn/
# rm -f *.po
# cp ../cn/*.pot .
Write a simple shell script for changing name from pot to po:
# vim rename.sh
for i in `ls *.pot`
do
	name=`echo $i | awk -F '.' {'print $1'}`
	mv $i $name.po
done
# chmod 777 rename.sh
# ./rename.sh
# rm -f rename.sh
# ls *.po
about-linstor.po              administration-manual.po      docker-linstor.po    features.po          internals.po            lvm.po        opennebula-linstor.po  pacemaker.po        recent-changes.po   xen.po
about.po                      benchmark.po                  docker.po            fundamentals.po      kubernetes.po           man-pages.po  opennebula.po          proxmox-linstor.po  rhcs.po
administration-drbdmanage.po  build-install-from-source.po  drbdmanage-more.po   gfs.po               latency.po              more-info.po  openstack-linstor.po   proxmox.po          throughput.po
administration-linstor.po     configure.po                  drbd-users-guide.po  install-packages.po  linstor-users-guide.po  ocfs2.po      openstack.po           proxy.po            troubleshooting.po
Add cn to UG-top.mk:
- languages = en ja
+ languages = en ja cn
Change UG-build.mk for adding cn selection:
# diff UG-build.mk  UG-build-back.mk
77c77
< 	if [ -d $(FONTDIR) ] && [ "$(lang)" != "ja" ] && [ "$(lang)" != "cn" ]; then \
---
> 	if [ -d $(FONTDIR) ] && [ "$(lang)" != "ja" ]; then \
83c83
< 	if [ -d $(FONTDIR) ] && [ "$(lang)" != "ja" ] && [ "$(lang)" != "cn" ]; then \
---
> 	if [ -d $(FONTDIR) ] && [ "$(lang)" != "ja" ]; then \
Change the Makefile for generating cn language pack:
# vim UG9/cn/Makefile
ASCIIDOCTOR_ADD_OPTIONS=-r asciidoctor-pdf-cjk -r asciidoctor-pdf-cjk-kai_gen_gothic -a pdf-style=KaiGenGothicCN
lang=cn

include ../../UG-build-po.mk
include ../../UG-build.mk
Add the default-theme.yml under the UG9/cn folder, and changes its fonts to CN related fonts:
# docker run --rm --entrypoint /bin/sh linbit-documentation:latest -c "cat /var/lib/gems/2.5.0/gems/asciidoctor-pdf-1.5.3/data/themes/default-theme.yml" > default-theme.yml
# vim default-theme.yml
font:
  catalog:
    # Noto Serif supports Latin, Latin-1 Supplement, Latin Extended-A, Greek, Cyrillic, Vietnamese & an assortment of symbols
    Noto Serif:
      normal: KaiGenGothicCN-Regular.ttf
      bold: KaiGenGothicCN-Bold.ttf
      italic: KaiGenGothicCN-Regular-Italic.ttf
      bold_italic: KaiGenGothicCN-Bold-Italic.ttf
    # M+ 1mn supports ASCII and the circled numbers used for conums
    M+ 1mn:
      normal: KaiGenGothicCN-Regular.ttf
      bold: KaiGenGothicCN-Bold.ttf
      italic: KaiGenGothicCN-Regular-Italic.ttf
      bold_italic: KaiGenGothicCN-Bold-Italic.ttf
page:
..........
Change the patch files under UG9/cn:
# mv UG9/cn/drbd-users-guide.adoc-ja.patch UG9/cn/drbd-users-guide.adoc-cn.patch
# vim UG9/cn/drbd-users-guide.adoc-cn.patch
@@ -1,4 +1,23 @@
 :doctype: article
+:lang: ja
+:chapter-label:
+:toc-title: 目录
+:preface-title: 前言标题
+:appendix-caption: 附录标题
+:caution-caption: 注意
+:example-caption: 示例标题
+:figure-caption: 图形标题
+:important-caption: 重要
+:last-update-label: 最終更新
+:listing-caption: 列表标题
+:manname-title: 人名
+:note-caption: 注記
+:preface-title: 前言标题
+:table-caption: 表标题
+:tip-caption: 要点标题
+:untitled-label: 未命名标签
+:version-label: 版本标签
+:warning-caption: 警告
 :source-highlighter: bash
 :listing-caption: Listing
 :icons: font
Now change the permission for all of the folder, thus docker could have write priviledge to current folder:
# chmod a+w -R *
#  make UG9-pdf-finalize-docker lang=cn
By running make UG9-pdf-finalize-docker could generate chinese version’s pdf, By running make UG9-html-finalize-docker lang=cn will generate chinese version’s htmls.
