Sep 27, 2020
TechnologyReflash latest firmware
Examine the disk and write the image to disk:
Disk /dev/sdd:1.88 GiB,2021654528 字节,3948544 个扇区
磁盘型号:
单元:扇区 / 1 * 512 = 512 字节
扇区大小(逻辑/物理):512 字节 / 512 字节
I/O 大小(最小/最佳):512 字节 / 512 字节
磁盘标签类型:dos
磁盘标识符:0x2fbbe9fe

设备       启动 起点    末尾    扇区  大小 Id 类型
/dev/sdd1  *       0 1390591 1390592  679M  0 空
/dev/sdd2        264  131335  131072   64M ef EFI (FAT-12/16/32)
dash@archnvme:/media/sda $ cd ~/Downloads
dash@archnvme:~/Downloads $ sudo su
[root@archnvme Downloads]# gzip -dc reflash111_of.img.gz | dd of=/dev/sdd bs=1M
Mount reflash’s usb disk into computer:
Mount the USB device on your system; you should see a volume named rfl-boot.
On the rfl-boot volume there is a directory named reflash.
Download the operating system image you would like to write, along with its MD5 file.
Copy both the compressed .img.gz file and its .img.gz.md5 counterpart into the reflash directory.
Now insert the flashed usb disk into joggler, then flash will begin.
After flashing, could poweron from flash.
Sep 24, 2020
TechnologyInstallation
Install microsoft visual studio code via:
$ sudo vim /etc/pacman.conf
[archlinuxcn]
#The Chinese Arch Linux communities packages.
SigLevel = Never
Server   = http://repo.archlinuxcn.org/$arch
$ sudo pacman -Sy
$ sudo pacman -S visual-studio-code-bin
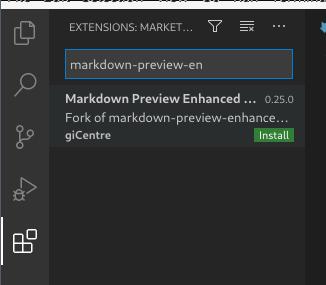
Install Plugin
Install via:
Install prince(for converting to pdf)via:
$ sudo pacman -S prince-bin
Configure the stylesheet for prince’s generated output:
$ cat ~/.mume/style.less
/* Please visit the URL below for more information: */
/*   https://shd101wyy.github.io/markdown-preview-enhanced/#/customize-css */

.markdown-preview.markdown-preview {
  // modify your style here
  // eg: background-color: blue;
  &.prince {
    @page {
      //size: A4 landscape
      size: A4 PortraitModes
    }
    @font-face {
      font-family: sans-serif;
      font-style: normal;
      font-weight: normal;
      src: url("/usr/share/fonts/adobe-source-han-sans/SourceHanSansCN-Regular.otf")
  }

  @font-face {
      font-family: sans-serif;
      font-style: normal;
      font-weight: bold;
      src: url("/usr/share/fonts/adobe-source-han-sans/SourceHanSansCN-Bold.otf")
  }

  @font-face {
      font-family: sans-serif;
      font-style: italic;
      font-weight: normal;
      src: url("/usr/share/fonts/adobe-source-code-pro/SourceCodePro-It.otf")
      //src: url("/usr/share/fonts/adobe-source-han-sans/SourceHanSansCN-Regular.otf")
  }

  @font-face {
      font-family: sans-serif;
      font-style: italic;
      font-weight: bold;
      src: url("/usr/share/fonts/adobe-source-code-pro/SourceCodePro-BoldIt.otf")
      //src: url("/usr/share/fonts/adobe-source-han-sans/SourceHanSansCN-Bold.otf")
  }
  }
}
Or edit the css via ctrl+shift+p and Run Markdown Preview Enhanced: Customize Css, Insert the above code.
Sep 15, 2020
TechnologyFind USB Equipment
Via lsusb we could find which usb equipment available:
$ sudo lsusb -t
/:  Bus 02.Port 1: Dev 1, Class=root_hub, Driver=xhci_hcd/8p, 10000M
    |__ Port 5: Dev 2, If 0, Class=Hub, Driver=hub/4p, 5000M
/:  Bus 01.Port 1: Dev 1, Class=root_hub, Driver=xhci_hcd/16p, 480M
    |__ Port 2: Dev 2, If 0, Class=Vendor Specific Class, Driver=rtsx_usb, 480M
    |__ Port 3: Dev 3, If 0, Class=Vendor Specific Class, Driver=asix, 480M
    |__ Port 6: Dev 4, If 0, Class=Human Interface Device, Driver=, 12M
    |__ Port 6: Dev 4, If 1, Class=Human Interface Device, Driver=usbhid, 12M
    |__ Port 9: Dev 5, If 0, Class=Hub, Driver=hub/4p, 480M
        |__ Port 1: Dev 7, If 1, Class=Human Interface Device, Driver=usbhid, 12M
        |__ Port 1: Dev 7, If 0, Class=Human Interface Device, Driver=usbhid, 12M
        |__ Port 2: Dev 9, If 0, Class=Human Interface Device, Driver=usbhid, 12M
        |__ Port 3: Dev 10, If 0, Class=Wireless, Driver=rndis_host, 480M
        |__ Port 3: Dev 10, If 1, Class=CDC Data, Driver=rndis_host, 480M
        |__ Port 4: Dev 12, If 0, Class=Vendor Specific Class, Driver=udl, 480M
    |__ Port 12: Dev 13, If 0, Class=Mass Storage, Driver=usb-storage, 480M
    |__ Port 13: Dev 6, If 1, Class=Video, Driver=uvcvideo, 480M
    |__ Port 13: Dev 6, If 0, Class=Video, Driver=uvcvideo, 480M
    |__ Port 14: Dev 8, If 0, Class=Wireless, Driver=btusb, 12M
    |__ Port 14: Dev 8, If 1, Class=Wireless, Driver=btusb, 12M
And we could found corresponding USB equipments:
$ ls /sys/bus/usb/drivers/usb
1-12  1-13  1-14  1-2  1-3  1-6  1-9  1-9.1  1-9.2  1-9.3  1-9.4  2-5  bind  uevent  unbind  usb1  usb2
Via following command we could unbind/bind DisplayLink equipments:
$ echo '1-9.4' | sudo tee /sys/bus/usb/drivers/usb/unbind
$ echo '1-9.4' | sudo tee /sys/bus/usb/drivers/usb/bind
unbind is equal to unplugin the usb port, bind is equal to insert the usb equipment.
xrandr tips
Via following commands:
$ xrandr --output DVI-I-2-2 --mode 1920x1080 --right-of HDMI-0'
Sep 9, 2020
TechnologyEnvironment
Ubuntu 18.04.3 LTS, Kernel version:
Linux build 5.3.0-62-generic.
vagrant box image: centos76.
lxc images:
# apt-get install -y kpartx
# cp ~/.vagrant.d/boxes/centos76/0/libvirt/box.img  /media/sdb/
# cd /media/sdb

root@build:/media/sdb# qemu-img convert box.img box1.img
root@build:/media/sdb# qemu-img info box.img
image: box.img
file format: qcow2
virtual size: 200G (214748364800 bytes)
disk size: 655M
cluster_size: 65536
Format specific information:
    compat: 1.1
    lazy refcounts: false
    refcount bits: 16
    corrupt: false
root@build:/media/sdb# qemu-img info box1.img
image: box1.img
file format: raw
virtual size: 200G (214748364800 bytes)
disk size: 1.3G

# kpartx -av box1.img
add map loop2p1 (253:2): 0 419428352 linear 7:2 2048
# mount /dev/mapper/loop2p1 /mnt8/
# ls /mnt8/
bin  boot  dev  etc  home  lib  lib64  media  mnt  opt  proc  root  run  sbin  srv  sys  tmp  usr  var
# tar -cvzf rootfs.tar.gz -C /mnt8 .
Create metadata and import lxc images:
# vim metadata.yaml
architecture: "x86_64"
creation_date: 1599622122 # To get current date in Unix time, use `date +%s` command
properties:
architecture: "x86_64"
description: "CentOS 7.6 for lxc"
os: "redhat"
release: "7.6"
# tar czvf metadata.tar.gz metadata.yaml
# lxc image import metadata.tar.gz rootfs.tar.gz --alias "centos76"
Image imported with fingerprint: 9f53f37e869c643049933dccf8cac9c76107856b1f66955cc2a9d3a55329a060
# lxc image ls
+----------+--------------+--------+-------------+--------+----------+-----------------------------+
|  ALIAS   | FINGERPRINT  | PUBLIC | DESCRIPTION |  ARCH  |   SIZE   |         UPLOAD DATE         |
+----------+--------------+--------+-------------+--------+----------+-----------------------------+
| centos76 | 9f53f37e869c | no     |             | x86_64 | 473.97MB | Sep 9, 2020 at 3:29am (UTC) |
+----------+--------------+--------+-------------+--------+----------+-----------------------------+
lxd init using following configuration:
root@build:/media/sdb# lxd init
Would you like to use LXD clustering? (yes/no) [default=no]:
Do you want to configure a new storage pool? (yes/no) [default=yes]:
Name of the new storage pool [default=default]:
Name of the storage backend to use (btrfs, dir, lvm) [default=btrfs]:
Create a new BTRFS pool? (yes/no) [default=yes]:
Would you like to use an existing block device? (yes/no) [default=no]: ^C
root@build:/media/sdb# lxd init
Would you like to use LXD clustering? (yes/no) [default=no]:
Do you want to configure a new storage pool? (yes/no) [default=yes]:
Name of the new storage pool [default=default]:
Name of the storage backend to use (btrfs, dir, lvm) [default=btrfs]: dir
Would you like to connect to a MAAS server? (yes/no) [default=no]:
Would you like to create a new local network bridge? (yes/no) [default=yes]:
What should the new bridge be called? [default=lxdbr0]:
What IPv4 address should be used? (CIDR subnet notation, “auto” or “none”) [default=auto]:
What IPv6 address should be used? (CIDR subnet notation, “auto” or “none”) [default=auto]: none
Would you like LXD to be available over the network? (yes/no) [default=no]:
Would you like stale cached images to be updated automatically? (yes/no) [default=yes]
Would you like a YAML "lxd init" preseed to be printed? (yes/no) [default=no]:
Create a bridge profile:
# lxc profile create bridge
root@build:/media/sdb# cat bridge.profile
config:
  linux.kernel_modules: ip_tables,ip6_tables,netlink_diag,nf_nat,overlay,br_netfilter
  raw.lxc: "lxc.apparmor.profile=unconfined\nlxc.cap.drop= \nlxc.cgroup.devices.allow=a\nlxc.mount.auto=proc:rw sys:rw"
  security.nesting: "true"
  security.privileged: "true"
description: Bridge LXD profile
devices:
  eth0:
    name: eth0
    nictype: bridged
    parent: br0
    type: nic
  root:
    path: /
    pool: default
    type: disk
name: bridge
root@build:/media/sdb# lxc  profile edit bridge < bridge.profile
root@build:/media/sdb# lxc profile list
+---------+---------+
|  NAME   | USED BY |
+---------+---------+
| bridge  | 0       |
+---------+---------+
| default | 0       |
+---------+---------+
Create a instance:
# lxc launch centos76 ko1 --profile bridge
Creating ko1
# lxc ls
+------+---------+-----------------------+------+------------+-----------+
| NAME |  STATE  |         IPV4          | IPV6 |    TYPE    | SNAPSHOTS |
+------+---------+-----------------------+------+------------+-----------+
| ko1  | RUNNING | 10.137.149.190 (eth0) |      | PERSISTENT | 0         |
+------+---------+-----------------------+------+------------+-----------+
How KO Works
Bug fix1: conf/my.cnf mapping.
Bug fix2: could not running on lxc’s docker-compose.
On adding Ubuntu
Via following commands, we could use lxc for ubuntu20.04.
# qemu-img convert box.img box1.img
# kpartx -av box1.img
# lvscan
# mount /dev/vgubuntu/root /mnt7/
# tar -czvf rootfs.tar.gz -C /mnt7 .
# vim metadata.yaml
architecture: "x86_64"
creation_date: 1600908919 # To get current date in Unix time, use `date +%s` command
properties:
architecture: "x86_64"
description: "ubuntu20.04 for lxc"
os: "ubuntu"
release: "20.04"
# tar czvf metadata.tar.gz metadata.yaml
# lxc image import metadata.tar.gz  rootfs.tar.gz --alias "ubuntu20.04"
On adding storage in cluster
Via following commands:
lxc cluster list
# for getting the member name.

lxc storage create fastPool dir source=/media/md0/lxd --target arm-a1
lxc storage create fastPool dir source=/media/md0/lxd --target arm-a2
lxc storage create fastPool dir source=/media/md0/lxd --target arm-a3
lxc storage create fastPool dir
x86 working tips
working tips for creating lxd cluster:
sudo apt install linux-image-extra-virtual linux-generic
cat /proc/sys/net/bridge/bridge-nf-call-iptables
1
lxc profile copy default k8s
lxc profile edit k8s
config:
  environment.TZ: Asia/Bangkok
  raw.lxc: |
    lxc.apparmor.profile=unconfined
    lxc.cgroup.devices.allow = a
    lxc.mount.auto=proc:rw sys:rw
    lxc.cap.drop=
  security.nesting: "true"
  security.privileged: "true"
description: Default LXD profile
devices:
  apparmor:
    path: /sys/module/apparmor/parameters/enabled
    source: /dev/null
    type: disk
  eth0:
    name: eth0
    nictype: bridged
    parent: br10
    type: nic
  hashsize:
    path: /sys/module/nf_conntrack/parameters/hashsize
    source: /dev/null
    type: disk
  kmsg:
    path: /dev/kmsg
    source: /dev/kmsg
    type: unix-char
  root:
    path: /
    pool: default
    type: disk
name: k8s
used_by:
- /1.0/containers/k1
- /1.0/containers/k2
- /1.0/containers/k3
lxc launch ubuntu:18.04 k1 -p k8s
Sep 7, 2020
Technologyftpd服务端
加载镜像:
# docker load<ftpd.tar
Loaded image: gists/pure-ftpd:arm64
# docker images | grep ftpd
gists/pure-ftpd                                                            arm64               1b3e76d8756b        3 months ago        5.77MB
运行以下命令, 创建一个pure-ftpd实例, 当前目录下的ftpd含有ftpd的配置文件(pureftpd)及存储目录(data):
# mkdir ftpd
# cd ftpd
# mkdir pureftpd data
# docker run -d --restart unless-stopped --name pure-ftpd  -e MIN_PASV_PORT=40000 -e MAX_PASV_PORT=40009 -p 21:21  -p 40000-40009:40000-40009  -v $(pwd)/pureftpd:/etc/pureftpd  -v $(pwd)/data:/home/ftpuser gists/pure-ftpd:arm64
运行以下命令配置pure-ftpd的权限,以及添加test用户,并刷新pure-ftpd本地配置文件:
 docker exec -it pure-ftpd chown ftpuser:ftpuser -R /home/ftpuser
 docker exec -it pure-ftpd pure-pw useradd test -m -u ftpuser -d /home/ftpuser/test
 docker exec -it pure-ftpd pure-pw mkdb
客户端
举winscp ftp连接为例, 新建一个ftp连接:

直接在winscp里拖拉实现上传下载:

进度:

