May 28, 2021
Technology1. 目的
k3s+kubevirt,运行虚拟机工作负载. 落地平台为AllInOne节点。主要针对边缘侧算力平台落地场景。
2. 环境
嵌套虚拟化环境用于承载k3s算力管控平台。运行操作系统为Ubuntu20.04, 40Core, 274G内存。
更新: 嵌套虚拟化会产生诸多问题,导致qemu无法启动,因而后面我采用在物理机上直接启动k3s的方式。
物理机环境:
Intel(R) Xeon(R) Gold 5118 CPU @ 2.30GHz
376G memory
2T nvme ssd
CentOS 7.6.1810
kernel: 4.19.12-1.el7.elrepo.x86_64
3. 步骤
注:以下为虚拟化环境,未安装成功(因后续有嵌套虚拟化导致qemu无法启动的问题)
安装步骤:
# apt-get update -y && apt-get upgrade -y
# export http_proxy export https_proxy
# curl -sfL https://get.k3s.io | sh -
# vim /etc/resolv.conf
nameserver 223.5.5.5
# systemctl stop systemd-resolved
# systemctl disable systemd-resolved
以下为正常过程:
安装k3s:
# yum update -y && yum install -y git
# curl -sfL https://get.k3s.io | sh -
安装KubeVirt:
# export VERSION=v0.41.0
# kubectl create -f https://github.com/kubevirt/kubevirt/releases/download/${VERSION}/kubevirt-operator.yaml
# kubectl create -f https://github.com/kubevirt/kubevirt/releases/download/${VERSION}/kubevirt-cr.yaml
安装virtctl用于控制KubeVirt虚拟机,这里使用Kubernetes的插件管理器Krew来安装virtctl:
# (   set -x; cd "$(mktemp -d)" &&   curl -fsSLO "https://github.com/kubernetes-sigs/krew/releases/latest/download/krew.tar.gz" &&   tar zxvf krew.tar.gz &&   KREW=./krew-"$(uname | tr '[:upper:]' '[:lower:]')_$(uname -m | sed -e 's/x86_64/amd64/' -e 's/arm.*$/arm/')" &&   "$KREW" install krew; )

# export PATH="${KREW_ROOT:-$HOME/.krew}/bin:$PATH"
# kubectl krew install virt
安装Containerized-Data-Importer(CDI)用于管理虚拟机的磁盘,安装步骤如下:
# export VERSION=$(curl -s https://github.com/kubevirt/containerized-data-importer/releases/latest | grep -o "v[0-9]\.[0-9]*\.[0-9]*")
# kubectl create -f https://github.com/kubevirt/containerized-data-importer/releases/download/$VERSION/cdi-operator.yaml
# kubectl create -f https://github.com/kubevirt/containerized-data-importer/releases/download/$VERSION/cdi-cr.yaml
从https://www.microsoft.com/en-us/evalcenter/evaluate-windows-server-2019 下载Windows ISO 180天试用版, 而后上传该ISO:
# Get the CDI upload proxy service IP:
 kubectl get svc -n cdi

 # Upload
 kubectl virt image-upload --image-path </path/to/iso> \
     --pvc-name iso-win2k19 --access-mode ReadWriteOnce \
     --pvc-size 10G --uploadproxy-url <upload-proxy service:443> \
     --insecure --wait-secs=240
上传前需要确保coredns正常运行,否则会出现上传不成功的情况。
PVC被设置成ReadWriteOnce, 因为默认的local-path storageclass 不支持更多的模式。因为我们只使用一个节点,所以这点没所谓,但是在大型的K3s集群里,需要注意PVC的属性配置。
virtio-container-disk 容器镜像需要被实现拉回,因为在安装的时候我们需要使用其中包含的驱动程序。
# crictl pull kubevirt/virtio-container-disk
现在我们创建一个yaml文件用于定义需要创建的KubeVirt虚拟机(win.yaml):
---
apiVersion: v1
kind: PersistentVolumeClaim
metadata:
  name: winhd
spec:
  accessModes:
    - ReadWriteOnce
  resources:
    requests:
      storage: 15Gi
  storageClassName: manual
---
apiVersion: kubevirt.io/v1alpha3
kind: VirtualMachine
metadata:
  name: win2k19-iso
spec:
  running: false
  template:
    metadata:
      labels:
        kubevirt.io/domain: win2k19-iso
    spec:
      domain:
        cpu:
          cores: 4
        devices:
          disks:
          - bootOrder: 1
            cdrom:
              bus: sata
            name: cdromiso
          - disk:
              bus: sata
            name: harddrive
          - cdrom:
              bus: sata
            name: virtiocontainerdisk
        machine:
          type: q35
        resources:
          requests:
            memory: 8G
      volumes:
      - name: cdromiso
        persistentVolumeClaim:
          claimName: iso-win2k19
      - name: harddrive
        persistentVolumeClaim:
          claimName: winhd
      - containerDisk:
          image: kubevirt/virtio-container-disk
        name: virtiocontainerdisk
我们再创建一个PV用于承载该虚拟机的磁盘(pv.yaml):
apiVersion: v1
kind: PersistentVolume
metadata:
  name: task-pv-volume
  labels:
    type: local
spec:
  storageClassName: manual
  capacity:
    storage: 20Gi
  accessModes:
    - ReadWriteOnce
  hostPath:
    path: "/media/sda/win"
创建虚拟机:
 kubectl apply -f pv.yaml
 kubectl apply -f win.yaml
 kubectl virt start win2k19-iso
 # If you're running this on a remote machine, use X-forwarding and
 # apt-get install virt-viewer
 kubectl virt vnc win2k19-iso
值得注意的是,win.yaml中我们只能选择sata作为主磁盘的格式,kubectl virt vnc在我的机器上无法使用,所以我用了kubectl virt --proxy-only=true win2k19-iso用于获取一个动态端口,而后vncviewer到该动态端口上去。
完成安装后,进入设备管理器安装完未安装好的驱动程序。
使用NodePort暴露安装好以后的虚拟机的RDP端口:
apiVersion: v1
kind: Service
metadata:
  name: windows-nodeport
spec:
  externalTrafficPolicy: Cluster
  ports:
  - name: nodeport
    nodePort: 30000
    port: 27017
    protocol: TCP
    targetPort: 3389
  selector:
    kubevirt.io/domain: win2k19-iso
  type: NodePort
创建完该服务后,则可通过xxx.xxx.xxx.xxx:30000用于访问该虚拟机的RDP远程桌面端口了。
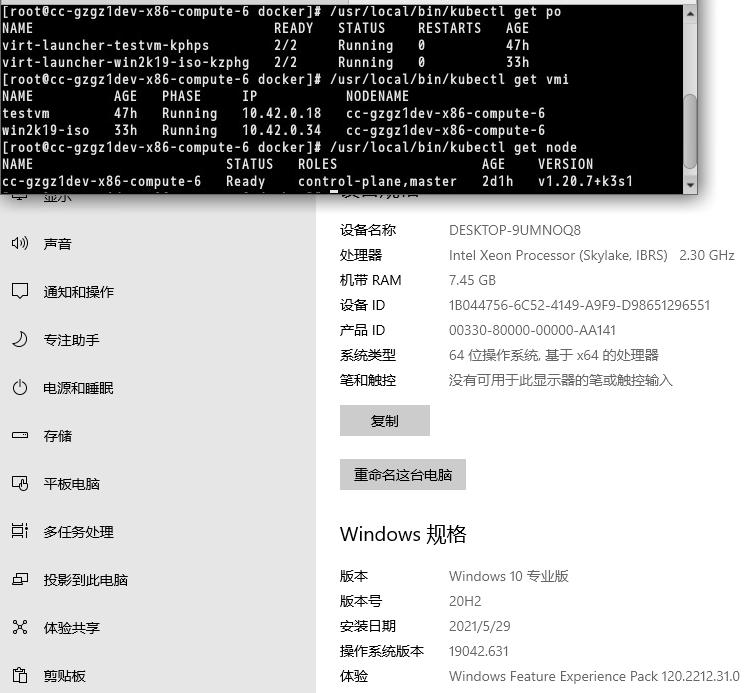
创建完以后的虚拟机如图所示:
如果是virtctl,则直接访问的方式是通过proxy:
kubectl proxy --address=0.0.0.0 --accept-hosts='^*$' --port 8080
testvm:
apiVersion: kubevirt.io/v1
kind: VirtualMachine
metadata:
  name: testvm
spec:
  running: false
  template:
    metadata:
      labels:
        kubevirt.io/size: small
        kubevirt.io/domain: testvm
    spec:
      domain:
        devices:
          disks:
            - name: containerdisk
              disk:
                bus: virtio
            - name: cloudinitdisk
              disk:
                bus: virtio
          interfaces:
          - name: default
            bridge: {}
        resources:
          requests:
            memory: 64M
      networks:
      - name: default
        pod: {}
      volumes:
        - name: containerdisk
          containerDisk:
            image: quay.io/kubevirt/cirros-container-disk-demo
        - name: cloudinitdisk
          cloudInitNoCloud:
            userDataBase64: SGkuXG4=
May 9, 2021
Technology目标
在LXD上运行ccse
准备
服务器上安装lxd, 初始化镜像centos7, ccse安装介质。
步骤
创建一个profile, 用于创建lxd用于部署验证:
lxc profile show default>ccse
vim ccse
lxc profile create ccse
lxc profile edit ccse<ccse
文件的内容如下:
config:
  linux.kernel_modules: ip_tables,ip6_tables,netlink_diag,nf_nat,overlay,br_netfilter,xt_conntrack
  raw.lxc: "lxc.apparmor.profile=unconfined\nlxc.cap.drop= \nlxc.cgroup.devices.allow=a\nlxc.mount.auto=p
roc:rw sys:rw"
  security.nesting: "true"
  security.privileged: "true"
description: CCSE Running profile
devices:
  eth0:
    name: eth0
    network: lxdbr0
    type: nic
  hashsize:
    path: /sys/module/nf_conntrack/parameters/hashsize
    source: /dev/null
    type: disk
  kmsg:
    path: /dev/kmsg
    source: /dev/kmsg
    type: unix-char
  root:
    path: /
    pool: ssd
    type: disk
name: ccse
验证此profile是否可正常工作:
# lxc launch centos7 kkk --profile ccse
Creating kkk
Starting kkk
# lxc exec kkk bash
[root@kkk ~]# cat /etc/redhat-release
CentOS Linux release 7.9.2009 (Core)
注意:
- 版本略高于推荐的centos 7.6.
- 使用上述的权限文件加载,可以解决teledb组碰到的获取磁盘权限问题。
部署介质准备
初始化容器:
cd /etc/yum.repos.d/
mkdir back
mv * back
vi ccse.repo
yum makecache
vi /etc/yum.conf
yum install -y which vim net-tools lsof sudo
因为需要将lxd当成物理机来使用,安装openssh-server后重启:
 yum install -y openssh-server
 systemctl enable sshd
 systemctl start sshd
 passwd
 reboot
再次进入容器后,下载安装文件:
scp docker@xxx.xxx.xxx.xx:/home/docker/shrink280/ccse-installer-2.8.0-rc-linux-amd64-offline-20210409204619-shrink.tar.xz .
tar xJf ccse-installer-2.8.0-rc-linux-amd64-offline-20210409204619-shrink.tar.xz
部署console节点
记录ip 地址 10.222.125.68, 配置完正确的IP地址后,按原有步骤安装console节点,安装完毕后上传镜像。
制作基础节点
需打包节点所需要的依赖:
# lxc launch centos7 base
# lxc exec base bash
     yum install -y which lsof vim net-tools sudo selinux-policy libseccomp libselinux-python selinux-policy-targeted openssh-server ebtables ethtool
     systemctl enable sshd
     passwd
     shutdown -h now
#  lxc publish base --alias ccsenode
hashsize:
sudo su
echo "262144" > /sys/module/nf_conntrack/parameters/hashsize
cat /sys/module/nf_conntrack/parameters/hashsize
May 8, 2021
TechnologyWorking Environment
Centos 7.9, vm , 8core, 16G.
Installation
Install dnsmasq:
# sudo yum install -y dnsmasq
Install dnscrypt-proxy:
# sudo yum install -y dnscrypt-proxy
Wget the chinadns configuration file:
# wget https://raw.githubusercontent.com/felixonmars/dnsmasq-china-list/master/accelerated-domains.china.conf
# mv accelerated-domains.china.conf /etc/dnsmasq.d/accelerated-domains.china.conf
you can replace the 114.114.114.114 via your own dns(china intranet dns).
Configuration
Configure dnsmasq:
# vim /etc/dnsmasq.conf
listen-address=127.0.0.1
no-resolv
conf-dir=/usr/local/etc/dnsmasq.d
server=127.0.0.1#5300
interface=lo
bind-interfaces
Configure dnscrypt-proxy:
# vim /etc/dnscrypt-proxy/dnscrypt-proxy.toml
     # 监听5300端口
     listen_addresses = ['127.0.0.1:5300', '[::1]:5300']
     # 使用下面3个公开的DNS服务
     server_names = ['google', 'cloudflare', 'cloudflare-ipv6']
     # 如果找不到合适的公开DNS服务,则使用下面的DNS服务
     fallback_resolvers = ['9.9.9.9:53', '8.8.8.8:53']
     # 担心这些DNS请求被墙,设置使用代理发送DNS请求
     force_tcp = true
     proxy = 'socks5://127.0.0.1:1086'
Configure /etc/resolv.conf for using 127.0.0.1:
nameserver 127.0.0.1
privoxy
In centos 7.9. don’t install this package from epel, download the source code from internet and compile it:
$ privoxy  --version
Privoxy version 3.0.28 (https://www.privoxy.org/)
make sure you have specify the gfwlist.
May 2, 2021
Technology完全用ram工作的场景下,关机时需要回写到磁盘上,以下是用来将Ram中的数据回写到磁盘的方法。
# vim /bin/writeback.sh
    #!/bin/sh
    kkk=`mount | grep "none on / type tmpfs"`
    if [ ! -z "$kkk" ]
    then
    mkdir -p /writeback
    mount /dev/mapper/ubuntu--vg-root /writeback
    rsync -a --delete --exclude 'tmp'   --exclude 'proc' --exclude 'writeback' --exclude 'sys' / /writeback/
    fi
创建一个回写的服务:
# vim  /etc/systemd/system/run-before-shutdown.service
[Unit]
Description=Run my custom task at shutdown
DefaultDependencies=no
Before=shutdown.target reboot.target halt.target

[Service]
Type=oneshot
ExecStart=/bin/writeback.sh
TimeoutStartSec=0

[Install]
WantedBy=shutdown.target
使能服务:
# systemctl enable run-before-shutdown
则关机时系统会调用回写脚本将Ram中的数据写入到磁盘中。
Apr 30, 2021
Technology环境说明
新建3台虚拟机:
192.168.100.13/14/15, 4核8G, 虚拟机环境
该虚拟机所在的网段为192.168.100.0/24, 其中dhcp范围为192.168.100.128~192.168.100.254, 网关为192.168.100.1
OS环境初始化配置
我们期待lxc实例能通过网桥获取到与宿主机(192.168.100.13/14/15)同样的IP地址范围,所以先配置各节点上的网桥br0:
删除手动连接后,NetworkManager会自动拉起另一个:

再次删除此自动建立的连接,直到只看到lxdbr0即可:

建立br0, 并指定eth0为br0的slave设备:

依次类推完成另外两台机器的配置。
相关的配置脚本(这里以192.168.100.14为例说明)如下,实际环境中需根据具体的配置信息进行更改:
nmcli con show | grep eth0 | awk {'print $2'} | xargs -I % nmcli con delete uuid %
nmcli con show | grep eth0 | awk {'print $4'} | xargs -I % nmcli con delete uuid %
nmcli con show
nmcli conn add type bridge ifname br0 ipv4.method manual ipv4.address "192.168.100.14" ipv4.gateway "192.168.100.1" ipv4.dns "223.5.5.5"
nmcli conn add type bridge-slave ifname eth0 master br0
lxc使用br0网络
lxc可以通过使用不同的profile定义出实例所在的网络,我们通过以下操作新建出一个可以通过网桥br0获取到192.168.100.0/24段地址的profile:
[root@node13 ~]# lxc profile list
+---------+---------------------+---------+
|  NAME   |     DESCRIPTION     | USED BY |
+---------+---------------------+---------+
| default | Default LXD profile | 0       |
+---------+---------------------+---------+
[root@node13 ~]# lxc profile show default>br0
[root@node13 ~]# vim br0
config: {}
description: Default LXD profile modified for using br0
devices:
  eth0:
    name: eth0
    nictype: bridged
    parent: br0
    type: nic
  root:
    path: /
    pool: default
    type: disk
name: br0
used_by: []
[root@node13 ~]# lxc profile create br0
Profile br0 created
[root@node13 ~]# lxc profile edit br0<br0
[root@node13 ~]# lxc profile list
+---------+--------------------------------------------+---------+
|  NAME   |                DESCRIPTION                 | USED BY |
+---------+--------------------------------------------+---------+
| br0     | Default LXD profile modified for using br0 | 0       |
+---------+--------------------------------------------+---------+
| default | Default LXD profile                        | 0       |
+---------+--------------------------------------------+---------+
现在可使用创建出的br0实例化一个容器,
# lxc launch centos7 node1 --profile br0
# lxc ls
+-------+---------+------------------------+----------------------------------------------+-----------+-----------+
| NAME  |  STATE  |          IPV4          |                     IPV6                     |   TYPE    | SNAPSHOTS |
+-------+---------+------------------------+----------------------------------------------+-----------+-----------+
| node1 | RUNNING | 192.168.100.130 (eth0) |                                              | CONTAINER | 0         |
+-------+---------+------------------------+----------------------------------------------+-----------+-----------+
固定IP的方法:
[root@node13 ~]# lxc exec node1 bash
[root@node1 ~]# vim /etc/sysconfig/network-scripts/ifcfg-eth0
DEVICE=eth0
BOOTPROTO=static
IPADDR=192.168.100.20
NETMASK=255.255.255.0
GATEWAY=192.168.100.1
ONBOOT=yes
HOSTNAME=node1
NM_CONTROLLED=no
TYPE=Ethernet
MTU=
DHCP_HOSTNAME=node1
[root@node1 ~]#  reboot
重启之后可以看到lxc确实使用了我们设置的192.168.100.20IP地址。
[root@node13 ~]# lxc ls
+-------+---------+------------------------+----------------------------------------------+-----------+-----------+
| NAME  |  STATE  |          IPV4          |                     IPV6                     |   TYPE    | SNAPSHOTS |
+-------+---------+------------------------+----------------------------------------------+-----------+-----------+
| node1 | RUNNING | 192.168.100.20 (eth0)  |                                              | CONTAINER | 0         |
最后验证与外部网络的互通性:
[root@node13 ~]# lxc exec node1 bash
[root@node1 ~]# ping 192.168.100.10
PING 192.168.100.10 (192.168.100.10) 56(84) bytes of data.
64 bytes from 192.168.100.10: icmp_seq=1 ttl=64 time=0.742 ms
64 bytes from 192.168.100.10: icmp_seq=2 ttl=64 time=0.287 ms
[root@node1 ~]# ping 10.50.208.145
PING 10.50.208.145 (10.50.208.145) 56(84) bytes of data.
64 bytes from 10.50.208.145: icmp_seq=1 ttl=63 time=0.410 ms
64 bytes from 10.50.208.145: icmp_seq=2 ttl=63 time=0.214 ms
^C
--- 10.50.208.145 ping statistics ---
2 packets transmitted, 2 received, 0% packet loss, time 1000ms
rtt min/avg/max/mdev = 0.214/0.312/0.410/0.098 ms
[root@node1 ~]# ping 10.50.208.147
PING 10.50.208.147 (10.50.208.147) 56(84) bytes of data.
64 bytes from 10.50.208.147: icmp_seq=1 ttl=64 time=0.146 ms
64 bytes from 10.50.208.147: icmp_seq=2 ttl=64 time=0.153 ms
^C
--- 10.50.208.147 ping statistics ---
2 packets transmitted, 2 received, 0% packet loss, time 1000ms
