Jun 15, 2021
Technology1. 硬件/配置
用来作为AirPlay Mirror Server的设备是一个brix投影电脑,配置为:
Intel(R) Core(TM) i3-4010U CPU @ 1.70GHz
16 GB Ram
120 GB msata ssd
1000 M ethernet
安装操作系统为ArchLinux.
2. 软件/安装配置步骤
通过yay安装uxplay:
yay uxplay
使能服务:
systemctl start avahi-daemon
systemctl enable avahi-daemon
此时最好重启,因uxplay安装过程中有涉及到其他模块。重启后可以通过以下命令开启uxplay, 此时IOS的屏幕镜像中找到uxplay的条目。
$ sudo uxplay &
3. 自动Serving
上述的场景针对个人使用一般情况下是够了,但是如果使用者是家人,则上述的步骤需要改进。
首先我们要让ArchLinux自动登录,自动登录后进入到图形界面。
然后我们要用uxplay随桌面启动而启动。
启动后我们需要禁用电源管理,以使得在长时间无键盘鼠标输入后屏幕依然可以保持常亮。
针对IOS普遍存在的设备上可用空间较少的缘故,我们需要开启brix盒子上的samba服务,让IOS可以使用外置存储用来播放视频。
IOS本身需要安装支持SAMBA的播放软件。
分而击之,一一解决这些问题。
3.1 自动登录
以用户dash为例,说明如何实现lightdm+awesome的自动登录过程:
$ sudo pacman -S lightdm lxde
# pacman -S xorg lightdm-gtk-greeter xterm xorg-xinit awesome
# systemctl enable lxdm.service
# vim /etc/lxdm/lxdm.conf
####autologin=dgod
autologin=dash
# vim /home/dash/.dmrc
[Desktop]
Session=awesome
# groupadd -r autologin
# gpasswd -a dash autologin
# vim /etc/lightdm.conf
[LightDM]
在此条目中做如下修改:
user-session = awesome
autologin-user = dash
autologin-session = awesome
[Seat:*]
在此条目中做如下修改:
pam-service=lightdm
pam-autologin-service=lightdm-autologin
greeter-session=lightdm-gtk-greeter
user-session=awesome
session-wrapper=/etc/lightdm/Xsession
autologin-user=dash
autologin-user-timeout=0
3.2 uxplay自启动
将sudo uxplay & 添加到~/.config/awesome/rc.lua条目中即可,具体步骤参见awesome的一般配置文档。需要注意的是dash用户需要免密码使用sudo .
3.3 禁用屏幕电源管理
将sudo xset -dpms & 添加到~/.config/awesome/rc.lua条目中即可.
3.4 samba服务
参考ArchLinux Wiki条目
3.5 IOS samba player
软件市场安装vlc, vlc中内建对samba Server的流媒体播放支持。
Jun 7, 2021
TechnologyHardware Info
gpu info:
root@usbserver:~# lspci | grep -i nvidia
01:00.0 VGA compatible controller: NVIDIA Corporation GP106M [GeForce GTX 1060 Mobile] (rev a1)
01:00.1 Audio device: NVIDIA Corporation GP106 High Definition Audio Controller (rev a1)
root@usbserver:~# uname -a
Linux usbserver 5.4.0-74-generic #83-Ubuntu SMP Sat May 8 02:35:39 UTC 2021 x86_64 x86_64 x86_64 GNU/Linux
root@usbserver:~# cat /etc/issue
Ubuntu 20.04.2 LTS \n \l
Newly installed system, install qemu/libvirtd/virt-manager via:
# apt-get update -y && apt-get install -y virt-manager
Configuration
Remove current NVIDIA or opensource Nouveau driver:
root@usbserver:~# apt-get remove --purge nvidia*
Add driver blacklist:
# vim /etc/modprobe.d/blacklist.conf
....
blacklist amd76x_edac #this might not be required for x86 32 bit users.
blacklist vga16fb
blacklist nouveau
blacklist rivafb
blacklist nvidiafb
blacklist rivatv
blacklist lbm-nouveau
options nouveau modeset=0
alias nouveau off
alias lbm-nouveau off
Disable modset and add intel_iommu for default grub setting and update grub:
# vim /etc/default/grub
GRUB_CMDLINE_LINUX_DEFAULT="maybe-ubiquity nouveau.modeset=0 intel_iommu=on"
# update-grub2
Disable nouveau kernel:
# echo options nouveau modeset=0 | sudo tee -a /etc/modprobe.d/nouveau-kms.conf
# update-initramfs -u
On the above output for lspci -nn | grep -i nvidia, record the GPU id 10de:1c20 and 10de:10f1, create /etc/modprobe.d/vfio.conf, add corresponding GPU PCI Ids:
# vim /etc/modprobe.d/vfio.conf
options vfio-pci ids=10de:10f1,10de:1c20
Edit /etc/default/grub for adding vfio-ids:
# vim /etc/default/grub
GRUB_CMDLINE_LINUX_DEFAULT="maybe-ubiquity nouveau.modeset=0 intel_iommu=on vfio-pci.ids=10de:1c20,10de:10f1"
# update-grub2
Add vfio modules into initrd:
# vim /etc/initramfs-tools/modules

vfio
vfio_iommu_type1
vfio_pci
vfio_virqfd
# update-initramfs -u
Now restart host machine, after boot check configurations for vfio:
# dmesg | grep -i iommu
# dmesg | grep -i dmar
# lspci -vv
See if the  drive in use is vfio-pci
VM
Jun 7, 2021
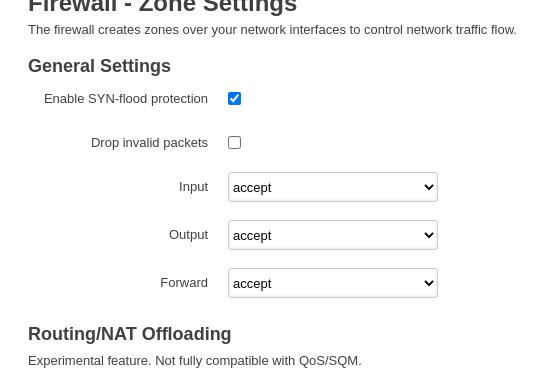
TechnologyIn openwrt, configure following:

Then in nuc(192.168.1.222) add following items:
# sudo route add -net 192.168.0.17 netmask 255.255.255.255 gw 192.168.1.2 enp3s0
# sudo route add -net 192.168.0.0 netmask 255.255.255.0 gw 192.168.1.2 enp3s0
While 192.168.1.2 is the openWRT’s wan address, while the 192.168.0.0/24 is its lan address range.
From now we could directly get to the 192.168.0.1/24 range.
Jun 5, 2021
Technology近来要调研一些虚拟化的东西,主要包括轻量级虚拟化、边缘池算力等,记下一些关键的点以便后续整理。
手头的两台GPU服务器,每台上面有7块GPU卡,需要将它们透传到虚拟机中以便调研相关系统的性能。
环境
环境信息列举如下:
CPU: model name      : Intel(R) Xeon(R) Gold 5118 CPU @ 2.30GHz
Memory:
free -m
              total        used        free      shared  buff/cache   available
Mem:         385679       22356      284811        1042       78512      358158
Swap:             0           0           0
GPU:
# lspci -nn | grep -i nvidia
3d:00.0 3D controller [0302]: NVIDIA Corporation GV100GL [Tesla V100 PCIe 32GB] [10de:xxxx] (rev a1)
3e:00.0 3D controller [0302]: NVIDIA Corporation GV100GL [Tesla V100 PCIe 32GB] [10de:xxxx] (rev a1)
40:00.0 3D controller [0302]: NVIDIA Corporation GV100GL [Tesla V100 PCIe 32GB] [10de:xxxx] (rev a1)
41:00.0 3D controller [0302]: NVIDIA Corporation GV100GL [Tesla V100 PCIe 32GB] [10de:xxxx] (rev a1)
b1:00.0 3D controller [0302]: NVIDIA Corporation GV100GL [Tesla V100 PCIe 32GB] [10de:xxxx] (rev a1)
b2:00.0 3D controller [0302]: NVIDIA Corporation GV100GL [Tesla V100 PCIe 32GB] [10de:xxxx] (rev a1)
b4:00.0 3D controller [0302]: NVIDIA Corporation GV100GL [Tesla V100 PCIe 32GB] [10de:xxxx] (rev a1)
b5:00.0 3D controller [0302]: NVIDIA Corporation GV100GL [Tesla V100 PCIe 32GB] [10de:xxxx] (rev a1)
操作系统:
# cat /etc/redhat-release
CentOS Linux release 7.6.1810 (Core)
# /usr/libexec/qemu-kvm --version
QEMU emulator version 2.12.0 (qemu-kvm-ev-2.12.0-44.1.el7_8.1)
Copyright (c) 2003-2017 Fabrice Bellard and the QEMU Project developers
# uname -r
4.19.12-1.el7.elrepo.x86_64
系统配置
激活IOMMU, 通过编辑/etc/default/grub中的GRUB_CMDLINE_LINUX行,增加intel_iommu=on后,重新生成grub引导文件:
# vim /etc/default/grub
GRUB_CMDLINE_LINUX="crashkernel=auto rhgb quiet intel_iommu=on rd.driver.pre=vfio-pci"
# grub-mkconfig -o /boot/grub2/grub.cfg
# reboot
重启后,检查:
dmesg | grep -E "DMAR|IOMMU"
激活vfio-pci内核模块, 注意填入的数值是lspci取得的:
# options vfio-pci ids=10de:xxxx
激活vfio-pci的自动加载:
# echo 'vfio-pci' > /etc/modules-load.d/vfio-pci.conf
# reboot
# dmesg | grep -i vfio
qemu的更新步骤如下:
# /usr/libexec/qemu-kvm -version
QEMU emulator version 1.5.3 (qemu-kvm-1.5.3-141.el7_4.6), Copyright (c) 2003-2008 Fabrice Bellard
# yum -y install centos-release-qemu-ev
# sed -i -e "s/enabled=1/enabled=0/g" /etc/yum.repos.d/CentOS-QEMU-EV.repo
# yum --enablerepo=centos-qemu-ev -y install qemu-kvm-ev
# systemctl restart libvirtd
# /usr/libexec/qemu-kvm -version
QEMU emulator version 2.12.0 (qemu-kvm-ev-2.12.0-44.1.el7_8.1)
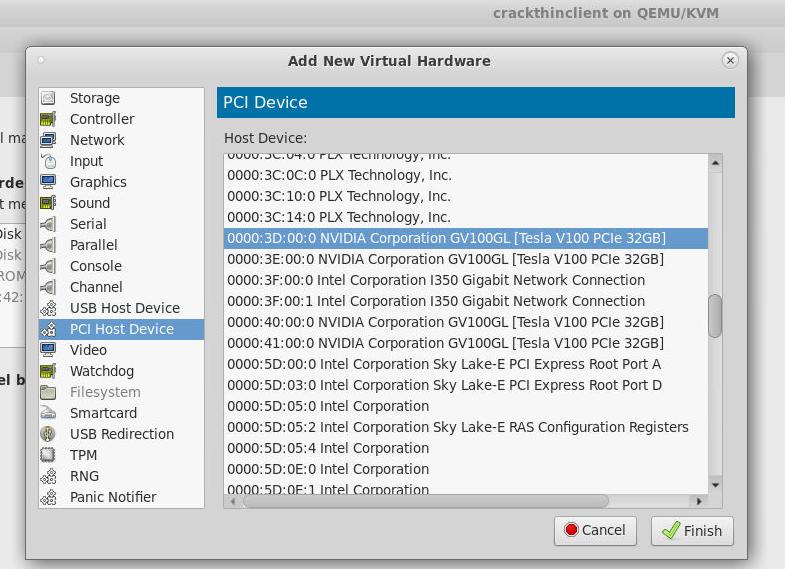
现在在virt-manager中是可以指定下放GPU的。

登录到虚拟机以后:
root@localhost:~# lspci -nn | grep -i nvidia
00:0a.0 3D controller [0302]: NVIDIA Corporation GV100GL [Tesla V100 PCIe 32GB] [10de:xxxx] (rev a1)
接下来我会调研如何在lxd下及在k3s+kubevirt的场景下透传GPU.
Jun 3, 2021
Technologylxc/lxd lacks of using host network like docker run -it --net host, following are the steps on how to enable this feature:
注:使用host网络模式会使得主机层面的网络增强在容器层面被绕过,等同于完全放开了网络安全策略,被攻击面增大。
建议谨慎使用。
lxd开启hostNetwork
将默认额lxd profile导入到文件中:
# lxc profile show default>host
编辑文件,去掉关于网卡的配置(前置-的行需要被删除):
# vim host
config:
  security.secureboot: "false"
description: Default LXD profile
devices:
-  eth0:
-    name: eth0
-    network: lxdbr0
-    type: nic
  root:
    path: /
    pool: default
    type: disk
name: default
used_by:
- /1.0/instances/centos
删除后保存文件,创建一个名称为hostnetwork的profile,用修改过的配置文件定义之:
lxc profile create hostnetwork
lxc profile edit hostnetwork<host
创建一个新实例:
# lxc init adcfe657303d ubuntu1
指定hostnetwork的profile为其启动所需的profile:
# lxc profile assign ubuntu1 hostnetwork
创建一个raw.lxc的外部配置文件:
# vim /root/lxc_host_network_config
lxc.net.0.type = none
配置该lxc实例的属性(raw.lxc及特权容器), 在某些系统上可能不需要特权容器, 设置完毕后启动:
lxc config set ubuntu1 raw.lxc="lxc.include=/root/lxc_host_network_config"
lxc config set ubuntu1 security.privileged=true
lxc start ubuntu1
检查lxc实例所拥有的网络地址空间:
# lxc ls
lxc ls
+---------+---------+---------------------------+--------------------------------------------------+-----------------+-----------+
|  NAME   |  STATE  |           IPV4            |                       IPV6                       |      TYPE       | SNAPSHOTS |
+---------+---------+---------------------------+--------------------------------------------------+-----------------+-----------+
| centos  | RUNNING | 10.225.0.168 (enp5s0)     | fd42:1cac:64d0:f018:547d:b31b:251b:381e (enp5s0) | VIRTUAL-MACHINE | 0         |
+---------+---------+---------------------------+--------------------------------------------------+-----------------+-----------+
| ubuntu1 | RUNNING | 192.192.189.1 (virbr1)    | fd42:1cac:64d0:f018::1 (lxdbr0)                  | CONTAINER       | 0         |
|         |         | 192.168.122.1 (virbr0)    | 240e:3b5:cb5:abf0:36d4:30d3:285b:862e (enp3s0)   |                 |           |
|         |         | 192.168.1.222 (enp3s0)    |                                                  |                 |           |
|         |         | 172.23.8.165 (ztwdjmv5j3) |                                                  |                 |           |
|         |         | 172.17.0.1 (docker0)      |                                                  |                 |           |
|         |         | 10.33.34.1 (virbr2)       |                                                  |                 |           |
|         |         | 10.225.0.1 (lxdbr0)       |                                                  |                 |           |
+---------+---------+---------------------------+--------------------------------------------------+-----------------+-----------+
进入到网络中检查所有网卡:
# lxc exec ubuntu1 bash
root@ubuntu1:~# ip link
1: lo: <LOOPBACK,UP,LOWER_UP> mtu 65536 qdisc noqueue state UNKNOWN mode DEFAULT group default qlen 1000
    link/loopback 00:00:00:00:00:00 brd 00:00:00:00:00:00
2: enp3s0: <BROADCAST,MULTICAST,UP,LOWER_UP> mtu 1500 qdisc fq_codel state UP mode DEFAULT group default qlen 1000
    link/ether 74:d4:35:6a:84:19 brd ff:ff:ff:ff:ff:ff
3: ztwdjmv5j3: <BROADCAST,MULTICAST,UP,LOWER_UP> mtu 2800 qdisc fq_codel state UNKNOWN mode DEFAULT group default qlen 1000
    link/ether 0e:d0:a9:d8:58:2a brd ff:ff:ff:ff:ff:ff
4: wlp2s0: <NO-CARRIER,BROADCAST,MULTICAST,UP> mtu 1500 qdisc mq state DOWN mode DORMANT group default qlen 1000
    link/ether 40:e2:30:30:1e:ee brd ff:ff:ff:ff:ff:ff
5: virbr0: <NO-CARRIER,BROADCAST,MULTICAST,UP> mtu 1500 qdisc noqueue state DOWN mode DEFAULT group default qlen 1000
    link/ether 52:54:00:ea:66:bb brd ff:ff:ff:ff:ff:ff
6: docker0: <NO-CARRIER,BROADCAST,MULTICAST,UP> mtu 1500 qdisc noqueue state DOWN mode DEFAULT group default
    link/ether 02:42:d0:f9:2f:53 brd ff:ff:ff:ff:ff:ff
7: lxdbr0: <BROADCAST,MULTICAST,UP,LOWER_UP> mtu 1500 qdisc noqueue state UP mode DEFAULT group default qlen 1000
    link/ether 00:16:3e:b7:04:a9 brd ff:ff:ff:ff:ff:ff
8: virbr1: <NO-CARRIER,BROADCAST,MULTICAST,UP> mtu 1500 qdisc noqueue state DOWN mode DEFAULT group default qlen 1000
    link/ether 52:54:00:88:da:f3 brd ff:ff:ff:ff:ff:ff
9: virbr2: <NO-CARRIER,BROADCAST,MULTICAST,UP> mtu 1500 qdisc noqueue state DOWN mode DEFAULT group default qlen 1000
    link/ether 52:54:00:7a:73:8b brd ff:ff:ff:ff:ff:ff
10: tapeac054b8: <BROADCAST,MULTICAST,UP,LOWER_UP> mtu 1500 qdisc mq master lxdbr0 state UP mode DEFAULT group default qlen 1000
    link/ether fe:25:d8:30:90:f6 brd ff:ff:ff:ff:ff:ff
11: veth43eb373c@veth5f86c132: <BROADCAST,MULTICAST> mtu 1500 qdisc noop state DOWN mode DEFAULT group default qlen 1000
    link/ether 00:16:3e:cb:fe:fc brd ff:ff:ff:ff:ff:ff
12: veth5f86c132@veth43eb373c: <NO-CARRIER,BROADCAST,MULTICAST,UP,M-DOWN> mtu 1500 qdisc noqueue master lxdbr0 state LOWERLAYERDOWN mode DEFAULT group default qlen 1000
    link/ether 9e:b0:74:e7:fa:86 brd ff:ff:ff:ff:ff:ff
19: veth8d89fdf9@vethb3a2bfad: <BROADCAST,MULTICAST> mtu 1500 qdisc noop state DOWN mode DEFAULT group default qlen 1000
    link/ether 00:16:3e:b3:06:c7 brd ff:ff:ff:ff:ff:ff
20: vethb3a2bfad@veth8d89fdf9: <NO-CARRIER,BROADCAST,MULTICAST,UP,M-DOWN> mtu 1500 qdisc noqueue master lxdbr0 state LOWERLAYERDOWN mode DEFAULT group default qlen 1000
    link/ether da:c7:ab:6b:90:7f brd ff:ff:ff:ff:ff:ff
lxc 开启hostNetwork
使用lxc创建一个容器:
lxc-create -n test -t download -- --dist ubuntu --release focal --arch amd64
编辑 /var/lib/lxc/test/config. 删除所有关于network的行, 添加 “lxc.network.type = none”
启动容器:
lxc-start -n test
检查lxc网络设置:
lxc-ls -f


NAME STATE   AUTOSTART GROUPS IPV4                                                                                          IPV6                                                          UNPRIVILEGED
test RUNNING 0         -      10.225.0.1, 10.33.34.1, 172.17.0.1, 172.23.8.165, 192.168.1.222, 192.168.122.1, 192.192.189.1 240e:3b5:cb5:abf0:36d4:30d3:285b:862e, fd42:1cac:64d0:f018::1 false
进入到容器后检查网卡:
➜  ~ lxc-attach test
# /bin/bash
root@test:~# ip addr
这里可以看到主机上所有的接口地址


