Jul 4, 2021
TechnologyCommands
Bootstrap via:
test@edge5:~$ juju bootstrap localhost overlord
Creating Juju controller "overlord" on localhost/localhost
Looking for packaged Juju agent version 2.9.5 for amd64
Located Juju agent version 2.9.5-ubuntu-amd64 at https://streams.canonical.com/juju/tools/agent/2.9.5/juju-2.9.5-ubuntu-amd64.tgz
To configure your system to better support LXD containers, please see: https://github.com/lxc/lxd/blob/master/doc/production-setup.md
Launching controller instance(s) on localhost/localhost...
 - juju-55e209-0 (arch=amd64)
Installing Juju agent on bootstrap instance
Fetching Juju Dashboard 0.7.1
Waiting for address
Attempting to connect to 10.53.118.136:22
Connected to 10.53.118.136
Running machine configuration script...
Bootstrap agent now started
Contacting Juju controller at 10.53.118.136 to verify accessibility...

Bootstrap complete, controller "overlord" is now available
Controller machines are in the "controller" model
Initial model "default" added
Verify bootstrap status:
test@edge5:~$ lxc ls
+---------------+---------+----------------------+------+-----------+-----------+
|     NAME      |  STATE  |         IPV4         | IPV6 |   TYPE    | SNAPSHOTS |
+---------------+---------+----------------------+------+-----------+-----------+
| juju-55e209-0 | RUNNING | 10.53.118.136 (eth0) |      | CONTAINER | 0         |
+---------------+---------+----------------------+------+-----------+-----------+
test@edge5:~$ juju status
Model    Controller  Cloud/Region         Version  SLA          Timestamp
default  overlord    localhost/localhost  2.9.5    unsupported  15:32:12+08:00

Model "admin/default" is empty.
microk8s
Deploy microk8s via:
$ juju deploy -n3 cs:~pjdc/microk8s
Located charm "microk8s" in charm-store, revision 24
Deploying "microk8s" from charm-store charm "microk8s", revision 24 in channel stable
View juju status:
test@edge5:~$ juju status
Model    Controller  Cloud/Region         Version  SLA          Timestamp
default  overlord    localhost/localhost  2.9.5    unsupported  15:35:54+08:00

App       Version  Status   Scale  Charm     Store       Channel  Rev  OS      Message
microk8s           waiting    0/3  microk8s  charmstore  stable    24  ubuntu  waiting for machine

Unit        Workload  Agent       Machine  Public address  Ports  Message
microk8s/0  waiting   allocating  0        10.53.118.110          waiting for machine
microk8s/1  waiting   allocating  1        10.53.118.99           waiting for machine
microk8s/2  waiting   allocating  2        10.53.118.115          waiting for machine

Machine  State    DNS            Inst id        Series  AZ  Message
0        pending  10.53.118.110  juju-585d2d-0  focal       Running
1        pending  10.53.118.99   juju-585d2d-1  focal       Running
2        pending  10.53.118.115  juju-585d2d-2  focal       Running
Until succeed:
test@edge5:~$ juju status
Model    Controller  Cloud/Region         Version  SLA          Timestamp
default  overlord    localhost/localhost  2.9.5    unsupported  15:49:48+08:00

App       Version  Status  Scale  Charm     Store       Channel  Rev  OS      Message
microk8s           active      3  microk8s  charmstore  stable    24  ubuntu

Unit         Workload  Agent  Machine  Public address  Ports                     Message
microk8s/0*  active    idle   0        10.53.118.110   80/tcp,443/tcp,16443/tcp
microk8s/1   active    idle   1        10.53.118.99    80/tcp,443/tcp,16443/tcp
microk8s/2   active    idle   2        10.53.118.115   80/tcp,443/tcp,16443/tcp

Machine  State    DNS            Inst id        Series  AZ  Message
0        started  10.53.118.110  juju-585d2d-0  focal       Running
1        started  10.53.118.99   juju-585d2d-1  focal       Running
2        started  10.53.118.115  juju-585d2d-2  focal       Running
own cloud
Ip and hostname listed as:
192.168.89.6	edge5
192.168.89.7	edge6
192.168.89.8	edge7
192.168.89.9	edge8
192.168.89.10	edge9
Added :
test@edge5:~$ ssh-copy-id test@192.168.89.7
test@edge5:~$ juju add-cloud
This operation can be applied to both a copy on this client and to the one on a controller.
No current controller was detected and there are no registered controllers on this client: either bootstrap one or register one.
Cloud Types
  lxd
  maas
  manual
  openstack
  vsphere

Select cloud type: manual

Enter a name for your manual cloud: manual-cloud

Enter the ssh connection string for controller, username@<hostname or IP> or <hostname or IP>: test@192.168.89.7

Cloud "manual-cloud" successfully added to your local client.
verify clouds available:
test@edge5:~$ juju clouds
Only clouds with registered credentials are shown.
There are more clouds, use --all to see them.
You can bootstrap a new controller using one of these clouds...

Clouds available on the client:
Cloud         Regions  Default    Type    Credentials  Source    Description
localhost     1        localhost  lxd     0            built-in  LXD Container Hypervisor
manual-cloud  1        default    manual  0            local
Now bootstrap the manual-cloud:
$ juju bootstrap manual-cloud
Add machines:
test@edge5:~$ juju add-machine ssh:test@192.168.89.8
created machine 0
test@edge5:~$ juju add-machine ssh:test@192.168.89.9 && juju add-machine ssh:test@192.168.89.10
created machine 1
created machine 2
test@edge5:~$ juju machines
Machine  State    DNS            Inst id               Series  AZ  Message
0        started  192.168.89.8   manual:192.168.89.8   focal       Manually provisioned machine
1        started  192.168.89.9   manual:192.168.89.9   focal       Manually provisioned machine
2        started  192.168.89.10  manual:192.168.89.10  focal       Manually provisioned machine
Deploy microk8s via:
$ juju deploy -n3 cs:~pjdc/microk8s
After deployment, the juju status show:
test@edge5:~$ juju status
Model    Controller            Cloud/Region          Version  SLA          Timestamp
default  manual-cloud-default  manual-cloud/default  2.9.5    unsupported  17:27:04+08:00

App       Version  Status  Scale  Charm     Store       Channel  Rev  OS      Message
microk8s           active      3  microk8s  charmstore  stable    24  ubuntu

Unit         Workload  Agent  Machine  Public address  Ports                     Message
microk8s/0*  active    idle   0        192.168.89.8    80/tcp,443/tcp,16443/tcp
microk8s/1   active    idle   1        192.168.89.9    80/tcp,443/tcp,16443/tcp
microk8s/2   active    idle   2        192.168.89.10   80/tcp,443/tcp,16443/tcp

Machine  State    DNS            Inst id               Series  AZ  Message
0        started  192.168.89.8   manual:192.168.89.8   focal       Manually provisioned machine
1        started  192.168.89.9   manual:192.168.89.9   focal       Manually provisioned machine
2        started  192.168.89.10  manual:192.168.89.10  focal       Manually provisioned machine
Verify Ha:
test@edge5:~$ juju exec --application microk8s -- 'microk8s status | grep -A2 high-availability:'
- return-code: 0
  stdout: |
    high-availability: yes
      datastore master nodes: 192.168.89.8:19001 192.168.89.9:19001 192.168.89.10:19001
      datastore standby nodes: none
  unit: microk8s/0
- return-code: 0
  stdout: |
    high-availability: yes
      datastore master nodes: 192.168.89.8:19001 192.168.89.9:19001 192.168.89.10:19001
      datastore standby nodes: none
  unit: microk8s/1
- return-code: 0
  stdout: |
    high-availability: yes
      datastore master nodes: 192.168.89.8:19001 192.168.89.9:19001 192.168.89.10:19001
      datastore standby nodes: none
  unit: microk8s/2
Verify the k8s status:
test@edge5:~$ juju exec --application microk8s -- microk8s kubectl get node
- return-code: 0
  stdout: |
    NAME    STATUS   ROLES    AGE   VERSION
    edge8   Ready    <none>   13m   v1.21.1-3+ba118484dd39df
    edge7   Ready    <none>   18m   v1.21.1-3+ba118484dd39df
    edge9   Ready    <none>   13m   v1.21.1-3+ba118484dd39df
  unit: microk8s/0
- return-code: 0
  stdout: |
    NAME    STATUS   ROLES    AGE   VERSION
    edge8   Ready    <none>   13m   v1.21.1-3+ba118484dd39df
    edge7   Ready    <none>   18m   v1.21.1-3+ba118484dd39df
    edge9   Ready    <none>   13m   v1.21.1-3+ba118484dd39df
  unit: microk8s/1
- return-code: 0
  stdout: |
    NAME    STATUS   ROLES    AGE   VERSION
    edge8   Ready    <none>   13m   v1.21.1-3+ba118484dd39df
    edge7   Ready    <none>   18m   v1.21.1-3+ba118484dd39df
    edge9   Ready    <none>   13m   v1.21.1-3+ba118484dd39df
  unit: microk8s/2
Jul 3, 2021
TechnologyBefore
A LXD cluster and juju status:
lxd cluster status and lxc instance before deploy work load:
test@freeedge1:~$ lxc cluster list
+-----------+---------------------------+----------+--------------+----------------+-------------+--------+-------------------+
|   NAME    |            URL            | DATABASE | ARCHITECTURE | FAILURE DOMAIN | DESCRIPTION | STATE  |      MESSAGE      |
+-----------+---------------------------+----------+--------------+----------------+-------------+--------+-------------------+
| freeedge1 | https://192.168.89.2:8443 | YES      | x86_64       | default        |             | ONLINE | Fully operational |
+-----------+---------------------------+----------+--------------+----------------+-------------+--------+-------------------+
| freeedge2 | https://192.168.89.3:8443 | YES      | x86_64       | default        |             | ONLINE | Fully operational |
+-----------+---------------------------+----------+--------------+----------------+-------------+--------+-------------------+
| freeedge3 | https://192.168.89.4:8443 | YES      | x86_64       | default        |             | ONLINE | Fully operational |
+-----------+---------------------------+----------+--------------+----------------+-------------+--------+-------------------+
| freeedge4 | https://192.168.89.5:8443 | YES      | x86_64       | default        |             | ONLINE | Fully operational |
+-----------+---------------------------+----------+--------------+----------------+-------------+--------+-------------------+
test@freeedge1:~$ lxc ls
+------+-------+------+------+------+-----------+----------+
| NAME | STATE | IPV4 | IPV6 | TYPE | SNAPSHOTS | LOCATION |
+------+-------+------+------+------+-----------+----------+
juju boostrap for provisioning a machine with LXD and create a controller
running within it:
$ juju bootstrap localhost overlord
Creating Juju controller "overlord" on localhost/localhost
Looking for packaged Juju agent version 2.9.5 for amd64
WARNING Got error requesting "https://streams.canonical.com/juju/tools/streams/v1/index2.sjson": Get "https://streams.canonical.com/juju/tools/streams/v1/index2.sjson": dial tcp [2001:67c:1360:8001::33]:443: connect: network is unreachable
No packaged binary found, preparing local Juju agent binary
To configure your system to better support LXD containers, please see: https://github.com/lxc/lxd/blob/master/doc/production-setup.md
Launching controller instance(s) on localhost/localhost...
 - juju-5a91a2-0 (arch=amd64)
Installing Juju agent on bootstrap instance
Fetching Juju Dashboard 0.7.1
Waiting for address
Attempting to connect to 192.168.89.155:22
Connected to 192.168.89.155
Running machine configuration script...
Bootstrap agent now started
Contacting Juju controller at 192.168.89.155 to verify accessibility...

Bootstrap complete, controller "overlord" is now available
Controller machines are in the "controller" model
Initial model "default" added
This command automatically create a new lxd instance and running the script in
it, like:
$ test@freeedge1:~$ lxc ls
+---------------+---------+-----------------------+------+-----------+-----------+-----------+
|     NAME      |  STATE  |         IPV4          | IPV6 |   TYPE    | SNAPSHOTS | LOCATION  |
+---------------+---------+-----------------------+------+-----------+-----------+-----------+
| juju-5a91a2-0 | RUNNING | 192.168.89.155 (eth0) |      | CONTAINER | 0         | freeedge1 |
+---------------+---------+-----------------------+------+-----------+-----------+-----------+
添加juju machines:
test@freeedge1:~$ juju add-machine -n 2
created machine 0
created machine 1
test@freeedge1:~$ juju machines
Machine  State    DNS  Inst id  Series  AZ  Message
0        pending       pending  focal       starting
1        pending       pending  focal       starting
等待一段时间,直到状态变为started:
$ juju machines
Machine  State    DNS             Inst id        Series  AZ  Message
0        started  192.168.89.197  juju-a5a008-0  focal       Running
1        started  192.168.89.173  juju-a5a008-1  focal       Running
实际上是lxc工作负载,exec进入到该实例中可发现其实是没有做任何资源限制的lxc工作实例, 如果资源需要做限制,则可以参考https://juju.is/docs/olm/constraints#heading--constraints-and-lxd-containers:
test@freeedge1:~$ lxc ls
+---------------+---------+-----------------------+------+-----------+-----------+-----------+
|     NAME      |  STATE  |         IPV4          | IPV6 |   TYPE    | SNAPSHOTS | LOCATION  |
+---------------+---------+-----------------------+------+-----------+-----------+-----------+
| juju-5a91a2-0 | RUNNING | 192.168.89.155 (eth0) |      | CONTAINER | 0         | freeedge1 |
+---------------+---------+-----------------------+------+-----------+-----------+-----------+
| juju-a5a008-0 | RUNNING | 192.168.89.197 (eth0) |      | CONTAINER | 0         | freeedge2 |
+---------------+---------+-----------------------+------+-----------+-----------+-----------+
| juju-a5a008-1 | RUNNING | 192.168.89.173 (eth0) |      | CONTAINER | 0         | freeedge2 |
+---------------+---------+-----------------------+------+-----------+-----------+-----------+
销毁刚才创建的machine:
test@freeedge1:~$ juju remove-machine 0
removing machine 0
test@freeedge1:~$ juju machines
Machine  State    DNS             Inst id        Series  AZ  Message
0        stopped  192.168.89.197  juju-a5a008-0  focal       Running
1        started  192.168.89.173  juju-a5a008-1  focal       Running

test@freeedge1:~$ juju remove-machine 1
removing machine 1
test@freeedge1:~$ juju machines
Machine  State    DNS             Inst id        Series  AZ  Message
1        stopped  192.168.89.173  juju-a5a008-1  focal       Running
创建一个hello-juju的charmed operator:
test@freeedge1:~$ juju deploy hello-juju
Located charm "hello-juju" in charm-hub, revision 8
Deploying "hello-juju" from charm-hub charm "hello-juju", revision 8 in channel stable
test@freeedge1:~$ juju status
Model    Controller  Cloud/Region         Version  SLA          Timestamp
default  overlord    localhost/localhost  2.9.5    unsupported  16:27:44+08:00

App         Version  Status  Scale  Charm       Store     Channel  Rev  OS      Message
hello-juju           active      1  hello-juju  charmhub  stable     8  ubuntu

Unit           Workload  Agent  Machine  Public address  Ports   Message
hello-juju/0*  active    idle   2        192.168.89.160  80/tcp

Machine  State    DNS             Inst id        Series  AZ  Message
2        started  192.168.89.160  juju-a5a008-2  focal       Running

test@freeedge1:~$ juju expose hello-juju
test@freeedge1:~$ juju status
Model    Controller  Cloud/Region         Version  SLA          Timestamp
default  overlord    localhost/localhost  2.9.5    unsupported  16:28:06+08:00

App         Version  Status  Scale  Charm       Store     Channel  Rev  OS      Message
hello-juju           active      1  hello-juju  charmhub  stable     8  ubuntu

Unit           Workload  Agent  Machine  Public address  Ports   Message
hello-juju/0*  active    idle   2        192.168.89.160  80/tcp

Machine  State    DNS             Inst id        Series  AZ  Message
2        started  192.168.89.160  juju-a5a008-2  focal       Running

部署charmed Kubernetes
记录一下步骤, 在LXD集群的情况下,直接部署会出现以下错误:
# juju deploy charmed-kubernetes
# juju status
Machine  State  DNS  Inst id  Series  AZ  Message
0        down        pending  focal       Failed creating instance record: Failed initialising instance: Failed loading storage pool: No such object
1        down        pending  focal       Failed creating instance record: Failed initialising instance: Failed loading storage pool: No such object
2        down        pending  focal       Failed creating instance record: Failed initialising instance: Failed loading storage pool: No such object
3        down        pending  focal       Failed creating instance record: Failed initialising instance: Failed loading storage pool: No such object
....
这是因为没有默认的default格式的storage定义,
test@freeedge1:~$ lxc storage list
+-------+--------+-------------+---------+---------+
| NAME  | DRIVER | DESCRIPTION | USED BY |  STATE  |
+-------+--------+-------------+---------+---------+
| local | zfs    |             | 3       | CREATED |
+-------+--------+-------------+---------+---------+
先行删除已经部署好的charmed-kubernetes(当前没有直接删除charmed
operator的方法,只能将app都删除):
 juju remove-application hello-juju
 juju remove-application containerd
 juju remove-application easyrsa
 juju remove-application etcd
 juju remove-application flannel
 juju remove-application kubeapi-load-balancer
 juju remove-application kubernetes-master
 juju remove-application kubernetes-worker
所有节点上创建相同的目录并添加到一个新的storage定义:
 $ ansible -i hosts.ini all -m shell -a "sudo mkdir -p /data/lxd && sudo chmod 777 -R /data/lxd"
$ lxc storage create --target freeedge1 default dir source=/data/lxd
Storage pool default pending on member freeedge1
$ lxc storage create --target freeedge2 default dir source=/data/lxd
Storage pool default pending on member freeedge2
$ lxc storage create --target freeedge3 default dir source=/data/lxd
Storage pool default pending on member freeedge3
$ lxc storage create --target freeedge4 default dir source=/data/lxd
Storage pool default pending on member freeedge4
$ lxc storage create default dir
Storage pool default created
$ lxc storage volume create default lxdvol --target freeedge1
Storage volume lxdvol created
$ lxc storage volume show default lxdvol --target freeedge1
config: {}
description: ""
name: lxdvol
type: custom
used_by: []
location: freeedge1
content_type: filesystem
各种乱七八糟的操作以后,清空:
juju destroy-controller overlord
现在重新开始部署juju(参考https://juju.is/docs/olm/lxd):
$ juju bootstrap localhost overlord
$ juju deploy charmed-kubernetes
Located bundle "charmed-kubernetes" in charm-hub, revision 679
WARNING "services" key found in bundle file is deprecated, superseded by "applications" key.
Located charm "containerd" in charm-store, revision 130
Located charm "easyrsa" in charm-store, revision 384
Located charm "etcd" in charm-store, revision 594
Located charm "flannel" in charm-store, revision 558
Located charm "kubeapi-load-balancer" in charm-store, revision 798
Located charm "kubernetes-master" in charm-store, revision 1008
Located charm "kubernetes-worker" in charm-store, revision 768
Executing changes:
- upload charm containerd from charm-store for series focal with architecture=amd64
- deploy application containerd from charm-store on focal
- set annotations for containerd
- upload charm easyrsa from charm-store for series focal with architecture=amd64
- deploy application easyrsa from charm-store on focal
  added resource easyrsa
- set annotations for easyrsa
- upload charm etcd from charm-store for series focal with architecture=amd64
- deploy application etcd from charm-store on focal
  added resource core
  added resource etcd
  added resource snapshot
- set annotations for etcd
- upload charm flannel from charm-store for series focal with architecture=amd64
- deploy application flannel from charm-store on focal
  added resource flannel-amd64
  added resource flannel-arm64
  added resource flannel-s390x
- set annotations for flannel
- upload charm kubeapi-load-balancer from charm-store for series focal with architecture=amd64
- deploy application kubeapi-load-balancer from charm-store on focal
- expose all endpoints of kubeapi-load-balancer and allow access from CIDRs 0.0.0.0/0 and ::/0
- set annotations for kubeapi-load-balancer
- upload charm kubernetes-master from charm-store for series focal with architecture=amd64
- deploy application kubernetes-master from charm-store on focal
  added resource cdk-addons
  added resource core
  added resource kube-apiserver
  added resource kube-controller-manager
  added resource kube-proxy
  added resource kube-scheduler
  added resource kubectl
- set annotations for kubernetes-master
- upload charm kubernetes-worker from charm-store for series focal with architecture=amd64
- deploy application kubernetes-worker from charm-store on focal
  added resource cni-amd64
  added resource cni-arm64
  added resource cni-s390x
  added resource core
  added resource kube-proxy
  added resource kubectl
  added resource kubelet
- expose all endpoints of kubernetes-worker and allow access from CIDRs 0.0.0.0/0 and ::/0
- set annotations for kubernetes-worker
- add relation kubernetes-master:kube-api-endpoint - kubeapi-load-balancer:apiserver
- add relation kubernetes-master:loadbalancer - kubeapi-load-balancer:loadbalancer
- add relation kubernetes-master:kube-control - kubernetes-worker:kube-control
- add relation kubernetes-master:certificates - easyrsa:client
- add relation etcd:certificates - easyrsa:client
- add relation kubernetes-master:etcd - etcd:db
- add relation kubernetes-worker:certificates - easyrsa:client
- add relation kubernetes-worker:kube-api-endpoint - kubeapi-load-balancer:website
- add relation kubeapi-load-balancer:certificates - easyrsa:client
- add relation flannel:etcd - etcd:db
- add relation flannel:cni - kubernetes-master:cni
- add relation flannel:cni - kubernetes-worker:cni
- add relation containerd:containerd - kubernetes-worker:container-runtime
- add relation containerd:containerd - kubernetes-master:container-runtime
- add unit easyrsa/0 to new machine 0
- add unit etcd/0 to new machine 1
- add unit etcd/1 to new machine 2
- add unit etcd/2 to new machine 3
- add unit kubeapi-load-balancer/0 to new machine 4
- add unit kubernetes-master/0 to new machine 5
- add unit kubernetes-master/1 to new machine 6
- add unit kubernetes-worker/0 to new machine 7
- add unit kubernetes-worker/1 to new machine 8
- add unit kubernetes-worker/2 to new machine 9
Deploy of bundle completed.
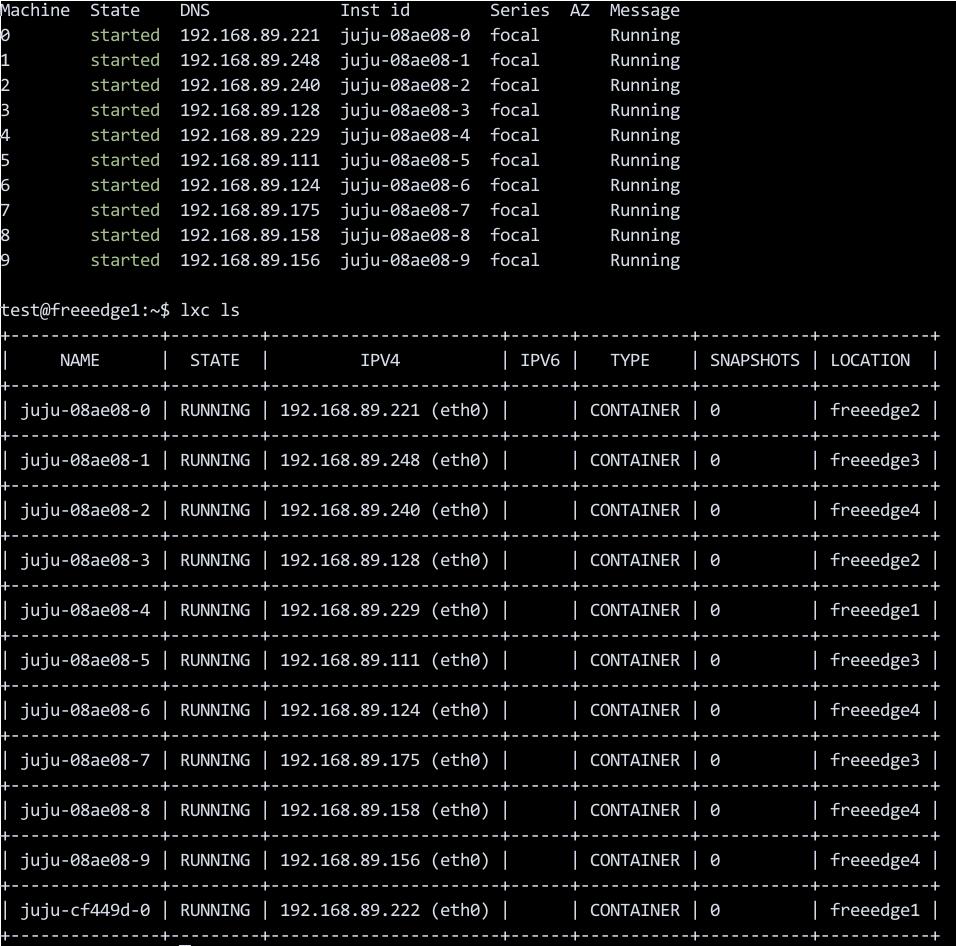
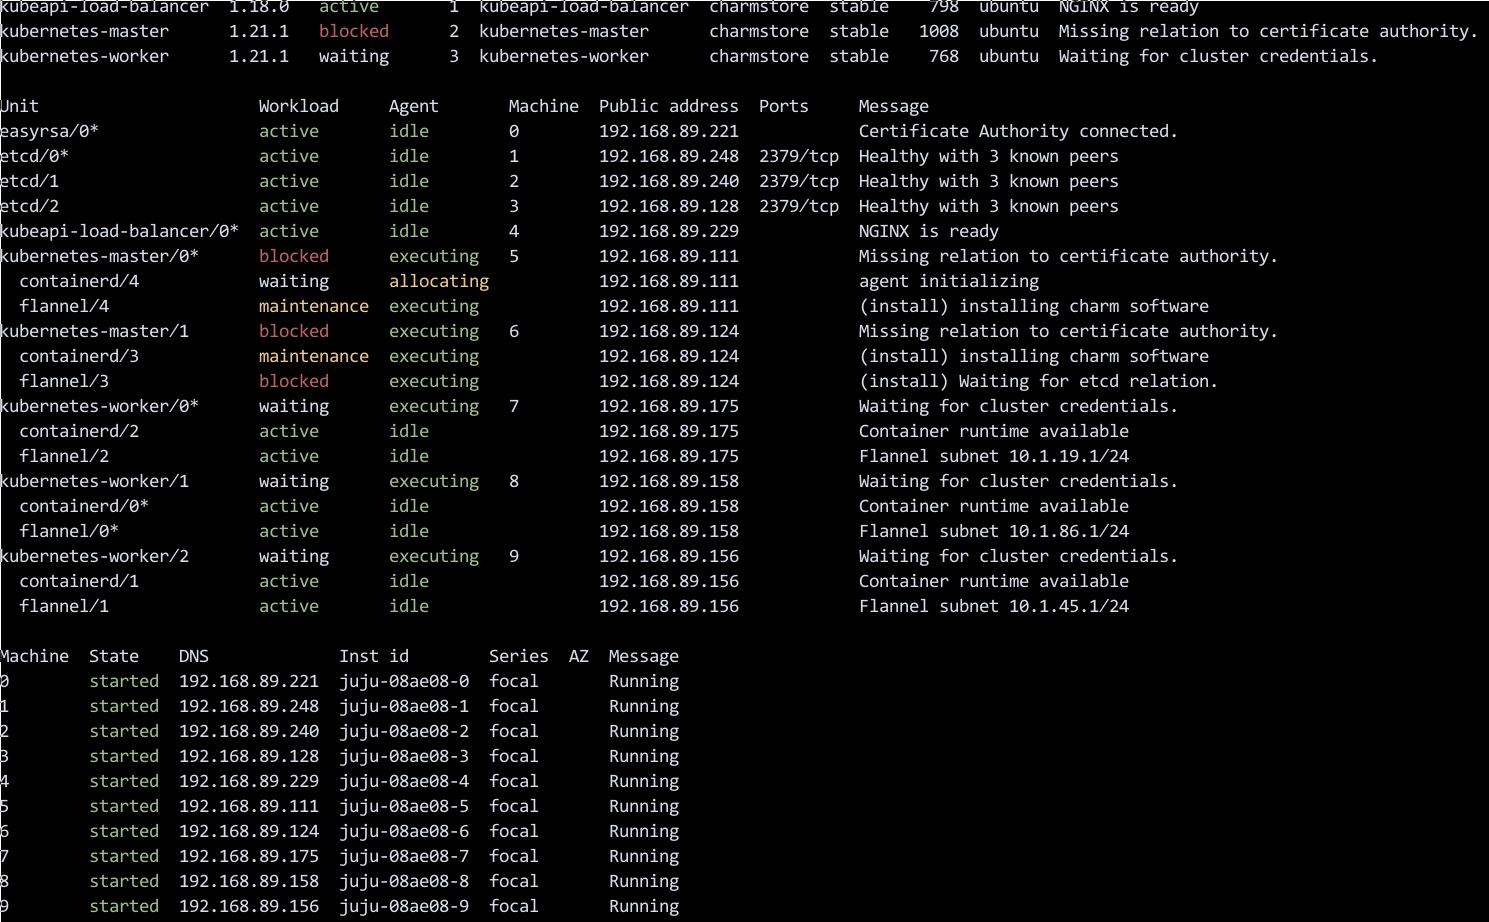
部署中可以通过juju status看即时的状态变更:
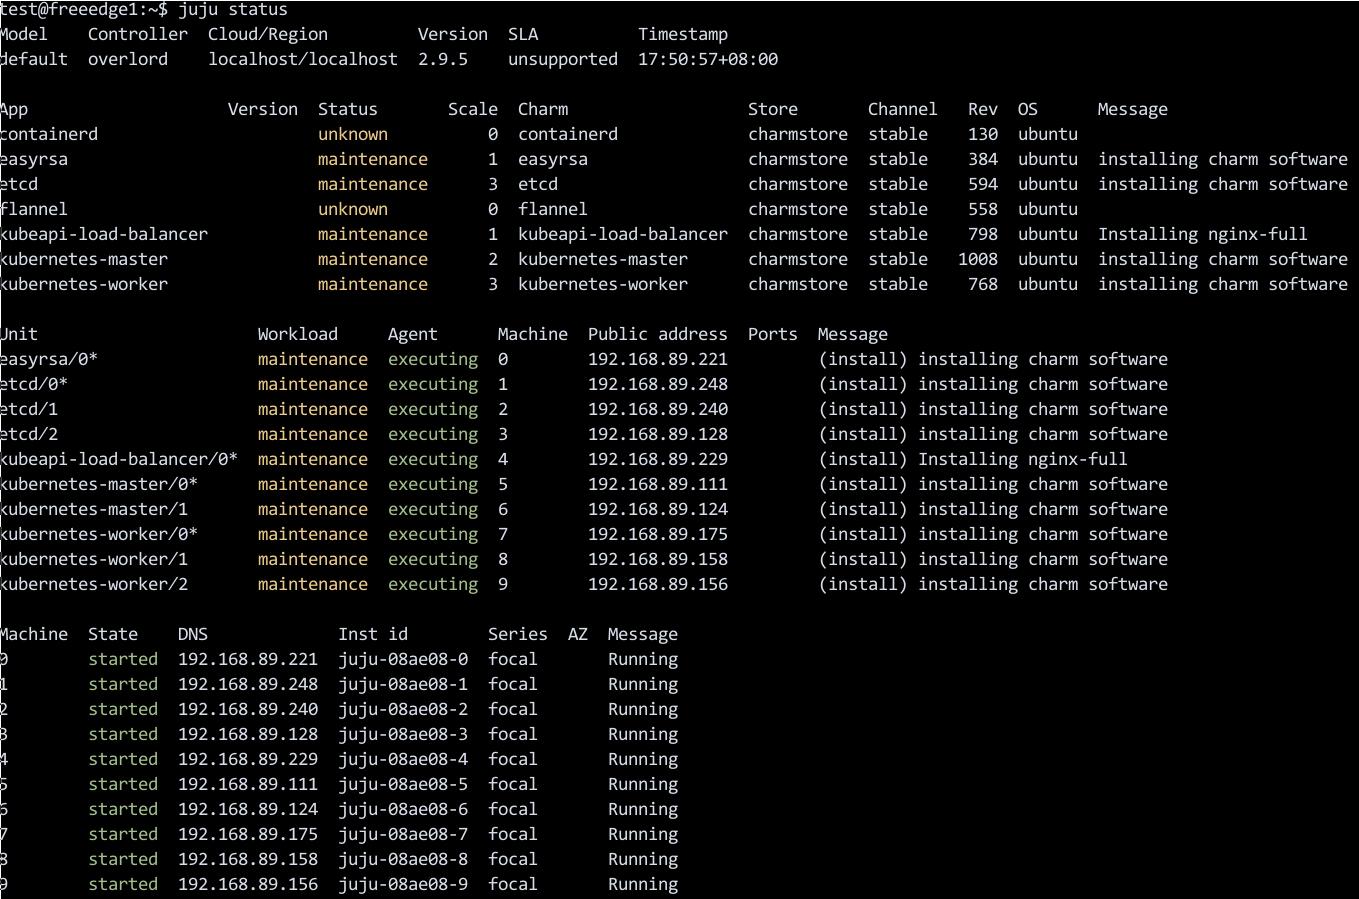
涉及到的落地实体:
安装kubectl用于管控集群:
test@freeedge1:~$ sudo snap install kubectl --classic
.....
kubectl 1.21.1 from Canonical✓ installed
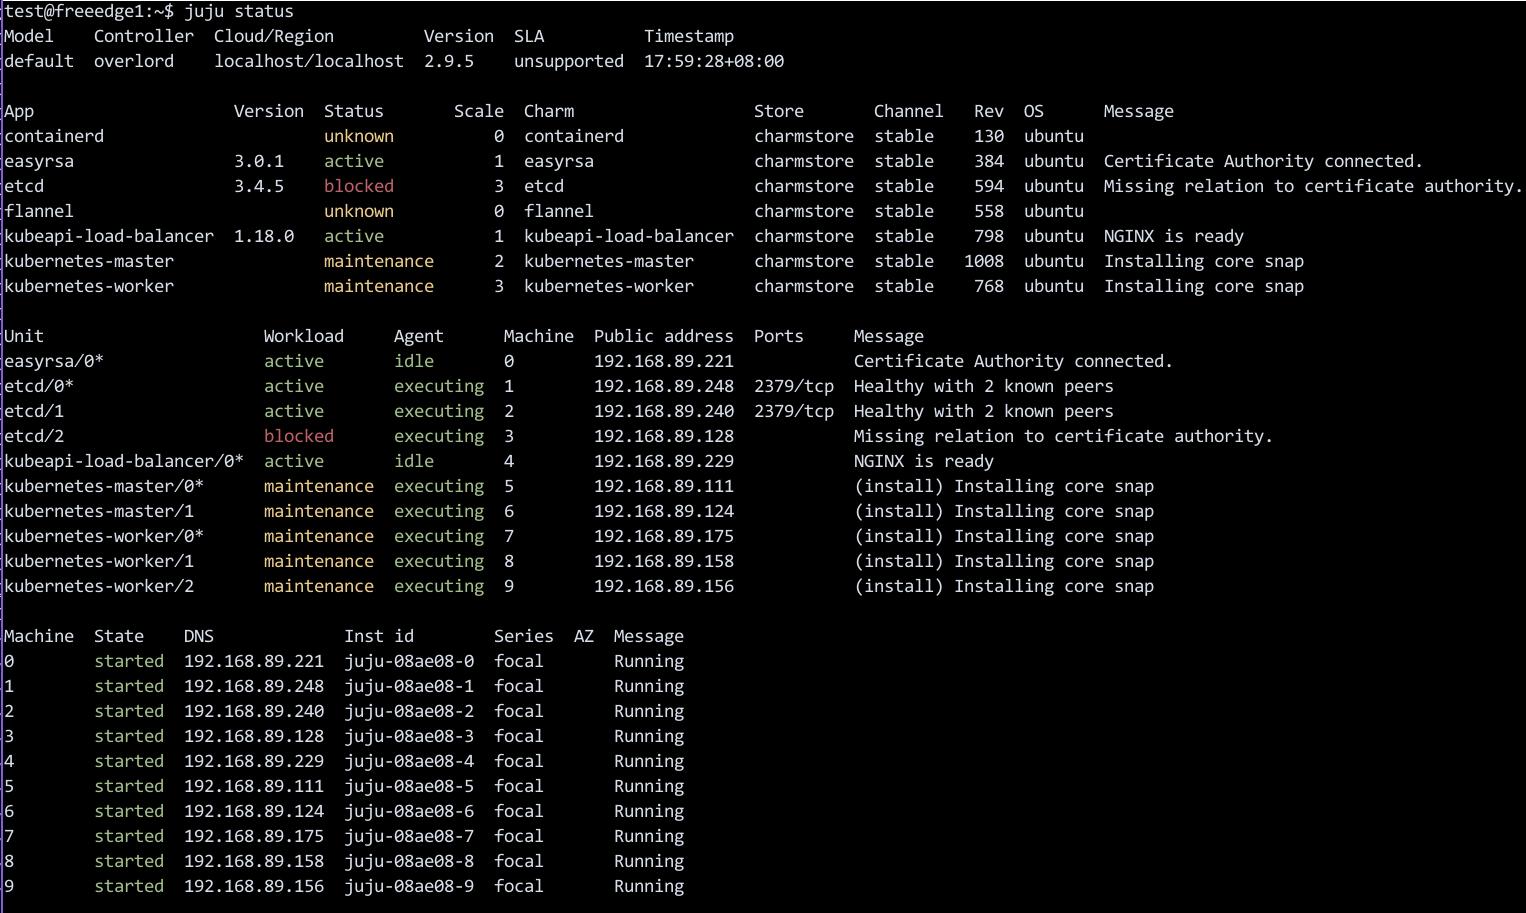
中间状态:
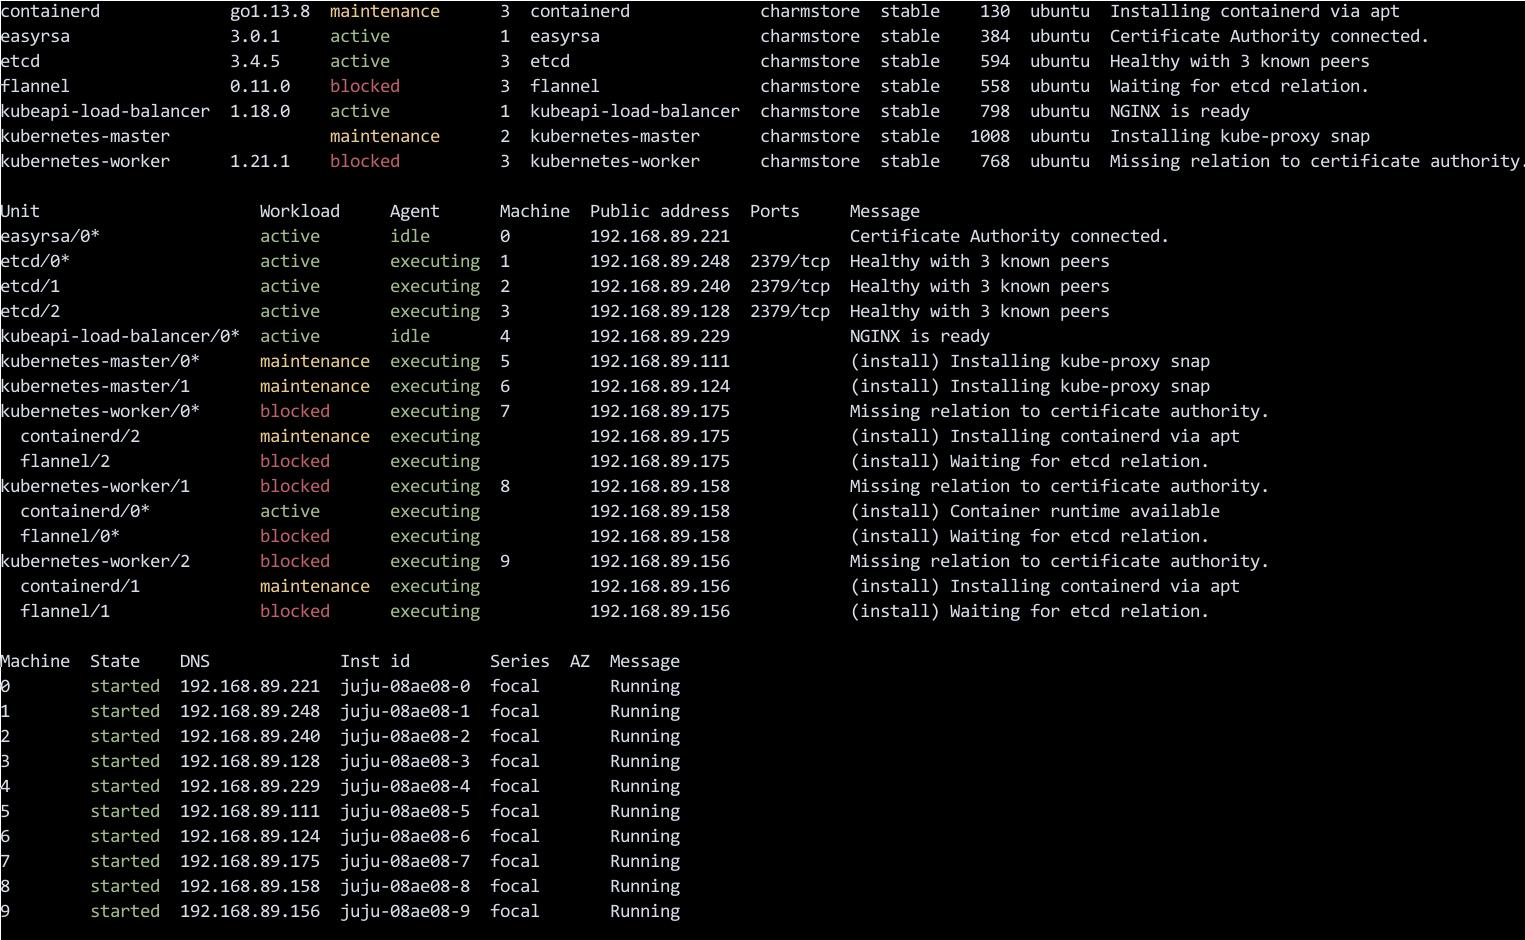
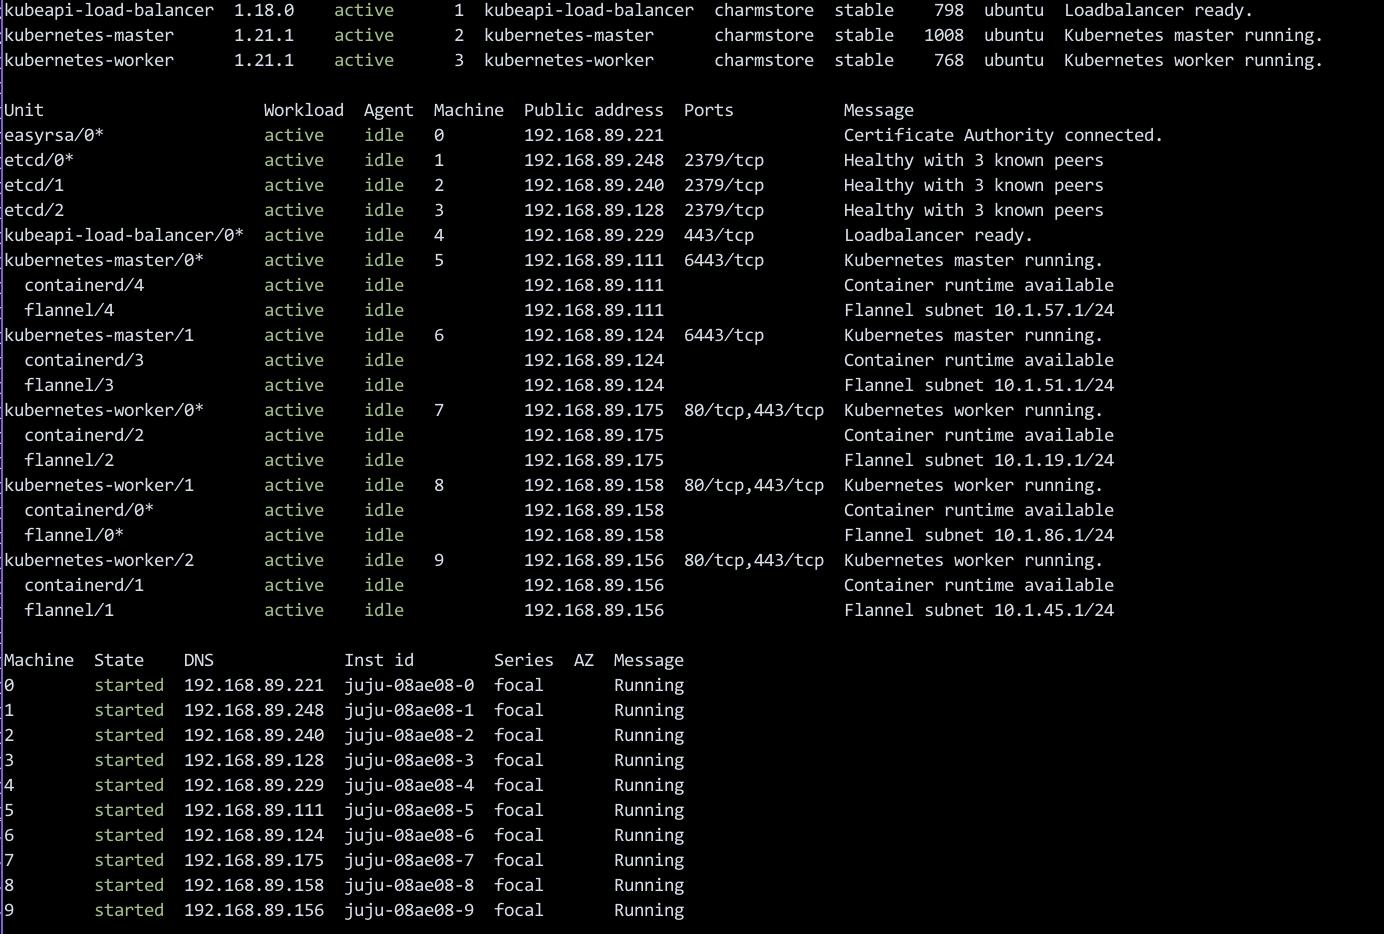
集群就绪:
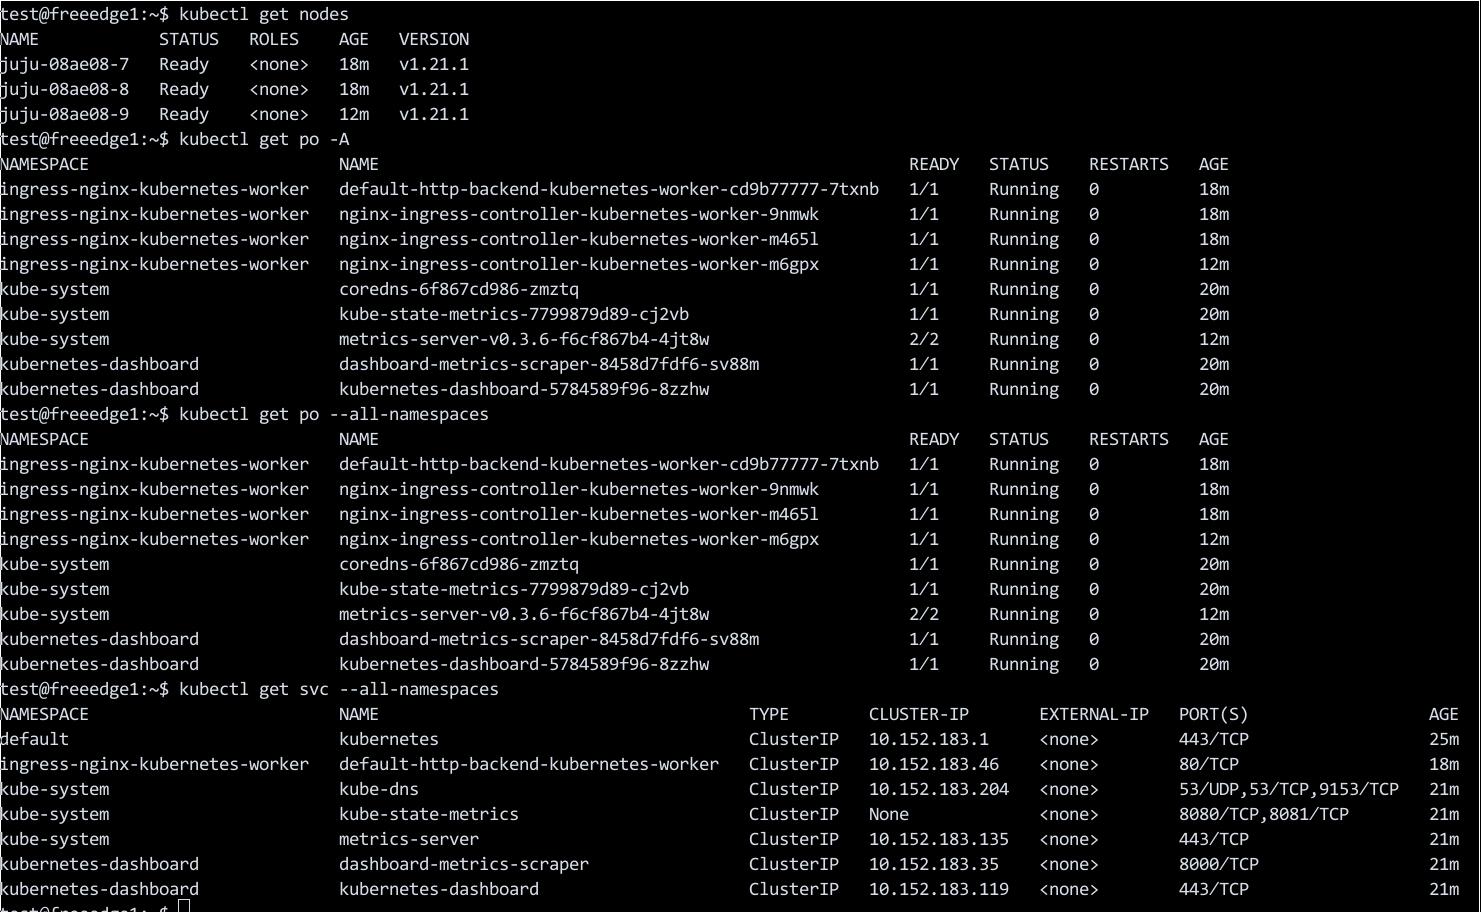
$ juju scp kubernetes-master/0:config ~/.kube/config
$ kubectl get nodes -A
NAME            STATUS   ROLES    AGE   VERSION
juju-08ae08-7   Ready    <none>   19m   v1.21.1
juju-08ae08-8   Ready    <none>   19m   v1.21.1
juju-08ae08-9   Ready    <none>   13m   v1.21.1
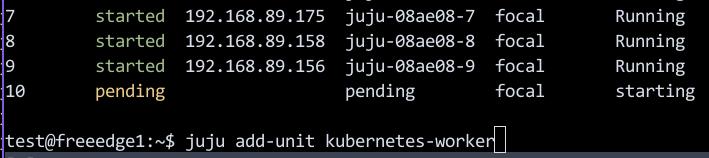
添加节点:
$ juju add-unit kubernetes-worker
增加完后:
$ kubectl get nodes -A
NAME             STATUS   ROLES    AGE   VERSION
juju-08ae08-10   Ready    <none>   12m   v1.21.1
juju-08ae08-7    Ready    <none>   42m   v1.21.1
juju-08ae08-8    Ready    <none>   42m   v1.21.1
juju-08ae08-9    Ready    <none>   36m   v1.21.1
增加3个:
$ juju add-unit kubernetes-worker -n 3
$ juju status
.....
11       pending                  pending         focal       starting
12       pending                  pending         focal       starting
13       pending                  pending         focal       starting
$ kubectl get nodes -A
NAME             STATUS   ROLES    AGE     VERSION
juju-08ae08-10   Ready    <none>   29m     v1.21.1
juju-08ae08-11   Ready    <none>   5m2s    v1.21.1
juju-08ae08-12   Ready    <none>   3m21s   v1.21.1
juju-08ae08-13   Ready    <none>   86s     v1.21.1
juju-08ae08-7    Ready    <none>   59m     v1.21.1
juju-08ae08-8    Ready    <none>   59m     v1.21.1
juju-08ae08-9    Ready    <none>   53m     v1.21.1
Jul 1, 2021
Technology1. 环境
物理机,全隔离环境,可通过隧道开通的proxy(10.xx.xx.xxx:8118)访问互联网.
终极目标:构建一个可自由连接互联网的网段用于虚拟机及虚拟网络方案的验证。
2. 配置步骤
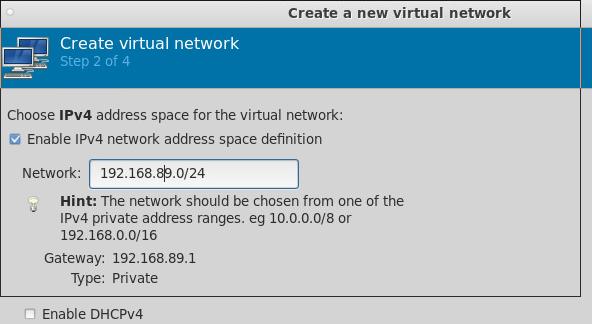
2.1 准备Router虚拟机
virt-manager内创建一个网段为192.168.89.0/24, dhcp关闭,转发模式。而后创建一台ubuntu20.04的虚拟机,配置为1核1G,使用该网络,启动。
启动后配置其网络地址为192.168.89.2/24:
$ cat /etc/netplan/01-netcfg.yaml
    # This file describes the network interfaces available on your system
    # For more information, see netplan(5).
    network:
      version: 2
      renderer: networkd
      ethernets:
        eth0:
          dhcp4: no
      bridges:
        br0:
          dhcp4: no
          addresses: [ 192.168.89.2/24 ]
          gateway4: 192.168.100.1
          interfaces:
             - eth0
$ sudo netplan apply
$ sudo hostnamectl set-hostname router
$ sudo vim /etc/hosts
....
127.0.1.1       router  router
....
因为192.168.89.0/24网段内无dncp服务器,dns服务器,因此我们希望Router这台机器用于接管整个网段的地址分配。这个网段我们预留前50个地址用于静态IP使用, 后面的192.168.89.51~192.168.89.254用于dhcp段地址分配。
dnsmasq安装及配置:
$ sudo apt-get install -y dnsmasq
$ sudo systemctl stop systemd-resolved.service
$ sudo systemctl disable systemd-resolved.service
$ sudo systemctl restart dnsmasq
$ sudo  vim /etc/dnsmasq.conf
dhcp-range=192.168.89.51,192.168.89.254,12h
dhcp-option=3,192.168.89.2
interface=br0
bind-interfaces
$ sudo systemctl restart dnsmasq
此时可以新建一台虚拟机接入该网段用于测试,可以看到该网段的dhcp确实由router承载,且分配了网关为192.168.89.2. 但是此时因为router上未开启流量转发,因而此虚拟机使用192.168.89.2作为网关时不能连接外部网络。
使能Ip转发:
$ cat /proc/sys/net/ipv4/ip_forward
0
$ sudo vim /etc/sysctl.conf
$ sudo sysctl -p
net.ipv4.ip_forward = 1
$ cat /proc/sys/net/ipv4/ip_forward
1
做到这里,我突然想到,如果一个局域网段有两个出口,有可能会带来隐患。不排除有的容器实例里某些诡异的操作会从192.168.89.1直接出也不一定。所以我决定彻底删除这个网段,将这个网段的forward属性也去掉,在libvirtd中,这就是一个完全隔离的网段,而Router这台机器我们将它配置成为一个双网卡的机器,而增加的eth1则连接到另一个网段(192.168.100.4)。
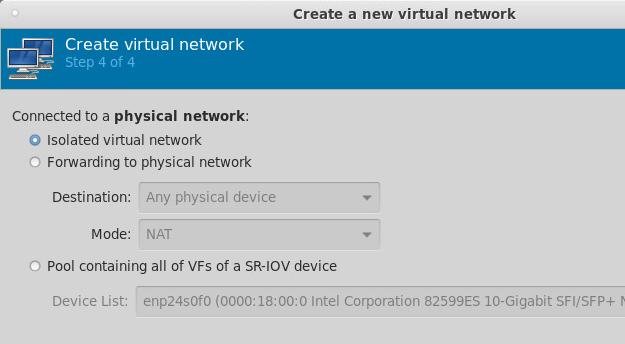
值得注意的是,在更改完isolated网络类型后,虚拟机的配置需要重新确认(libvirtd可能在增删网络配置的过程中将原有的网络回归到default)。
最终router上的网络及路由配置如下:
test@router:~$ cat /etc/netplan/01-netcfg.yaml
# This file describes the network interfaces available on your system
# For more information, see netplan(5).
network:
  version: 2
  renderer: networkd
  ethernets:
    eth0:
      dhcp4: no
      addresses: [ 192.168.89.2/24 ]
      #routes:
      #  - to: 192.168.89.0/24
      #    via: 192.168.89.1
test@router:~$ cat /etc/netplan/02-eth1.yaml
# This file describes the network interfaces available on your system
# For more information, see netplan(5).
network:
  version: 2
  renderer: networkd
  ethernets:
    eth1:
      dhcp4: no
      addresses: [ 192.168.100.4/24 ]
      gateway4: 192.168.100.1
test@router:~$ route -n
Kernel IP routing table
Destination     Gateway         Genmask         Flags Metric Ref    Use Iface
0.0.0.0         192.168.100.1   0.0.0.0         UG    0      0        0 eth1
192.168.89.0    0.0.0.0         255.255.255.0   U     0      0        0 eth0
192.168.100.0   0.0.0.0         255.255.255.0   U     0      0        0 eth1
重启过程中发现/etc/resolv.conf无效,执行以下操作:
test@router:/etc$ sudo rm -f resolv.conf
test@router:/etc$ sudo vim /etc/resolv.conf
nameserver 223.5.5.5
test@router:/etc$ sudo chattr +i /etc/resolv.conf
执行转发:
# sudo apt-get install -y iptables-persistent
# sudo iptables -t nat -A POSTROUTING -s 192.168.89.1/24 ! -d 192.168.89.0/24 -j SNAT --to-source 192.168.100.4
# apt-get install -y libevent-devel
##### get redsocks
# cd /opt/src/redsocks/
# make clean && make
# cd /opt/src/redsocks
配置
# ./redsocks.sh start
这里值得注意的是,redsocks需要配置为socks5代理才可以让本机访问到外面。
udp转发
外部机器建立ssh隧道用于转发:
# ssh -o GatewayPorts=true -f -N -T -R \*:18888:localhost:18888 docker@10.xx.xx.xxx
外部机器做udp到tcp的socat转发:
# sudo socat tcp-listen:18888,reuseaddr,fork udp:127.0.0.1:53
内部机器做tcp到udp的socat转发:
# socat -T15 udp4-recvfrom:53,bind=10.xx.xxx.xxx,fork tcp:localhost:18888
Jun 25, 2021
Technology现场测试时,测试人员报告在安装ipvsadm时,有包缺失现象。报错现象如下:
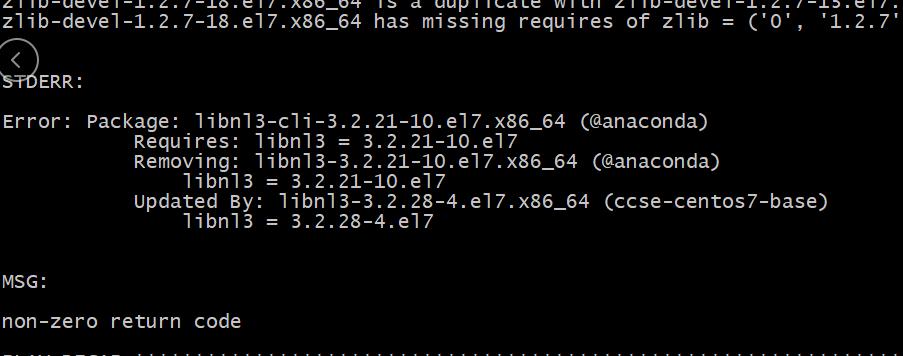
原因是因为在安装ipvsadm时的libnl3依赖更新开始,客户安装的操作系统是centos7.2,而我们做包的系统是>centos7.5以后的,因而导致了libnl3-cli因libnl3的更新抱怨更新后确实依赖而不能进行安装。
解决方案:

Jun 17, 2021
Technology解决问题
LXD 的macvlan组网方式,共享与主机相同的地址段.
环境
环境如下:
lxd1 eth0 192.168.100.61
lxd2 eth0 192.168.100.62
lxd3 eth0 192.168.100.63
创建出的macvlan的profile如下:
# lxc profile show macvlan
config: {}
description: Default LXD profile modified for using macvlan
devices:
  eth0:
    nictype: macvlan
    parent: eth0
    type: nic
name: macvlan
在lxd2主机上创建实例并检查:
# lxc launch 48f7ccdc7b02 test1 --profile default --profile macvlan
# lxc ls
| test1 | RUNNING | 192.168.100.253 (eth0) |      | CONTAINER | 0         |
# lxc exec test1 bash
ping 192.168.100.61/63都可以
无法ping 192.168.100.62
同样在lxd1和lxd3上的容器实例亦无法ping通本机。
workaround
虽然macvlan无法Ping通物理机,因为这是由它的设计原理决定的。但是macvlan可以ping通其他的macvlan, 因而我们可以在主机上分别加上一个额外的macvlan专用来与本机上启动的Lxc容器通信:
以lxd2主机为例,新增一个mynet的macvlan网络设备,指定其地址为192.168.100.72, 而后添加路由,所有到达其产生的LXC容器实例的流量均经过该mynet设备转发:
ip link add mynet link eth0 type macvlan mode bridge
ip addr add 192.168.100.72 dev mynet
ip link set mynet up
ip route add 192.168.100.253 dev mynet
创建完成后,ping本机上的test1容器(192.168.100.253):
PING 192.168.100.253 (192.168.100.253) 56(84) bytes of data.
64 bytes from 192.168.100.253: icmp_seq=1 ttl=64 time=0.088 ms
进入容器后亦可ping通主机.
检查主机上新创建的设备及路由:
# ip addr show mynet
5: mynet@eth0: <BROADCAST,MULTICAST,UP,LOWER_UP> mtu 1500 qdisc noqueue state UNKNOWN group default qlen 1000
    link/ether ba:2b:e7:86:33:9a brd ff:ff:ff:ff:ff:ff
    inet 192.168.100.72/32 scope global mynet
       valid_lft forever preferred_lft forever
    inet6 fe80::b82b:e7ff:fe86:339a/64 scope link
       valid_lft forever preferred_lft forever
# ip route
default via 192.168.100.1 dev eth0 proto static metric 100
10.230.202.0/24 dev lxdbr0 proto kernel scope link src 10.230.202.1
192.168.100.0/24 dev eth0 proto kernel scope link src 192.168.100.62 metric 100
192.168.100.253 dev mynet scope link
ToDO
如果要用于生产环境的话,需要考虑:
1. 自动化创建mynet设备并绑定一个额外的同网段IP地址。
2. LXC实例创建后,自动在主机层面创建经由mynet设备的路由。
3. LXC销毁后,自动删除该LXC IP对应的路由。
