Oct 18, 2021
TechnologyEnvironment Description
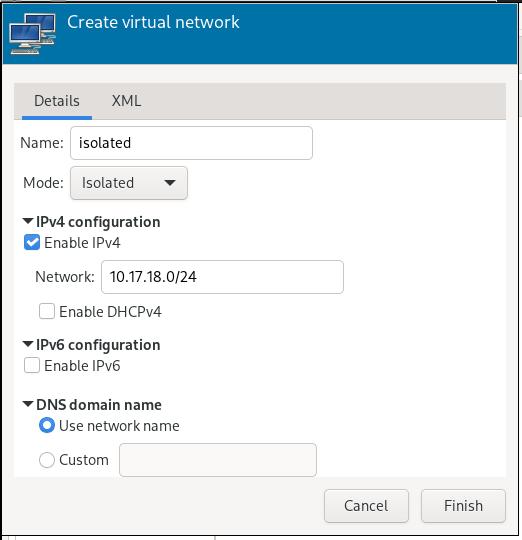
In virt-manager, create a new isolated virtual network via:
Create VM
Get the openwrt x86 images from:
wget https://downloads.openwrt.org/releases/21.02.0-rc4/targets/x86/64/openwrt-21.02.0-rc4-x86-64-generic-ext4-combined.img.gz
gunzip openwrt-21.02.0-rc4-x86-64-generic-ext4-combined.img.gz
mv /root/openwrt-21.02.0-rc4-x86-64-generic-ext4-combined.img /var/lib/libvirt/images
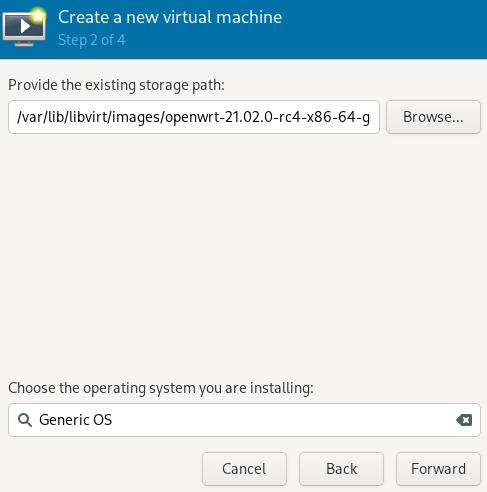
Create a new virtual machine using this image:
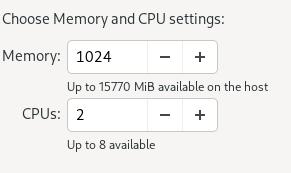
2-Core , 1024 MB:
Named it zzzz_OpenWRT:

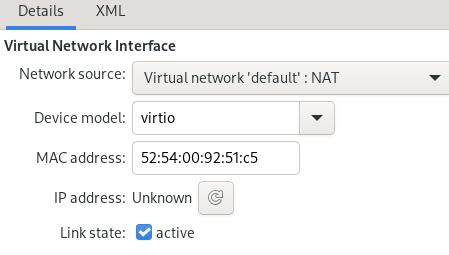
Customize the vm, first define an ethernet card which use default network:
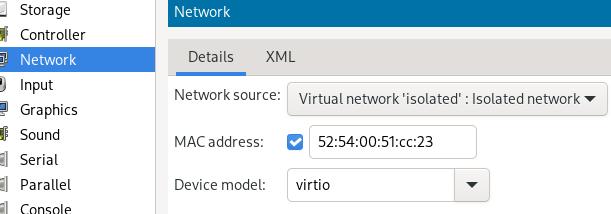
Add a second nic which uses isolated network:
Bootup the machine until you see:
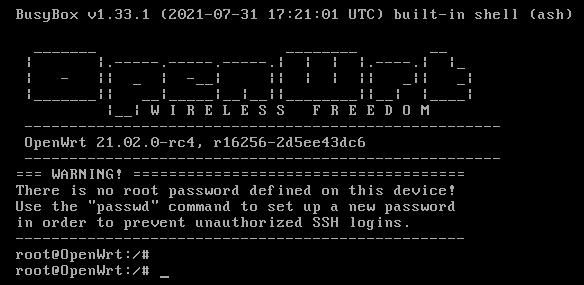
You should use passwd for generating a new password for security.
Swith the eth0/eth1, cause eth0 will be the lan, while eth1 will be the wan.
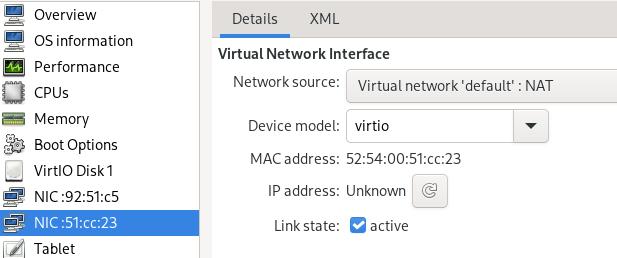
Manually set the br-lan address via:
# vim /etc/config/network
- option ipaddr '192.168.1.1'
+ option ipaddr '10.17.18.254'
Login luci via:
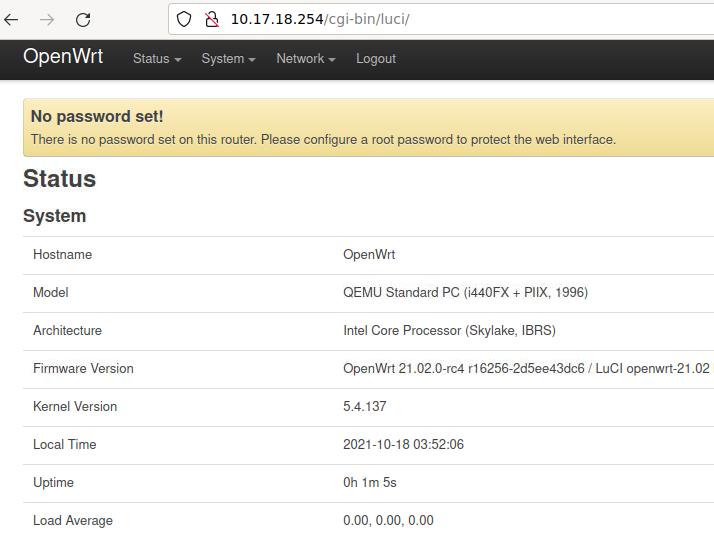
Install redsocks via:
# opkg update
# opkg install redsocks
Oct 8, 2021
Technology1. Install Android Studio
Enable 32-bit library and install some 32-bit libs:
dpkg --add-architecture i386
apt-get update
sudo apt-get install libc6:i386 libncurses5:i386 libstdc++6:i386 lib32z1 libbz2-1.0:i38
Download from offcial website:
https://developer.android.com/studio, then untar it to:
Ignored
2. vendor.img resize
Install qemu tools via:
# apt-get install -y qemu qemu-utils
Resize via:
# qemu-img resize vendor.img +1G
# mount -o loop,offset=1048576 vendor.img /mnt8/
# losetup -l
# resize2fs /dev/loop9
# df -h | grep mnt8
/dev/loop9      1.1G   67M  1.1G   7% /mnt8
3. waydroid
Install via:
# export DISTRO="focal"
# sudo curl https://repo.waydro.id/waydroid.gpg --output /usr/share/keyrings/waydroid.gpg && \
# echo "deb [signed-by=/usr/share/keyrings/waydroid.gpg] https://repo.waydro.id/ $DISTRO main" > ~/waydroid.list && sudo mv ~/waydroid.list /etc/apt/sources.list.d/waydroid.list && sudo apt-get update -y
# sudo apt-get install -y waydroid
Initialize via:
root@vp1:~# waydroid init
[08:42:25] Download https://sourceforge.net/projects/waydroid/files/images/system/lineage/waydroid_x86_64/lineage-17.1-20211007-VANILLA-waydroid_x86_64-system.zip/download
[08:43:29] Validating system image
[08:43:31] Extracting to /var/lib/waydroid/images
[08:43:58] Download https://sourceforge.net/projects/waydroid/files/images/vendor/waydroid_x86_64/lineage-17.1-20211007-MAINLINE-waydroid_x86_64-vendor.zip/download
[08:44:10] Validating vendor image
[08:44:10] Extracting to /var/lib/waydroid/images
conflict with redroid, so ignored.
Via gnome-control-center we could setup the monitor.
https://blog.csdn.net/ALakers/article/details/102705681
https://blog.imlk.top/blog/51/
https://zhiwei.li/blog/%E7%BC%96%E8%AF%91android_emualtor.html
https://zhiwei.li/blog/android%E6%A8%A1%E6%8B%9F%E5%99%A8rom%E7%BC%96%E8%AF%91.html
6. v2ray
via:
sudo docker run -d --restart=always --privileged --network=host --name=v2raya -v /etc/v2raya:/etc/v2raya mzz2017/v2raya
7. repo sync issue
solved via(python2->python3):
curl https://storage.googleapis.com/git-repo-downloads/repo-1 > ~/bin/repo
chmod a+x ~/bin/repo
python3 ~/bin/repo init -u git@....
8. build blissOS
via:
sudo apt-get install git-core gnupg flex bison maven gperf build-essential zip curl zlib1g-dev gcc-multilib g++-multilib libc6-dev-i386  lib32ncurses5-dev x11proto-core-dev libx11-dev lib32z-dev ccache libgl1-mesa-dev libxml2-utils xsltproc unzip squashfs-tools python-mako libssl-dev ninja-build lunzip syslinux syslinux-utils gettext genisoimage gettext bc xorriso libncurses5
sudo apt-get install -y openjdk-8-jdk
repo init -u https://github.com/BlissRoms-x86/manifest.git -b p9.0-x86
repo sync -j24 -c --no-tags --no-clone-bundle
Next step is to download the proprietary files from ChromeOS:
mkdir vendor/bliss_priv/proprietary
mkdir vendor/bliss_priv/source
bash build-x86.sh -r android_x86_64-userdebug
After that, you can build your release file:
bash build-x86.sh android_x86_64-userdebug (to build the userdebug version for x86_64 CPUs)
9. Install gcc/g++ 10
via:
sudo add-apt-repository ppa:ubuntu-toolchain-r/test
sudo apt-get update
sudo apt install gcc-10
For g++-10:
   sudo apt install g++-10
10. tips for houdini
refers to:
https://www.reddit.com/r/Androidx86/comments/nf2kx7/aarch64armv8aarm64_support/
11. Disable unattended upgrade svc
via:
systemctl stop unattended-upgrades.service && systemctl disable unattended-upgrades.service
12. repo sync
using ustc:
repo init -u git://mirrors.ustc.edu.cn/aosp/platform/manifest
## 如果提示无法连接到 gerrit.googlesource.com,可以编辑 ~/bin/repo,把 REPO_URL 一行替换成下面的:
## REPO_URL = 'https://gerrit-googlesource.proxy.ustclug.org/git-repo'
13. repo sync in cn
via:
repo init -u git://mirrors.ustc.edu.cn/aosp/platform/manifest -b android-9.0.0_r61
repo sync -c
# backup
tar cf - houdini_build/ | pigz -9 -p 32 > houdini_build.tar.gz
14. android 11 add new lunch
via:
# vim build/make/target/product/AndroidProducts.mk
.....
COMMON_LUNCH_CHOICES := \
    aosp_arm64-eng \
    aosp_arm-eng \
    aosp_x86_64-eng \
    aosp_x86-eng \
    sdk_phone_x86_64-userdebug \
# lunch sdk_phone_x86_64
# m -j88
15. stop k3s
via:
/usr/local/bin/k3s-killall.sh
/usr/local/bin/uninstall-all.sh
16. headless vnc server
via:
https://kb.brightcomputing.com/knowledge-base/using-nvidia-gpus-in-x-application-on-a-headless-node-via-vnc/
https://joelgriffiths.com/how-to-configure-nvidia-settings-for-linux-crypto-mining-on-headless-ubuntu-system/
17. disable sleep
disable sleep in ubuntu:
sudo systemctl mask sleep.target suspend.target hibernate.target hybrid-sleep.target
18. rotate screen
via:
$ xrandr --output HDMI1 --rotate left
19. speed-up grep
via:
LANG=c grep -i xxxx ./ -r
20. diff ignore directory
via:
diff -qr --exclude=ignoreme ...
21. change default boot item
via:
# vim /etc/default/grub
GRUB_DEFAULT="Advanced options for Ubuntu>Ubuntu, with Linux 4.15.0-162-generic"
# update-grub2
22. list all users
via:
ps -eo user,uid | awk 'NR>1 && $2 >= 1000 && ++seen[$2]==1{print $1}'
23. remove pci devices
via:
$  vim /etc/udev/rules.d/removesomething.rules
ACTION=="add", KERNEL=="0000:00:03.0", SUBSYSTEM=="pci", RUN+="/bin/sh -c 'echo 1 > /sys/bus/pci/devices/0000:00:03.0/remove'"
24. config gcc
via:
sudo update-alternatives --config gcc
25. Install gcc version
Using gcc 9 via:
sudo update-alternatives --install /usr/bin/gcc gcc /usr/bin/gcc-9 9
26. build kernel for 20.10
via:
# rm -f vmlinux-gdb.py
# vim tools/objtool/elf.c
# make deb-pkg -j$(nproc)
27. Disable gdm sleep mode
via:
sudo -u gdm dbus-launch gsettings set org.gnome.settings-daemon.plugins.power sleep-inactive-ac-type 'nothing'
28. Use phoronix for tesing gpu
Steps:
$ sudo dpkg install -y phoronix-test-suite_10.6.1_all.deb
$ sudo apt --fix-broken install
$ phoronix-test-suite list-available-tests
$ export DISPLAY=:0.0
$ phoronix-test-suite install pts/unigine-heaven
$ phoronix-test-suite benchmark pts/unigine-heaven
29. Auto-Login in gdm
via:
Had the same issue, I solved it by enabling 'Timed Login' in the /etc/gdm3/custom.conf file. Mine looks like:

# GDM configuration storage
#
# See /usr/share/gdm/gdm.schemas for a list of available options.

[daemon]
AutomaticLoginEnable=true
AutomaticLogin=username

# Uncoment the line below to force the login screen to use Xorg
#WaylandEnable=false

# Enabling automatic login

# Enabling timed login
TimedLoginEnable = true
TimedLogin = username
TimedLoginDelay = 10
30. Disable auto-sleep in gdm
via:
switch to a VT (e.g. Ctrl+Alt+F3), login as root and run:

su - gdm -s /bin/sh
to switch user to gdm.

then run:

export $(dbus-launch)
and set idle delay to 0 (which translates to never):

GSETTINGS_BACKEND=dconf gsettings set org.gnome.desktop.session idle-delay 0
run exit or hit Ctrl+D to return to root account.

reboot your machine or restart the display manager:

systemctl restart gdm
And:
systemctl mask sleep.target suspend.target hibernate.target hybrid-sleep.target
31. update initramfs
In ubuntu 20.04 update initramfs Via:
update-initramfs -u
32. termux change repo
via:
termux-change-repo
33. Android Phone Image BAckup
via:
$ aft-mtp-mount ~/mnt
34. remount android partition
via:
:/boot # mount -o rw,remount /boot
:/boot # cp Image  Image.origin
35. android docker tips
Start dockerd via:
# echo "nameserver 223.5.5.5">/etc/resolv.conf
#  dockerd --iptables=false --dns=223.5.5.5
Start docker instance via:
# docker run --entrypoint "/system/bin/sleep" redroid/redroid:9.0.0-latest -- 3600
Enter docker instance and execute the init via:
rpi4:/ # docker exec -it 59eccd0c23ea /system/bin/sh
59eccd0c23ea:/ # /init qemu=1 androidboot.hardware=redroid
59eccd0c23ea:/ # ps -ef
UID            PID  PPID C STIME TTY          TIME CMD
root             1     0 0 12:36 ?        00:00:00 sleep -- 3600
root             7     0 0 12:49 pts/0    00:00:00 sh
root            16     1 0 15:44 136:0    00:00:00 [init]
root            17     1 0 15:44 136:0    00:00:00 [init]
root            18     1 0 15:44 136:0    00:00:00 ueventd
root            43     7 2 58:46 pts/0    00:00:00 ps -ef
36. android docker tips(x86)
Start docker instance via:
docker run --privileged -p 15589:5555 --memory-swappiness=0 --entrypoint "/system/bin/sleep" redroid:9officialhoudini -- 3600
Enter the docker instance and execute:
a2c9bf73d181:/ # ./init qemu=1 androidboot.hardware=redroid
6|a2c9bf73d181:/ # getprop | grep -i boot | grep comple
[sys.logbootcomplete]: [0]
37. redroid in docker
via:
# docker run --privileged --memory-swappiness=0  -p 15589:5555 --rm  --entrypoint "/init" redroid/redroid:11.0.0-latest qemu=1 androidboot.hardware=redroid
root@ubuntu:/home/ubuntu# docker ps
dCONTAINER ID   IMAGE                           COMMAND                  CREATED         STATUS         PORTS                                         NAMES
8b4ffa8dcb58   redroid/redroid:11.0.0-latest   "/init qemu=1 androi…"   4 minutes ago   Up 4 minutes   0.0.0.0:15589->5555/tcp, :::15589->5555/tcp   adoring_hertz
root@ubuntu:/home/ubuntu# docker exec -it adoring_hertz sh
8b4ffa8dcb58:/ # getprop | grep boot | grep complete
grep: (standard input): Invalid argument
[dev.bootcomplete]: [1]
[sys.boot_completed]: [1]
[sys.bootstat.first_boot_completed]: [1]
images:
redroid/redroid 11.0.0-latest 7fb7c2776f41 12 days ago 1.47GB
38. remount android system
via:
$ su
# mount -o rw,remount -t ext4 /system
39. Disable oh-my-zsh auto update
via:
DISABLE_UPDATE_PROMPT=true
40. Build Android Kernel
Classical method:
/media/nvme/security/prebuilts/qemu-kernel/build-kernel.sh --arch=x86_64 --config=x86_64_ranchu --out=/root/Code/commonout
41. tim in archlinux
Install via:
$ yay com.qq.tim.spark
$ sudo vim /opt/apps/com.qq.tim.spark/files/run.sh
#......
#Add:
export XMODIFIERS="@im=fcitx"
export GTK_IM_MODULE="fcitx"
export QT_IM_MODULE="fcitx"
#.....
42. awesome dialog position
Edit the rc.lua via:
 {
      rule = { class = "xxxxx" },
      properties = {
         placement = awful.placement.centered,
         titlebars_enabled = false,
      }
   },

    -- Set Firefox to always map on the tag named "2" on screen 1.
    -- { rule = { class = "Firefox" },
    --   properties = { screen = 1, tag = "2" } },
}
43. emulator with bridge connection
via:
emulator -avd mmkk -verbose -writable-system -kernel /root/Code/commonout/kernel-qemu -show-kernel -partition-size 61240 -qemu -device virtio-net-pci,netdev=nic0,mac=00:16:3e:0c:12:78 -netdev tap,id=nic0,br=br0,helper=/usr/lib/qemu/qemu-bridge-helper -cpu host -m 16535M -smp cores=10,threads=1,sockets=1
Enter the emulator and find the eth1 to be the bridged connection
44. android 90 building issue
via:
$ make clean-apache-xml
$ make apache-xml
Then:
$ make clean-ims-common
$ make ims-common
$ make apache-xml
$ make -j12
45. change adb port
via:
setprop service.adb.tcp.port 5555
stop adbd
start adbd
46. /dev/shm issue
via:
mount -t tmpfs tmpfs /dev/shm
47. pm install privileged
via:
adb install --user USER_ID YOUR_APK
adb shell pm install --user USER_ID YOUR_APK
48. card/driver
ethernet card and device driver:
# ls -1 /sys/class/net/ | grep -v lo | xargs -n1 -I{} bash -c 'echo -n {} :" " ; basename `readlink -f /sys/class/net/{}/device/driver`'
Sep 20, 2021
TechnologyAIM
Enable libndk_translation in waydroid.
Steps
Disable the waydroid-container and reboot the machine:
systemctl disable waydroid-container
reboot
Now you could make a backup for your origin system.img and vendor.img
file:
 cp /var/lib/waydroid/images/system.img /root
 cp /var/lib/waydroid/images/vendor.img /root
Clone the repository :
$ git clone https://github.com/newbit1/libndk_translation_Module.git
$ cd libndk_translation_Module
$ tar czvf native-bridge.tar.gz system
Copy the native-bridge.tar.gz to some place(For example /root), later we will use it.
Resize the img file(enlarge them):
qemu-img resize -f raw system.img +512M
losetup -f system.img
losetup -l
e2fsck -f /dev/loop5
resize2fs /dev/loop5
losetup -d /dev/loop5
 qemu-img resize -f raw vendor.img +100M
 losetup -f vendor.img
 e2fsck -f /dev/loop6
 resize2fs /dev/loop6
 losetup -d /dev/loop6
Mount the img file in rw mode:
 mount -o rw /var/lib/waydroid/images/system.img /var/lib/waydroid/rootfs
 mount -o rw /var/lib/waydroid/images/vendor.img /var/lib/waydroid/rootfs/vendor
Inject libndk_translation_Module:
# cd /var/lib/waydroid/rootfs
# cp /root/native-bridge.tar.gz .
# tar xzvf native-bridge.tar.gz
Enable nativebridge.rc:
# vim /var/lib/waydroid/rootfs/vendor/etc/init/nativebridge.rc
on early-init
    setprop ro.odm.product.cpu.abilist x86_64,x86,arm64-v8a,armeabi-v7a,armeabi
    setprop ro.odm.product.cpu.abilist32 x86,armeabi-v7a,armeabi
    setprop ro.odm.product.cpu.abilist64 x86_64,arm64-v8a
    setprop ro.product.cpu.abilist x86_64,x86,arm64-v8a,armeabi-v7a,armeabi
    setprop ro.product.cpu.abilist32 x86,armeabi-v7a,armeabi
    setprop ro.product.cpu.abilist64 x86_64,arm64-v8a
    setprop ro.vendor.product.cpu.abilist x86_64,x86,arm64-v8a,armeabi-v7a,armeabi
    setprop ro.vendor.product.cpu.abilist32 x86,armeabi-v7a,armeabi
    setprop ro.vendor.product.cpu.abilist64 x86_64,arm64-v8a
    setprop ro.dalvik.vm.native.bridge libndk_translation.so
    setprop ro.enable.native.bridge.exec 1
    setprop ro.ndk_translation.version 0.2.2
    setprop ro.dalvik.vm.isa.arm x86
    setprop ro.dalvik.vm.isa.arm64 x86_64
Enable native.bridge in prop.default:
# vim /var/lib/waydroid/rootfs/system/etc/prop.default
native.bridge=0 --> native.bridge=1
?
native.bridge=0 --> native.bridge=libndk_translation.so
trancode not OK…… lots of issues.
