Feb 15, 2022
Technologyaosp preparation
Prepare the 10.0.0_r33 aosp source via:
repo init -u https://mirrors.tuna.tsinghua.edu.cn/git/AOSP/platform/manifest -b android-10.0.0_r33
repo sync -j8
Build via:
# vim build/target/product/AndroidProducts.mk
.....
COMMON_LUNCH_CHOICES := \
    aosp_arm64-eng \
    aosp_arm-eng \
    aosp_x86_64-eng \
    aosp_x86-eng \
    sdk_phone_x86_64-userdebug \
# source build/envsetup.sh
# lunch sdk_phone_x86_64-userdebug
# m -j128
Then we could use emulator for operating the android 10 vm.
Kernel Prepartion
Sync the 4.14.112 kernel via:
git clone https://android.googlesource.com/kernel/goldfish.git
cd goldfish/
git checkout -b android-goldfish-4.14-gchips remotes/origin/android-goldfish-4.14-gchips
vim security/selinux/include/classmap.h
vim scripts/selinux/mdp/mdp.c
vim scripts/selinux/genheaders/genheaders.c
cp arch/x86/configs/x86_64_ranchu_defconfig  arch/x86/configs/x86_64_emu_defconfig
export PATH=$PATH:/root/Code/android10_redroid/prebuilts/gcc/linux-x86/x86/x86_64-linux-android-4.9/bin
export ARCH=x86_64
export CROSS_COMPILE=x86_64-linux-android-
export REAL_CROSS_COMPILE=x86_64-linux-android-
/root/Code/android10_redroid/prebuilts/qemu-kernel/build-kernel.sh --arch=x86_64
cp /tmp/kernel-qemu/x86_64-4.14.112/kernel-qemu  ~/
Kernel Customization
Customize via:
# cd goldfish
# make x86_64_emu_defconfig
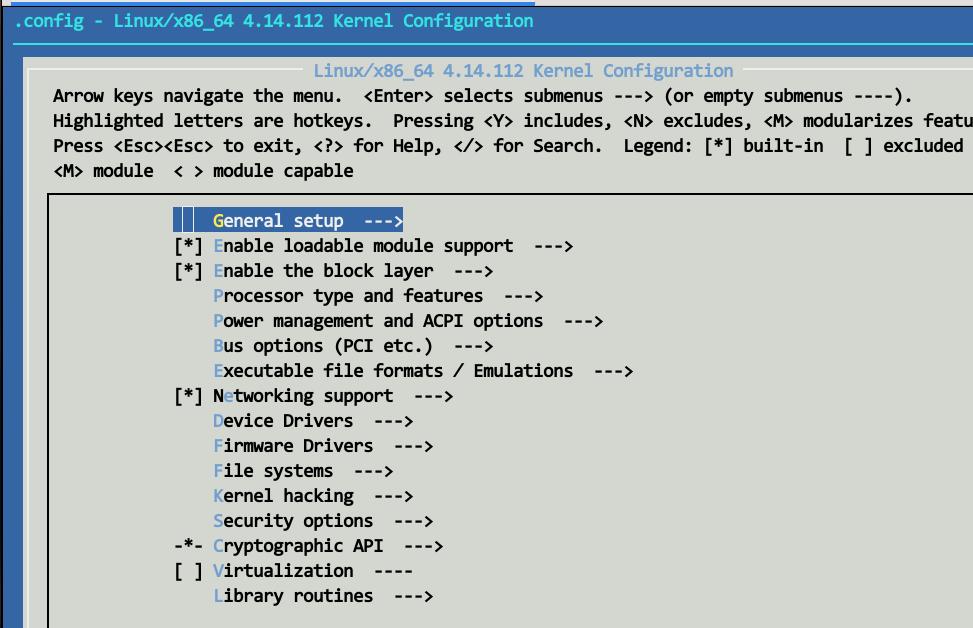
# make menuconfig
Here you will see the kernel configuration window, make changes in it, then save and replace the x86_64_emu_defconfig configuration file.
Detailed changes:
Generic setup -> POSIX Message Queues
Generic setup -> Controller Group support -> PIDs controller
Generic setup -> Controller Group support -> Device controller
Generic setup -> Controller Group support -> CPU controller -> Group sheduling for SCHED_OTHER
Generic setup -> Controller Group support -> CPU controller -> CPU bandwidth provisioning for FAIR-GROUP_SCHED
Generic setup -> Controller Group support -> CPU controller -> Group sheduling for SCHED_RR/FIFO
Generic setup -> Controller Group support -> Perf controller
Generic setup -> Namespaces support -> User namespace
Generic setup -> Namespaces support -> PID namespace
Networking support -> Networking options -> Network packet filtering framework (Netfilter) -> Bridged IP/ARP packets fiiltering
Networking support -> Networking options -> Network packet filtering framework (Netfilter) -> IP virtual server support
Networking support -> Networking options -> Network packet filtering framework (Netfilter) -> Core Netfilter configuration ->  "addrtype" address type match support
Networking support -> Networking options -> Network packet filtering framework (Netfilter) -> Core Netfilter configuration ->  "control group" address type match support
Networking support -> Networking options -> Network packet filtering framework (Netfilter) -> Core Netfilter configuration ->  "control group" address type match support
File Systems -> Overlay filesystem support
But we lost the binderfs support in 4.14.112, have to change to other kernel version!
Migrating the binderfs to the kernel 4.14.112, steps remains to be written .
Refers to:
https://github.com/purplepalmdash/binderfs_backport.git
Start the emulator via:
# emulator -show-kernel -kernel /root/kernel-qemu -no-snapshot-load -selinux disabled
Replace the kernel in aosp kernel source:
cd /root/Code/android10_redroid/prebuilts/qemu-kernel/x86_64
cp -r 4.14/ 4.14.back
cp /root/kernel-qemu 4.14/kernel-qemu2
binderfs enable
aosp source code should add modification for enable binderfs.
Make modification for rootdir, the aim is for enable binderfs:
# vim ./system/core/rootdir/init.rc
    mount configfs none /config nodev noexec nosuid
    chmod 0770 /config/sdcardfs
    chown system package_info /config/sdcardfs

+    # Mount binderfs
+    mkdir /dev/binderfs
+    mount binder binder /dev/binderfs stats=global
+    chmod 0755 /dev/binderfs
+
+    # Mount fusectl
+    mount fusectl none /sys/fs/fuse/connections
+
+    symlink /dev/binderfs/binder /dev/binder
+    symlink /dev/binderfs/hwbinder /dev/hwbinder
+    symlink /dev/binderfs/vndbinder /dev/vndbinder
+
+    chmod 0666 /dev/binderfs/hwbinder
+    chmod 0666 /dev/binderfs/binder
+    chmod 0666 /dev/binderfs/vndbinder
Recompile the aosp source code and get the new generated image
Docker Integration
Download the docker binary files and extract them to prebuilts folder:
$ wget https://download.docker.com/linux/static/stable/x86_64/docker-20.10.8.tgz
// Switch to aosp source tree
$ cd prebuilts
$ tar xzvf ~/docker-20.10.8.tgz -C .
Add docker binary files into system.img, add them into /system/bin so that
we could direct use them:
$ vim  ./build/make/target/board/generic_x86_64/device.mk
// At the end of the file
PRODUCT_COPY_FILES += \
    prebuilts/docker/containerd:system/bin/containerd \
    prebuilts/docker/containerd-shim:system/bin/containerd-shim \
    prebuilts/docker/containerd-shim-runc-v2:system/bin/containerd-shim-runc-v2 \
    prebuilts/docker/ctr:system/bin/ctr \
    prebuilts/docker/docker:system/bin/docker \
    prebuilts/docker/dockerd:system/bin/dockerd \
    prebuilts/docker/docker-init:system/bin/docker-init \
    prebuilts/docker/docker-proxy:system/bin/docker-proxy \
    prebuilts/docker/runc:system/bin/runc \
$ vim build/target/product/sdk_phone_x86_64.mk
// At the end of the file
PRODUCT_ARTIFACT_PATH_REQUIREMENT_ALLOWED_LIST := \
    system/bin/containerd \
    system/bin/containerd-shim \
    system/bin/containerd-shim-runc-v2 \
    system/bin/ctr \
    system/bin/docker \
    system/bin/dockerd \
    system/bin/docker-init \
    system/bin/docker-proxy \
    system/bin/runc \
Change the sepolicy for creating the docker runtime:
$ vim system/sepolicy/prebuilts/api/29.0/private/file_contexts

// Added /var,/run,/system/etc/docker definition under # Symlinks
# Symlinks
/bin                u:object_r:rootfs:s0
/bugreports         u:object_r:rootfs:s0
/charger            u:object_r:rootfs:s0
/d                  u:object_r:rootfs:s0
/etc                u:object_r:rootfs:s0
/sdcard             u:object_r:rootfs:s0
/var                u:object_r:rootfs:s0
/run                u:object_r:rootfs:s0
/system/etc/docker                u:object_r:system_file:s0

$ vim system/sepolicy/private/file_contexts
 /sdcard             u:object_r:rootfs:s0
 /var             u:object_r:rootfs:s0
 /run             u:object_r:rootfs:s0
 /system/etc/docker             u:object_r:system_file:s0

   # SELinux policy files

$ vim system/core/rootdir/Android.mk

     ln -sf /system/etc $(TARGET_ROOT_OUT)/etc; \
     ln -sf /data/var $(TARGET_ROOT_OUT)/var; \
     ln -sf /data/run $(TARGET_ROOT_OUT)/run; \
     ln -sf /data/user_de/0/com.android.shell/files/bugreports $(TARGET_ROOT_OUT)/bugreports;


 # Since init.environ.rc is required for init and satisfies that requirement, we hijack it to create the symlink.
 LOCAL_POST_INSTALL_CMD += ; ln -sf /system/bin/init $(TARGET_ROOT_OUT)/init
 LOCAL_POST_INSTALL_CMD += ; ln -sf /data/docker $(TARGET_OUT)/etc/
 LOCAL_POST_INSTALL_CMD += ; ln -sf /data/resolv.conf $(TARGET_OUT)/etc/resolv.conf
Manually create the folders and make image again:
$ mkdir -p out/target/product/generic_x86_64/data/run
$ mkdir -p out/target/product/generic_x86_64/data/var
$ mkdir -p out/target/product/generic_x86_64/data/docker
$ echo "nameserver 223.5.5.5" > out/target/product/generic_x86_64/data/resolv.conf
$ make userdataimage -j50
Restart the emulator, now it’s free to use docker.
Create emulator
Start the emulator via:
# sudo tunctl
# brctl addif virbr0 tap0
# ip link set dev tap0 up
# emulator -show-kernel -no-snapshot-load -selinux disabled  -qemu -cpu host -device virtio-net-pci,netdev=hn0,mac=52:55:00:d1:55:51   -netdev tap,id=hn0,ifname=tap0,script=no,downscript=no
The added eth1 has no ip addr, use dhclient for getting the address from
virbr0:
adb root
adb shell "dhcpclient -i eth1 &"
Check the ip addr for eth1:
adb shell
generic_x86_64:/ # ifconfig eth1
eth1      Link encap:Ethernet  HWaddr 52:55:00:d1:55:51  Driver virtio_net
          inet addr:192.168.122.124  Bcast:192.168.122.255  Mask:255.255.255.0
          inet6 addr: fe80::5055:ff:fed1:5551/64 Scope: Link
          UP BROADCAST RUNNING MULTICAST  MTU:1500  Metric:1
          RX packets:27 errors:0 dropped:0 overruns:0 frame:0
          TX packets:58 errors:0 dropped:0 overruns:0 carrier:0
          collisions:0 txqueuelen:1000
          RX bytes:2800 TX bytes:15341
Set the /etc/resolv.conf, cgroupfs, then start the dockerd manually:
echo "nameserver 223.5.5.5">/etc/resolv.conf
mount -t tmpfs -o uid=0,gid=0,mode=0755 cgroup /sys/fs/cgroup
cd /sys/fs/cgroup/
mkdir -p cpu cpu acct blkio memory devices pids
mount -n -t cgroup -o cpu cgroup cpu
mount -n -t cgroup -o  cpuacct cgroup cpuacct
mount -n -t cgroup -o  blkio cgroup blkio
mount -n -t cgroup -o  memory cgroup memory
mount -n -t cgroup -o  devices cgroup devices
mount -n -t cgroup -o  pids cgroup pids

ip rule add from all lookup main pref 30000
dockerd  --dns=223.5.5.5 --data-root=/data/var/ --ip=192.168.122.124 & >/data/dockerd-logfile 2>&1
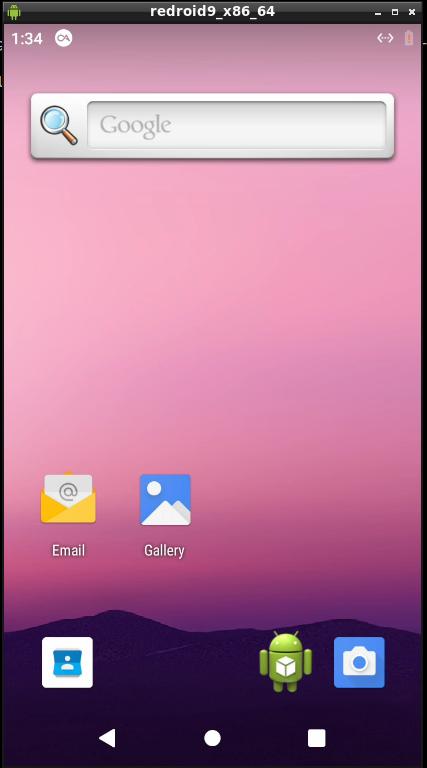
Start the redroid instance via:
docker run -d --privileged -p 8888:5555 redroid/redroid:8.1.0-latest
Feb 7, 2022
Technology这篇指南将详细讲述如何在Android-x86上运行redroid容器。
介绍
Redroid:
ReDroid (Remote anDroid) 是一种支持GPU加速的(容器中的Android)方案. 你可以在任意Linux主机(Docker, podman, k8s等)上使用。Redoird支持arm64及amd64架构,Redroid适用于云游, VMI(Virtual Mobile Infrstructure), 自动化测试及更多场景。
https://github.com/remote-android/redroid-doc#overview
Android-x86:
在PC上运行Android. 这个项目被用于将Android Open Source Project移植到x86平台上,项目前身为"patch hosting for android x86 support”.
https://www.android-x86.org/
编译 Android-x86
我们从pie(aosp9)分支作为起点:
# mkdir android-x86
# cd android-x86
# repo init -u git://git.osdn.net/gitroot/android-x86/manifest -b pie-x86
# repo sync --no-tags --no-clone-bundle -j18
或者,进一步指定其子版本(非master分支):
repo init -u git://git.osdn.net/gitroot/android-x86/manifest -b pie-x86 -m android-x86-9.0-r2.xml
repo sync --no-tags --no-clone-bundle
repo 大小为:
# du -hs android-x86/
79G	android-x86/
# ls android-x86/
Android.bp  bionic    bootstrap.bash  compatibility  dalvik       device    frameworks  kernel   libnativehelper  packages  platform_testing  sdk     test
art         bootable  build           cts            development  external  hardware    libcore  Makefile         pdk       prebuilts         system  tools
对rootdir作修改,目的是为了启用binderfs:
# vim ./system/core/rootdir/init.rc
    mount configfs none /config nodev noexec nosuid
    chmod 0770 /config/sdcardfs
    chown system package_info /config/sdcardfs

+    # Mount binderfs
+    mkdir /dev/binderfs
+    mount binder binder /dev/binderfs stats=global
+    chmod 0755 /dev/binderfs
+
+    # Mount fusectl
+    mount fusectl none /sys/fs/fuse/connections
+
+    symlink /dev/binderfs/binder /dev/binder
+    symlink /dev/binderfs/hwbinder /dev/hwbinder
+    symlink /dev/binderfs/vndbinder /dev/vndbinder
+
+    chmod 0666 /dev/binderfs/hwbinder
+    chmod 0666 /dev/binderfs/binder
+    chmod 0666 /dev/binderfs/vndbinder
使用以下命令编译出iso文件:
# . build/envsetup.sh; lunch android_x86_64-userdebug
# make iso_img TARGET_PRODUCT=android_x86_64 -j128
检查编译出的Iso文件:
# ls -l -h out/target/product/x86_64/android_x86_64.iso
-rw-r--r-- 1 root root 725M Feb  5 02:02 out/target/product/x86_64/android_x86_64.iso
自定义内核
自定义内核步骤如下(详细步骤见最后章节kernel configuration):
# cd kernel
# make android-x86_64_defconfig
# make menuconfig
##### After make customization
# cp arch/x86/configs/android-x86_64_defconfig arch/x86/configs/android-x86_64_defconfig.back
# cp .config arch/x86/configs/android-x86_64_defconfig
重新编译内核并生成iso文件:
# cd kernel
# make mrproper
# cd ..
# . build/envsetup.sh; lunch android_x86_64-userdebug
# rm $OUT/obj/kernel/arch/x86/boot/bzImage
# make iso_img TARGET_PRODUCT=android_x86_64 -j128
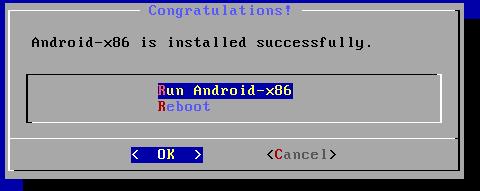
Android-x86 安装
在虚拟机中安装Android-x86:
选择分区:
是否选择GPT:
cfdisk:
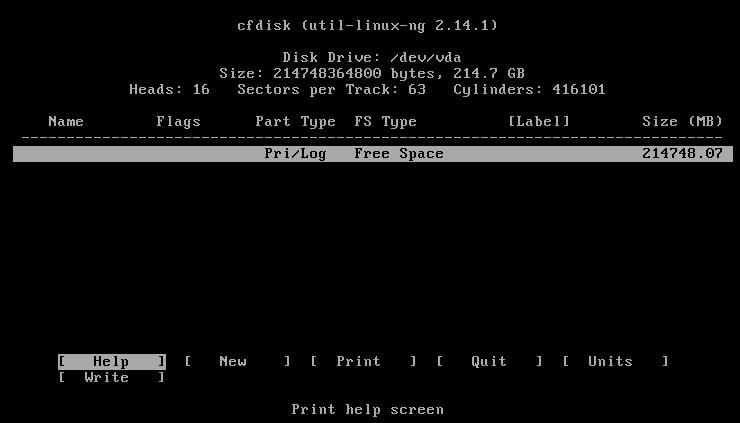
创建一个200GB大小的主分区:
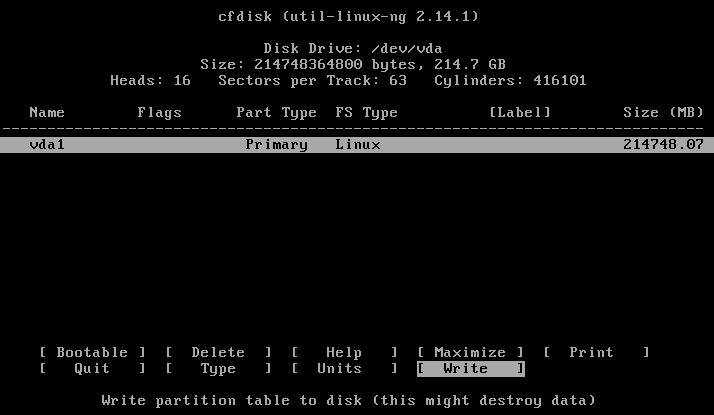
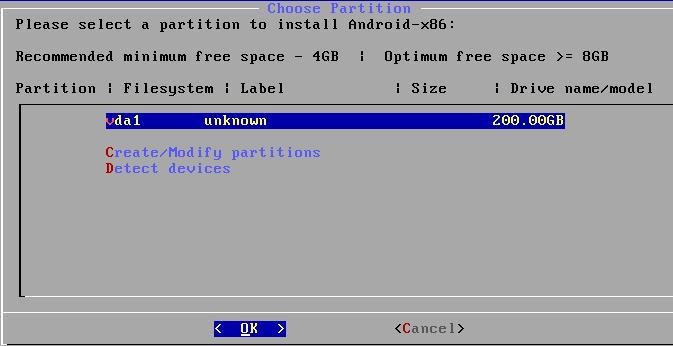
选择Write, Quit后,在安装界面中选择分区进行安装:
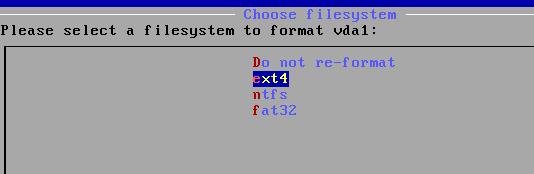
选择格式化为ext4格式:
确认:
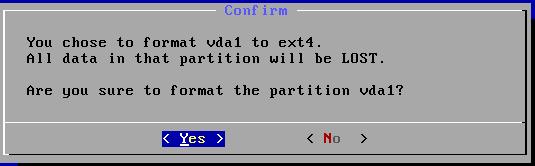
继续格式化:
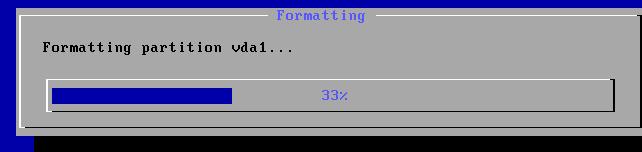
确认:

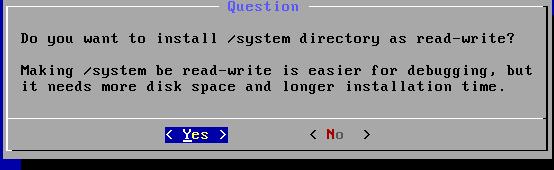
设置为可读/可写模式:
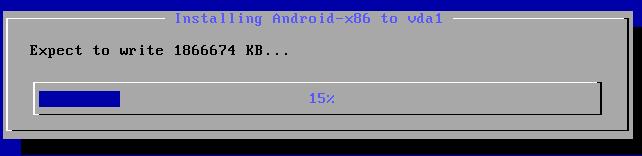
开始安装:
选择 Reboot, 完成安装:
使能 docker
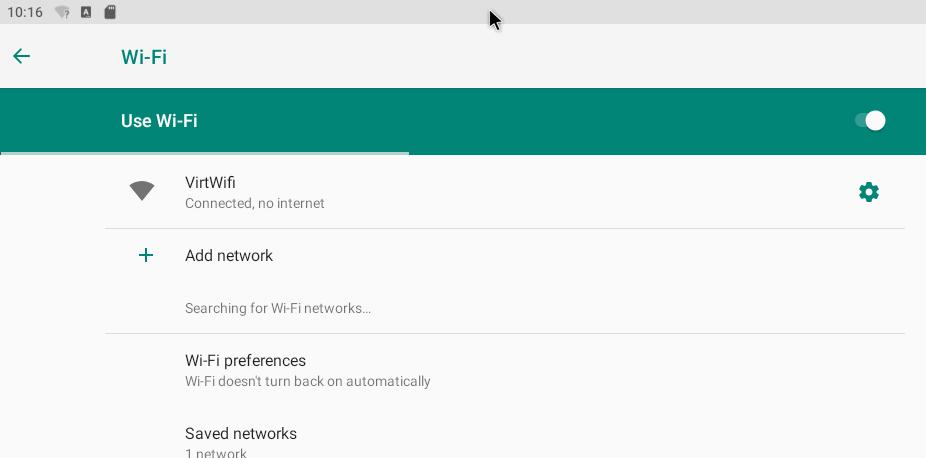
在Android-x86界面中,使能 wifi:
adb root and re-connect:
# adb connect 192.168.122.232
connected to 192.168.122.232:5555
# adb -s 192.168.122.232:5555 root
restarting adbd as root
# adb connect 192.168.122.232
connected to 192.168.122.232:5555
创建docker工作目录:
# adb shell
x86_64:/ # mkdir /data/var
x86_64:/ # mkdir /data/docker/
x86_64:/ #
从docker-ce官方网站下载docker-ce二进制包, 将其本地解压后通过adb push命令上传到对应目录:
# adb push ~/Code/docker/* /data/docker/
在adb shell命令行下准备dockerd工作环境:
mount -o remount,rw /
ln -s /data/docker/* /bin/
ip rule add pref 1 from all lookup main
ip rule add pref 2 from all lookup default
ip route add default via 192.168.122.1 dev wlan0
ip rule add from all lookup main pref 30000
echo "nameserver 223.5.5.5">/etc/resolv.conf
# mount cgroupfs
mount -t tmpfs -o uid=0,gid=0,mode=0755 cgroup /sys/fs/cgroup
cd /sys/fs/cgroup/
mkdir -p cpu cpu acct blkio memory devices pids
mount -n -t cgroup -o cpu cgroup cpu
mount -n -t cgroup -o  cpuacct cgroup cpuacct
mount -n -t cgroup -o  blkio cgroup blkio
mount -n -t cgroup -o  memory cgroup memory
mount -n -t cgroup -o  devices cgroup devices
mount -n -t cgroup -o  pids cgroup pids
使用以下命令启动dockerd守护进程:
# dockerd  --dns=223.5.5.5 --data-root=/data/var/ --ip=192.168.122.232 & >/data/dockerd-logfile 2>&1
# docker images
REPOSITORY   TAG       IMAGE ID   CREATED   SIZE
此时可以启动redroid容器实例:
# docker run -d --privileged -p 8888:5555 redroid/redroid:9.0.0-latest
# docker ps
CONTAINER ID   IMAGE                          COMMAND                  CREATED         STATUS         PORTS                            NAMES
2efa5f6e987b   redroid/redroid:9.0.0-latest   "/init qemu=1 androi…"   5 seconds ago   Up 4 seconds   192.168.122.232:8888->5555/tcp   sweet_ishizaka
验证
adb connect并使用scrcpy命令验证redroid实例是否运行正常:
# adb connect 192.168.122.232:8888
# scrcpy --serial 192.168.122.232:8888
通过以下命令在redroid实例中安装apk:
$ adb -s 192.168.122.232:8888 install ~/apks/aaaaaaa.apk
内核配置
需追加的内核配置项(基于arch/x86/configs下的 android-x86_64_defconfig):
Generic setup -> POSIX Message Queues
Generic setup -> Controller Group support -> PIDs controller
Generic setup -> Controller Group support -> Device controller
Generic setup -> Controller Group support -> CPU controller -> Group sheduling for SCHED_OTHER
Generic setup -> Controller Group support -> CPU controller -> CPU bandwidth provisioning for FAIR-GROUP_SCHED
Generic setup -> Controller Group support -> CPU controller -> Group sheduling for SCHED_RR/FIFO
Generic setup -> Controller Group support -> Perf controller
Generic setup -> Namespaces support -> User namespace
Generic setup -> Namespaces support -> PID namespace
Networking support -> Networking options -> Network packet filtering framework (Netfilter) -> Bridged IP/ARP packets fiiltering
Networking support -> Networking options -> Network packet filtering framework (Netfilter) -> IP virtual server support
Networking support -> Networking options -> Network packet filtering framework (Netfilter) -> Core Netfilter configuration ->  "addrtype" address type match support
Networking support -> Networking options -> Network packet filtering framework (Netfilter) -> Core Netfilter configuration ->  "control group" address type match support
Networking support -> Networking options -> Network packet filtering framework (Netfilter) -> Core Netfilter configuration ->  "control group" address type match support
File Systems -> Overlay filesystem support
Device Driver -> Android ->  Android Binderfs filesystem
Feb 5, 2022
TechnologyThis guideline shows how to run redroid on Android-x86.
Introduction
Redroid:
ReDroid (Remote anDroid) is a GPU accelerated AIC (Android In Container) solution. You can boot many instances in Linux host (Docker, podman, k8s etc.). ReDroid supports both arm64 and amd64 architectures. ReDroid is suitable for Cloud Gaming, VMI (Virtual Mobile Infrastructure), Automation Test and more
https://github.com/remote-android/redroid-doc#overview
Android-x86:
Run Android on your PC. This is a project to port Android Open Source Project to x86 platform, formerly known as “patch hosting for android x86 support”.
https://www.android-x86.org/
Building Android-x86
We use pie(based on aosp9) for startup:
# mkdir android-x86
# cd android-x86
# repo init -u git://git.osdn.net/gitroot/android-x86/manifest -b pie-x86
# repo sync --no-tags --no-clone-bundle -j18
Or:
repo init -u git://git.osdn.net/gitroot/android-x86/manifest -b pie-x86 -m android-x86-9.0-r2.xml
repo sync --no-tags --no-clone-bundle
repo size:
# du -hs android-x86/
79G	android-x86/
# ls android-x86/
Android.bp  bionic    bootstrap.bash  compatibility  dalvik       device    frameworks  kernel   libnativehelper  packages  platform_testing  sdk     test
art         bootable  build           cts            development  external  hardware    libcore  Makefile         pdk       prebuilts         system  tools
Make modification for rootdir, the aim is for enable binderfs:
# vim ./system/core/rootdir/init.rc
    mount configfs none /config nodev noexec nosuid
    chmod 0770 /config/sdcardfs
    chown system package_info /config/sdcardfs

+    # Mount binderfs
+    mkdir /dev/binderfs
+    mount binder binder /dev/binderfs stats=global
+    chmod 0755 /dev/binderfs
+
+    # Mount fusectl
+    mount fusectl none /sys/fs/fuse/connections
+
+    symlink /dev/binderfs/binder /dev/binder
+    symlink /dev/binderfs/hwbinder /dev/hwbinder
+    symlink /dev/binderfs/vndbinder /dev/vndbinder
+
+    chmod 0666 /dev/binderfs/hwbinder
+    chmod 0666 /dev/binderfs/binder
+    chmod 0666 /dev/binderfs/vndbinder
Build via:
# . build/envsetup.sh; lunch android_x86_64-userdebug
# make iso_img TARGET_PRODUCT=android_x86_64 -j128
Examine the build out iso files:
# ls -l -h out/target/product/x86_64/android_x86_64.iso
-rw-r--r-- 1 root root 725M Feb  5 02:02 out/target/product/x86_64/android_x86_64.iso
Customization kernel
customize the kernel via(See last section kernel configuration):
# cd kernel
# make android-x86_64_defconfig
# make menuconfig
##### After make customization
# cp arch/x86/configs/android-x86_64_defconfig arch/x86/configs/android-x86_64_defconfig.back
# cp .config arch/x86/configs/android-x86_64_defconfig
Re-build the kernel and re-gen iso:
# cd kernel
# make mrproper
# cd ..
# . build/envsetup.sh; lunch android_x86_64-userdebug
# rm $OUT/obj/kernel/arch/x86/boot/bzImage
# make iso_img TARGET_PRODUCT=android_x86_64 -j128
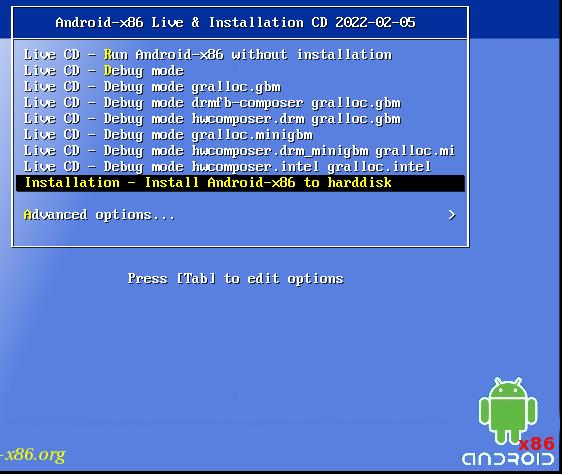
Android-x86 Installation
Install Android-x86 in vm:
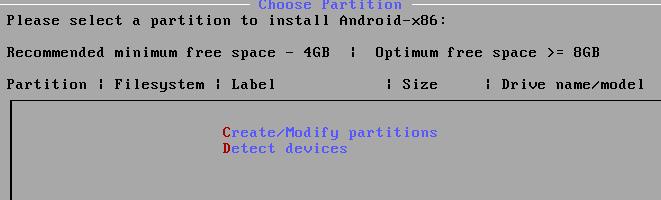
Choose Partition:
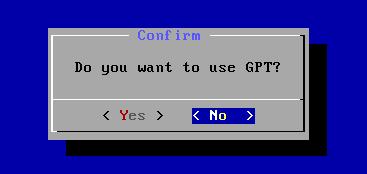
Choose GPT or not:
cfdisk:
create 200 GB primary disk:
After write and quit, Choose partition:
Format to ext4 format:
Confirm:
Formatting:
Confirm:
Read/Write:
Installing status:
Choose Reboot:
Enable docker
Enable wifi:
adb root and re-connect:
# adb connect 192.168.122.232
connected to 192.168.122.232:5555
# adb -s 192.168.122.232:5555 root
restarting adbd as root
# adb connect 192.168.122.232
connected to 192.168.122.232:5555
Create folder structure:
# adb shell
x86_64:/ # mkdir /data/var
x86_64:/ # mkdir /data/docker/
x86_64:/ #
Download docker-ce binary files from https://, extract them and upload them
to android-x86 machine:
# adb push ~/Code/docker/* /data/docker/
Prepare the dockerd running environment in adb shell:
mount -o remount,rw /
ln -s /data/docker/* /bin/
ip rule add pref 1 from all lookup main
ip rule add pref 2 from all lookup default
ip route add default via 192.168.122.1 dev wlan0
ip rule add from all lookup main pref 30000
echo "nameserver 223.5.5.5">/etc/resolv.conf
# mount cgroupfs
mount -t tmpfs -o uid=0,gid=0,mode=0755 cgroup /sys/fs/cgroup
cd /sys/fs/cgroup/
mkdir -p cpu cpu acct blkio memory devices pids
mount -n -t cgroup -o cpu cgroup cpu
mount -n -t cgroup -o  cpuacct cgroup cpuacct
mount -n -t cgroup -o  blkio cgroup blkio
mount -n -t cgroup -o  memory cgroup memory
mount -n -t cgroup -o  devices cgroup devices
mount -n -t cgroup -o  pids cgroup pids
Start the dockerd daemon:
# dockerd  --dns=223.5.5.5 --data-root=/data/var/ --ip=192.168.122.232 & >/data/dockerd-logfile 2>&1
# docker images
REPOSITORY   TAG       IMAGE ID   CREATED   SIZE
Start redroid docker instance:
# docker run -d --privileged -p 8888:5555 redroid/redroid:9.0.0-latest
# docker ps
CONTAINER ID   IMAGE                          COMMAND                  CREATED         STATUS         PORTS                            NAMES
2efa5f6e987b   redroid/redroid:9.0.0-latest   "/init qemu=1 androi…"   5 seconds ago   Up 4 seconds   192.168.122.232:8888->5555/tcp   sweet_ishizaka
Verification
Connect and view screen via:
# adb connect 192.168.122.232:8888
# scrcpy --serial 192.168.122.232:8888
Install apks via:
$ adb -s 192.168.122.232:8888 install ~/apks/aaaaaaa.apk
Kernel configuration
Configuration items(based on android-x86_64_defconfig):
Generic setup -> POSIX Message Queues
Generic setup -> Controller Group support -> PIDs controller
Generic setup -> Controller Group support -> Device controller
Generic setup -> Controller Group support -> CPU controller -> Group sheduling for SCHED_OTHER
Generic setup -> Controller Group support -> CPU controller -> CPU bandwidth provisioning for FAIR-GROUP_SCHED
Generic setup -> Controller Group support -> CPU controller -> Group sheduling for SCHED_RR/FIFO
Generic setup -> Controller Group support -> Perf controller
Generic setup -> Namespaces support -> User namespace
Generic setup -> Namespaces support -> PID namespace
Networking support -> Networking options -> Network packet filtering framework (Netfilter) -> Bridged IP/ARP packets fiiltering
Networking support -> Networking options -> Network packet filtering framework (Netfilter) -> IP virtual server support
Networking support -> Networking options -> Network packet filtering framework (Netfilter) -> Core Netfilter configuration ->  "addrtype" address type match support
Networking support -> Networking options -> Network packet filtering framework (Netfilter) -> Core Netfilter configuration ->  "control group" address type match support
Networking support -> Networking options -> Network packet filtering framework (Netfilter) -> Core Netfilter configuration ->  "control group" address type match support
File Systems -> Overlay filesystem support
Device Driver -> Android ->  Android Binderfs filesystem
Feb 3, 2022
Technology1. cells源码准备
从github克隆代码至本地目录
# mkdir -p ~/Code/show/cells
# cd ~/Code/show/cells
# git clone https://github.com/jianglin-code/cells-android10.git
# cd cells-android10
# ls
cells  frameworks  kernel  README.md  system
2. aosp 10源码准备
对标cells源码中的要求, 克隆特定版本的aosp10源码(10.0.0_r33):
# mkdir -p ~/Code/show/aosp10
# cd ~/Code/show/aosp10
# repo init -u https://mirrors.tuna.tsinghua.edu.cn/git/AOSP/platform/manifest -b android-10.0.0_r33
# repo sync -j8
3. 内核源码准备
因为使用的真机是pixel 3a,内核源码的获取见以下代码:
# mkdir -p ~/Code/show/android-kernel
# cd ~/Code/show/android-kernel
#  repo init --depth 1 -u https://aosp.tuna.tsinghua.edu.cn/kernel/manifest -b android-msm-bonito-4.9-android10
# repo sync -j4
# ls
build  build.config  prebuilts  prebuilts-master  private
# du -hs *
732K	build
0	build.config
189M	prebuilts
5.8G	prebuilts-master
870M	private
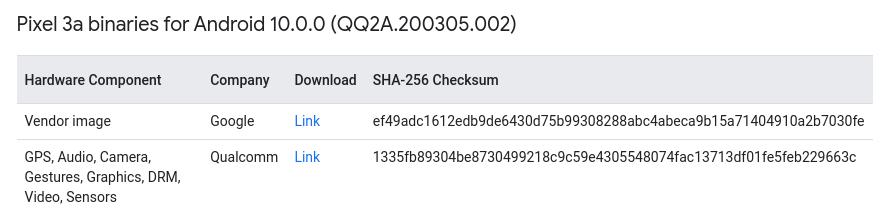
4. 二进制驱动准备
从以下网址查找真机对应需要的二进制驱动标号:
https://source.android.com/setup/start/build-numbers#source-code-tags-and-builds:
QQ2A.200305.002 android-10.0.0_r30 Android10 Pixel 2、Pixel 2 XL、Pixel 3、Pixel 3 XL、Pixel 3a、Pixel 3a XL 2020-03-05
根据查找出的代号,从以下网址下载二进制驱动文件:
https://developers.google.cn/android/drivers?hl=zh-cn#sargoqq2a.200405.005:
将下载的二进制驱动文件拷贝到aosp源码树:
# cp extract-google_devices-sargo.sh extract-qcom-sargo.sh /root/Code/show/aosp10
5. 编译内核
使用cells源码中的相应目录替换aosp10内核中对应代码:
# mv private/msm-google private/msm-google.back
# cp -ar  ~/Code/show/cells/cells-android10/kernel/ private/msm-google
使用以下命令编译内核:
# cd private/msm-google
# make mrproper
# cd ../../
# cp -r private/msm-google.back/techpack/ private/msm-google/
# vim build/build.sh
comment the line of soong_zip(line 798)
# build/build.sh
检验内核编译出的二进制文件:
# ls out/android-msm-pixel-4.9/dist/
abi.prop  Image.lz4              kernel-uapi-headers.tar.gz  System.map  wlan.ko
dtbo.img  kernel-headers.tar.gz  sdm670.dtb                  vmlinux
6. aosp源码编译
解压二进制驱动代码:
# ./extract-google_devices-sargo.sh
# ./extract-qcom-sargo.sh
替换aosp中内置的内核代码:
# mv device/google/bonito-kernel/Image.lz4 device/google/bonito-kernel/Image.lz4.back
# cp /root/Code/show/android-kernel/out/android-msm-pixel-4.9/dist/Image.lz4 device/google/bonito-kernel/Image.lz4
将cells源码并入到aosp编译树中:
# cp -r /root/Code/show/cells/cells-android10/cells/ vendor/
# vim device/google/bonito/device.mk
Added at the last line:
$(call inherit-product-if-exists, vendor/cells/cells_build.mk)
开始编译:
# source build/envsetup.sh
# lunch aosp_sargo-userdebug
# vim frameworks/base/data/etc/privapp-permissions-platform.xml
增加:
    <privapp-permissions package="com.cells.cellswitch.secure">
        <permission name="android.permission.BLUETOOTH_PRIVILEGED"/>
    </privapp-permissions>
# vim vendor/cells/switchsystem/src/com/cells/cellswitch/secure/view/SwitchActivity.java
注释掉:
//import android.os.CellsManager;
//import android.os.ICellsManager;
# cp -r /root/Code/show/aosp10back/frameworks/multidex/library/
frameworks/multidex
# m -j128
编译到80%左右时将失败,重新计算依赖后编译方可成功:
# development/vndk/tools/header-checker/utils/create_reference_dumps.py -l libbinder && development/vndk/tools/header-checker/utils/create_reference_dumps.py -l libhwbinder_noltopgo && development/vndk/tools/header-checker/utils/create_reference_dumps.py -l libhidlbase && m -j128
检验编译输出文件:
# ls out/target/product/sargo/*.img
out/target/product/sargo/boot-debug.img     out/target/product/sargo/ramdisk.img
out/target/product/sargo/boot.img           out/target/product/sargo/ramdisk-recovery.img
out/target/product/sargo/dtb.img            out/target/product/sargo/super_empty.img
out/target/product/sargo/dtbo.img           out/target/product/sargo/system.img
out/target/product/sargo/persist.img        out/target/product/sargo/system_other.img
out/target/product/sargo/product.img        out/target/product/sargo/vbmeta.img
out/target/product/sargo/ramdisk-debug.img  out/target/product/sargo/vendor.img
最终编译树尺寸大小:
# du -hs *
15G     android-kernel
177G    aosp10
2.4G    aosp10back
6.0G    cells
7. 烧写镜像
通过USB连接pixel 3a:
$ adb devices
List of devices attached
92UAY04L95	device

$  adb reboot bootloader
通过以下命令烧录镜像:
$ fastboot devices
92UAY04L95	fastboot
$ export ANDROID_PRODUCT_OUT=/root/Code/show/aosp10/out/target/product/sargo
$ fastboot flashall -w
--------------------------------------------
Bootloader Version...: b4s4-0.2-6355063
Baseband Version.....: g670-00042-200421-B-6414611
Serial Number........: 92UAY04L95
--------------------------------------------
Checking 'product'                                 OKAY [  0.058s]
Setting current slot to 'b'                        OKAY [  0.138s]
.....
Erasing 'userdata'                                 OKAY [  0.311s]
Erase successful, but not automatically formatting.
File system type raw not supported.
Erasing 'metadata'                                 OKAY [  0.006s]
Erase successful, but not automatically formatting.
File system type raw not supported.
Rebooting                                          OKAY [  0.001s]
Finished. Total time: 336.662s
将二进制驱动烧录进真机,从而可以使用无线连接:
# 禁用校验机制
adb root
adb disable-verity
adb shell sync
adb reboot

# 上传模块
adb root
adb remount
adb push /media/nfs1/android-kernel/out/android-msm-pixel-4.9/dist/wlan.ko /vendor/lib/modules/

# 重启手机生效
adb reboot
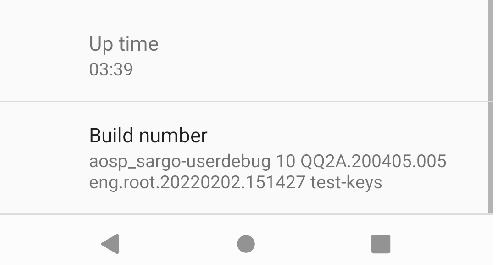
8. 基本使用场景
检验编译串号:
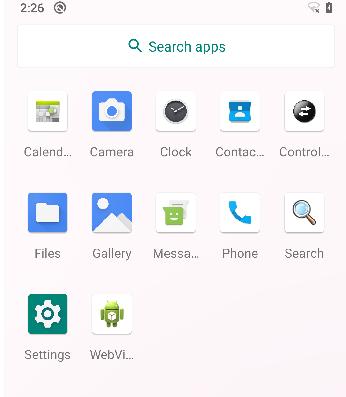
控制中心是用来切换双系统的快捷方式:
点击控制中心后将出现Start按钮:
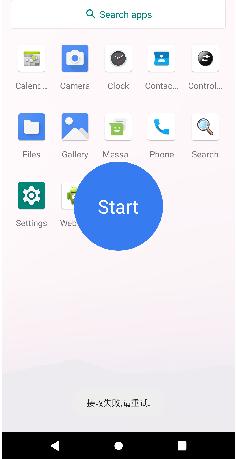
点击Start按钮后,第二系统将启动:

启动成功:

再次点击Start按钮进入到第二系统:

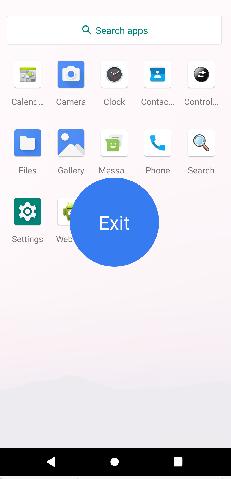
在第二系统中点击控制中心将提示推出该系统并回到主系统:
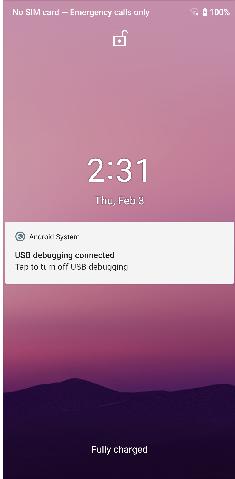
退出后将回到第一系统的锁屏界面:
9. 定制化
定制化1: 语言设置/输入法设置
定制化2:为双系统各自安装软件仓库:
$ adb install apks/MobileAssistant_1.apk
Performing Streamed Install
Success
定制化3:为双系统安装更多的apks:
定制化4: 更改主题等
Feb 2, 2022
Technology1. cells源码准备
从github克隆代码至本地目录
# mkdir -p ~/Code/show/cells
# cd ~/Code/show/cells
# git clone https://github.com/jianglin-code/cells-android10.git
# cd cells-android10
# ls
cells  frameworks  kernel  README.md  system
2. aosp 10源码准备
对标cells源码中的要求, 克隆特定版本的aosp10源码(10.0.0_r33):
# mkdir -p ~/Code/show/aosp10
# cd ~/Code/show/aosp10
# repo init -u https://mirrors.tuna.tsinghua.edu.cn/git/AOSP/platform/manifest -b android-10.0.0_r33
# repo sync -j8
3. 内核源码准备
因为使用的真机是pixel 3a,内核源码的获取见以下代码:
# mkdir -p ~/Code/show/android-kernel
# cd ~/Code/show/android-kernel
#  repo init --depth 1 -u https://aosp.tuna.tsinghua.edu.cn/kernel/manifest -b android-msm-bonito-4.9-android10
# repo sync -j4
# ls
build  build.config  prebuilts  prebuilts-master  private
# du -hs *
732K	build
0	build.config
189M	prebuilts
5.8G	prebuilts-master
870M	private
4. 二进制驱动准备
从以下网址查找真机对应需要的二进制驱动标号:
https://source.android.com/setup/start/build-numbers#source-code-tags-and-builds:
QQ2A.200305.002 android-10.0.0_r30 Android10 Pixel 2、Pixel 2 XL、Pixel 3、Pixel 3 XL、Pixel 3a、Pixel 3a XL 2020-03-05
根据查找出的代号,从以下网址下载二进制驱动文件:
https://developers.google.cn/android/drivers?hl=zh-cn#sargoqq2a.200405.005:
将下载的二进制驱动文件拷贝到aosp源码树:
# cp extract-google_devices-sargo.sh extract-qcom-sargo.sh /root/Code/show/aosp10
5. 编译内核
使用cells源码中的相应目录替换aosp10内核中对应代码:
# mv private/msm-google private/msm-google.back
# cp -ar  ~/Code/show/cells/cells-android10/kernel/ private/msm-google
使用以下命令编译内核:
# cd private/msm-google
# make mrproper
# cd ../../
# cp -r private/msm-google.back/techpack/ private/msm-google/
# vim build/build.sh
comment the line of soong_zip(line 798)
# build/build.sh
检验内核编译出的二进制文件:
# ls out/android-msm-pixel-4.9/dist/
abi.prop  Image.lz4              kernel-uapi-headers.tar.gz  System.map  wlan.ko
dtbo.img  kernel-headers.tar.gz  sdm670.dtb                  vmlinux
6. aosp源码编译
解压二进制驱动代码:
# ./extract-google_devices-sargo.sh
# ./extract-qcom-sargo.sh
替换aosp中内置的内核代码:
# mv device/google/bonito-kernel/Image.lz4 device/google/bonito-kernel/Image.lz4.back
# cp /root/Code/show/android-kernel/out/android-msm-pixel-4.9/dist/Image.lz4 device/google/bonito-kernel/Image.lz4
将cells源码并入到aosp编译树中:
# cp -r /root/Code/show/cells/cells-android10/cells/ vendor/
# vim device/google/bonito/device.mk
Added at the last line:
$(call inherit-product-if-exists, vendor/cells/cells_build.mk)
开始编译:
# source build/envsetup.sh
# lunch aosp_sargo-userdebug
# vim frameworks/base/data/etc/privapp-permissions-platform.xml
增加:
    <privapp-permissions package="com.cells.cellswitch.secure">
        <permission name="android.permission.BLUETOOTH_PRIVILEGED"/>
    </privapp-permissions>
# vim vendor/cells/switchsystem/src/com/cells/cellswitch/secure/view/SwitchActivity.java
注释掉:
//import android.os.CellsManager;
//import android.os.ICellsManager;
# cp -r /root/Code/show/aosp10back/frameworks/multidex/library/
frameworks/multidex
# m -j128
编译到80%左右时将失败,重新计算依赖后编译方可成功:
# development/vndk/tools/header-checker/utils/create_reference_dumps.py -l libbinder && development/vndk/tools/header-checker/utils/create_reference_dumps.py -l libhwbinder_noltopgo && development/vndk/tools/header-checker/utils/create_reference_dumps.py -l libhidlbase && m -j128
检验编译输出文件:
# ls out/target/product/sargo/*.img
out/target/product/sargo/boot-debug.img     out/target/product/sargo/ramdisk.img
out/target/product/sargo/boot.img           out/target/product/sargo/ramdisk-recovery.img
out/target/product/sargo/dtb.img            out/target/product/sargo/super_empty.img
out/target/product/sargo/dtbo.img           out/target/product/sargo/system.img
out/target/product/sargo/persist.img        out/target/product/sargo/system_other.img
out/target/product/sargo/product.img        out/target/product/sargo/vbmeta.img
out/target/product/sargo/ramdisk-debug.img  out/target/product/sargo/vendor.img
最终编译树尺寸大小:
# du -hs *
15G     android-kernel
177G    aosp10
2.4G    aosp10back
6.0G    cells
7. 烧写镜像
通过USB连接pixel 3a:
$ adb devices
List of devices attached
92UAY04L95	device

$  adb reboot bootloader
通过以下命令烧录镜像:
$ fastboot devices
92UAY04L95	fastboot
$ export ANDROID_PRODUCT_OUT=/root/Code/show/aosp10/out/target/product/sargo
$ fastboot flashall -w
--------------------------------------------
Bootloader Version...: b4s4-0.2-6355063
Baseband Version.....: g670-00042-200421-B-6414611
Serial Number........: 92UAY04L95
--------------------------------------------
Checking 'product'                                 OKAY [  0.058s]
Setting current slot to 'b'                        OKAY [  0.138s]
.....
Erasing 'userdata'                                 OKAY [  0.311s]
Erase successful, but not automatically formatting.
File system type raw not supported.
Erasing 'metadata'                                 OKAY [  0.006s]
Erase successful, but not automatically formatting.
File system type raw not supported.
Rebooting                                          OKAY [  0.001s]
Finished. Total time: 336.662s
将二进制驱动烧录进真机,从而可以使用无线连接:
# 禁用校验机制
adb root
adb disable-verity
adb shell sync
adb reboot

# 上传模块
adb root
adb remount
adb push /media/nfs1/android-kernel/out/android-msm-pixel-4.9/dist/wlan.ko /vendor/lib/modules/

# 重启手机生效
adb reboot
8. 基本使用场景
检验编译串号:
控制中心是用来切换双系统的快捷方式:
点击控制中心后将出现Start按钮:
点击Start按钮后,第二系统将启动:
启动成功:
再次点击Start按钮进入到第二系统:
在第二系统中点击控制中心将提示推出该系统并回到主系统:
退出后将回到第一系统的锁屏界面:
9. 定制化
定制化1: 语言设置/输入法设置
定制化2:为双系统各自安装软件仓库:
$ adb install apks/MobileAssistant_1.apk
Performing Streamed Install
Success
定制化3:为双系统安装更多的apks:
定制化4: 更改主题等
