May 27, 2022
TechnologyCreate disk via:
qemu-img create -f qcow2 -b /images/Centos1810Base.qcow2 sg1_openstack.qcow2
Create a vm, using bridged networking and set its ip address to 192.168.89.25.
Upload the kernel and deployment files onto the server:
scp ./kernel_4.19.12-1.xxx_rpms.tar.gz SG1Deployment.tar.gz ctctest@192.168.89.25:~
To 25, and install the kernel via:
# ./install_kernel.sh
# reboot
After reboot, check the kernel version.
May 24, 2022
Technologynessus整改策略
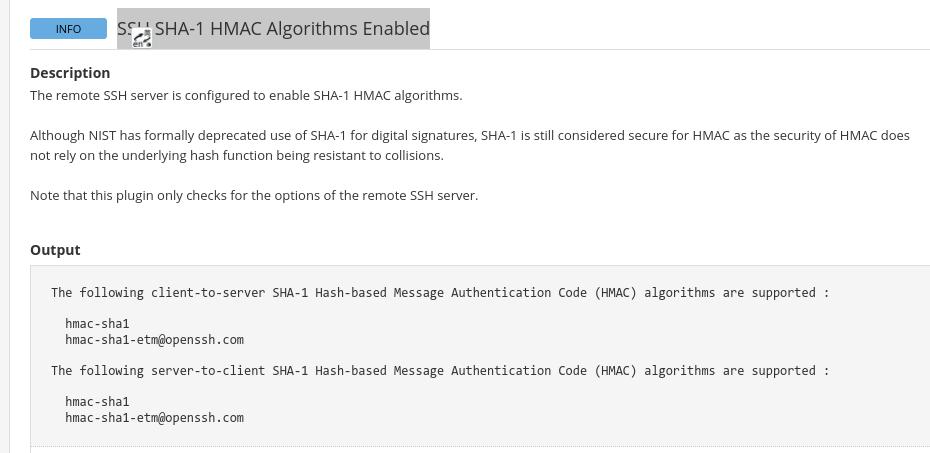
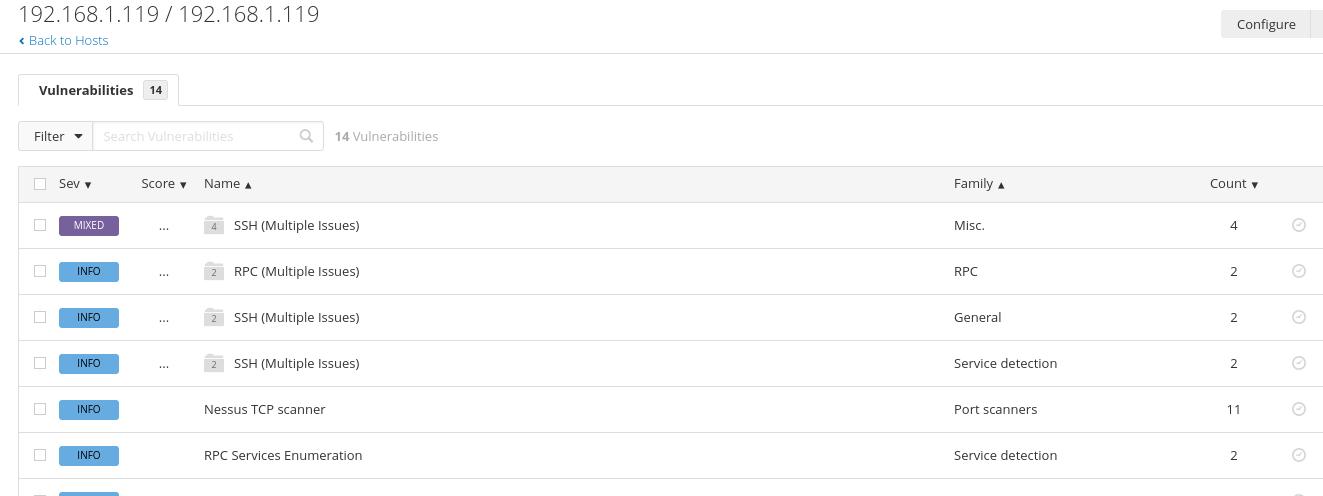
1. SSH SHA-1 HMAC Algorithms Enabled
问题:

原因:
sshd服务器开启了hmac-sha1,需要在sshd配置文件中将其关闭并重启, Ubuntu为例整改步骤如下:
列出所有支持的MAC算法:
# sshd -T | grep macs
macs umac-64-etm@openssh.com,umac-128-etm@openssh.com,hmac-sha2-256-etm@openssh.com,hmac-sha2-512-etm@openssh.com,hmac-sha1-etm@openssh.com,umac-64@openssh.com,umac-128@openssh.com,hmac-sha2-256,hmac-sha2-512,hmac-sha1
将上述输出的条目,去掉hmac-sha1后,加入到sshd配置文件:
# vim /etc/ssh/sshd_config
........
macs umac-64-etm@openssh.com,umac-128-etm@openssh.com,hmac-sha2-256-etm@openssh.com,hmac-sha2-512-etm@openssh.com,hmac-sha1-etm@openssh.com,umac-64@openssh.com,umac-128@openssh.com,hmac-sha2-256,hmac-sha2-512
# systemctl restart ssh && systemctl restart sshd
重启后,检查是否移除mac:
# sshd -T | grep macs
macs umac-64-etm@openssh.com,umac-128-etm@openssh.com,hmac-sha2-256-etm@openssh.com,hmac-sha2-512-etm@openssh.com,hmac-sha1-etm@openssh.com,umac-64@openssh.com,umac-128@openssh.com,hmac-sha2-256,hmac-sha2-512
2. MEDIUMUnencrypted Telnet Server
关闭23端口的xinetd服务:
# sudo netstat -anp | grep 23
# sudo systemctl stop xinetd
# sudo systemctl disable xinetd
# sudo netstat -anp | grep 23
3. SSH Weak Key Exchange Algorithms Enabled
Info:
The following weak key exchange algorithms are enabled :

  diffie-hellman-group-exchange-sha1
  diffie-hellman-group1-sha1
检测、更改配置:
# sshd -T | grep diffie
kexalgorithms curve25519-sha256,curve25519-sha256@libssh.org,ecdh-sha2-nistp256,ecdh-sha2-nistp384,ecdh-sha2-nistp521,diffie-hellman-group-exchange-sha256,diffie-hellman-group16-sha512,diffie-hellman-group18-sha512,diffie-hellman-group-exchange-sha1,diffie-hellman-group14-sha256,diffie-hellman-group14-sha1,diffie-hellman-group1-sha1
# vim /etc/ssh/sshd_config
kexalgorithms curve25519-sha256,curve25519-sha256@libssh.org,ecdh-sha2-nistp256,ecdh-sha2-nistp384,ecdh-sha2-nistp521,diffie-hellman-group-exchange-sha256,diffie-hellman-group16-sha512,diffie-hellman-group18-sha512,diffie-hellman-group14-sha256,diffie-hellman-group14-sha1
Restart the sshd via systemctl restart sshd
4. SSH Server CBC Mode Ciphers Enabled
检测:
# sshd -T |grep ciphers
ciphers chacha20-poly1305@openssh.com,aes128-ctr,aes192-ctr,aes256-ctr,aes128-gcm@openssh.com,aes256-gcm@openssh.com,aes128-cbc,aes192-cbc,aes256-cbc,blowfish-cbc,cast128-cbc,3des-cbc
更改配置并重启
# vim /etc/ssh/sshd_config
Ciphers aes128-ctr,aes192-ctr,aes256-ctr
以上修改效果(整改前):

整改后:
May 23, 2022
TechnologyAdd Channel
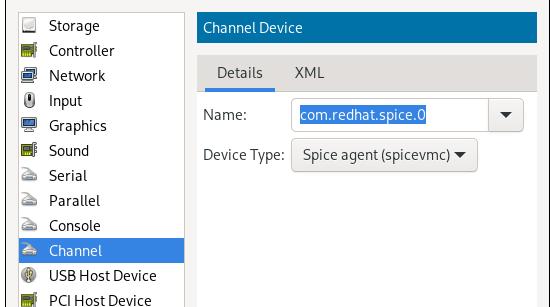
Add a channel named Channel spice:

Install python and let python2 to be the default python version:
# sudo apt-get install -y python2
# update-alternatives --install /usr/bin/python python /usr/bin/python2.7 1
update-alternatives: using /usr/bin/python2.7 to provide /usr/bin/python (python) in auto mode
# python
Python 2.7.18 (default, Mar 12 2022, 06:24:29)
[GCC 11.2.0] on linux2
Type "help", "copyright", "credits" or "license" for more information.
>>> quit()
# sudo apt-get install -y libevent-dev
# cd /usr/ && cp ./lib/aarch64-linux-gnu/libevent-2.1.so.7 ./lib/aarch64-linux-gnu/libevent-2.1.so.6
May 13, 2022
Technology步骤
安装必要的包:
$ sudo apt-get install -y qemu-system
$ ls /usr/share/AAVMF/AAVMF
AAVMF32_CODE.fd  AAVMF32_VARS.fd  AAVMF_CODE.fd    AAVMF_VARS.fd
May 10, 2022
TechnologySteps
扫描 nvidia cards:
$ sudo lspci | grep -i nvidia
0000:01:00.0 3D controller: NVIDIA Corporation TU104GL [Tesla T4] (rev a1)
0001:01:00.0 3D controller: NVIDIA Corporation TU104GL [Tesla T4] (rev a1)
0006:01:00.0 3D controller: NVIDIA Corporation TU104GL [Tesla T4] (rev a1)
0007:01:00.0 3D controller: NVIDIA Corporation TU104GL [Tesla T4] (rev a1)
安装必要的包(nvidia驱动需要):
$ sudo apt-get update -y && sudo apt-get upgrade -y
$ sudo apt-get install -y build-essential
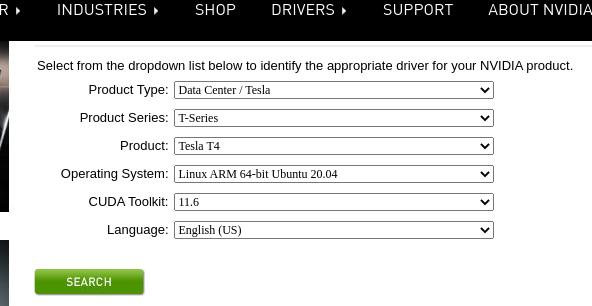
下载nvidia官方驱动:

安装驱动,nvidia驱动
$ sudo apt-get install -y nvidia-driver-local-repo-ubuntu2004-510.47.03_1.0-1_arm64.deb
$ sudo apt-get update -y
$ sudo apt-get install -y cuda-drivers cuda-drivers-510 libnvidia-gl-510 libnvidia-common-510=510.47.03-0ubuntu1
注意安装过程中nvidia驱动自动blacklist了开源的nvidia驱动:
A modprobe blacklist file has been created at /etc/modprobe.d to prevent Nouveau
from loading. This can be reverted by deleting the following file:
/etc/modprobe.d/nvidia-graphics-drivers.conf

A new initrd image has also been created. To revert, please regenerate your
initrd by running the following command after deleting the modprobe.d file:
`/usr/sbin/initramfs -u`

*****************************************************************************
*** Reboot your computer and verify that the NVIDIA graphics driver can   ***
*** be loaded.                                                            ***
*****************************************************************************
重启`sudo reboot"后继续执行后续操作
配置xorg
更改Xwrapper权限:
$ vim /etc/X11/Xwrapper.config
allowed_users = anybody
创建xorg配置文件:
sudo nvidia-xconfig
样例文件:
# nvidia-xconfig: X configuration file generated by nvidia-xconfig
# nvidia-xconfig:  version 510.47.03

Section "ServerLayout"
    Identifier     "Layout0"
    Screen      0  "Screen0"
    InputDevice    "Keyboard0" "CoreKeyboard"
    InputDevice    "Mouse0" "CorePointer"
EndSection

Section "Files"
EndSection

Section "InputDevice"
    # generated from default
    Identifier     "Mouse0"
    Driver         "mouse"
    Option         "Protocol" "auto"
    Option         "Device" "/dev/psaux"
    Option         "Emulate3Buttons" "no"
    Option         "ZAxisMapping" "4 5"
EndSection

Section "InputDevice"
    # generated from default
    Identifier     "Keyboard0"
    Driver         "kbd"
EndSection

Section "Monitor"
    Identifier     "Monitor0"
    VendorName     "Unknown"
    ModelName      "Unknown"
    Option         "DPMS"
EndSection

Section "Device"
    Identifier     "Device0"
    Driver         "nvidia"
    VendorName     "NVIDIA Corporation"
    BusID          "PCI:1:0:0"
EndSection

Section "Screen"
    Identifier     "Screen0"
    Device         "Device0"
    Monitor        "Monitor0"
    DefaultDepth    24
    SubSection     "Display"
        Depth       24
    EndSubSection
EndSection
拷贝三份,分别更改对应的BusID:
$ sudo mv /etc/X11/xorg.conf /etc/X11/xorg0.conf
$ sudo cp /etc/X11/xorg0.conf /etc/X11/xorg1.conf
    BusID          "PCI:1@1:0:0"
$ sudo cp /etc/X11/xorg0.conf /etc/X11/xorg2.conf
    BusID          "PCI:1@6:0:0"
$ sudo cp /etc/X11/xorg0.conf /etc/X11/xorg3.conf
    BusID          "PCI:1@7:0:0"
创建X Session:
$ sudo Xorg :60 -config /etc/X11/xorg0.conf -sharevts
$ sudo Xorg :61 -config /etc/X11/xorg1.conf -sharevts
$ sudo Xorg :62 -config /etc/X11/xorg2.conf -sharevts
$ sudo Xorg :63 -config /etc/X11/xorg3.conf -sharevts
检验:
$ export DISPLAY=:62
$ glmark2
=======================================================
    glmark2 2021.02
=======================================================
    OpenGL Information
    GL_VENDOR:     NVIDIA Corporation
    GL_RENDERER:   Tesla T4/PCIe
    GL_VERSION:    4.6.0 NVIDIA 510.47.03
=======================================================
[build] use-vbo=false: FPS: 7012 FrameTime: 0.143 ms
[build] use-vbo=true: FPS: 18139 FrameTime: 0.055 ms

=======================================================
                                  glmark2 Score: 14298
=======================================================
跑分时可以看到对应的gpu上的负载已经启动了:

avd Integration
解压avd、lib到相应目录:
$ mkdir Android
$ tar xzvf /home/ctctest/avdavd.tar.gz -C .
$ cd /home/ctctest
$ tar xvf lib.tar
$ mv lib/* /usr/local/lib/
启动avd:
$ cd /home/Android/android-12
$ vim env_setup.sh
更改display 为 :62
$ source env_setup.sh
$ sudo ufw disable
$ sudo apt-get install -y openjdk-11-jdk libfdt1 librbd1 libjpeg62 libssl-dev
$ sudo cp /home/ctctest/libssl.so.1.0.0  /usr/lib/aarch64-linux-gnu
$ sudo cp /home/ctctest/libcrypto.so.1.0.0 /usr/lib/aarch64-linux-gnu
$ android create avd --name test_avd --target android-31 --abi arm64-v8a --device "Nexus 4" --skin 720x1280
Created AVD 'test_avd' based on Android 12, ARM (arm64-v8a) processor,
with the following hardware config:
hw.accelerometer=yes
hw.audioInput=yes
hw.battery=yes
hw.dPad=no
hw.device.hash2=MD5:6930e145748b87e87d3f40cabd140a41
hw.device.manufacturer=Google
hw.device.name=Nexus 4
hw.gps=yes
hw.keyboard=no
hw.lcd.density=320
hw.mainKeys=no
hw.sdCard=no
hw.sensors.orientation=yes
hw.sensors.proximity=yes
hw.trackBall=no

$ emulator -avd  test_avd  -feature Wifi -skip-adb-auth -no-snapshot -no-window -cores 8 -writable-system -partition-size 20480 -verbose -gpu swiftshader_indirect -qemu -D /home/ctctest/qemu.log -rtc base=utc,clock=rt  -enable-kvm -m 6124 -spice port=7001,addr=0.0.0.0,disable-ticketing,streaming-video=filter,seamless-migration=on -device virtio-serial-device -chardev spicevmc,id=charchannel0,name=vdagent -device virtserialport,nr=1,chardev=charchannel0,id=channel0,name=com.redhat.spice.0 -chardev spiceport,id=charchannel3,name=org.spice-space.data.0 -device virtserialport,nr=4,chardev=charchannel3,id=channel3,name=org.spice-space.data.0  -chardev spiceport,id=charchannel4,name=org.spice-space.usb.video.0 -device virtserialport,nr=5,chardev=charchannel4,id=channel4,name=org.spice-space.usb.video.0 -chardev spiceport,id=charchannel5,name=org.spice-space.usb.video.1 -device virtserialport,nr=6,chardev=charchannel5,id=channel5,name=org.spice-space.usb.video.1 -vnc :50


