UsingGimpForPhotoEditing
Jul 19, 2022Technology
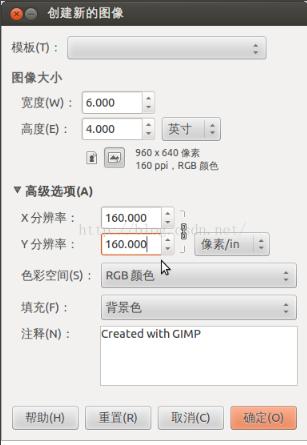
Create the new image:

Adjust the little image via:

160x200 px, resolution is 160 px/in.
Then select/copy the image into the big images, save as jpg, then we could print out the image.
Create the new image:

Adjust the little image via:

160x200 px, resolution is 160 px/in.
Then select/copy the image into the big images, save as jpg, then we could print out the image.
Rebuild qemu for enlarge the frame-rate for benchmark GPU, following are the steps.
Steps are:
$ sudo apt-get install build-essential pbuilder
$ dpkg -l | grep qemu
### Get the installed package name is `qemu-system-x86`
$ sudo vim /etc/apt/sources.list
$ sudo apt-get update
$ mkdir tmp
$ cd tmp/
$ apt-get source qemu-system-x86
$ ls
qemu-4.2  qemu_4.2-3ubuntu6.23.debian.tar.xz  qemu_4.2-3ubuntu6.23.dsc  qemu_4.2.orig.tar.xz
Refers to https://www.reddit.com/r/VFIO/comments/nviap2/in_case_your_games_output_60_fps_but_the/:
$ vim ./qemu-4.2/include/ui/console.h
......
/* in ms */
- #define GUI_REFRESH_INTERVAL_DEFAULT    30
+ #define GUI_REFRESH_INTERVAL_DEFAULT    16
#define GUI_REFRESH_INTERVAL_IDLE     3000
......
Rebuild the deb packages, first install the build dependencies for qemu-system-x86:
$ sudo apt-get build-dep qemu-system-x86
Now Rebuild the package via:
$ cd qemu-4.2/
$ dpkg-buildpackage -rfakeroot -b -uc -us
$ sudo dpkg -l | grep qemu
$ sudo apt-get purge qemu qemu-kvm qemu-system-common qemu-system-gui qemu-system-x86 qemu-utils
$ cd ..
$ ls *.deb
$ sudo dpkg -i *.deb
$ sudo apt-get install -f
No effect on 60 fps.
Configuration for hostapd:
# vim /etc/hostapd/hostapd.conf
...
ignore_broadcast_ssid=1
...
# systemctl restart hostapd
Changed from dnsmasq to isc-dhcp-server.
Install via:
# apt install pdnsd
Select manual for manually configure the pdnsd server
Configuration files:
Changes for:
# Generated by resolvconf
server {
	label=resolvconf;
	#ip=192.168.1.117;
}

others refers to previous article(written in 2017-12-24)
Change the redsocks configuration to listen to 0.0.0.0:12345:
redsocks {
        /* `local_ip' defaults to 127.0.0.1 for security reasons,
         * use 0.0.0.0 if you want to listen on every interface.
         * `local_*' are used as port to redirect to.
         */
        local_ip = 0.0.0.0;
        local_port = 12345;

        // `ip' and `port' are IP and tcp-port of proxy-server
        ip = 127.0.0.1;
        port = 1080;

        // known types: socks4, socks5, http-connect, http-relay
        type = socks5;
}
Configuration for the iptables:
sudo iptables -t nat -N SHADOWSOCKS

# 注意这里要把 $server_IP 改成你自己的 socks5 远程IP,即你的VPS IP,不然无法正常工作
sudo iptables -t nat -A SHADOWSOCKS -d xx.xx.xx.xxx  -j RETURN
sudo iptables -t nat -A SHADOWSOCKS -d xx.xx.xx.xxx -j RETURN

# 忽略局域网地址
sudo iptables -t nat -A SHADOWSOCKS -d 0.0.0.0/8 -j RETURN
sudo iptables -t nat -A SHADOWSOCKS -d 10.0.0.0/8 -j RETURN
sudo iptables -t nat -A SHADOWSOCKS -d 127.0.0.0/8 -j RETURN
sudo iptables -t nat -A SHADOWSOCKS -d 169.254.0.0/16 -j RETURN
sudo iptables -t nat -A SHADOWSOCKS -d 172.16.0.0/12 -j RETURN
sudo iptables -t nat -A SHADOWSOCKS -d 192.168.0.0/16 -j RETURN
sudo iptables -t nat -A SHADOWSOCKS -d 224.0.0.0/4 -j RETURN
sudo iptables -t nat -A SHADOWSOCKS -d 240.0.0.0/4 -j RETURN
#sudo iptables -t nat -A SHADOWSOCKS -m set --match-set chnroute dst -j RETURN

# 把流量转发到 12345 端口,即redsocks
sudo iptables -t nat -A SHADOWSOCKS -p tcp -j REDIRECT --to-ports 12345
sudo iptables -t nat -A OUTPUT -p tcp -j SHADOWSOCKS
sudo iptables -t nat -A PREROUTING -p tcp -j SHADOWSOCKS
iptables result:
# Generated by xtables-save v1.8.2 on Thu Jun 30 14:34:24 2022
*filter
:INPUT ACCEPT [1455927:2412196175]
:FORWARD ACCEPT [0:0]
:OUTPUT ACCEPT [927092:2335234307]
-A FORWARD -i wlan0 -j ACCEPT
-A FORWARD -o wlan0 -j ACCEPT
-A FORWARD -i eth0 -o wlan0 -m state --state RELATED,ESTABLISHED -j ACCEPT
-A FORWARD -i wlan0 -o eth0 -j ACCEPT
COMMIT
# Completed on Thu Jun 30 14:34:24 2022
# Generated by xtables-save v1.8.2 on Thu Jun 30 14:34:24 2022
*nat
:PREROUTING ACCEPT [4873:855180]
:INPUT ACCEPT [10699:685912]
:POSTROUTING ACCEPT [9810:590833]
:OUTPUT ACCEPT [14989:908253]
:SHADOWSOCKS - [0:0]
-A PREROUTING -p tcp -j SHADOWSOCKS
-A POSTROUTING -o eth0 -j MASQUERADE
-A SHADOWSOCKS -d xxx.xxx.xxx.xxx/32 -j RETURN
-A SHADOWSOCKS -d 0.0.0.0/8 -j RETURN
-A SHADOWSOCKS -d 10.0.0.0/8 -j RETURN
-A SHADOWSOCKS -d 127.0.0.0/8 -j RETURN
-A SHADOWSOCKS -d 169.254.0.0/16 -j RETURN
-A SHADOWSOCKS -d 172.16.0.0/12 -j RETURN
-A SHADOWSOCKS -d 192.168.0.0/16 -j RETURN
-A SHADOWSOCKS -d 224.0.0.0/4 -j RETURN
-A SHADOWSOCKS -d 240.0.0.0/4 -j RETURN
-A SHADOWSOCKS -p tcp -j REDIRECT --to-ports 12345
-A SHADOWSOCKS -d 1xx.xx.xxx.xxx/32 -j RETURN
-A SHADOWSOCKS -d 1xx.xx.xxx.xxx/32 -j RETURN
COMMIT
# Completed on Thu Jun 30 14:34:24 2022
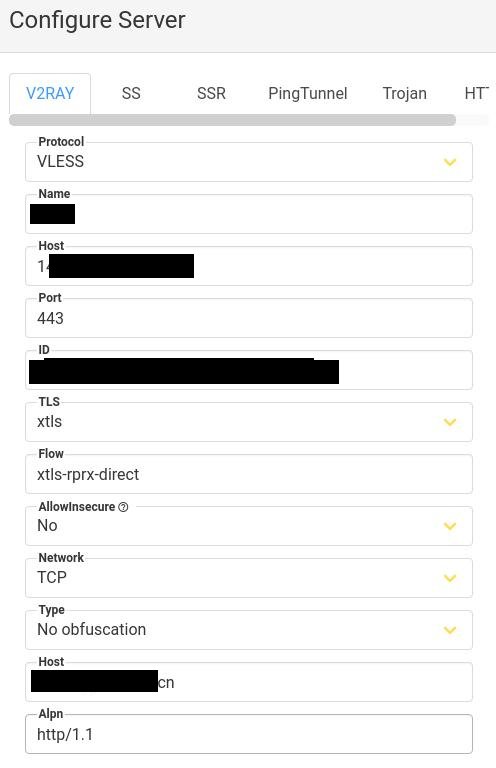
Install v2rayA client on archlinux, then yay xray, uninstall all v2ray related.
Refers to https://v2raya.org/docs/manual/use-other-core/
Changes to xray-core
Install acme:
# curl https://get.acme.sh | sh
Generate the certification:
acme.sh --issue --server letsencrypt --test -d www.fuckgfwmother.cn -w /root/blog/html --keylength ec-256
acme.sh --set-default-ca --server letsencrypt
acme.sh --issue -d www.fuckgfwmother.cn -w /root/blog/html --keylength ec-256 --force
Then copy the cerfitication to /etc/xray:
# cp /root/.acme.sh/www.fuckgfwmother.cn_ecc/fullchain.cer /etc/xray/chain.crt
# cp /root/.acme.sh/www.fuckgfwmother.cn_ecc/www.fuckgfwmother.cn.key /etc/xray/key.key
Edit the config.json under the folder /etc/xray, then start the docker instance via:
$ docker run -d -p 443:443 --name xray --restart=always -v /etc/xray:/etc/xray teddysun/xray
Via:

Now start via sudo v2raya, then you could use the proxy.