Feb 25, 2023
TechnologyInstall canddy on rpi via:
# sudo apt install -y debian-keyring debian-archive-keyring apt-transport-https -y
# apt-cache search caddy
# curl -1sLf 'https://dl.cloudsmith.io/public/caddy/stable/debian.deb.txt' | sudo tee /etc/apt/sources.list.d/caddy-stable.list
# sudo apt update
# sudo apt-get install caddy -y
Configuration files:
$ cat /etc/caddy/Caddyfile
# The Caddyfile is an easy way to configure your Caddy web server.
#
# Unless the file starts with a global options block, the first
# uncommented line is always the address of your site.
#
# To use your own domain name (with automatic HTTPS), first make
# sure your domain's A/AAAA DNS records are properly pointed to
# this machine's public IP, then replace ":80" below with your
# domain name.

:80 {
	# Set this path to your site's directory.
	root * /media/sda/ucc
	# Enable the static file server.
	file_server browse {
	hide .git
}

basicauth * {
cwgo gowugowuoguwougowugouwogue
}
	# Another common task is to set up a reverse proxy:
	# reverse_proxy localhost:8080

	# Or serve a PHP site through php-fpm:
	# php_fastcgi localhost:9000
}

# Refer to the Caddy docs for more information:
# https://caddyserver.com/docs/caddyfile
The password could be generated via caddy hash-password.
Reload the server:
$ sudo systemctl reload caddy
Feb 24, 2023
TechnologySteps
Install kde desktop environment:
$ sudo apt install -y kubuntu-desktop
Install libvirtd and remove default qemu, then install compiled qemu:
$  sudo apt install -y libvirt-bin
$  sudo apt remove qemu-system-x86
// Go to   qemu source code:
#  make install
# qemu-system-x86_64 --version
QEMU emulator version 4.2.0 (v4.2.0-dirty)
Copyright (c) 2003-2019 Fabrice Bellard and the QEMU Project developers
Install virt-manager for managing the vms:
$ sudo apt install -y virt-manager
$ sudo systemctl enable libvirtd
$ sudo systemctl start libvirtd
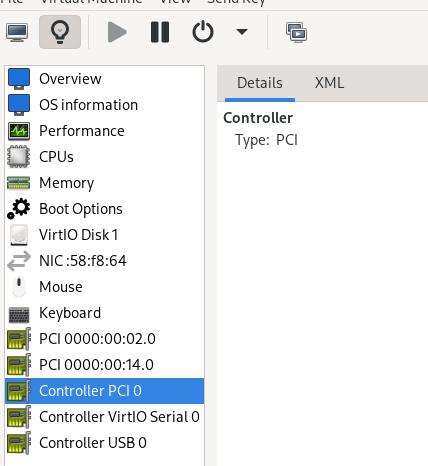
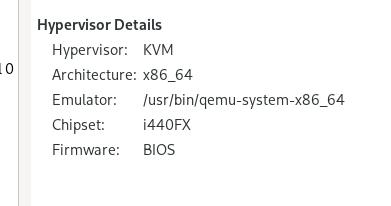
Install win10 using following configurations:

vm configuration:

Added the qemuargs:
virt-xml win10 --edit --confirm --qemu-commandline '-set device.hostpci0.x-igd-gms=1'
libvirt configuration
libvirt hooks for pre-set vfio and post release vfio equipments:
root@idv10:/etc/libvirt/hooks# cat qemu
#!/bin/bash

OBJECT="$1"
OPERATION="$2"

if [[ $OBJECT == "win10" ]]; then
	case "$OPERATION" in
        	"prepare")
                systemctl start libvirt-nosleep@"$OBJECT"  2>&1 | tee -a /var/log/libvirt/custom_hooks.log
                /bin/vfio-startup.sh 2>&1 | tee -a /var/log/libvirt/custom_hooks.log
                ;;

            "release")
                systemctl stop libvirt-nosleep@"$OBJECT"  2>&1 | tee -a /var/log/libvirt/custom_hooks.log
                /bin/vfio-teardown.sh 2>&1 | tee -a /var/log/libvirt/custom_hooks.log
                ;;
	esac
fi
root@idv10:/etc/libvirt/hooks# cat vfio-startup.sh
#!/bin/bash
# Helpful to read output when debugging
set -x

long_delay=10
medium_delay=5
short_delay=1
echo "Beginning of startup!"

function stop_display_manager_if_running {
    # Stop dm using systemd
    if command -v systemctl; then
        if systemctl is-active --quiet "$1.service" ; then
            echo $1 >> /tmp/vfio-store-display-manager
            systemctl stop "$1.service"
        fi

        while systemctl is-active --quiet "$1.service" ; do
            sleep "${medium_delay}"
        done

        return
    fi

    # Stop dm using runit
    if command -v sv; then
        if sv status $1 ; then
            echo $1 >> /tmp/vfio-store-display-manager
            sv stop $1
        fi
    fi
}


# Stop currently running display manager
if test -e "/tmp/vfio-store-display-manager" ; then
    rm -f /tmp/vfio-store-display-manager
fi

stop_display_manager_if_running sddm
stop_display_manager_if_running gdm
stop_display_manager_if_running lightdm
stop_display_manager_if_running lxdm
stop_display_manager_if_running xdm
stop_display_manager_if_running mdm
stop_display_manager_if_running display-manager

sleep "${medium_delay}"

# Unbind VTconsoles if currently bound (adapted from https://www.kernel.org/doc/Documentation/fb/fbcon.txt)
if test -e "/tmp/vfio-bound-consoles" ; then
    rm -f /tmp/vfio-bound-consoles
fi
for (( i = 0; i < 16; i++))
do
  if test -x /sys/class/vtconsole/vtcon${i}; then
      if [ `cat /sys/class/vtconsole/vtcon${i}/name | grep -c "frame buffer"` \
           = 1 ]; then
	       echo 0 > /sys/class/vtconsole/vtcon${i}/bind
           echo "Unbinding console ${i}"
           echo $i >> /tmp/vfio-bound-consoles
      fi
  fi
done

# Unbind EFI-Framebuffer
if test -e "/tmp/vfio-is-nvidia" ; then
    rm -f /tmp/vfio-is-nvidia
fi

if lsmod | grep "nvidia" &> /dev/null ; then
    echo "true" >> /tmp/vfio-is-nvidia
    echo efi-framebuffer.0 > /sys/bus/platform/drivers/efi-framebuffer/unbind
fi

igd_id="8086 $(lspci -n|grep '0:02.0'|cut -d ':' -f4|cut -c 1-4)"
usb_id="8086 $(lspci -n|grep '00:14.0'|cut -d ':' -f4|cut -c 1-4)"
echo 0000:00:02.0 > /sys/bus/pci/drivers/i915/unbind
echo 0000:00:14.0 > /sys/bus/pci/drivers/xhci_hcd/unbind
if ! lsmod | grep "vfio_pci" &> /dev/null ; then
    modprobe vfio-pci
fi
echo $igd_id > /sys/bus/pci/drivers/vfio-pci/new_id
echo $usb_id > /sys/bus/pci/drivers/vfio-pci/new_id

echo "End of startup!"
root@idv10:/etc/libvirt/hooks# cat vfio-teardown.sh
#!/bin/bash
set -x

# on shutoff state then you could unbind the vfio-pcis
#sleep 20
#a="fucku"
#until [[ $a == "shut off" ]]
#do
#	a=`virsh domstate win10`
#	sleep 3
#done

ia_addr="0000:$(lspci|grep 'Audio'|grep 'Intel'|cut -c 1-7)"
usb_addr="0000:$(lspci|grep 'USB'|grep 'Intel'|cut -c 1-7)"
igd_id="8086 $(lspci -n|grep '0:02.0'|cut -d ':' -f4|cut -c 1-4)"

echo 0000:00:02.0 > /sys/bus/pci/drivers/vfio-pci/unbind
echo $ia_addr > /sys/bus/pci/drivers/vfio-pci/unbind
echo $usb_addr > /sys/bus/pci/drivers/vfio-pci/unbind
echo $igd_id > /sys/bus/pci/drivers/vfio-pci/remove_id
echo 0000:00:02.0 > /sys/bus/pci/drivers/i915/bind
echo $ia_addr > /sys/bus/pci/drivers/snd_hda_intel/bind
echo $usb_addr >/sys/bus/pci/drivers/xhci_hcd/bind

echo "Beginning of teardown!"

sleep 10

# Restart Display Manager
input="/tmp/vfio-store-display-manager"
while read displayManager; do
  if command -v systemctl; then
    systemctl start "$displayManager.service"
  else
    if command -v sv; then
      sv start $displayManager
    fi
  fi
done < "$input"

# Rebind VT consoles (adapted from https://www.kernel.org/doc/Documentation/fb/fbcon.txt)
input="/tmp/vfio-bound-consoles"
while read consoleNumber; do
  if test -x /sys/class/vtconsole/vtcon${consoleNumber}; then
      if [ `cat /sys/class/vtconsole/vtcon${consoleNumber}/name | grep -c "frame buffer"` \
           = 1 ]; then
    echo "Rebinding console ${consoleNumber}"
	  echo 1 > /sys/class/vtconsole/vtcon${consoleNumber}/bind
      fi
  fi
done < "$input"

# Rebind framebuffer for nvidia
if test -e "/tmp/vfio-is-nvidia" ; then
  echo "efi-framebuffer.0" > /sys/bus/platform/drivers/efi-framebuffer/bind
fi


echo "End of teardown!"
kde reback
kde startup command in desktop, vm exit will send back to desktop.
fix
some fixes:
root@h3c:/etc/libvirt/hooks# chmod 777 *.sh
root@h3c:/etc/libvirt/hooks# chmod 777 *
root@h3c:/etc/libvirt/hooks# ln -s /etc/libvirt/hooks/vfio-startup.sh /bin/
root@h3c:/etc/libvirt/hooks# ln -s /etc/libvirt/hooks/vfio-teardown.sh /bin/
root@h3c:/etc/libvirt/hooks# ls -l -h /bin/vfio-*
lrwxrwxrwx 1 root root 34 Feb 28 23:05 /bin/vfio-startup.sh -> /etc/libvirt/hooks/vfio-startup.sh
lrwxrwxrwx 1 root root 35 Feb 28 23:05 /bin/vfio-teardown.sh -> /etc/libvirt/hooks/vfio-teardown.sh
Add some systemd files:
root@h3c:/etc/libvirt/hooks# cat /etc/systemd/system/libvirt-nosleep\@.service
[Unit]
Description=Preventing sleep while libvirt domain "%i" is running

[Service]
Type=simple
ExecStart=/usr/bin/systemd-inhibit --what=sleep --why="Libvirt domain \"%i\" is running" --who=%U --mode=block sleep infinity
Feb 17, 2023
Technology记录步骤
我看还是用私有的笔记来记录吧
Feb 12, 2023
Technology变更(piap->pivpn)
主要修改如下:
本来用来做公司的AP,但是因为需要,弄成了家里的pivpn,
- 关闭了hostapd:
sudo systemctl disable hostapd
- 关闭了xray
sudo systemctl disable xray
- 关闭了shadowsocks
sudo systemctl disable shadowsocks
- 关闭了pdnsd
sudo systemctl disable pdnsd
- 关闭了dhcpd
sudo systemctl disable isc-dhcp-server
- 关闭了motion(摄像头)
sudo systemctl disable motion
- 关闭了shadowsocks-libev
sudo systemctl disable shadowsocks-libev
更改了网络配置:
$ cat /etc/network/interfaces
# interfaces(5) file used by ifup(8) and ifdown(8)

# Please note that this file is written to be used with dhcpcd
# For static IP, consult /etc/dhcpcd.conf and 'man dhcpcd.conf'

# Include files from /etc/network/interfaces.d:
#source-directory /etc/network/interfaces.d
#auto wlan0
#iface wlan0 inet static
#  address 10.16.42.1
#  netmask 255.255.255.0
auto eth0
iface eth0 inet static
  address 192.168.1.117
  netmask 255.255.255.0
  gateway 192.168.1.1
更新到最新(2023.02.12)
Feb 8, 2023
Technology目的
关闭kylinv10桌面特效
方法
安装qdbus:
$ sudo apt install -y qdbus-qt5
/usr/bin下新建脚本文件switchoffeffect.sh:
#!/bin/bash
qdbus org.ukui.KWin /Compositor suspend
/usr/share/applications下复制一个desktop模板用于撰写自定义启动文件:
$ sudo cp /usr/share/applications/kylin-weather.desktop /usr/share/applications/xxxxx-optimized.desktop
更改关键字段,最终效果如下:
[Desktop Entry]
Name=SwichOff
Name[zh_CN]=XX优化
Name[bo_CN]=གནམ་གཤིས།
Comment[bo_CN]=ཀྲུང་གོའི་དུས་ལྟར་གནམ་གཤིས།
Comment=Indicator applet for current weather conditions in China
Comment[zh_CN]=关闭特效
GenericName[bo_CN]=གནམ་གཤིས།
GenericName=China Weather Applet
Keywords=weather,china
Exec=sh /usr/bin/switchoffeffect.sh
Icon=kylin-weather
Terminal=false
Type=Application
X-GNOME-Autostart-Delay=10
Categories=System;Utility;
X-UKUI-AutoRestart=true;
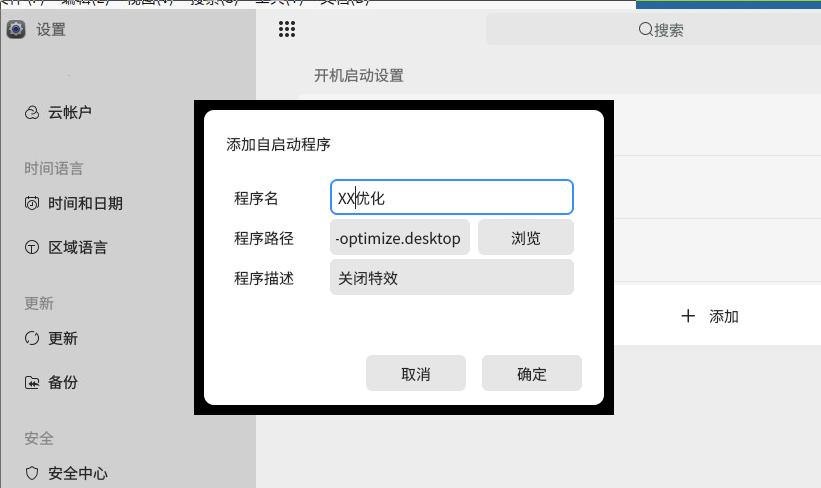
开始菜单中点击: 设置->应用->开机启动, 点击添加,在弹出的添加自定义程序对话框中选择刚才创建的启动文件:

点击确定后,开机启动项如下:

重启后,桌面因为特效关闭的缘故,流畅度大有提升。


