Oct 23, 2013
Technology###Installation and Configuration
Download the install.iso and install it in the virtualbox.
Then add http_proxy, https_proxy, ftp_proxy, ftps_proxy into the .profile file.
visudo add the current user to the sudo list, then add Defaults env_keep to the http_proxy, etc, because we want to use pkg_add under the sudo priviledge.
###Updating the software repository snapshot
Edit the Package path via:
export PKG_PATH=ftp://filedump.se.rit.edu/pub/OpenBSD/5.3/`machine -a`/
Update the ports configuration database:
	$ cd /tmp
	$ ftp ftp://filedump.se.rit.edu/pub/OpenBSD/5.3/ports.tar.gz
	$ cd /usr
	$ sudo tar xzf /tmp/ports.tar.gz
Now you got the updated port information.
###Search and install specified packages via ports system
Take vim installation for example:
	$ cd /usr/ports
	$ make key=vim describe
	$ make search key=****
	$ cd /usr/ports/editors/vim
	$ sudo make install
	or
	$ sudo make install clean clean-depends
Then the ports will take a long,long time to download all of the packages and start to build. Strangely, this command installed gvim into the system.
Oct 22, 2013
Technology###Prefix
3 days ago I wrote a simple translator on my ArchLinux which could pop-up a notification window when I query a word. But when I use it at company it failed. Becaus the firewall has banned the communication to Google’s API. Thus I have to write another version of translator, which could get the result from the local database.
###Preparation
python-stardict is a great library for querying word from stardict’s dictionary, you can get it via:
$ git clone https://github.com/pysuxing/python-stardict.git
Also you have to download stardict’s dictionary from http://abloz.com/huzheng/stardict-dic/, you can choose whatever you like dictionary, then uncompress it into your python-stardict located directory.
###Coding
Open stardict.py with your favorite editor, adding a function at the end of the file. The code snippet is listed as following:
def my_read_dict_info():
    """
    """
    my_ifo_file = "/home/Trusty/code/python/python-stardict/stardict-langdao-ec-gb-2.4.2/langdao-ec-gb.ifo"
    my_idx_file = "/home/Trusty/code/python/python-stardict/stardict-langdao-ec-gb-2.4.2/langdao-ec-gb.idx"
    my_dict_file = "/home/Trusty/code/python/python-stardict/stardict-langdao-ec-gb-2.4.2/langdao-ec-gb.dict.dz"
    #########Uncomment them for other dictionaries ######
    #my_dict_file = "stardict-dictd_www.dict.org_gcide-2.4.2/dictd_www.dict.org_gcide.dict.dz"
    #my_idx_file = "stardict-dictd_www.dict.org_gcide-2.4.2/dictd_www.dict.org_gcide.idx"
    #my_ifo_file = "stardict-dictd_www.dict.org_gcide-2.4.2/dictd_www.dict.org_gcide.ifo"
    #my_ifo_file = "stardict-longman-2.4.2/longman.ifo"
    #my_idx_file = "stardict-longman-2.4.2/longman.idx"
    #my_dict_file = "stardict-longman-2.4.2/longman.dict.dz"
    my_ifo_reader = IfoFileReader(my_ifo_file)
    my_idx_reader = IdxFileReader(my_idx_file)
    my_dict_reader = DictFileReader(my_dict_file, my_ifo_reader, my_idx_reader, True)
    cmdargs = str(sys.argv) ## args
    result = my_dict_reader.get_dict_by_word(str(sys.argv[1]))  ## Using args[1] for querying
    print result[0].values()[0]		## output result in terminal
    result_str = "\'<span color=\"green\" size=\"14000\">"+result[0].values()[0]+"</span>\'"	## Build the command line for notify-send
    #print result_str
    call(["notify-send", str(sys.argv[1]), result_str])		## Call notify-send to print on screen, last for 5 seconds
    #call(["echo", commandstr])
    #output = subprocess.check_output(["echo", commandstr])
    #p1 = subprocess.Popen(['echo','-e', commandstr], stdout=subprocess.PIPE)
    #p1 = subprocess.Popen(['printf', commandstr], stdout=subprocess.PIPE)
    #p2 = subprocess.Popen(['awesome-client', '-'], stdin=p1.stdout, stdout=subprocess.PIPE)
    #p1.stdout.close()
    #output = p2.communicate()[0]
    #print "*****"
    #print output

# read_ifo_file("stardict-cedict-gb-2.4.2/cedict-gb.ifo")
# read_idx_file("stardict-cedict-gb-2.4.2/cedict-gb.idx")
# read_dict_info()
my_read_dict_info()
Clean code:
def my_read_dict_info():
    """
    """
    my_ifo_file = "/home/Trusty/code/python/python-stardict/stardict-langdao-ec-gb-2.4.2/langdao-ec-gb.ifo"
    my_idx_file = "/home/Trusty/code/python/python-stardict/stardict-langdao-ec-gb-2.4.2/langdao-ec-gb.idx"
    my_dict_file = "/home/Trusty/code/python/python-stardict/stardict-langdao-ec-gb-2.4.2/langdao-ec-gb.dict.dz"
    my_ifo_reader = IfoFileReader(my_ifo_file)
    my_idx_reader = IdxFileReader(my_idx_file)
    my_dict_reader = DictFileReader(my_dict_file, my_ifo_reader, my_idx_reader, True)
    cmdargs = str(sys.argv) ## args
    result = my_dict_reader.get_dict_by_word(str(sys.argv[1]))  ## Using args[1] for querying
    print result[0].values()[0]		## output result in terminal
    result_str = "\'<span color=\"green\" size=\"14000\">"+result[0].values()[0]+"</span>\'"	## Build the command line for notify-send
    call(["notify-send", str(sys.argv[1]), result_str])		## Call notify-send to print on screen, last for 5 seconds

my_read_dict_info()
###Configuration
You can add an alias into your ~/.bashrc
alias mydict='python2 /home/Trusty/code/python/python-stardict/stardict.py'
Or you can add an executable file named /bin/mydic which contains:
#!/bin/bash
python2 /home/Trusty/code/python/python-stardict/stardict.py $@
###Result
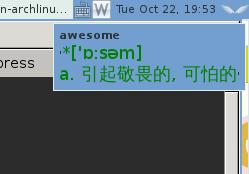
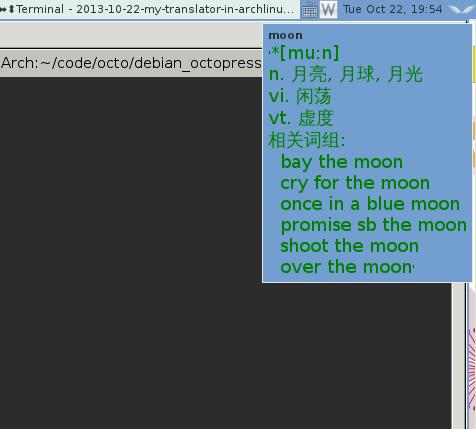
See the following images for result:


The query result will vanished in 5 seconds.
###TBD
- How to automatically record every query?
- How to replace the python-stardict with my own library(Written in C, much more fast?)?
- How to automatically judge english/chinese, or other languages?
- Considering Error Handling.
Oct 22, 2013
TechnologyThere are following things to be done in recent days:
- Using a local dictionary for refering the words [Currently Done]
- SNMP on different equipments [Currently Done]
- Try installing and using FreeBSD/NetBSD [Currently Done]
- Using python to do image manipulation
- Using Python and other software to generate the big alubum pictures which contains different small pictures
- How to compare images using Linux scripts
- How to create a local search engine on my personal web server. [Currently Done]
- werc installation
This is an H1
Oct 21, 2013
Technology###Install snmpd
$ opkg update && opkg install snmpd
The configuration file is /etc/config/snmpd, the configure file could be finetuned. while the file /etc/init.d/snmpd script will make snmpd program to load another cutom config
snmpd is too big for embedded system, so we use mini-snmpd for openwrt.
###Install mini-snmpd
$ opkg update && opkg install mini-snmpd
The configuration file is located at /etc/config/mini_snmpd, edit this file,for enable the default configration from option enable 0 to option enable 1, this will make mini_snmpd start for default.
###Use cacti Server Monitor to view the result
In Ubuntu, type:
$ apt-get install cacti cacti-spine
After the installation, you should visiti http://Your_ip_address/cacti for loging, the username and password are “admin” by default, but you will be asked to change it after the first login.
Go to “Device” click add at the right top, this will ask you to add an equipment for monitoring.
Fill in the ip address and select the type to “Generic SNMP-enabled Host”, then add some additional notes if necessary.
You can use following command to get the snmpd status:
[Trusty@XXXyyy ~]$ snmpwalk -c public -v 2c 10.0.0.1:161
Oct 21, 2013
TechnologyI want to use snmp for administrating my raspberry PI, for example, its disk usage, cpu usage, and etc. following is the how-to of setting up the monitoring environment.
###Preparation
	$ apt-get upate && apt-get upgrade
	$ apt-get install apache2 php5 mysql-client mysql-server
You will be prompted to set a password for mysql root user.
	$ apt-get install php5-mysql php5-snmp rrdtool snmp snmpd


