Nov 11, 2013
Technology#烤派宝典第六章之Screen01
欢迎来到Screen教程系列。在这一系列教程中,你将学会如何在汇编语言中控制Raspberry Pi的屏幕, 如何开始显示随机数据,然后我们将学会如何显示一个固定的图像,显示文字,如何将数字转换为文字。 我们假设你已经完成了之前的OK系列,OK系列里提到过的基本概念在本教程中不会再被提及。
Screen01这一章讲述了一些基本的图像处理理论,我们将在这一章里,在屏幕上或是电视机(TV)上显示出一个渐变颜色的格式。
###1. 开始
我们希望你已经完成了OK系列,OK系列中已经完成的’gpio.s'和’systemTimer.s'文件中所撰写的函数会在本系列中被重复调用。如果你还没有这些文件,或者说你更愿意使用标准的参考文件,你可以从下载页面中下载到OK05的解决方案模板。 ‘main.s'文件同样是有用的,但是你需要把mov sp,#0x8000之后的内容删除。
###2. 计算机图形
正如你所希望看到的,在很原始的层面上来看,计算机其实是很愚蠢的。它们的指令集是有限的,几乎不会解数学题目。但是不知为何它们拥有近乎无所谓不为的能力。我们目前所需要了解的,计算机如何在屏幕上显示出图像?我们如何将问题翻译成二进制而后扔给计算机去解决?答案非常简单,对于每一种颜色,我们为它编上一个唯一的编号,然后我们在计算机屏幕上的每一个点都储存上这个编号中的一个值。像素就是你屏幕上的这样一个小点,如果你凑近了看,你可能会在自己的屏幕上看到这样的点,你可以看到电脑上的每一幅图像,都是由这样的点的集合所组成的。
随着计算机时代的演进,人们需要越来越复杂的图形,所以显卡被发明出来。显卡可以看作是你的计算机的第二个处理器,它仅仅负责在屏幕上画图。它的主要职责是将像素值信息转换为被送到屏幕上的光强度信息。 在现代计算机中,显卡能干的活儿远远不止这些,比如绘制3D图像也是它的拿手好戏。然而在本教程中,我们之关注于显卡的初级使用;从内存中获取到像素信息,输出到屏幕上。
有很多种用数字来表达颜色的系统,这里我们使用RGB系统,但是HSL是另一种广泛被使用的系统。
要注意到的一点是我们系统所使用的色彩编号系统。有很多种选择,每种选择将输出不同质量的图像。为了有助于你的完整理解,我在这里列举出了一些选择。
尽管这里的图像有很多种颜色,它们都使用了一种被称作空间抖动的技术。这使得它们能用很少的颜色表现出绝佳的图像效果。许多早期的操作系统中都运用了这种技术。
  <th>单色</th>

  <th>描述</th>

  <th>例子</th>
</tr>
  <td>2</td>

  <td>使用一个位来存储每个像素点,1代表白色,0代表黑色
  </td>

  <td><img alt="鸟-单色" src=
  "/images/colour1bImage.png"></td>
</tr>

<tr>
  <td>灰阶</td>

  <td>256</td>

  <td>使用1byte来表示每个像素点,有255中表示白色的方式,0代表黑色,0~255之间的任意数字都代表两者的线性组合
  </td>
  <td><img alt="鸟-灰阶" src=
  "/images/colour8gImage.png"></td>
</tr>

<tr>
  <td>8位色</td>

  <td>8</td>

  <td>使用3个位来存储每个像素点,第1个位代表红色通道的值,第2个位代表绿色通道的值,第3个位代表蓝色通道的值。
  </td>

  <td><img alt="鸟-八位色" src=
  "/images/colour3bImage.png"></td>
</tr>

<tr>
  <td>低彩色</td>

  <td>256</td>

  <td>使用8个位来存储每个像素点的信息,前3个位代表红色通道的强度,接下来的3个位代表绿色通道的强度,最后2个位代表蓝色通道的强度。
  </td>

  <td><img alt="鸟- 256色(低彩色)" src=
  "/images/colour8bImage.png"></td>
</tr>

<tr>
  <td>高彩色</td>

  <td>65,536</td>

  <td>使用16个位来存储每个像素点的信息,前5个位用于表示红色通道的强度,接下来的6个位用于表示绿色通道的强度,最后的5个位用来表示蓝色通道的强度。
  </td>

  <td><img alt="鸟- 高彩色" src=
  "/images/colour16bImage.png"></td>
</tr>

<tr>
  <td>真彩色</td>

  <td>16,777,216</td>

  <td>使用24个位来存储每个像素点的信息,前8个位用于表示红色通道的强度,接下来的8个位用于表示绿色通道强度,最后的8个位用于表示蓝色通道的强度。
  </td>

  <td><img alt="鸟 - 真彩色" src=
  "/images/colour24bImage.png"></td>
</tr>

<tr>
  <td>RGBA32</td>

  <td>16,777,216(256个透明度级别)</td>

  <td colspan="2">使用32个位来存储每个像素点的信息,前8个位用于表示红色通道的强度,接下来的8个位用于表示绿色通道的强度,第3组8个位用于表示蓝色通道的强度,最后的8个位用于表示透明度通道。同名读通道通常用于在一幅图片上绘制另一幅图片,0用于代表后置图片的颜色,255代表当前图片的颜色,所有其之间的值代表两者的组合。
  </td>

  <td></td>
</tr>
在本指南中我们将使用高彩色。从上面的图片中我们可以看到,高彩彩色已经相当清晰,图片质量也不错,对比于真彩色,它不会占据太大的空间。也就是说,显示一张800x600像素大小的图片,它只会占据大概1M byte的空间。它还有个优势是,它是2的幂次方的大小,对比于真彩图片,很容易得到其信息。
Raspberry Pi上的图形处理器有一点点怪异。在Raspberry Pi上,图形显示器最先运行,并负责启动主处理器(中央处理器)。对比于正常的操作系统,这有点“不太正常”。 虽然最终这种启动方式不会造成任何差别,但总给人感觉就是中央处理器被沦落为了第二处理器,图形处理器有喧宾夺主的感觉。Raspberry Pi的中央处理器和图形处理器之间的通信方式被称之为“邮箱(mailbox)”. 这两个处理器都可以给另一个处理器发送邮件,而对段处理器在收到邮件后将在可能的时间点处理之。我们可以使用邮箱机制从图形处理器取得一个地址。这个地址就是我们需要将色彩像素信息写在屏幕上的位置,被称为Frame Buffer, 显卡通常会检查这个位置,并从这里取得信息用于直接更新屏幕。
存储Frame buffer会给计算机带来沉重的内存负载。基于这个原因,早期的计算机经常会使用一些欺诈的伎俩,比如,储存一个满是文字的屏幕,但是每次仅仅更新单个需要更新的字符。
###3. 邮递员编程
有关图形编程我们第一个要接触的就是‘邮箱’这个概念。邮箱只有两个方法需要注意,一个是MailboxRead, 用于从位于r0的邮箱通道里读出来一条消息。MailboxWrite,用于将r0中的前28个二进制位直接写入到位于r1的邮箱通道。Raspberry Pi有7个邮箱通道,可用于连接图像处理器,我们只能使用第一个通道,因为它直接和Frame Buffer交互。
下面的表格和图标描述了有关邮箱的操作。
  <th>大小/ Bytes</th>

  <th>名称</th>

  <th>描述</th>

  <th>读/ 写</th>
</tr>
  <td>4</td>

  <td>Read</td>

  <td>接收邮件.</td>

  <td>R</td>
</tr>

<tr>
  <td>2000B890</td>

  <td>4</td>

  <td>Poll</td>

  <td>接收邮件但不取回.</td>

  <td>R</td>
</tr>

<tr>
  <td>2000B894</td>

  <td>4</td>

  <td>Sender</td>

  <td>发送信息.</td>

  <td>R</td>
</tr>

<tr>
  <td>2000B898</td>

  <td>4</td>

  <td>Status</td>

  <td>信息.</td>

  <td>R</td>
</tr>

<tr>
  <td>2000B89C</td>

  <td>4</td>

  <td>Configuration</td>

  <td>配置.</td>

  <td>RW</td>
</tr>

<tr>
  <td>2000B8A0</td>

  <td>4</td>

  <td>Write</td>

  <td>发送邮件.</td>

  <td>W</td>
</tr>
消息传递是组件间通信的一种很常见的方式。一些操作系统使用虚拟的消息传递机制以允许应用程序之间的相互通信.
发送消息给特定的邮箱步骤如下:
- 发送端必须等待状态寄存器的最高位为0.
- 发送端写入Write寄存器, 第4个二进制位代表要写入的位置,高28个二进制位代表要写入的信息。
从邮箱读取一条信息的步骤如下:
- 接收端等待状态寄存器的第30个二进制位变为0.
- 接收端从Read寄存去读取。
- 接收端确认消息是从正确的邮箱读出的,如果不是,则重试。
如果你足够自信的话,你现在已经拥有足够的信息可以用于写出邮箱读/写函数了,如果你觉得还不够,那么请接着往下读。
还是那句话,我推荐你一开始就把邮箱区域的取寄存器地址函数实现掉:
.globl GetMailboxBase
GetMailboxBase:
ldr r0,=0x2000B880
mov pc,lr
发送流程最为简单,所以我们一开始就把它实现掉。随着你的函数越来越复杂,你需要开始计划如何组织它们。一个好的方式是实现将其实现步骤列举出来,越详细越好,比如下面的:
- 我们的输出需要写入的寄存器是(r0), 邮箱需要写入的寄存器是(r1)。 我们需要检查邮箱地址是否有效,低4个二进制位的值是否是0,永远不要忘记校验输入值。
- 使用GetMailboxBase函数取得mailbox的地址。
- 读取状态寄存器的位。
- 检查最高位是否是0,如果不为0,则返回第3步。
- 组合值,写入邮箱通道。
- 写入Write寄存器。
让我们挨个来实现之:
1.
	.globl MailboxWrite
	MailboxWrite:
	tst r0,#0b1111
	movne pc,lr
	cmp r1,#15
	movhi pc,lr
以上代码实现了关于r0和r1寄存器的校验。 tst用于比较两个数字,通过对两个数字的逻辑与(and)运算, 并将结果与0作比较。 在这个例子这哦你哦个我们检查寄存器r0的低4位是否全为0。
tst reg,#val计算reg和#val作与运算的值,将其结果与0做比较。
2.
	channel .req r1
	value .req r2
	mov value,r0
	push {lr}
	bl GetMailboxBase
	mailbox .req r0
上述代码确保调用函数时我们不会覆盖已有的寄存器的值和lr寄存器的值, 之后我们开始调用GetMailboxBase。
3.
	wait1$:
	status .req r3
	ldr status,[mailbox,#0x18]
上述代码将加载入当前的状态。
4.
	tst status,#0x80000000
	.unreq status
	bne wait1$
上述代码将检查状态寄存器的最高位是否为0,如果不是,则返回步骤3.
5.
	add value,channel
	.unreq channel
上述代码将通道值和值做组合。
6.
	str value,[mailbox,#0x20]
	.unreq value
	.unreq mailbox
	pop {pc}
上述代码将结果写入到write寄存器中。
MailboxRead的代码也是类似的。
- 我们的输入值为需要读取的邮箱值(r0)。 我们需要实现校验之,以确定它是真实的邮箱地址。永远记得在函数调用前要校验输入值。
- 调用GetMailboxBase函数用于取回地址。
- 读取状态寄存器标志位。
- 检查第30个二进制位是否是0,如果不为0,则分支跳转回3.
- 从Read寄存器对应的地址开始读取数据。
- 检查mailbox是否是我们需要的那个,如果不是,则返回第3步继续执行。
- 返回结果。
让我们按次序来实现之:
1.
	.globl MailboxRead
	MailboxRead:
	cmp r0,#15
	movhi pc,lr
上述代码用于校验r0,是否是通道0~16之间,事实上我们只能使用一个mailbox通道。
2.
	channel .req r1
	mov channel,r0
	push {lr}
	bl GetMailboxBase
	mailbox .req r0
上述代码确保我们在调用GetMailboxBase函数时不会覆盖通用寄存器和lr寄存器值。
3.
	rightmail$:
	wait2$:
	status .req r2
	ldr status,[mailbox,#0x18]
上述代码将载入当前的状态寄存器值,现在你可以在r2中看到当前的状态寄存器值。
4.
	tst status,#0x40000000
	.unreq status
	bne wait2$
上述代码用于检查状态寄存器的第30个二进制位是否为0,如果不是,则返回到第3步继续等待。
5.
	mail .req r2
	ldr mail,[mailbox,#0]
上述代码从邮箱中读入下一个条目。
6.
	inchan .req r3
	and inchan,mail,#0b1111
	teq inchan,channel
	.unreq inchan
	bne rightmail$
	.unreq mailbox
	.unreq channel
上述代码检查我们刚才读取的通道就是我们所提供的通道,如果不是,我们将返回步骤3继续执行。因为低4位包含了地址,所以将其与输入值作对比就知道我们读取的是否是正确的,一般来说,这里可以看作是校验过程。
7.
	and r0,mail,#0xfffffff0
	.unreq mail
	pop {pc}
上述代码将答案(mail的高28位)写入r0寄存器中。
###4. 我最心爱的图像处理器
有了上面写的两个函数充当邮递员,我们就拥有了往显卡发送消息的能力了。我们应该发送什么消息过去?这个答案很难回答,在所有线上文档中我没发现有确切的答案。 然而通过查阅Raspberry Pi的GNU/Linux文档,我们可以随心所欲的发送任何我们想要发送的东西。
消息非常简单,我们描述好我们希望创建的framebuffer, 显卡要么同意我们的请求,要么拒绝。如果显卡同意我们开辟出如此大小的framebuffer,那它会返回0, 并填充我们所需要的内存区域;如果显卡拒绝我们的请求,将返回给我们一个非0值, 这代表可能分配了一小块或者根本就没分配。 不幸的是,我不知道这些非0值的真实含义是什么,我们只能以为如果显卡送回0时,它表示很高兴接收我们赋予它的任务。幸运的是,没有特殊情况的话,显卡总是乐呵呵的返回给我们0值,所以在返回值这个问题上,你不要有过多的担心。
因为Pi上的内存被中央处理起和显示处理器所共享,我们只需要发送何处可以找到我们消息的地址就可以了, 这种技术叫做DMA,许多复杂的设备使用它以加速访问时间。
为简单起见,我们将提前实现我们的需求,将其存储在.data段中。 在文件’framebuffer.s'中我们输入下列代码:
	section .data
	.align 4
	.globl FrameBufferInfo
	FrameBufferInfo:
	.int 1024 /* #0 Physical Width */
	.int 768 /* #4 Physical Height */
	.int 1024 /* #8 Virtual Width */
	.int 768 /* #12 Virtual Height */
	.int 0 /* #16 GPU - Pitch */
	.int 16 /* #20 Bit Depth */
	.int 0 /* #24 X */
	.int 0 /* #28 Y */
	.int 0 /* #32 GPU - Pointer */
	.int 0 /* #36 GPU - Size */
上面就是我们需要传递给显示处理器的消息格式。前两个字描述了物理屏幕的宽度和高度。第二对字则是虚拟屏幕的的宽度和高度。framebuffer的宽度和高度属于虚拟宽度和高度,GPU会自动将其适配到物理的宽度和高度上。接下来的字用于表示GPU是否可以满足我们的请求,如果能则会被设置为framebuffer每一行的字节数,在这里是2x1024=2048。 接下来的字是每一个像素需要分配多少个二进制位用于表征色彩信息。使用16代表GPU支持高彩色,如果是24则代表真彩色,32则代表RGBA32。接下来的两个字分别代表x和y坐标,代表将framebuffer拷贝到屏幕上时需要忽略掉的像素值,x和y是相对于屏幕左上方而言。最后的两个字会被显示处理器所填充,第一个代表指向framebuffer的地址,第二个值代表framebuffer的实际大小,单位是byte。
这里我很谨慎地使用了一个.align 4。 以前我们提起过,这条指令将保证下一条指令地址的低4个二进制为全0. 这样以来,我们就可以确保FrameBufferInfo放在可以直接传递给图形处理起的地址,因为我们的mailbox只能传送低4位全为0的地址。
当和使用DMA的设备交互时,对齐限制变得非常重要。GPU希望消息以16个byte对齐。
现在我们已经构建好了我们的消息结构,接下来我们写出发送这些消息的代码。消息通信将遵循一下流程:
- 将地址FrameBufferInfo + 0x40000000写入邮箱通道1。
- 读取邮箱通道1的结果,如果它为非0,这代表我们没有请求到合适的frame buffer。
- 拷贝图像到GPU的指针地址,它就会直接在屏幕上显示出来。
在步骤1中,我们需要在FrameBufferInfo地址上加上偏移0x40000000后才发送之。这条指令是一条特殊信号,用于告诉GPU在何处写入结构。如果我们只传输地址,GPU将返回它的应答信息,而不会立即更新缓存。缓存是一段内存,被处理器用于记载其当前正在处理的值,以便稍后放入内存中的对应位置。如果加上0x40000000,我们将告诉GPU不用写入缓存,保证了我们可以直接看到更改。
因为这里我们需要做很多事,最好是将其实现为一个函数,我们将写一个名为InitialiseFrameBuffer的函数,这个函数完成诊断和协调工作,并返回包含有frame buffer信息数据结构的指针。 为简单起见,我们应该把宽度,高度和frame buffer的颜色深度都作为这个函数的输入,这样在main.s中我们就很容易更改值,而不用关注到函数的实现细节。
还是老路子,我们先把实现的步骤逐个写下来。如果你有足够的自信,你可以跳开这一步,直接进入到函数的编写阶段。
- 检验输入值。
- 将输入值写入到frame buffer中。
- 将地址frame buffer + 0x40000000写入到mailbox地址。
- 收到mailbox的应答信息。
- 如果应答信息非0,表示方法失败。我们将返回0代表失败。
- 如果成功,我们将返回表征frame buffer信息的指针。
现在我们将撰写一个巨大的实现函数,下面的代码是一个实现方案。
1.
	.section .text
	.globl InitialiseFrameBuffer
	InitialiseFrameBuffer:
	width .req r0
	height .req r1
	bitDepth .req r2
	cmp width,#4096
	cmpls height,#4096
	cmpls bitDepth,#32
	result .req r0
	movhi result,#0
	movhi pc,lr
上述代码检查width和height是否在4096的范围内,颜色深度是否小于32。我们在这里又用到了条件执行的计谋。 请仔细检查你的代码是否能检查到输入值正确的取值。
2.
	fbInfoAddr .req r4
	push {r4,lr}
	ldr fbInfoAddr,=FrameBufferInfo
	str width,[r4,#0]
	str height,[r4,#4]
	str width,[r4,#8]
	str height,[r4,#12]
	str bitDepth,[r4,#20]
	.unreq width
	.unreq height
	.unreq bitDepth
上面的代码用于直接加载预先定义过的frame buffer 结构。这里我还将r4和链接寄存器的值保存在了栈中,因为我们需要将framebuffer的值保存在r4中。
3.
	mov r0,fbInfoAddr
	add r0,#0x40000000
        mov r1,#1
	bl MailboxWrite
MailboxWrite函数的输入值分别是:r0中存储需要写入的值,r1中存储需要写入的通道值。
4.
	mov r0,#1
	bl MailboxRead
MailboxRead的输入值是寄存器r0, 代表要读取的通道,输出值是我们读出的值。
5.
	teq result,#0
	movne result,#0
	popne {r4,pc}
上述代码检查MailboxRead的返回值是否为0,如果不是0,代表我们读取失败,函数将返回0(本函数返回0代表失败, MailboxRead返回0却代表成功,这两者容易混淆,需要注意)。
6.
	mov result,fbInfoAddr
	pop {r4,pc}
	.unreq result
	.unreq fbInfoAddr
上述代码是函数的结束,成功返回frame buffer 的地址。
###5. 在一个框架内的连续像素
现在我们来创建一个可以和显示处理器通信的函数。它将给出来一个指向frame buffer的指针(地址),以便我们可以在该地址上绘图。现在我们可以开始画图了。
在第一个例子中,我们将绘制一个持续颜色渐变的屏幕。它看起来不怎么美观,但是至少它代表了我们的程序是可以正常工作的。 实现的原理是我们将framebuffer中的每个像素点设置为一个持续渐变的值,并不停的更新它。
将下列代码拷贝到’main.s'文件中的mov sp,#0x8000代码后。
	mov r0,#1024
	mov r1,#768
	mov r2,#16
	bl InitialiseFrameBuffer
以上代码调用了InitialiseFrameBuffer函数,创建出一个宽1024,高768的frame buffer, 颜色深度为16。 你可以将这些值改成你所期待的数字, 只要你能让它运行起来就没问题。 如果图形处理器无法给出我们一个正确的frame buffer,这个函数将返回0, 我们最好检查这个函数的返回值,如果函数执行失败,我们将点亮OKLED等,以表示函数运行有误。
	teq r0,#0
	bne noError$

	mov r0,#16
	mov r1,#1
	bl SetGpioFunction
	mov r0,#16
	mov r1,#0
	bl SetGpio

	error$:
	b error$

	noError$:
	fbInfoAddr .req r4
	mov fbInfoAddr,r0
现在我们已经拥有了frame buffer info的地址,我们需要从中得到frame buffer的指针地址,即frame buffer point, 以便我们可以直接绘制图形到屏幕上。 我们使用两个循环函数来完成绘制过程,一个循环绘制成行的像素点,另一个函数绘制成列的像素点。 在Raspberry Pi上,事实上,在几乎所有的应用程序中,图像的存储方式都是从左至右,从上而下的,我们的函数就是按照这样的方式来绘制图形的。
	render$:
	fbAddr .req r3
	ldr fbAddr,[fbInfoAddr,#32]

	colour .req r0
	y .req r1
	mov y,#768
	drawRow$:
	x .req r2
	mov x,#1024
	drawPixel$:
	strh colour,[fbAddr]
	add fbAddr,#2
	sub x,#1
	teq x,#0
	bne drawPixel$

	sub y,#1
	add colour,#1
	teq y,#0
	bne drawRow$

	b render$

	.unreq fbAddr
	.unreq fbInfoAddr
这里有很多代码,loop里嵌套的loop里还有loop, 为了让你更便于浏览这些代码,我在这里使用了适当的缩进,用以标明不同的loop级别。 在高级编程语言里,使用缩进很常见,汇编代码中也支持缩进,因为编译器会自动去除tab缩进符。 我们看到代码中首先先我们往frame buffer地址中加载入frame buffer消息结构,然后循环设置一行的像素点,也就是说,给这一行里的每一个像素点分别赋值。在每个像素点,我们使用一条strh(存储高位字)指令用于存储当前的颜色信息,而后对我们当前所写入的地址执行加1操作。写完一行以后,我们对绘制的颜色执行加1操作。写完整个屏幕后,我们将跳转回开始点重新执行。
strh reg,[dest]将寄存器reg中的低半字存入dest给定的地址中。
###6. 曙光初现
现在你可以在Raspberry Pi上测试你的代码了。你将看到一个不断变化的渐变色屏幕。注意:在发送第一个消息给mailbox前,Raspberry Pi在四个角上显示一个静止的倾斜样式。如果你碰到问题,请参阅troubleshooting页面。
如果你成功运行了本章例程,恭喜你!现在你学会控制屏幕了!你可以修改代码以便在屏幕上画出任何你想要的样式。你可以自己定义出一些好看的显示样式,你可以直接计算每个像素的值,因为y包含了y坐标,x包含了x坐标,你定义的点可以直接显示在屏幕上。 下一课中也就是烤派宝典第7章之Screen02中,我们将学习一种常见的绘制方法,画直线。
Nov 11, 2013
Technology#烤派宝典第四章之OK04
OK04 这一章基于OK03,将教会你如何使用定时器(timer)来精确控制’OK’或’ACT’灯的闪烁频率。我们假设你已经拥有了烤派宝典第三章之OK03中的代码和知识储备作为基础。
###新的设备
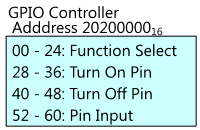
到现在为止,我们已经杰出倒了Raspberrry Pi中的一个硬件,也就是GPIO控制器。在前面的章节中,我只是告诉了你现成的答案,需要做什么,里头的主要原理。现在我们来看看一个新的设备,定时器,这回我将手把手教会你如何从硬件手册中理解其工作方式。
和GPIO控制器一样,定时器也有一个地址。在我们的例子中,定时器的地址在2000300016, 通过阅读手册,我们能找到下面的表格:
定时器是Raspberry Pi上唯一可以保存时间的方式。大多数计算机在主板上都有电池驱动的RTC模块用于在掉电时保持时间。但是Raspberry Pi为了降低成本,去掉了这一部分电路。
  <th>大小 / Bytes</th>

  <th>名字</th>

  <th>描述</th>

  <th>读/写</th>
</tr>
  <td>4</td>

  <td>控制/状态</td>

  <td>用于控制和清除定时器通道比较位
  </td>

  <td>RW</td>
</tr>

<tr>
  <td>20003004</td>

  <td>8</td>

  <td>定时器</td>

  <td>一个以1MHz递加的定时器。</td>

  <td>R</td>
</tr>

<tr>
  <td>2000300C</td>

  <td>4</td>

  <td>比较值 0</td>

  <td>第0个比较值寄存器</td>

  <td>RW</td>
</tr>

<tr>
  <td>20003010</td>

  <td>4</td>

  <td>比较值 1</td>

  <td>第一个比较值寄存器.</td>

  <td>RW</td>
</tr>

<tr>
  <td>20003014</td>

  <td>4</td>

  <td>比较值 2</td>

  <td>第二个比较值寄存器.</td>

  <td>RW</td>
</tr>

<tr>
  <td>20003018</td>

  <td>4</td>

  <td>比较值 3</td>

  <td>第三个比较值寄存器.</td>

  <td>RW</td>
</tr>

表格里包含了很多信息,但是手册里关于每个域的解释更为详尽。手册里的说明显示定时器每一微秒增加1. 每次增加1时,它将比较自身的值和最低的32位(4 byte)中的4个比较寄存器, 如果附和它们中的任何一个,就将更新控制/状态寄存器以表征时间匹配。
更详细的关于bits/bytes/bit field和数据大小的解释如下:
一个bit是单个的二进制数字位,回忆一下,单个二进制位只能有两种取值,0或者1。 一个byte是我们取给8个bit集合的名称。因为每个bit只能有两种取值,一共有2的八次方,一共256个不同的取值。我们经常理解为0到255之间的任一值。 下图是GPIO函数选择控制器0的表征。一个bit域可被理解为二进制位,除了可以被理解为数字外,二进制可以表征更多的事物。比如,我们可以用二进制来表征开关的开(1)/关(0)状态。 我们已经在GPIO控制器中接触到了比特域表征的值,用于描述一个管脚的开/关。 有时候我们需要表征更多的状态,我们就可以将很多个比特位链接起来,如图所示。比如GPIO控制函数的设置,图中所示,在图中每一个3字节的位对应控制一个GPIO的管脚函数。

我们的目的是实现一个可以输入等待时间值的函数,函数读取等待时间值后将在等待完相应的时间间隔后而后返回。 在实现前根据我们现有的材料,思考一下该如何实现它。
在我看来有两种方法可以实现:
- 从计数器中读入数值,然后通过分支跳转到同样的代码中,等待,直到计数器中的值大于设定的值。
- 从计数器中读入数值, 增加已经等待过的时间,将其存放在某一比较寄存器中,而后分支跳转回同样的代码中,直到控制/状态寄存器更新。
两种策略都可以工作得很好,但是在本章中我们只实现第一种方法。原因在于,比较寄存器很容易出错,因为在将等待时间储存到比较寄存器的过程中时,计数器可能会增加值,以至于不能匹配。这可能引发会在请求1微s(microsecond)的等待时间无意中引发出过长的等待间隙(或者,更糟的是,0微s, 0 microsecond的等待时间)。
这种情况被称之为并发行问题,几乎是不可被修复的。
###实现
这里我将实现wait方法的挑战留给你。 我建议你在名为’systemTimer.s'的文件中放入所有你操作定时器的代码。 这个挑战中的难点在于计数器是8byte长度的,但是每个寄存器只能储存4个byte, 因而我们需要把寄存器的值分为两部分。
下列的代码供参考:
ldrd r0,r1,[r2,#4]
ldrd regLow,regHigh,[src,#val] 从src地址加上val的内存中取出来8个byte,将其分别放入regLow和regHigh中。
上面这条指令对你很有用处。它将一个8byte的值分配到两个寄存器中。在这个例子中,r2寄存器中存储的地址起始的8个byte的内存将被分别拷贝给r0和r1。 有点儿复杂的是这种分配方式中,r1中将存储到高的4个byte,距离来说,如果一个计数器的值是十进制的999,999,999,999 = 也就是二进制的1110100011010100101001010000111111111111, 那么r1中的值会是 111010002, r0 则包含剩下的 110101001010010100001111111111112.
大型操作系统通常在执行等待函数时,在后台运行程序以充分利用CPU。
最明智的方式是计算出当前计数器的值,减掉函数调用时的值,用这个结果和我们设定的值作比较,以确定等待的结束。为了更方便使用,除非我们支持8个byte长度的等待时间,否则我们可以把例子中r1存储的值忽略,只考虑低4个byte。
等待的过程中你应该总是记得比较大于值,而不是相等的值。因为你可能等不到那个刚好的值,错过了那个时间点,你就只能一直等在那里了。
如果你不知道如何编写wait函数代码,请点击一下链接:
waitfunction
###另一个闪烁灯版本
当你觉得自己的等待函数可以工作时,更改’main.s'来使用它。更改r0的值为一个很大的数字(记住这个值表征的是微秒), 然后在你的Raspberry Pi上验证之。如果有任何问题,请参阅troubleshooting页面。
如果你成功了,恭喜你已经掌握了另一种设备,定时器。在下一章,也就是OK系列的最后一章,烤派宝典第五章之OK05中我们将学会如何在LED按预设的模式进行闪烁。
Nov 9, 2013
Technology###Table in Markdown
Table in markdown can be represent like following:
	| Tables        | Are           | Cool  |
	| ------------- |:-------------:| -----:|
	| col 3 is      | right-aligned | $1600 |
	| col 2 is      | centered      |   $12 |
	| zebra stripes | are neat      |    $1 |
Or we can use the pure html code:
	<table>
	    <tr>
	        <td>Foo</td>
	    </tr>
	</table>
By both method we can create our own table.
###Display Table in Octopress
By default, table won’t be displayed in octopress, this is because we don’t provide the corresponding css file to table. we have first to add the css file under source/sytlesheets/data-table.css:
* + table {
  border-style:solid;
  border-width:1px;
  border-color:#e7e3e7;
}

* + table th, * + table td {
  border-style:Trustyed;
  border-width:1px;
  border-color:#e7e3e7;
  padding-left: 3px;
  padding-right: 3px;
}

* + table th {
  border-style:solid;
  font-weight:bold;
  background: url("/images/noise.png?1330434582") repeat scroll left top #F7F3F7;
}

* + table th[align="left"], * + table td[align="left"] {
  text-align:left;
}

* + table th[align="right"], * + table td[align="right"] {
  text-align:right;
}

* + table th[align="center"], * + table td[align="center"] {
  text-align:center;
}
Then we can add the following line in source/_includes/head.html:
<link href="/stylesheets/data-table.css" media="screen, projection" rel="stylesheet" type="text/css" />
By now we can see the tables as following:
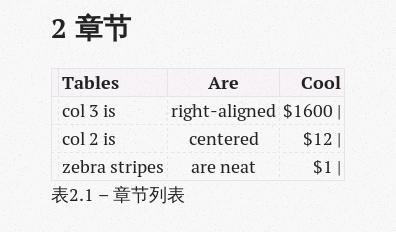
Table Processing in vim
Install htmltidy via:
$ pacman -S tidyhtml
Add following lines into your own ~/.vimrc
	:vmap ,x :%!tidy -q -i --show-errors 0<CR>
	:command Thtml :%!tidy -q -i --show-errors 0
	:command Txml  :%!tidy -q -i --show-errors 0 -xml
Open your vim and type in:
:Thtml
by now you can get tidy html.
Nov 9, 2013
Technology#烤派宝典第一章之OK01
OK01 这一章内容涉及了如何起步,并将教会你如何点亮Raspberry PI开发板上的’OK’或是’ACT’ LED灯,这个LED灯靠近RCA和USB口。这个LED灯最开始被命名为OK,在Raspberry Pi第二版时它被改名为ACT。
###1 起步
此时此刻我假设你已经访问了下载页面,并架设好了必要的GNU工具链。下载页面上有一个名为OS Template的文件,请下载并解压到一个新的目录。
###2 开始
现在你已经解压开了模板,接下来请在’source'文件夹下创建一个名为’main.s'的新文件。这个文件将包含这个操作系统的代码。特别指明一下,现在你的目录结构看起来应该如下:
	build/
	   (empty)
	source/
	   main.s
	kernel.ld
	LICENSE
	Makefile
‘.s'文件扩展名可以在所有的汇编语言格式中被使用,但是我们要时刻记住现在是在ARMv6架构中写程序。
在文字编辑器中打开’main.s'文件,开始敲入汇编代码。Rapberry Pi使用的汇编代码类型被成为ARMv6, ARMv6这就是我们需要写入的代码类型。
粘贴以下代码:
.section .init
.globl _start
_start:
敲入的这几行代码不能让Raspberry Pi做任何事,它们只是传递给汇编器的指令而已。汇编器是一个用于在人类可理解的汇编代码和Raspberry Pi能理解的二进制代码之间做转换的一个程序。在灰白你代码中,每一行都是一个新的命令。第一行告诉汇编器在哪里放置我们的代码。我提供的模板使得.init部分的代码被放置到输出文件的起始部分。这很重要,是因为我们需要确保能控制哪一段代码应该首先被执行。如果我们不指定代码的执行顺序,以字母顺序排列的代码将第一个被运行!.section命令用于告诉汇编器将代码放入哪一部分,从这一行起直到文件结尾。
接下来的两行用于移除警告信息,完全可以忽略。
###3 第一行代码
现在我们真正来编点儿代码。在汇编代码中,除非被特别告知,否则计算机将一行一行的执行代码,严格按顺序执行每条指令。每条指令以一个新行开始。
粘贴入以下代码:
ldr r0,=0x20200000
在汇编代码中,你可以插入空行,也可以在行首或行尾加上任意多个空格,这将增强代码的可读性。
这是我们输入的第一条命令。它告诉处理器,将数字0x20200000加载入寄存器r0。这里我需要回答两个问题,什么是寄存器,0x20200000是怎样的一个数字?
寄存器是位于处理器中的一小片内存,用于存储处理器当前用于工作所需的数字。处理器中有很多寄存器,它们中的很多都有着特殊的含义,之后我们将慢慢见识到。最重要的寄存器有13个(分别被命名为r0,r1,r2,…,r9,r10,r11,r12),它们被称之为通用寄存器,你可以用它们来执行任何你想让其执行的运算。由于这是我们的第一个程序,这里我使用了r0,其实我可以使用r0~12之中的任意一个。只要你愿意,你用哪个都可以。
0x20200000实际上就是个数字。然而它被写成了十六进制记数法的格式。如果你想了解更多的关于十六进制的知识,请点开下面的参考:
十六进制解释
ldr reg,=val用于将数字val加载入名为reg的寄存器中。
在Raspberry Pi上,单个寄存器可以存储0到4,294,967,295之间的任意数字,这个数看起来很巨大了,事实上不过区区32个二进制位而已。
我们的第一条命令将十六进制数0x20200000加载入了r0寄存器。这听起来似乎没什么多大用处,但事实上用处大大。计算机中,有着意想不到的大块大块的内存和设备可以用于访问。为了可以访问到这些硬件,我们需要给它们每个一个地址。就好比邮寄地址或是互联网上的域名一样,我们用地址来标明计算机可访问到的每一个硬件设备或是每一块内存。地址在计算机中就是数字,20200000这个十六进制地址恰好是Raspberry Pi的GPIO控制器的硬件地址。它由硬件制造商所决定,硬件制造商可以指定出任何一个可能的地址(前提是这个地址和别的设备地址不冲突)。我知道0x20200000这个地址是因为我阅读了硬件手册,在地址这个话题上,没有特殊的系统(任何一个系统上它们都是大块大块的十六进制数字)。
###4 使能输出
读完手册里的对应部分后,我们知道现在应该传递两条消息给GPIO控制器。我们需要用它的语言和它交谈,只要它理解了,它就能乖乖的照我们所指示的去做,点亮板子上的OK LED。幸运的是,GPIO控制器是个很简单的芯片,只需要几个数字就能让它明白自己该做什么。
	mov r1,#1
	lsl r1,#18
	str r1,[r0,#4]
这几行代码激活了第16个GPIO口的输出。首先我们往r1中存入一个值,而后将它传递给GPIO控制器。这里我们用了两条指令用于设置r1中的值,其实我们可以像前面一样使用ldr指令来一步到位设置好。但是为了以后的课程中我们能随心所欲的设置/控制任意给定的GPIO口值,我们这里稍走几步弯路,使用公式来直接推导出相应的值,而不是直接写上。OK LED连接在第16个GPIO口上,因而我们需要传送命令以激活第16个GPIO口的输出。
mov reg,#val 用于将数字val放入名为reg的寄存器中。
lsl reg,#val 用于将寄存器reg中二进制表示的数字左移val个位置。
str reg,[dest,#val] 用于将reg中的数字存储在由dest+val指定的地址中。
r1中存储的数值是用来激活LED口的。第一行将十进制的1放入寄存器r1中。mov指令要比ldr指令快得多,因为它不会涉及到与内存交互,而ldr则需要从内存中加载我们需要传递给寄存器的值。但是,mov只能被用来加载常值。在ARM汇编语言中,几乎所有的指令都以三个字母开头。这种命名规则被称之为助记符,可用于提示该条指令的实际用途。比如mov是move(移动)的缩写,ldr则是load(加载)寄存器的缩写。mov移动第二个参数#1到第一个参数r1寄存器中。通常来说,#必须被用于表示数字,但是我们已经见到过反例了。
第二条指令lsl,被称之为逻辑左移(logical shift left)。它表示将二进制表示的第一个参数逻辑左移,移动的参数由第二个参数指定。在这里我们逻辑左移十进制表示的1(二进制表示要是1) 18个位置(结果是1000000000000000000,也就是十进制的262144)。
如果你对二进制不熟悉,你可以参考这里:
二进制解释
再提一次,我知道18这个数值,还是通过阅读硬件手册得来的。手册上说,由GPIO控制器中共24比特的比特集合的值,以决定GPIO管脚的配置。前4个比特集与前10个GPIO口相关,第二个4比特集则与后10个GPIO口相关,依此类推。Raspberry Pi上存在一共54个GPIO口。既然我们需要定位到第16个GPIO口,我们就需要使用第二个4比特集合,因为我们所需要处理的GPIO口落在10-19这个范围内,我们需要这个范围内的第6个值,再乘以3个位(bits),所以结果就是18(18==6*3),这就解释了为什么在上面的代码中我们需要设置#18的值给r1。
最后一条指令str ‘store register'代表存储寄存器值,它将第一个参数中存储的值,即寄存器r1里的值,存储到第二个需要通过计算才得来的表达式中。这个表达式可以是一个寄存器,在我们的例子中是r0,我们知道这个值是GPIO控制器的地址,和另一个数值相加所得出的结果,在我们的例子中,这个数值是#4.这意味着我们对GPIO控制器的地址加4,并将r1中存储的数值写入了这个地址。这个被写入的地址恰恰是我在上一段中提到的,第二个4比特集合中对应的位置,就这样我们把第一条消息传递给了GPIO控制器,告诉它把第16个GPIO管脚设置为输出(output)状态。
###5 生命的迹象
现在LED已经准备好,只差一步就能点亮了,让我们来点亮它!完成这一步意味着我们需要发送一条消息给GPIO控制器以将16管脚关闭。是的,关闭。芯片制造商决定了要将LED点亮就需要将GPIO口置为关闭(off)状态。硬件工程师似乎经常我行我素的做乱七八糟的决定,似乎只是为了让操作系统开发人员跟在他们屁股后头闻尾气。这里你需要特别注意下,千万别弄错了。
	mov r1,#1
	lsl r1,#16
	str r1,[r0,#40]
希望这时候你已经能对上面的命令熟视无睹了,不用考虑他们的值。第一条指令用于将1放入寄存器r1中。第二条指令将1以二进制的表示形式左移16位。因为我们需要将16口置为关闭(off)状态,我们需要在下一条消息的第16个位上置1,其他的值则是用于控制别的管脚。然后我们将它写入到GPIO控制器以后加上40的地址上,这个地址可以被用于写入,以控制管脚的关闭(GPIO控制器后28的地址可以将管脚置为接通状态)。
###6 从此过上幸福的生活
现在该试着结束了,但是不幸的是处理器并不知道我们该结束了。事实上,处理器是永远不会停摆的。只要它被加电,它就一直工作。既然如此,我们就需要给它一个持续执行的空任务,否则Raspberry Pi就会崩溃(在这个例子中问题不大,反正OK灯打开了就一直会亮着)。
	loop$:
	b loop
代码的第一行在这里不是指令,只是个标号而已。它标明下一行的名称为loop$。这标明在以后的代码中,我们就可以使用这个标号来引用该行了。这个标号被称之为label。标号在变成二进制代码时候会被省略,但它能方便我们随时引用需要引用的行数,或者数字(常用于标识地址)。按照惯例,我们使用$符号用于表示标号,作用范围也仅仅在当前文件中,对全局程序不会构成影响。b(branch分支)命令用于指示下一行后执行标号指定一行的内容,而不是b的当前行位置的后一行。由于使用了b,这一行代码会被反复执行,直到天长地久海枯石烂。这样处理器就被卡在一个完美的无限循环状态,直到被安全断电为止。
代码块后的新行需要特别注意。GNU工具链希望每一个代码文件都以空行结束,以确保你真正写完了改写的代码,文件也不应该被截断。如果你不多加个新行,你可能会在编译时收到汇编器给出的警告信息。
命名:标识下一行的名字为name.
b label使得下一行被执行到label所在的行数。
###7 Pi 登台
好了,代码写完了,接下来我们请出来Pi。在你的开发机上打开一个终端程序,切换到当前工作目录的父目录下,敲入make,回车。如果一切顺利,你将得到一个kernel.img文件。如果你遇到任何错误,请参考troubleshooting章节。kernel.list文件是你刚才写入的汇编代码经过编译后实际得到的行数。在将来它可以被用来检查到底你做对了哪些事情。kernel.map文件则包含了所有label的起始位置,可用于跟踪变量。
要安装你的操作系统,首先你应该准备一张已经烧写好Raspberry PI操作系统的SD卡。如果你浏览SD卡中的文件,你将看到一个名为kernel.img的文件。将它重命名为另一个名字。然后拷贝我们生成的kernel.img到SD卡的对应位置下。这意味着我们把Raspberry Pi上的操作系统换成我们刚刚写出来的操作系统了。如果要用回原来的操作系统,我们只需要删除自己的kernel.img文件,换回刚才备份好的那个文件就好。我发现随时保留一个原始 Raspberry Pi操作系统的镜像是很有必要的,这样我们随时可以回滚到安全的状态下。
将SD卡插入Raspberry Pi,加电。OK LED灯现在应该亮起来了。如果没有亮,请查阅troubleshooting页面。如果成功了,恭喜你,你已经写出了你的第一个操作系统。接下来你可以学习烤派宝典第2章之OK02,这一课将教会你如何让LED一闪一灭。
Nov 9, 2013
Technology#烤派宝典第三章之OK03
OK03 这一章基于OK02,将教会你在汇编语言中如何使用函数,函数的引入将使得汇编代码可用性大大提升,并提升代码的可读性。开始本章之前,我们假定你已经有了烤派宝典第二章之OK02的代码作为基础。
##1 可重用的代码
迄今为止我们写操作系统时代码都是硬生生敲进去的。对于小程序而言无所谓,但倘若我们要把整个系统用这种方式写出来,代码将变得完全不可读。解决方案是我们将使用函数。
有关函数的解释:
函数是一小段用于计算出特定答案的、可重用的代码,或者它可以执行一个特定的动作。你可能听过它的不同叫法,例如procedures, routines, subroutines。 这些叫法没有本质上的差别,也没有特定的标准叫法。 你可能早就在数学课上接触过函数的概念了。比如余弦函数将根据给定的角度计算出一个介于-1和1之间的值。我们用标号cos(x)来表明这是参数为x的函数。在代码中,函数能拥有多个输入值(也可以无输入值),这可能会有点副作用。比如一个函数可能能完成多个功能:在文件系统上创建一个文件,读入标准输入,保存命名之。
在高级语言譬如C或C++中,函数是语言本身的概念。但是在汇编语言中,函数就是我们所拥有的想法。

理想情况下,我们设想给寄存器某些输入值,而后程序分支跳转到另一地址,执行完该地址的代码后将跳转回代码分支执行的地方,这时候寄存器中会得到输出值。这就是汇编语言中的函数执行流程。难点在于我们如何系统化组织和设置寄存器。如果我们使用我们所能想象到的方式来组织,那么每个程序员所撰写的代码都会变得难以理解。对于编译器而言,如何组织设置寄存器是无所谓的话题,因为它们压根就不知道如何使用函数。为了避免混淆,一种叫ABI(Application Binary Interface,二进制程序接口)的标准被引入,这是任何一种汇编语言中的约定俗成,规定了函数应该如何被运行。如果每个程序员都按照同样的方式来创建函数,那么所有的函数都可以被别人使用。在这里我会讲解这一标准,而且从现在开始我敲入的所有函数代码都将适应这一标准。
标准定义如下:寄存器r0,r1,r2,r3将被依次被用作函数的输入。如果函数无输入值,这些寄存器值就都可以被忽略。如果需要一个参数,则把参数放入r0中。如果需要两个参数,则第一个参数放入r0中,第二个参数放入r1中,依此类推。输出值将被放入r0中。如果函数无输出值,那就可以忽略r0里的值。
此外,标准还要求,函数运行完毕后,r4到r12必须保持函数运行前的取值。这意味着当你调用一个函数时,可以确认的是r4到r12的值不会发生变化,但是对r0到r3的值,我们就没法确保了。
函数通常被称之为“黑盒子”,我们输入值,然后得到输出值。但是我们不知道黑盒子内部是如何工作的。
函数执行完毕后需要回到函数被调用的起始点。这意味着我们必须知道代码是从何处被调用的。为方便起见,有一个特殊寄存器,名为lr(link register,链接寄存器),它总是用于记住指令调用该函数后的地址。
  <th>概述</th>

  <th>是否保留</th>

  <th>规则</th>
</tr>
  <td>参数和结果</td>

  <td>No</td>

  <td rowspan="2">r0 和 r1被用作传递第一个和第二个参数给函数,并存储在函数中返回的值。如果函数无返回值,则他们的值可为任意值。
  </td>
</tr>

<tr class="highlightRow1">
  <td>r1</td>

  <td>参数和结果</td>

  <td>No</td>
</tr>

<tr>
  <td>r2</td>

  <td>参数</td>

  <td>No</td>

  <td rowspan="2">r2 和r3被用于传递第3个参数起的两个参数给函数。当函数被运行了,它们可以被改变为其他任意值。
  </td>
</tr>

<tr>
  <td>r3</td>

  <td>参数</td>

  <td>No</td>
</tr>

<tr class="highlightRow1">
  <td>r4</td>

  <td>通用</td>

  <td>Yes</td>

  <td rowspan="9">r4 到 r12被用作工作值,他们的值在函数调用前后保持一致。
  </td>
</tr>

<tr class="highlightRow1">
  <td>r5</td>

  <td>通用</td>

  <td>Yes</td>
</tr>

<tr class="highlightRow1">
  <td>r6</td>

  <td>通用</td>

  <td>Yes</td>
</tr>

<tr class="highlightRow1">
  <td>r7</td>

  <td>通用</td>

  <td>Yes</td>
</tr>

<tr class="highlightRow1">
  <td>r8</td>

  <td>通用</td>

  <td>Yes</td>
</tr>

<tr class="highlightRow1">
  <td>r9</td>

  <td>通用</td>

  <td>Yes</td>
</tr>

<tr class="highlightRow1">
  <td>r10</td>

  <td>通用</td>

  <td>Yes</td>
</tr>

<tr class="highlightRow1">
  <td>r11</td>

  <td>通用</td>

  <td>Yes</td>
</tr>

<tr class="highlightRow1">
  <td>r12</td>

  <td>通用</td>

  <td>Yes</td>
</tr>

<tr>
  <td>lr</td>

  <td>返回值</td>

  <td>No</td>

  <td>lr 中存储了函数完成时需要跳转回的地址,这个值在函数完成前保持不变.
  </td>
</tr>

<tr class="highlightRow1">
  <td>sp</td>

  <td>栈指针</td>

  <td>Yes</td>

  <td>sp 是栈指针寄存器,描述如下。它的值需要保持到函数执行完后。
  </td>
</tr>
通常函数运行时需要更多的寄存器,而不是仅仅局限于r0到r3,因为r4到r12的值需要在函数运行前后保持一直,在使用前我们就必须将它们保存到某个特定地方,这个特定的地方被称之为栈(Stack)。
栈是我们在计算机中用于存储数值的一个比喻。就像一叠盘子,你只能在这一堆盘子的顶部取走盘子,或者添加新的盘子到顶部。 在函数运行时候使用栈来存储寄存器数据是一个绝佳的主意。比如如果我有一个函数需要存储寄存器r4和r5的值,那我就可以直接将这些寄存器的值放到栈的顶部。调用完函数后再从栈中将其送回。更聪明的如果我在函数里又调用了另一个函数以便完成某些操作,我仍然可以将当前的寄存器值继续送到栈中,运行完再取回。反复的压栈和取栈操作并不会影响到r4和r5所存储位置的值,每次新的压栈都会被添加到栈的顶部,而后从同样的位置被移除。 我们用来在栈里存放数据的方法用术语来讲就叫“stack frame(堆栈桢)”。并不是每个函数都需要用到堆栈桢,有的函数压根儿就不需要保存数值。
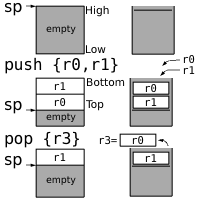
由于栈如此有用,在ARMv6指令集中我们可以直接设置它。一个特殊的寄存器叫sp(stack pointer,栈指针)用于专门存放栈地址。当有新的条目被添加到栈中时,栈指针寄存器将更新其内容,以确保永远指向第一个条目的地址。push{r4,r5}这条指令将会把r4和r5放入到栈的顶部,pop{r4,r5}将把这两个条目从栈中取回(按正确的顺序取回)。
##2 第一个函数
现在我们已经知道函数是如何工作的了,让我们来写一个函数。作为第一个最基础的例子,我们要写一个没有输入的函数,输出则是GPIO地址。在上一章里,我们已经写入了这个值,但最好还是用函数来实现,因为在一个操作系统中我们需要频繁设置GPIO口的值,但我们不可能每一次都记得该GPIO口的物理地址。
拷贝下列代码到一个新文件中,命名为’gpio.s’。新文件应该在’source'文件夹中,和’main.s'同一级。我们将把所有与GPIO控制器相关的函数都放在这个文件中,以方便我们查找。
	.globl GetGpioAddress
	GetGpioAddress:
	ldr r0,=0x20200000
	mov pc,lr
这是一个很简单而完整的函数。.global GetGpioAddress命令是传递给汇编器的消息,这使得GetGpioAddress在所有的文件里都可见。也意味着在main.s文件里我们可以跳转到GetGpioAddress这个符号,尽管在当前文件中没有定义。
.globl lbl使得标号lbl可以在其他文件中被调用。
你应该已经认识ldr r0,=0x20200000命令了,这条命令将GPIO控制器地址加载入r0寄存器中。这里我们用函数的形式实现,需要把输出放入r0中,所以我们不再像以前一样可以自由使用任何寄存器了。
mov pc,lr将lr寄存器中存储的值拷贝到pc。如以前所说,lr中存储的地址永远是我们执行完函数后需要返回的地址。pc是一个特殊的寄存器,它含有下一条需要运行的指令的地址。正常的跳转命令将改变这个寄存器的值。通过把lr的值拷贝到pc,我们确保了函数执行完后依然可以返回当初调用该函数的下一行执行。
mov reg1,reg2将寄存器reg2中的值拷贝到寄存器reg1中。
一个合理的问题是:实际上我们是如何运行函数中的代码的?我们用一个特殊的跳转指令bl来完成这一点。它跳转到一个标签,就像是正常的分支指令,但是调用这条指令会更新lr的值,使得lr指向分支指令后的紧跟的代码行。更新完lr的值意味着当函数完成时,需要返回的行将是bl指令的下一行。这使得函数的调用和其他命令一样,它被调用,做完需要完成的事情后,继续执行下一行。这是思考函数工作方式时,一个非常有用的思考方式。使用函数时,我们把函数看作是‘黑盒子’,我们不需要考虑它们内部的运行逻辑和工作方式,我们只需要知道其所需要的输入和它们能给出的输出。
现在,别担心使用函数会带来什么坏处了,我们将在下一小节开始使用它们。
##3 一个大函数
接下来我们来实现一个大函数。我们要完成的第一个任务是使能GPIO16管脚的输出。用函数来实现它是一种优雅的方式。我们的代码将调用一个函数和给出一个管脚号,函数将设置该管脚的值。这样以来,我们将可以使用代码来控制任意GPIO口,而不仅仅是LED。
拷贝下列命令到gpio.s中,在GetGpioAddress函数下:
	.globl SetGpioFunction
	SetGpioFunction:
	cmp r0,#53
	cmpls r1,#7
	movhi pc,lr
后缀ls使得该条指令的执行条件限定在:仅仅在第一个数字小于或是等于第二个数字。这两个数字都应该是无符号数字.
后缀hi使得该条命令的执行条件限定在:仅仅在第一个数字大于第二个数字。 这两个数字都应该是无符号数。
我们需要时刻铭记于心的是:既然函数里的代码都是手动输入的,如果它们运行错误该怎么办?在这个例子里,我们的唯一输入是GPIO管脚数字,所以其输入值应该在0到53之间,因为一共只有54个管脚。每个管脚有8个函数,所以0到7是函数代码所能取值的范围。我们可以假定输入都是正确的,但不加检查和限定的代码很危险,因为在实际的硬件上工作时,错误的输入值将导致可能灾难性的后果。因此,在这个例子中,我们希望能对输入的值做安全检查,使得它们都在正确的范围内。
我们需要检查r0<=53和r1<=7。首先,我们需要使用之前我们已经使用过的比较功能,对r0的值和53做比较。就下来,我们调用cmpls,这是一条通用的比较指令,只有在r0小于和等于53的时候才会被运行。如果这一步被执行了,我们接着比较r1和7的值,否则比对结果依然是上一次比对的结果。如果历经比较后,最后一次比对的值大于给定值(r0大于53或者r1大于7),我们将返回到调用函数的起始地址。
这正好是我们想要的结果,如果r0大于53,那么之后的cmpls命令就不会被执行。如果r0小于等于53,cmpls命令才被执行,之后用r1和7作比较,如果r1大于7,movhi会被执行,函数终结。否则movhi不会被执行,这样我们就知道了r0<=53, r1<=7。
ls(小于或相同)和le(小于或相等)之间有微小的差别, hi(大于)和 gt(大于)指令之间也存在细微的差别,我会在后面的章节中提到这一问题。
接着拷贝下列代码:
	push {lr}
	mov r2,r0
	bl GetGpioAddress
这三条命令将用于调用我们之前的第一个方法。push {lr}命令将lr的值拷贝入栈的顶部,以便我们在稍后取回它。这一步是必须的,因为我们需要调用GetGpioAddress函数,调用前,我们需要使用lr寄存器用于存储调用完毕后以便程序返回的地址。
push {reg1,reg2,…}将列表reg1,reg2….中的寄存器拷贝到栈的顶部。只有通用寄存器和lr才可以执行push指令。
如果我们不知道不了解GetGpioAddress的实现细节,那么我们必须假定调用函数会改变r0,r1,r2和r3,那么我们可以将这些值暂存入r4和r5中,因为这些寄存器的值在函数调用的前后不会发生变化。幸运的是,这里我们已经知道GetGpioAddress的实现细节了,我们知道它仅仅改变了r0寄存器的值,而不会影响到r1,r2和r3。 因此,我们只需要将r0的值移出即可,这样就不会在函数调用中被覆盖,我们可以把它暂存入r2中,因为GetGpioAddress函数并不会改动r2的值。
最后我们使用bl指令来运行GetGpioAddress。 通常我们使用名词'调用(call)‘来运行一个函数。之前我们说过,bl在调用函数前会把lr更新为下一条指令的地址后,才分支跳转到函数中去。
bl lbl将lr寄存器指向下一条指令地址,然后跳转执行到标号lbl所示的代码。
当函数调用完毕后,我们可以说函数'返回'了。当GetGpioAddress返回时,我们知道r0寄存器中包含了GPIO地址,r1中包含了函数代码r2包含了GPIO 管脚数。我之前提到过GPIO函数以10的block大小存储,所以首先我们需要确定我们所得到的是在哪一个块中。听起来我们需要完成一个除法,但是除法在处理器中执行起来很慢,这里我们最好使用重复减法。
在上面代码的基础上,拷贝入下列代码行:
	functionLoop$:
	cmp r2,#9
	subhi r2,#10
	addhi r0,#4
	bhi functionLoop$
add reg,#val 将数字val加到reg寄存器所包含的值中去。
这个简单的循环代码比较了管脚号和9, 如果管脚号大于9, 那它将自动减少10,然后把地址在GPIO控制器的基础上加上4后,重新运行检查程序。
这样做的效果是,r2将包含0~9之间的数字,用于表示管脚除以10后的余数。 r0现在则包含了GPIO控制器中关于管脚的地址。效果等同于GPIO控制器基准地址 + 4 x (GPIO管脚号/10)。
最后,在上述代码的基础上,拷贝入下列代码行:
	add r2, r2,lsl #1
	lsl r1,r2
	str r1,[r0]
	pop {pc}
这几行代码完成了这个函数。第一行实际上是将数字乘以3. 乘法在汇编代码中执行起来很慢,因为电路需要很长时间才能运算出答案。有时候,使用某些指令能更快的得到结果。 在这个例子中,我知道r2x3的结果相当于r2x2+r2。 将r2乘以2的操作实际上就是将二进制表示的数字左移一位。
reg,lsl #val将二进制表示的reg中的值左移val个位。这个移位操作在使用它之前就会做完。
ARMv6汇编语言的一个很有用的特性是能够在使用一个数字前将其做偏移。在这个例子中,我将r2加上了r2二进制表示下左移一行以后的结果。在汇编代码中,我们可以使用这样的技巧以便使得更容易得到计算结果,如果你觉得这样实现起来不舒服,你仍然可以使用传统的方式来实现,比如: mov r3,r2; add r2,r3; add r2,r3.
lsl reg,amt 将二进制表示的reg中的值左移amt个位置。
现在我们将r1的值左移r2的位置。大多数诸如add和sub的指令有一个使用寄存器而不是使用数值的变体。我们运行这条shift指令是因为我们需要设置管脚值所对应的比特位, 每个管脚有3个比特位。
我们接下来将计算出的函数地址存储到GPIO控制器中,我们已经在循环中计算出了地址,所以我们不再需要像在OK01和OK02中使用便移了。
str reg,[dst]和str reg,[dest,#0]作用效果相同。
最后,我们从这个函数调用中返回。 因为我们以前曾把lr放入了栈中,如果我们将pc取出, 它将拷贝上一次我们放入栈中的lr值。这和mov pc,lr这条指令执行的效果是一样的, 执行完这一行后,函数调用就返回了。
pop {reg1,reg2,…} 将值从栈顶按顺序取出,仅通用寄存器和pc才可以被pop出。
细心的家伙可以会注意到这个函数实际上是不能正运行的。尽管它设置了正确的数值和GPIO管脚给函数, 但是它导致同一个块中的10个函数的值都变成了0!因为频繁使用了GPIO管脚设置函数,会给系统带来很重的负担。这里我把练习留给你,让你来修正这个错误,使得我们在设置某一个管脚时候,不会影响到别的管脚状态,所做的改动仅限于该管脚对应的3个bit位上。这个练习的解决方案可以在本章的下载页面中找到。可能对你有用的函数包括:计算布尔值的and,用于计算布尔的与,not,计算布尔值的或,orr用于计算布尔值的或。
##4 另一个函数
现在,我们已经有了一个可以用于设置GPIO管脚函数的函数。我们现在需要一个可以用于设置GPIO管脚导通和断开的函数。与其写两个函数来完成这两个功能,不如用一个函数来控制两种状态。
我们将创建一个叫SetGpio的函数,这个函数的第一个输入参数是r0,用于记录GPIO的管脚号,第二个参数用于记录该管脚的取值。如果取值为0,我们将管脚断开,如果是非0值,我们将这个管脚导通。
在文件’gpio.s'的末尾拷贝和粘贴进下列代码:
	.globl SetGpio
	SetGpio:
	pinNum .req r0
	pinVal .req r1
alias .req reg 设置了寄存器的别名为reg。
我们又一次使用了.globl命令用于将这个函数设为全局可访问(可以从其他文件中访问)。这次我们要设置一个寄存器的别名。寄存器别名允许我们使用一个更容易记忆的名字,而不是直接使用晦涩难懂的r0或是r1。现在看起来设置别名不重要,但是在写大的函数体的时候你会发现这一点很有用。现在开始你可以试着使用别名了。 pinNum .reg r0意思是pinNum现在在代码中表示r0。
在上述代码的基础上,拷贝和粘贴下列代码:
	cmp pinNum,#53
	movhi pc,lr
	push {lr}
	mov r2,pinNum
	.unreq pinNum
	pinNum .req r2
	bl GetGpioAddress
	gpioAddr .req r0
.unreq alias 将移除别名alias.
和SetGpioFunction类似,函数开始的第一件事情就是用来检查管脚是否是一个有效值。 我们将首先比较pinNum(r0)值和53, 如果管脚值大于53,函数将立刻返回。 既然我们需要调用GetGpioAddress函数,我们需要在栈中保存lr的值,并将pinNum(r0)的值保存到r2。接着我们使用.unreq声明来移除关于r0的别名。因为管脚取值现在被存储在r2中,我们需要别名映射到它,所以我们在移除r0的同时,新建了一个指向r2的别名。一旦我们不再使用变量别名,第一件事就是将它移除掉,这样在之后的代码中你就不会引用到一个不再使用的别名了。
接着我们调用GetGpioAddress,并创建一个指向r0的别名来表示它。
在上述代码的基础上,拷贝和粘贴下列代码:
	pinBank .req r3
	lsr pinBank,pinNum,#5
	lsl pinBank,#2
	add gpioAddr,pinBank
	.unreq pinBank
lsr dst,src,#val 将二进制形式表示的数字src右移val个位置,并将结果保存在dst中。
GPIO控制器有两个4比特的序列用于控制管脚的导通与截至。第一个序列控制着前32个管脚的状态,第二个序列则控制着剩下的22个。为了确定我们需要哪个序列,我们需要将管脚除以32。除法在这里非常容易,就等同于将二进制格式表示的管脚值右移5个位。 因此,在这个例子中将r3命名为pinBank,并将pinNum/32的值存入其中。因为序列的大小是4个Byte,要得到地址,则需要将pinBank的值乘以4。乘以4这个操作等同于将二进制表示的值左移两个位,这就是lsl pinBank,#2这条指令做的事。你可能会奇怪,为什么我们非要先右移后左移,先右5后左2干嘛不直接右3?答案是如果直接右移3位将不会工作,因为在执行/32的时候,有些值会被截断。而单纯除以8则达不到这个效果。
现在就诶过是gpioAddr会被设置为,如果管脚是0-31时值为2020000016, 如果管脚是32-53时则是2020000416。 这意味着如果我们加上2810,我们将会把管脚导通,加上4010则会把管教截至。我们现在可以不用使用pinBank了,所以用.unreq将其注释掉。
在上述代码的基础上,拷贝和粘贴入下列代码:
and pinNum,#31
setBit .req r3
mov setBit,#1
lsl setBit,pinNum
.unreq pinNum
and reg,#val 计算出reg中数字和val的布尔与运算的结果。
函数的下一部分是生成正确的含有位偏移的数字。为了让GPIO控制器打开和关闭一个管脚,我们需要用该管脚值除以32后得到的余数去设置对应的值。例如,要设置第16个管脚,我们需要在数字的第16位设置位1.为了设置管脚45为1,我们需要将第13位设置为1,原因是因为45/32的余数是13。
与运算指令and可用于计算余数。对两个数进行and运算的结果是只有当两个数的某个位都为1才为1,否则就为0. 这是一个很基本的二进制运算,速度非常快。这里我们给出的输入值是pinNum and 31(10进制的31) = 11111(二进制)。这意味着只有最后5个位置的值会被计入最终结果,因而所得的结果肯定在0~31之间。具体来说,只有为1的位会被计入结果,和除以32的结果是一样的,这不是巧合,因为31=32-1。

接下来的代码使用这个值来将1左移相应的位置。这就创建出了我们所需要的特定的二进制值。
在现有代码的基础上拷贝和粘贴上以下代码:
teq pinVal,#0
.unreq pinVal
streq setBit,[gpioAddr,#40]
strne setBit,[gpioAddr,#28]
.unreq setBit
.unreq gpioAddr
pop {pc}
teq reg,#val 检查reg中的数字是否等于val。
上几行代码是函数的结束。正如前面指明的,如果pinVal的值为0,我们就将管脚断开了,否则意味着管教导通了。teq( test equal,测试相等)是另一条比较指令,只能用于测试相等。它和cmp相似,但是不用用于比较哪个数字更大。如果你要做的只是比较两个数字是否相等,你可以直接使用 teq指令。
如果 pinVal的值为0,我们将调用setBit在GPIO基准地址40, 这能将管脚设为断开状态。否则我们将其放置于GPIO基准地址28的地址,这能将管教置为导通。最后,我们通过从栈中压出之前保存的值,从而返回。
##5 新的开始
最后,我们终于拥有了自己的GPIO函数。现在我们修改’main.s'以使用它。因为’main.s'现在变得越来越大,结构也越来越复杂,我们最好将它分成两个部分。‘init'部分我们已经使用过,保持它越小越好。以便我们将来修改的方便,修改完立马就可以看到结果。
将下列代码插入到main.s文件中_start: 之后:
b main

.section .text
main:
mov sp,#0x8000
我们这里的主要修改在于引入了.text部分。在我的makefile和链接脚本中,.text部分(即默认部分)中的代码会被放置在.init部分之后,位置在800016。这是默认的加载地址,给了我们用于存储栈的空间。因为栈存在于内存中,它需要有一个地址。栈在内存中从上向下增长, 这样每一个新插入的值都拥有最低的地址,这就是栈的"栈顶”, 越靠近栈顶,地址越低。
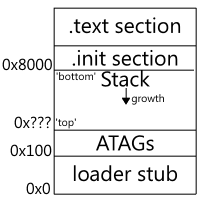
图中的 ‘ATAGs'部分存储了Raspberry Pi硬件相关的信息,譬如,板载内存大小,默认的屏幕分辨率,等等。
将上一章中用于设置GPIO管脚的代码换成下列代码:
	pinNum .req r0
	pinFunc .req r1
	mov pinNum,#16
	mov pinFunc,#1
	bl SetGpioFunction
	.unreq pinNum
	.unreq pinFunc
以上代码调用了SetGpioFunction函数,参数为管脚号16,管脚函数名为1.这使得该管脚置为输出状态。
把上一章中用于点亮OK LED的代码替换为下列代码:
pinNum .req r0
pinVal .req r1
mov pinNum,#16
mov pinVal,#0
bl SetGpio
.unreq pinNum
.unreq pinVal
上述代码调用SetGpio以关闭GPIO管脚16。,从而点亮OK LED。如果我们使用mov pinVal, #1,那么LED将熄灭。把你之前用于点亮LED的代码换成上述代码。
##6 前瞻
希望到现在,你可以在Raspberry Pi上测试完上面写完的代码。这一章我们写了很大一块代码,免不了我们会碰到各种乱七八糟的错误。如果你遇到了,请参考troubleshooting页面。
如果你使用本章代码成功点亮了你的OK LED,恭喜你!对比于烤派宝典2之OK02而言,我们所做的事情效果一样,但是我们接触到了许多新的概念,譬如函数和格式,我们还学会了如何写出更块的函数的特性。现在稍微修改修改我们代码,指向不同的GPIO寄存器,就能让我们的操作系统更为完善,通过控制不同的GPIO寄存器,我们可以自由控制任何想控制的硬件。
在下一章OK04中,我们将引入更为精确的定时函数,这样我们可以更好的控制LED,最终我们将玩转所有的GPIO口。
