Jul 19, 2023
TechnologyInstall the server via :

关机后,在host机器上,:
apt install -y docker.io guestfish
qemu-img convert -f qcow2 -O raw  uos10G.qcow2 uos10G.img
guestfish -a uos10G.img --ro

Welcome to guestfish, the guest filesystem shell for
editing virtual machine filesystems and disk images.

Type: ‘help’ for help on commands
      ‘man’ to read the manual
      ‘quit’ to quit the shell

><fs> run
><fs> list-filesystems
/dev/sda1: ext4
/dev/sda2: ext4
><fs> mount /dev/sda2 /
><fs> mount /dev/sda1 /boot
><fs> tar-out / - | xz --best >> myuos.xz
><fs> exit
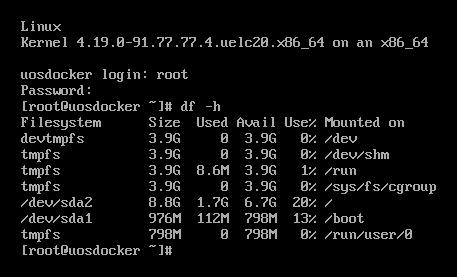
 cat myuos.xz | docker import - uoskkk
root@delli9:~# docker images
REPOSITORY   TAG       IMAGE ID       CREATED          SIZE
uoskkk     latest    2fb3905a142f   18 seconds ago   1.68GB
run into docker instance via:
root@delli9:~# docker run -it uosctyun:latest /bin/bash
[root@8d94931f1eb0 /]# cat /etc/issue
\S
Kernel \r on an \m
[root@8d94931f1eb0 /]# cat /etc/uos-release
UOS Server Enterprise-C 20
[root@8d94931f1eb0 /]# yum makecache
使用方法, 绿色版安装docker:
[root@uos ~]# tar xzvf docker-24.0.2.tgz
docker/
docker/docker-proxy
docker/containerd-shim-runc-v2
docker/ctr
docker/docker
docker/docker-init
docker/runc
docker/dockerd
docker/containerd
[root@uos ~]# mv docker/* /usr/bin
[root@uos ~]# dockerd&
在另一个终端上启动容器实例:
[root@uos ~]# cat myuos.xz | docker import - uosxj
sha256:e09cca9384977ce87a05d50a50134a8fa44607b19f4586222b835916dddb24a0
[root@uos ~]# docker images
REPOSITORY   TAG       IMAGE ID       CREATED          SIZE
uosxj        latest    e09cca938497   40 seconds ago   1.68GB
[root@uos ~]# docker run --privileged -it uosxj /bin/bash
[root@0bb3783f7e1e /]# yum makecache
[root@0bb3783f7e1e /]# yum install -y qemu-kvm-ev
[root@0bb3783f7e1e /]# /usr/libexec/qemu-kvm  --version
QEMU emulator version 2.12.0 (qemu-kvm-ev-2.12.0-45.uelc20_2.01)
Copyright (c) 2003-2017 Fabrice Bellard and the QEMU Project developers
Jul 3, 2023
TechnologyCreate 3 disk files:
 qemu-img create -f qcow2 -b win.qcow2 -F qcow2 vm1.qcow2
 qemu-img create -f qcow2 -b win.qcow2 -F qcow2 vm2.qcow2
 qemu-img create -f qcow2 -b win.qcow2 -F qcow2 vm3.qcow2
Create vm1/vm2/vm3.
Start and detect the spice:
netstat -anp | grep 590
tcp        0      0 0.0.0.0:5902            0.0.0.0:*               LISTEN      7307/qemu-system-x8
tcp        0      0 0.0.0.0:5900            0.0.0.0:*               LISTEN      6813/qemu-system-x8
tcp        0      0 0.0.0.0:5901            0.0.0.0:*               LISTEN      7101/qemu-system-x8
Jul 1, 2023
Technology目的
GRUB(Grand Unified Bootloader)是一个用于引导和加载操作系统内核的工具,也是基于Linux内核的系统的默认引导加载程序。尽管它在机器打开时首先运行,但普通用户很少看到 GRUB 运行。它自动运行,不需要用户输入。
然而,当尝试在同一台机器上引导另一个操作系统与 Linux并存时,另一个系统的引导加载程序可能会覆盖 GRUB,从而导致 Linux 系统无法引导。
本文将介绍如何使用 GRUB Rescue 命令和引导修复工具修复 Linux 引导失败。
先决条件
- 具有 sudo 权限的帐户。
- 访问命令行。
Grub启动问题
GRUB 无法引导到操作系统的最常见原因是另一个操作系统的引导加载程序覆盖了 GRUB 引导配置。在尝试与现有 Linux 安装进行双重引导时会出现此问题。另一个原因是意外删除了 GRUB 配置文件。
当 GRUB 无法引导系统时,会出现 GRUB Rescue 提示符。

上面的示例显示 GRUB 在显示 grub 救援提示之前显示“无此类分区”错误。另一个常见的 GRUB 错误是“未知文件系统”,后面跟着相同的提示。

有时候将直接显示grub提示符:

Grub恢复命令
以下是常用 GRUB Rescue 命令的列表。使用上一节中提到的提示中的命令。
Command	Description	Example
boot	Start booting (shortcuts: F10, CTRL + x).	The command is issued without arguments.
cat	Write the contents of a file to standard output.	cat (hd0,1)/boot/grub/grub.cfg
configfile	Load a configuration file.	configfile (hd0,1)/boot/grub/grub.cfg
initrd	Load the initrd.img file.	initrd (hd0,1)/initrd.img
insmod	Load a module.	insmod (hd0,1)/boot/grub/normal.mod
loopback	Mount an image file as a device.	loopback loop0 (hd0,1)/iso/image.iso
ls	Display the contents of a directory or partition.	ls (hd0,1)
lsmod	Display a list of loaded modules.	The command is issued without arguments.
normal	Activate the normal module.	The command is issued without arguments.
search	Search for devices. Option --file searches for files, --label searches for labels, --fs-uuid searches for filesystem UUID.	search -file [filename]
set	Set an environment variable. If issued with no arguments, the command prints the list of all environment variables and their values.	set [variable-name]=[value]
修复启动问题
本教程介绍了解决 GRUB 引导问题的两种方法:使用 GRUB Rescue 提示符和引导修复工具。
使用GRUB Rescue提示符
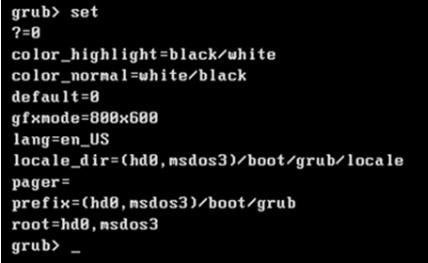
- 使用不带参数的 set 命令查看环境变量:
set
这个例子的输出显示,GRUB被设置为从(hd0,msdos3)分区启动:

- ls命令列出了磁盘上的可用分区。
ls
输出展示了分区列表:

使用ls命令找到包含启动目录的分区。
ls [partition-name]
这个例子显示了(hd0,msdos1)分区中的启动目录。

- 将引导分区设置为根变量的值。该示例使用名为 (hd0,msdos1) 的分区。
set root=(hd0,msdos1)
- 加载normal启动模式:
insmod normal
- 启动normal启动模式:
normal
normal启动模式下允许你能使用更复杂的命令修复启动
- 使用linux命令加载Linux内核:
linux /boot/vmlinuz-4.19.12-generic root=/dev/sda1 ro
- 调用boot命令:
boot
现在系统应该可以正常启动了。
这篇文章了讲述了在命令行下使用grub rescue修复系统启动的话题,下一部分将讲述如何在使用Livecd启动到图形界面后执行grub rescue的步骤。
Uefi recovery
获取当前:
grub> set
...
prefix=(hd0,gpt1)/boot/grub
...
实际查看(hd0,gpt1)下的内容:
grub> ls(hd0,gpt1)/
efi/
这里就是问题所在:
更改为:
prefix=(hd0,gpt1)/efi/ubuntu
insmod normal
normal
因此获得了登陆的grub:

重新格式化efi分区后,重新挂载:
sudo umount /boot/efi
sudo mkfs.vfat -F32 /dev/vda1
sudo mount /dev/vda1 /boot/efi
sudo update-grub
sudo update-grub2
sudo grub-install /dev/vda
sudo grub2-mkconfig -o /boot/efi/EFI/ubuntu/grub.cfg
vim /etc/fstab
change efi
sudo reboot
Jun 22, 2023
Technologysteps:
[root@ttt yum.repos.d]# cat local.repo
[local]
name=local
baseurl=file:///root/rpms
enabled=1
gpgcheck=0
# yum makecache
Using vm
using vm(nested kvm) for trying.

View the default installation version:
[root@lucky ~]# /usr/libexec/qemu-kvm  --version
QEMU emulator version 1.5.3 (qemu-kvm-1.5.3-160.el7), Copyright (c) 2003-2008 Fabrice Bellard
[root@lucky ~]# libvirtd --version
libvirtd (libvirt) 4.5.0
Install kernel and changes to new kernel:
# rpm -ivh kernel-5.15.85_lts2021_kkkk-3.x86_64.rpm
Preparing...                          ################################# [100%]
Updating / installing...
 1:kernel-5.15.85_lts2021_kkkk-3    ################################# [100%]
# vi /boot/grub2/grubenv
saved_entry=CentOS Linux (5.15.85-lts2021-kkkk) 7 (Core)
Change the selinux and firewalld:
[root@lucky ~]# systemctl disable firewalld
Removed symlink /etc/systemd/system/multi-user.target.wants/firewalld.service.
Removed symlink /etc/systemd/system/dbus-org.fedoraproject.FirewallD1.service.
[root@lucky ~]# vim /etc/selinux/config
Install gcc-11 for building libvirtd and qemu:
yum install -y centos-release-scl
yum install -y devtoolset-11 bc
Build Qemu:
# mkdir Code
# mv libvirt-8.5.0.tar.xz qemu_spice_modified.tar.gz Code
# cd Code
# tar xJvf libvirt-8.5.0.tar.xz
# tar xzvf qemu_spice_modified.tar.gz
# which ninja
# yum install -y git glib2-devel pixman-devel zlib-devel libusb-devel libusb libusbx-devel pulseaudio-libs-devel libcap-ng-devel libattr-devel spice-server-devel usbredir-devel python3 bzip2
# cd qemu-7.1.0
# scl enable devtoolset-11 bash
#  ./configure --enable-modules --target-list=x86_64-softmmu --enable-debug --disable-docs --disable-virglrenderer --prefix=/opt/local --enable-virtfs --enable-libusb --disable-debug-tcg --audio-drv-list=pa
# make -j8
# make install
# /opt/local/bin/qemu-system-x86_64 --version
QEMU emulator version 7.1.0
Copyright (c) 2003-2022 Fabrice Bellard and the QEMU Project developers
Build libvirtd:
# yum install -y epel-release
# yum install -y meson python36-docutils python-docutils glib2-devel gnutls-devel libxml2-devel libtirpc-devel gnutls-devel netcf-devel libpciaccess-devel systemd-devel yajl-devel
Build to /usr
and install
Jun 19, 2023
TechnologyBasic info:
[root@tl ~]# cat /etc/redhat-release
CentOS Linux release 7.6.1810 (Core)
[root@tl ~]# uname -r
3.10.0-957.el7.x86_64
[root@tl ~]# lscpu |grep "Model name"
Model name:            12th Gen Intel(R) Core(TM) i3-12100
[root@tl ~]# free -m
              total        used        free      shared  buff/cache   available
Mem:          64005         482       63299           9         223       63023
Swap:          2043           0        2043
Kernel
Install kernel and configure its default startup:
[root@tl materials]# cp -ar i915/* /lib/firmware/i915/
cp: overwrite ‘/lib/firmware/i915/bxt_dmc_ver1_07.bin’? y
cp: overwrite ‘/lib/firmware/i915/bxt_dmc_ver1.bin’? y
cp: overwrite ‘/lib/firmware/i915/bxt_guc_ver8_7.bin’? y
......
# rpm -ivh kernel-*.rpm


