Dec 1, 2013
Technology直接操作寄存器的好处,最主要的就是看中它的快。缺点在于比较晦涩,因为你需要了解到实现的底层。在官方库中,我们可以找到如下的定义:
//./Libraries/CMSIS/CM3/DeviceSupport/ST/STM32F10x/stm32f10x.h:
#define PERIPH_BASE           ((uint32_t)0x40000000) /*!< Peripheral base address in the alias region */
//./Libraries/CMSIS/CM3/DeviceSupport/ST/STM32F10x/stm32f10x.h:
#define APB2PERIPH_BASE       (PERIPH_BASE + 0x10000)
//./Libraries/CMSIS/CM3/DeviceSupport/ST/STM32F10x/stm32f10x.h:
#define GPIOA_BASE            (APB2PERIPH_BASE + 0x0800)
//./Libraries/CMSIS/CM3/DeviceSupport/ST/STM32F10x/stm32f10x.h:
#define GPIOA               ((GPIO_TypeDef *) GPIOA_BASE)
// Definition of the GPIO Types
/**
  * @brief General Purpose I/O
  */

typedef struct
{
  __IO uint32_t CRL;
  __IO uint32_t CRH;
  __IO uint32_t IDR;
  __IO uint32_t ODR;
  __IO uint32_t BSRR;
  __IO uint32_t BRR;
  __IO uint32_t LCKR;
} GPIO_TypeDef;

/**
 * IO definitions
 *
 * define access restrictions to peripheral registers
 */

#ifdef __cplusplus
  #define     __I     volatile                /*!< defines 'read only' permissions      */
#else
  #define     __I     volatile const          /*!< defines 'read only' permissions      */
#endif
#define     __O     volatile                  /*!< defines 'write only' permissions     */
#define     __IO    volatile                  /*!< defines 'read / write' permissions   */
;
从上面就可以基本看出GPIO的相关知识。在GPIO的使用中我们需要注意7个寄存器:
CRL, CRH, IDR, ODR, BSRR, BRR, LCKR.
使用起来很简单,直接调用相应的寄存器操作就好:
GPIOA->CRL=0x00;
寄存器的定义在手册中有详细的介绍。简单的说,CRL和CRH被称之为Configuration Register, 配置寄存器,而IDR和ODR则是数据寄存器,一个是INPUT一个是OUTPUT。 置位/复位寄存器BSRR,还有一个16位的复位寄存器BRR, 还有一个32位的锁定寄存器LCKR,设置好对应的寄存器则可执行相应的操作。
输入和输出操作可以直接操作寄存器,例如点亮和熄灭LED都是可以直接用操作寄存器来完成。而对键盘的操作,则是读入值。
#define GET_LEFT() (!(GPIOD->IDR&GPIO_Pin_3))
能使用库函数的场合,除非对IO要求非常高,否则不建议直接操作寄存器。因为出错误的概率会远远增大。
Dec 1, 2013
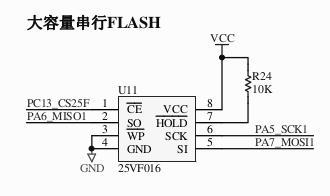
TechnologySST25F080,高达 1M 字节的串行 FLASH 存储器,此芯片为-50 版,即 SPI 速度可达到 50M,利用 STM32 的最高速 SPI 接口(36M),读写速度绝对不比并行 FLASH 慢.
连线图如下:
Nov 30, 2013
TechnologyRTC(Real Time Clock) 在STM32中可以理解为内置的一个部件,和传说中的DS1302是有差别的。尽管官方发布的程序可以将RTC搞成一个万年历。
###配置RTC
RTC需要顺带使用后备寄存器, 因为RTC是一个简单的秒中断定时器,关于年日月分秒的信息需要在掉电保存时依然放在某个地方,这个地方就是STM32的后备寄存器。配置好以后,尽管系统关电,依靠板子上的后备电池,依然可以保存32768的晶振和后备寄存器的数据。
配置RTC的方法:
	#include "stm32f10x_bkp.h"
	#include "stm32f10x_pwr.h"
	#include "stm32f10x_rtc.h"
	//使能一些外设
		RCC_APB1PeriphClockCmd(RCC_APB1Periph_PWR | RCC_APB1Periph_BKP, ENABLE);
		PWR_BackupAccessCmd(ENABLE);
###判断RTC是否被配置过
下面的函数被用于判断RTC是否被配置过:
/**************************************************************
** 函数名:TestRtc
** 功能:测试RTC用
** 注意事项:用于显示RTC是否已经设置过.
***************************************************************/
void TestRtc(void)
{
	if(RTC_Blank)
	{
		USART1_Puts("The Time is not set\r\n");
	}
	else
	{
		USART1_Puts("Time Setted.\r\n");
	}
}
这个函数判断RTC_Blank全局变量的值,而全局变量的值则在配置RTC的时候被设定。
void RTC_Configuration(void)
{
  //......
	if(BKP_ReadBackupRegister(BKP_DR1) != 0xA5A5)
		{
	//......
			RTC_Blank=1;	//这个标志代表RTC是没有预设的(或者说是没有上纽扣电池)

		}
如果RTC后备寄存器的值为设定为0xA5A5,则代表RTC已经被设置过。否则,我们认为它处于未被设置过的状态。
###使用RTC的秒中断
在NVIC中,需要有下列的定义,以标识RTC的秒中断。
	/* RTC */
	NVIC_InitStructure.NVIC_IRQChannel = RTC_IRQn;
	NVIC_InitStructure.NVIC_IRQChannelPreemptionPriority = 0;
	NVIC_InitStructure.NVIC_IRQChannelSubPriority = 0;
	NVIC_InitStructure.NVIC_IRQChannelCmd = ENABLE;
	NVIC_Init(&NVIC_InitStructure);
对应的中断响应例程则定义在stm32f10x_it.c中:
/*******************************************************************************
* Function Name  : RTC_IRQHandler    RTC中断
* Description    :
* Input          : None
* Output         : None
* Return         : None
*******************************************************************************/
extern volatile bool Sec;	//1S标志
void RTC_IRQHandler(void)
{
	if(RTC_GetITStatus(RTC_IT_SEC) != RESET) //RTC发生了秒中断(也有可能是溢出或者闹钟中断)
	{
		RTC_ClearITPendingBit(RTC_IT_SEC);
		Sec=TRUE;

		//以免RTC计数溢出,这里限制了RTC计数值的大小.0x0001517f实际就是一天的秒数
		if(RTC_GetCounter() >= 0x0001517f)
		{
			RTC_SetCounter(0x0);
		}
	}
}
而在main.c中,则根据Sec的值来闪烁LED1灯。
	for(;;)
	{
		if(Sec == 1)
		{
			Sec = 0;
			GPIOA->ODR^=GPIO_Pin_8;
		}
	}
Test:
	for(;;)
	{
		if(Sec == 1)
		{
			Sec = 0;
			GPIOA->ODR^=GPIO_Pin_8;
		}
	}
Nov 30, 2013
TechnologyCortx-M3特有的SysTick可以很方便的实现定时。系统始终的频率和开启系统时钟中断主要在RCC.c里进行设置:
	//SYSTICK分频--1ms的系统时钟中断
	if (SysTick_Config(SystemCoreClock / 1000))
  	{
  	  	/* Capture error */
    	while (1);
  	}
// The definition of the SysTick_Config:

/**
 * @brief  Initialize and start the SysTick counter and its interrupt.
 *
 * @param   ticks   number of ticks between two interrupts
 * @return  1 = failed, 0 = successful
 *
 * Initialise the system tick timer and its interrupt and start the
 * system tick timer / counter in free running mode to generate
 * periodical interrupts.
 */

/*
  *      - SystemCoreClock variable: Contains the core clock (HCLK), it can be used
  *                                  by the user application to setup the SysTick
  *                                  timer or configure other parameters.
*/
系统时钟SYSCLK,它是供STM32中绝大部分部件工作的时钟源。系统时钟可选择为PLL输出、HSI或者HSE。系统时钟最大频率为72MHz,它通过AHB分频器分频后送给各模块使用,AHB分频器可选择1、2、4、8、16、64、128、256、512分频。其中AHB分频器输出的时钟送给5大模块使用:
①、送给AHB总线、内核、内存和DMA使用的HCLK时钟。
②、通过8分频后送给Cortex的系统定时器时钟。
③、直接送给Cortex的空闲运行时钟FCLK。
④、送给APB1分频器。APB1分频器可选择1、2、4、8、16分频,其输出一路供APB1外设使用(PCLK1,最大频率36MHz),另一路送给定时器(Timer)2、3、4倍频器使用。该倍频器可选择1或者2倍频,时钟输出供定时器2、3、4使用。
⑤、送给APB2分频器。APB2分频器可选择1、2、4、8、16分频,其输出一路供APB2外设使用(PCLK2,最大频率72MHz),另一路送给定时器(Timer)1倍频器使用。该倍频器可选择1或者2倍频,时钟输出供定时器1使用。另外,APB2分频器还有一路输出供分频器使用,分频后送给ADC模块使用。ADC分频器可选择为2、4、6、8分频。
Cortex-M3允许为SysTick提供2个时钟源以供选择,第一个是内核的“自由运行时钟”FCLK,“自由”表现在它不是来自系统时钟HCLK,因此在系统时钟停止时,FCLK也能继续运行。第2个是一个外部的参考时钟,但是使用外部时钟时,因为它在内部是通过FCLK来采样的,因此其周期必须至少是FCLK的两倍(采样定理)。
/*******************************************************************************
* Function Name  : SysTickHandler
* Description    :系统时钟,一般调教到1MS中断一次
*******************************************************************************/

void SysTick_Handler(void)
{
	if(Timer1)
		Timer1--;
}
Timer1 为全局变量,我们将设置这个全局变量,以决定其定时期限。
/********************************************
**函数名:SysTickDelay
**功能:使用系统时钟的硬延迟
**注意事项:一般地,不要在中断中调用本函数,否则会存在重入问题.另外如果屏蔽了全局中断,则不要使用此函数
********************************************/
volatile u16 Timer1;
void SysTickDelay(u16 dly_ms)
{
	Timer1=dly_ms;
	while(Timer1);
}
而设置这个全局变量则是在main.c的loop函数中设置的。
	for(;;)
	{
		SysTickDelay(500);
		GPIOA->ODR^=GPIO_Pin_8;
	}
如果把500改成其它的值,则很方便可以实现不同大小的定时器。
Nov 30, 2013
Technology代码非常之简单:
#define	FLASH_ADR	0x08008000		//要写入数据的地址
#define	FLASH_DATA	0x5a5a5a5a		//要写入的数据


int main(void)
{
	u32 tmp;
	ChipHalInit();			//片内硬件初始化
	ChipOutHalInit();		//片外硬件初始化

	//判断此FLASH是否为空白
	tmp=*(vu32*)(FLASH_ADR);
	if(tmp==0xffffffff)
	{
		FLASH_Unlock();
		FLASH_ProgramWord(FLASH_ADR,FLASH_DATA);
		FLASH_Lock();
		USART1_Puts("The destination is empty, Data has been written in!\r\n");
	}
	else if(tmp==FLASH_DATA)
	{
		USART1_Puts("The destination data is the same as certification data!\r\n");
	}
	else
	{
		USART1_Puts("The destination data is not equal to certification data, may caused via written error, or the destination is not empty!\r\n");
		FLASH_Unlock();
		FLASH_ErasePage(FLASH_ADR);
		FLASH_Lock();
		USART1_Puts("Erased the written destination!\r\n");
	}
运行结果为:
	The destination is empty, Data has been written in!
	The destination data is the same as certification data!
	The destination data is the same as certification data!
	The destination data is the same as certification data!
	The destination data is the same as certification data!
原理在于,直接读取到目的地址的值,与预设的值相比较。 要注意如何写入。先unlock,写入字后,lock住。
