Feb 25, 2014
TechnologyFirst you have to install sound-juicer, by:
sudo pacman -S sound-juicer
Run “sound-juicer” will call the sound-juicer out, remember the pulse-audio should be started before the sound-juicer is called.
On start, sound juicer will automatically scan the CD-ROM, and retrieve back the track listing, this will take for a while. Sorry, failed. …
goobox is only a CD Player
grip is good, just use it for cd mp3 gripping.
After gripping the sound-track, the generated mp3 file is listed under the directory that your specified, with a m3u file and the mp3 fils. Here comes a new problem, how to rename from the m3u file?
Following is the bash script for doing this:
#!/bin/bash
number=0
# Make the directory for processed result
mkdir -p ./changed
underscore="_"
for filename in `cat ./verschiedene_knstler-piano_piano.m3u`
do
	number=`expr $number + 1`
	# How to get the filename?
	file_basename=`basename $filename`
	#echo $file_basename
	if [ $number -lt 10 ]
	then
		# Add 0 before the number,
		# and form the name like "01_abc"
		zeroprefixname="0$number$underscore$file_basename"
		echo $zeroprefixname
		cp $filename ./changed/$zeroprefixname
	else
		# The name needn't add 0
		prefixname=$number$underscore$file_basename
		echo $prefixname
		cp $filename ./changed/$prefixname
	fi
done
Feb 18, 2014
TechnologyFor keeping the “Clean Desktop”, the cleaner in my office unpluged my laptop’s powerline, and the laptop suddenly going to black when I was coding, so I want to write some scripts for calculating the battery’s power percentage and got notification when the power of the battery is too low.
###Add an indicator in Awesome Desktop
Awesome have a very good 3rd-party library called “Vicious”, its page is athttp://awesome.naquadah.org/wiki/Vicious, following the guideline for install and configure it.
Install the library:
	$ cd ~/.config/awesome
	$ git clone http://git.sysphere.org/vicious
Modify the rc.lua to add following lines:
-- Using vicious
-- Vicious is a modular widget library for awesome, derived from the Wicked widget library.
vicious = require("vicious")

-- Add the Battery
mybattery = wibox.widget.textbox()
vicious.register(mybattery, vicious.widgets.bat, "||Battery: $2% ", 30, "BAT0")

-------------------------------------
right_layout:add(mytextclock)
-- We add mybattery here!
right_layout:add(mybattery)
right_layout:add(mylayoutbox[s])
-------------------------------------
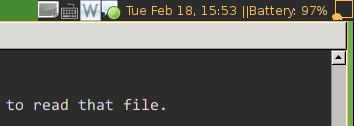
After modification, save the rc.lua and restart the awesome desktop, you will see the following pictures.
 ###Add notification when battery is too low
We can use acpi for getting the battery and power supply information, so first let’s install it:
###Add notification when battery is too low
We can use acpi for getting the battery and power supply information, so first let’s install it:
$ sudo pacman -S acpi
Then we can write an script named notifybattery.sh, put it under the /bin folder:
battery_level=`acpi -b | grep -P -o '[0-9]+(?=%)'`
if [ $battery_level -le 10 ]
then
    notify-send "Battery low" "Battery level is ${battery_level}%!"
fi
Then we add an item under crotab:
	$ crontab -e
	# crontab's configuration:
	2 * * * * /bin/notifybattery.sh
Now we can got an indication when battery is less than 10%. you can adjust the number to whatever you want.
Feb 11, 2014
TechnologyDue to frequently query the ntp webserver, the website is banned by the administrator, thus I have to think about another way for updating the local machine’s time on OpenWRT.
First, install the coreutils-date:
opkg install coreutils-date
Add the no-login for local server:
cat id_rsa.pub | ssh ddddd@1xx.xxx.xxx.xxx ‘cat >.ssh/authorized_keys’
Now you can directly call remote command via:
ssh ddddd@1xx.xxx.xxx.xxx ls
OK, we update the time.sh
#!/bin/sh
#echo $http_proxy
#echo $https_proxy
#date $(wget -O - "http://www.timeapi.org/utc/in+eight+hours" 2>/dev/null | sed s/[-T:+]/\ /g | awk '{print $2,$3,$4,$5,".",$6}' | tr -d " " )
timestring=`ssh ddddd@1xx.xxx.xxx.xxx date`
echo $timestring
/usr/bin/date -s "$timestring"
Add the following line into the crontab
* */3 * * * /bin/time.sh
Now you can enjoy the local server updated time.
Jan 26, 2014
TechnologyFor create a new branch in the current repository:
git branch <name_of_your_new_branch>
Then you can push the branch on github
git push origin <name_of_your_new_branch>
If you want to switch to your new branch:
git checkout <name_of_your_new_branch>
See all of the branches via:
git branch
Also you can add multiply remote url via:
git remote add <name_of_your_remote> <url>
Push all of your changes
git push origin <name_of_your_remote>
Jan 26, 2014
TechnologyInstall python-virtualenv:
sudo apt-get install python-virtualenv
Install the virtualenv Wrapper:
sudo apt-get install virtualenvwrapper
Now create the directory for holding the virtual environment:
mkdir ~/pyv
Edit the virtualenv resource file:
	export WORKON_HOME="/home/Trusty/pyv"
	export PROJECT_HOME="/home/Trusty/pyv"
	#source /usr/bin/virtualenvwrapper.sh
Here we meet the problem, it says cannot find the /usr/bin/virtualenvwrapper.sh, I got the answer from the stackoverflow:
	From /usr/share/doc/virtualenvwrapper/README.Debian:

	In contrast to the information in
	/usr/share/doc/virtualenvwrapper/en/html/index.html this package installs
	virtualenvwrapper.sh as /etc/bash_completion.d/virtualenvwrapper.

	Virtualenvwrapper is enabled if you install the package bash-completion and
	enable bash completion support in /etc/bash.bashrc or your ~/.bashrc.

	If you only want to use virtualenvwrapper you may just add

	 source /etc/bash_completion.d/virtualenvwrapper

	to your ~/.bashrc.
So the right command should be:
	$ cat /home/Trusty/.virtualenvrc
	export WORKON_HOME="/home/Trusty/pyv"
	export PROJECT_HOME="/home/Trusty/pyv"
	source /etc/bash_completion.d/virtualenvwrapper
Now add this find into .bashrc and source~/.bashrc again:
	$ tail -1 ~/.bashrc
	source /home/Trusty/.virtualenvrc
	$ source ~/.bashrc
Good!!! Now you can continue with the following steps, just as we noticed in previous articles.
