Mar 15, 2014
TechnologyRecently I will moving an old-style website from ASP to WorldPress, that’s a funny work. This series will record the steps for migrating.
###Preparation
First I got all of the files which locates in the ASP.NET Server, the database is very simple, it’s a mdb file, which could be viewed by Microsoft Access.
The static files and images could also be downloaded from the server, thus the materials is enough for building a whole-new WorldPress based website.
###Using Python To Generate Content
All of the webpage information are located in the mdb file, thus we have to do some dealing with this database file. Python could easily retrieve the data out from the database.
Install pyodbc:
$ pip install pyodbc
Notice when you are using Microsoft Access for visiting the database, the system will automatically generate a ldb file for you.
In Linux, the pyodbc will encouter un-predicted problems, so I use ActivePython in Windows for analyzing the mdb file.
	$ pypm search pyodbc
	$ pypm install pyodbc
Now begin to analyse the database
TBD
Mar 14, 2014
TechnologySince the Wordpress is located at home, there are several problems for dealing with.
###Changeing Apache Listening Port
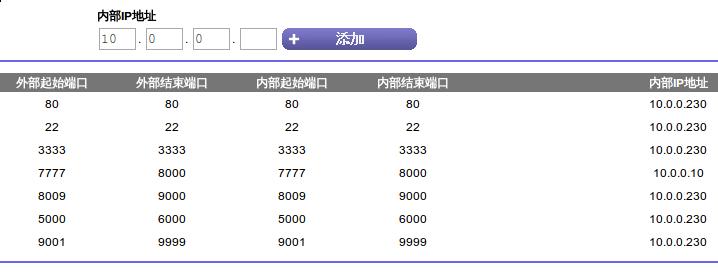
Nanjing Unicom has banned the port 80, thus I have to change the default listening port of apache from 80 to other ports. Following is How-To:
First import an variable in /etc/apache2/envvars:
export VHOST_PORT_HTTP=7777
Then Change the /etc/apache2/ports.conf:
	# NameVirtualHost *:80
	# Listen 80
	NameVirtualHost *:${VHOST_PORT_HTTP}
	Listen ${VHOST_PORT_HTTP}
Finally change the site-enabled:
	root@arm:/etc/apache2# cat sites-enabled/000-default
	<VirtualHost *:${VHOST_PORT_HTTP}>
Now restart the apache2 service, you should see the apache listens the 7777 port.
/etc/init.d/apache2 restart
###Configurating the WordPress
Install this light-weight browser for changing configurations.
pacman -S midori
After remote login with “ssh -Y”, simply input:
midori
Then you can get a local window.
But wait, midori relies on window, but we’d better do everything in command-line for savign the bandwidth, thus we install the elinks, and use it for configurating the wordpress.
$ apt-get install elinks
You have to change the configuration->General, from http://xxx.xxx.xxx.xxx to http://xxx.xxx.xxx.xxx:7777, then we can change the port and let it show in browser.
Now you can access the wordpress in everywhere.
Mar 13, 2014
TechnologyFor Using proxy for Wordpress, we can directly edit the wp-config file:
	$ cat wp-config.php
	/** Set following for working behind the proxy **/
	//define('WP_PROXY_HOST', '10.0.0.221');
	//define('WP_PROXY_PORT', '9001');
	#define('WP_PROXY_BYPASS_HOSTS','*.local-intranet');
	##
	define('WP_EMMORY_LIMIT', '64M');
A trouble shooting, you have to edit the /etc/resolv.conf to change the default dns server, then your wordpress could reach the network and install new plugins or themes.
Mar 13, 2014
TechnologySince BeagleBone Black’s hardware configuration is enough for running LAMP, I decide to run wordpress on it.
###Environment
Hardware Configuration:
CPU: Generic AM33XX (Flattened Device Tree)
MEM: MemTotal: 507428 kB
Disk: 1.8’’ USB Disk, 30 GB
I also add 512MB swapfile for swapping partition.
Software Configuration:
Kernel: Linux arm 3.8.13-bone30 #1 SMP Mon Nov 18 14:53:22 CST 2013 armv7l GNU/Linux
OS: Debian GNU/Linux 7 \n \l
###LAMP Configuration
####Install Apache
$ apt-get install apache2
After installation, simply open the browser and visit the http://YourIPAddress, if you can find “It works!", then this says the apache server is running now.
####Install MySQL
MySQL is a powerful database management system which is used for organizing and retrieving data.
$ apt-get install mysql-server libapache2-mod-auth-mysql php5-mysql
You should be asked to provide the MySQL “root” user password.
Activate MySQL via following command:
	$ mysql_install_db
	Change the root password? [Y/n] n
	Remove anonymous users? [Y/n] Y
	Disallow root login remotely? [Y/n] Y
	Remove test database and access to it? [Y/n] Y
	Reload privilege tables now? [Y/n] Y
Now the MySQL is OK, you have to install PHP
####Install PHP
Install following packages:
$ apt-get install php5 libapache2-mod-php5 php5-mcrypt
Edit the directory index file:
	# cat /etc/apache2/mods-enabled/dir.conf
	<IfModule mod_dir.c>
	          DirectoryIndex index.php index.html index.cgi index.pl index.php index.xhtml index.htm
	</IfModule>
Install modules for using the searched result:<br />
	apt-cache search php5-
Testing PHP on your own apache search:<br />
	root@arm:/home# cat /var/www/info.php
	<?php
	phpinfo();
	?>
Restart apache server and view the result:
# /etc/init.d/apache2 restart
View the http://YourIpAddress/info.php you can see the php printed out messages.
###Wordpress Setup
Download the latest Wordpress via:
# wget http://wordpress.org/latest.tar.gz
Install the ntp server, or you may meet some time and date problem:
# apt-get install ntp
Ok, the time is really an issue, gonna be discussed later.
Simply set the time via " date -s “$timestring”” is enough.
Now uncompress the wordpress.
Create the Wordpress Database and User:
	# mysql -u root -p
	mysql> CREATE DATABASE wordpress;
	Query OK, 1 row affected (0.01 sec)
	mysql> CREATE USER wordpressuser@localhost;
	Query OK, 0 rows affected (0.00 sec)
	mysql> SET PASSWORD FOR wordpressuser@localhost= PASSWORD("xxxxxxxx");
	Query OK, 0 rows affected (0.00 sec)
	mysql> GRANT ALL PRIVILEGES ON wordpress.* TO wordpressuser@localhost IDENTIFIED BY 'password';
	Query OK, 0 rows affected (0.00 sec)
	mysql> FLUSH PRIVILEGES;
	Query OK, 0 rows affected (0.00 sec)
	mysql> exit
	Bye
Setup the WordPress Configuration:
cp ~/wordpress/wp-config-sample.php ~/wordpress/wp-config.php
Edit the configuration file:
	cat ~/wordpress/wp-config.php
	// ** MySQL settings - You can get this info from your web host ** //
	/** The name of the database for WordPress */
	define('DB_NAME', 'wordpress');

	/** MySQL database username */
	define('DB_USER', 'wordpressuser');

	/** MySQL database password */
	define('DB_PASSWORD', 'password');
Install rsync:
# apt-get install rsync
Use rsync for sync to the website’s root directory:
# rsync -avP ~/wordpress/ /var/www/
Change to the website’s root directory and change the ownership to the apache user:
	root@arm:/etc# cd /var/www/
	root@arm:/var/www# chown www-data:www-data /var/www -R
	root@arm:/# chmod g+w /var/www -R
To know the username of apache:
	lsof -i
	Notice the :http part.
Install php5-gd , which is the required php module to run wordpress.
apt-get install php5-gd
Now access the page of /wp-admin/install.php is OK. or you can access the http://YourIPAddress is ready for install the wordpress on your BeagleBone Black.
Mar 12, 2014
TechnologySince I want to run wordpress at home, while my RaspberryPI got only 256M RAM, it will be hard to run such a heavy application, I use BeagleBone Black to run it, BeagleBone Black has 512M RAM, which will be enough for run wordpress and etc.
###Setting up NFS Server
First I have to setup a nfs server in my LAN, I set it on my RaspberryPI, since I got only 1 USB hub which serves RaspberryPI, a 500GB harddisk has been attached to the USB hub, which is quite enough for serving nfs servers.
My RaspberryPI runs archlinux, then I follow the ArchLinux’s Wiki setting up the nfs server
	pacman -S nfs-utils
	# cat /etc/exports
	/media/debianroot 10.0.0.1/24(rw,sync,no_subtree_check,no_root_squash) 10.0.0.11(rw,sync,no_subtree_check,no_root_squash)
	### Check the result
	root@alarmpi ~]# exportfs -arv
	exporting 10.0.0.11:/media/debianroot
	exporting 10.0.0.1/24:/media/debianroot
	exporting 10.0.0.11:/media/debianroot to kernel
	exportfs: 10.0.0.11:/media/debianroot: Function not implemented
	### Change the domainname to "localhost"
	vim /etc/idmapd.conf
	### Testing the services
	systemctl start rpc-idmapd.service
	systemctl start rpc-mountd.service
	### Enable the Services at startup
	systemctl enable rpc-mountd.service
	systemctl enable rpc-idmapd.service
Want testing the nfs, simply use following command:
mount -t nfs 10.0.0.230:/media/debianroot /mnt1
If you can see the mnt1 directory has the same content as in nfs server, you can use nfs now.
###Change the BeagleBone Startup file
In SD card, change uEnv.txt
	[root@DashArch mnt]# cat uEnv.txt
	kernel_file=zImage
	initrd_file=uInitrd
	serverip=10.0.0.230
	ipaddr=10.0.0.122
	rootpath=/media/debianroot
	console=ttyO0,115200n8
###Replace Pogoplug
To replace Pogoplug at home, I have to do the following issues:
- Use No-ip on BeagleBone, replacing the Pogoplug’s No-ip.
- Run Apache or nginx instead of Pogoplug’s service.
Use No ip:
Install no-ip on RaspberryPI:
pacman -S noip
Configure noip on RaspberryPI:
	noip2 -C -Y
	[root@alarmpi ~]# systemctl start noip2
	[root@alarmpi ~]# systemctl enable noip2
	ln -s '/usr/lib/systemd/system/noip2.service' '/etc/systemd/system/multi-user.target.wants/noip2.service'
	[root@alarmpi ~]# ps -ef | grep noip
	nobody     411     1  0 00:40 ?        00:00:00 /usr/bin/noip2 -c /etc/no-ip2.conf
Now we need to replace Pogoplug’s service to RaspberryPI:
First we change the direct port 22 from pogoplug to RasspberryPI on Router.
Now your no-ip pointed machine changed from Pogoplug into RaspberryPI.
###Remote update
Simply replacing the ssh related via setting up the different id_rsa:
cat .ssh/id_rsa.pub | ssh root@xxx.xx.xx.com 'cat >> .ssh/authorized_keys
