Mar 20, 2014
Technology###Cross Compiler Prepration
Get the cross-compiler from github:
	[Trusty@XXXyyy tools]$ pwd
	/media/y/raspberryPI/tools
	[Trusty@XXXyyy tools]$ git clone git://github.com/raspberrypi/tools.git
Add the cross-compiler to system path:
export PATH="/media/y/raspberryPI/tools/tools/arm-bcm2708/gcc-linaro-arm-linux-gnueabihf-raspbian/bin:$PATH"
Now input “arm-linux-g” + tab you will see the cross-compiler is ready.
###Prepare the kernel
Get the kernel source from github:
git clone git://github.com/raspberrypi/linux.git
Now we need to get the patches for supporting the raspberryPI, Torlus has done the patches which could also be downloaded from github:
Now we need to configure the kernel:
	cd linux
	make ARCH=arm versatile_defconfig
NO, I MADE A MISTAKE, IT SHOULDN’T COMPILE KERNEL, SHOULD COMPILE QEMU!!!
###Compile qemu
Get the modified qemu branch from github:
git clone git://github.com/Torlus/qemu.git
Switch to ‘rpi’ branch:
	git fetch origin
	git branch -v -a # List the available branches.
	git checkout -b raspberry origin/rpi	# Checkout the origin/rpi to local raspberry
	git fetch
	git checkout raspberry
Begin to configure qemu, notice we have to use python2 for configuring the qemu:
	workon venv2
	./configure --help
	./configure --target-list="arm-softmmu arm-linux-user" --enable-sdl
Now begin to make the qemu, use -j8 for speeding up, adjust the number according to your own machine:
make -j8
Now under the following directory you will get the qemu-system-arm:
	$ pwd
	/media/y/raspberryPI/qemu/arm-softmmu
Get the kernel.img from the SD image.
###Use the compiled qemu for running
We have to change the scripts for running the qemu:
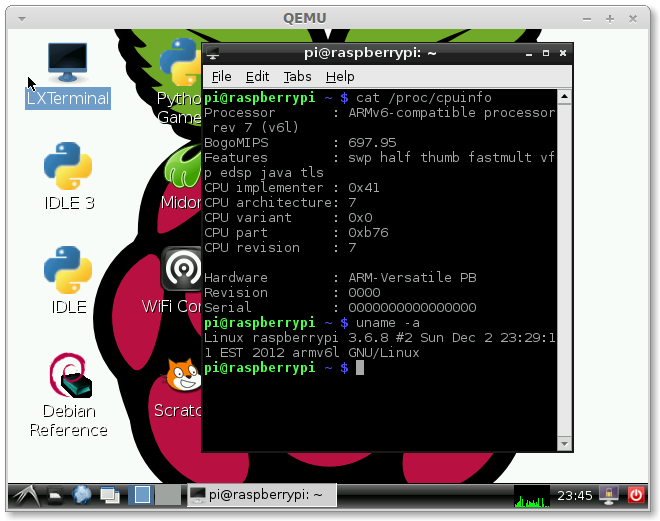
/media/y/raspberryPI/qemu/arm-softmmu/qemu-system-arm -net nic,macaddr=$macaddr -net user -kernel kernel.img -cpu arm1176 -m 512 -M raspi -no-reboot -serial stdio -append "rw earlyprintk loglevel=8 panic=120 keep_bootcon rootwait dma.dmachans=0x7f35 bcm2708_fb.fbwidth=1024 bcm2708_fb.fbheight=768 bcm2708.boardrev=0xf bcm2708.serial=0xcad0eedf smsc95xx.macaddr=B8:27:EB:D0:EE:DF sdhci-bcm2708.emmc_clock_freq=100000000 vc_mem.mem_base=0x1c000000 vc_mem.mem_size=0x20000000 dwc_otg.lpm_enable=0 kgdboc=ttyAMA0,115200 console=tty1 root=/dev/mmcblk0p2 rootfstype=ext4 elevator=deadline rootwait" -sd 2014-01-07-wheezy-raspbian.img -device usb-kbd -device usb-mouse -usbdevice net
Now we can run the raspberryPI in QEMU with 512MB memory, but, the network is still unavailable.
Mar 18, 2014
TechnologyFirst download the latest image from http://www.raspberrypi.org/downloads, mine is Wheezy.
And we also have to download the qemu-compatible kernel from following address:
$ wget http://xecdesign.com/downloads/linux-qemu/kernel-qemu
Change the img file according to http://localhost/blog/2013/09/04/qemu-for-raspberrypi/, follow this tutorial, you have to change the img file size and its content, but we have to do some modifications.
The run-qemu file is changed to following:
	#!/bin/bash
	USERID=$(whoami)

	# Get name of newly created TAP device; see https://bbs.archlinux.org/viewtopic.php?pid=1285079#p1285079
	precreationg=$(/usr/bin/ip tuntap list | /usr/bin/cut -d: -f1 | /usr/bin/sort)
	sudo /usr/bin/ip tuntap add user $USERID mode tap
	postcreation=$(/usr/bin/ip tuntap list | /usr/bin/cut -d: -f1 | /usr/bin/sort)
	IFACE=$(comm -13 <(echo "$precreationg") <(echo "$postcreation"))

	# This line creates a random mac address. The downside is the dhcp server will assign a different ip each time
	printf -v macaddr "52:54:%02x:%02x:%02x:%02x" $(( $RANDOM & 0xff)) $(( $RANDOM & 0xff )) $(( $RANDOM & 0xff)) $(( $RANDOM & 0xff ))
	# Instead, uncomment and edit this line to set an static mac address. The benefit is that the dhcp server will assign the same ip.
	# macaddr='52:54:be:36:42:a9'
        macaddr = '52:54:79:3c:80:c0'

	qemu-system-arm -net nic,macaddr=$macaddr -net tap,ifname="$IFACE" -append "root=/dev/sda2 panic=1 rootfstype=ext4 rw" $*

	sudo ip link set dev $IFACE down &> /dev/null
	sudo ip tuntap del $IFACE mode tap &> /dev/null
In router, we add the static address for mac corresponding to 10.0.0.168, you can alter it according to your habit.
Now we want to disable the X at every startup and use vnc instead.
And we can overlocking the raspberryPI to 1000MHZ, this will greatly improve the performance.
Enable the vncserver:
$ apt-get install tightvncserver vim
Now startup the vncserver and use vncviewer to view the desktop:
No, the correct method is listed as:
	cat /eroot@raspberrypi:~# cat /etc/init.d/startvnc
	#!/bin/sh -e
	### BEGIN INIT INFO
	# Provides:          vncserver
	# Required-Start:    networking
	# Default-Start:     3 4 5
	# Default-Stop:      0 6
	### END INIT INFO

	PATH="$PATH:/usr/X11R6/bin/"

	# The Username:Group that will run VNC
	export USER="pi"
	#${RUNAS}

	# The display that VNC will use
	DISPLAY="1"

	# Color depth (between 8 and 32)
	DEPTH="16"

	# The Desktop geometry to use.
	#GEOMETRY="<WIDTH>x<HEIGHT>"
	#GEOMETRY="800x600"
	#GEOMETRY="1024x768"
	GEOMETRY="1280x1024"

	# The name that the VNC Desktop will have.
	NAME="my-vnc-server"

	OPTIONS="-name ${NAME} -depth ${DEPTH} -geometry ${GEOMETRY} :${DISPLAY}"

	. /lib/lsb/init-functions

	case "$1" in
	start)
	log_action_begin_msg "Starting vncserver for user '${USER}' on   localhost:${DISPLAY}"
	su ${USER} -c "/usr/bin/vncserver ${OPTIONS}"
	;;

	stop)
	log_action_begin_msg "Stoping vncserver for user '${USER}' on localhost:${DISPLAY}"
	su ${USER} -c "/usr/bin/vncserver -kill :${DISPLAY}"
	;;

	restart)
	$0 stop
	$0 start
	;;
	esac

	exit 0
And now we can add this script into /etc/rc.local as:
	# Start the vncserver here:
	/etc/init.d/startvnc start
So everytime we startup the qemu based raspberryPI, we can easily attached to its geometry, and we can easily adapt the resolution.
Mar 18, 2014
TechnologyFollowing is the steps for moving the weather app to BBB(BeagleBone Black)
###Apache Configuration
Create the site definition file under /etc/apache2/sites-available:
$ cp default nanjing
Edit the nanjing file with the following content:
	$ cat nanjing
	<VirtualHost *:7778>
		ServerAdmin webmaster@localhost
	        ServerName nanjing
	        ServerAlias nanjing.weather

		DocumentRoot /srv/www1
		<Directory />
			Options FollowSymLinks
			AllowOverride None
		</Directory>
		<Directory /srv/www1/>
			Options Indexes FollowSymLinks MultiViews
			AllowOverride None
			Order allow,deny
			Allow from all
		</Directory>

		ScriptAlias /cgi-bin/ /usr/lib/cgi-bin/
		<Directory "/usr/lib/cgi-bin">
			AllowOverride None
			Options +ExecCGI -MultiViews +SymLinksIfOwnerMatch
			Order allow,deny
			Allow from all
		</Directory>

		ErrorLog ${APACHE_LOG_DIR}/error.log

		# Possible values include: debug, info, notice, warn, error, crit,
		# alert, emerg.
		LogLevel warn

		CustomLog ${APACHE_LOG_DIR}/access.log combined
	</VirtualHost>
Then we have to edit the /etc/apache2/ports.conf file, to add the newly-added site definition file.
	$ cat ports.conf
	NameVirtualHost *:7777
	Listen 7777
	NameVirtualHost *:7778
	Listen 7778
	NameVirtualHost *:7779
	Listen 7779
	NameVirtualHost *:7780
	Listen 7780
Now you already could visit the site of http://Your_Ip_Address:7777 for the nanjing weather infos.
###Script Moving
Be sure following modules has been installed:< br />
	$ pip install django pywapi pinyin
	$ pip install BeautifulSoup
Add the crontab tasks:
	0 */1 * * * python /root/code/genhtml.py
	15 */1 * * * python /root/code/genhtml_bj.py
	30 */1 * * * python /root/code/genhtml_changsha.py
Now the script will be run every hour at 0/15/30 minutes, enjoy it.
Notice the timezone should be correctly configured:
	$  dpkg-reconfigure tzdata
	# Choose Asia/Shanghai
Mar 17, 2014
TechnologySince I enabled the RaspberryPI and disabled the PogoPlug, I have to move the Weather App on RaspberryPI.
The main difference lies on the python version, on PogoPlug the default python version is python2.7, while on RaspberryPI it’s python3.3, thus I have to use the virtualenvironment of Python.
###Setup the virtualenv
Following is the steps for setting up the virtual environment for python2.7 on ArchLinux:
	$ mkdir ~/pyves
	$ cat >~/.virtualenvrc <<EOF
	export WORKON_HOME="$HOME/pyves"
	export PROJECT_HOME="$HOME/pyves"
	source /usr/bin/virtualenvwrapper.sh
	EOF
	$ source  ~/.virtualenvrc
	$ cat >>~/.bashrc <<EOF
	source $HOME/.virtualenvrc
	EOF
	$ mkvirtualenv --python=/usr/bin/python2.7 v27
	$ workon v27
	$ pip install pywapi django sqlite3
###Deployment Python Script
Copy the script to some directory, mine is under /root/code/weather.
If we want cron to call the virtual environment, we have to create a script and in the script to call the python script.
	#!/bin/bash
	# Export everything.
	source /root/.bashrc
	# Change to the virtual environment
	workon v27
	# Call python
	python /root/code/weather/genhtml.py
Now we add this script to crontab, at every whole point, each hour it will run once.
	crontab -e
	0 */1 * * * /root/code/weather/NJ.sh
	15 */1 * * * /root/code/weather/BJ.sh
	30 */1 * * * /root/code/weather/CS.sh
Now at every 0/15/30, our cron job will be run, and retrieve the data generate the flot image for displaying.
Mar 17, 2014
TechnologyRecent days I am doing a data migration from asp website to WordPress, Following is how-to.
###Database
First we have to download the whole website content from the server, in my situation, the website contains a database called “xxxx.mdb”, I downloaded this database and renamed its name to “origin.mdb"
We can use Microsoft Access for opening this database file, and from the left side panel we can see all of the tables.
We know the about/news1/news2/news3/news4 table which contains the actual webpages content.
We can see the picture of news1 which displayed as following:
 ###CSV Preparation
In a Ubuntu machine, we install mdbtools via following command:
###CSV Preparation
In a Ubuntu machine, we install mdbtools via following command:
$ sudo apt-get install mdbtools
Export the specified tables from the mdb file:
$ mdb-export origin.mdb news > news.csv
The CSV file is seperated via semicolon, just linke following:
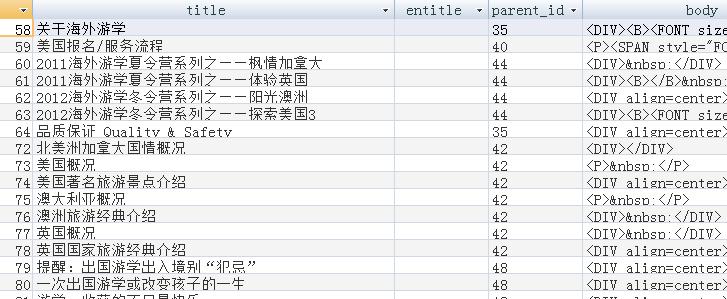
	$ cat news.csv
	id,title,entitle,url,body,enbody,zz,hit,data,ssfl,img,ly,enly,color,encolor,tuijian,px_id,pass,kin
	58,"关于海外游学",,,"<DIV><B><FONT size=2 face=Arial>关于游学</FONT></B></DIV>
	<DIV><FONT size=2><FONT face=Arial><STRONG></STRONG><B></B></FONT></FONT>&n
	............
Now the news.csv contains all of the content which contains in the news table.
###WordPress Plugins Installation
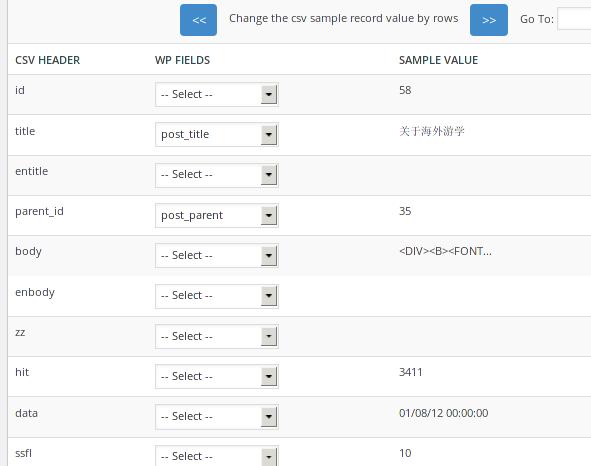
Install the WP Ultimate CSV Importer for importing the csv into the WordPress:
This Plug-ins is fairly frendly, we simply upload the csv onto the plug-in, the plugin will analyse the csv’s content,and begin to mapping the database fields.
Notice: You can import the csv into posts or pages, here I choose “Pages”, and it got the Parent Pages, so first you have to create the parent page, just as following:

The content of parent page named “[child_pages]” is also another plug-in, this plug-in is called “Child Pages Shortcode”, after installed it, you can get the “screenshots” of the child pages.
The actual effects is listed as following picture:

Another plug-in is called “Children Index Shortcode”. This plug-in will generate all of the child pages’ hyper-links. You can call this plug-in via insert “children-index” into the content of the parent page.
###Change The Theme
You can easily install themes in wordpress, via Appearence->Theme.
Currently I use “BlackBird Wordpress Theme”, the default suport of chinese is pretty good.
Things to be do:
- Check all of the images.
- Beautify the pages.
- Customize the pages.
