Dec 23, 2013
Technology###Material
Just some items on how to setup a wordpress website on Ubuntu12.04 and Ubuntu13.04.
The tutorial for setting up wordpress on Ubuntu12.04 is located at:
https://www.digitalocean.com/community/articles/how-to-install-wordpress-on-ubuntu-12-04
And a tutorial for setting up LAMP server on Ubuntu12.04 is located at:
https://www.digitalocean.com/community/articles/how-to-install-linux-apache-mysql-php-lamp-stack-on-ubuntu
###TroubleShotting
I encountered some problem during setup. Following is the solutions for them.
####Delete the previous installed wordpress
	# mysqladmin -uXXXX -pXXXXXXXX drop wordpress
	Do you really want to drop the 'wordpress' database [y/N] y
Then you can Re-Create the database.
####Upload file size limitation
Edit the file limitation via:
	# vim /etc/php5/apache2/php.ini
		post_max_size = 64M
		upload_max_filesize = 64M
	# /etc/init.d/apache2 restart
####Reset the default webserver
Change from default nginx to apache2 server:
	$ update-rc.d -f nginx disable
	$ update-rc.d -f apache2 enable
####Fresh Re-install of apach2
Sometimes you have to re-set the configuration of apache, following steps will let you freshly re-install it.
	$ apt-get remove --purge apache2 apache2-utils php5-cgi php5-fpm libapache2-mod-php5filter libapache2-mod-php5  apache2.2-common
	$ apt-get install  apache2 apache2-utils php5-cgi php5-fpm  apache2.2-common
	$ apt-get install libapache2-mod-php5filter
	$ apt-get install libapache2-mod-php5
Dec 21, 2013
Technologynanoc is a static site generator, fit for building anything from a small personal blog to a large corporate web site.
###Installation
Simply do following:
	mkdir nanoc
	cd nanoc/
	gem install nanoc
Then create a tutorial site
nanoc create-site tutorial
Compile the site out
nanoc compile
Before your preview, install adsf
gem install adsf
Now you can preview the website
nanoc view
Dec 20, 2013
Technology1. Download Putty, it’s a green software, click it and then you got its configuration window.
2. Configure the ssh Tunnel via following
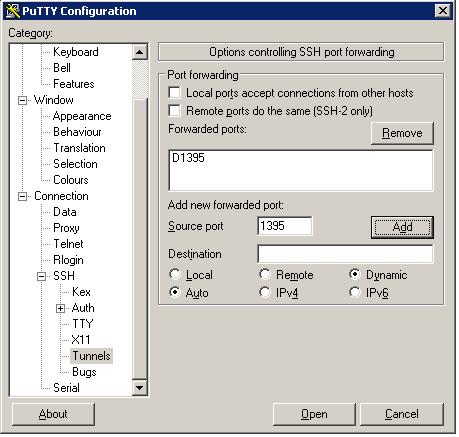
3. Disable the Command line interface.
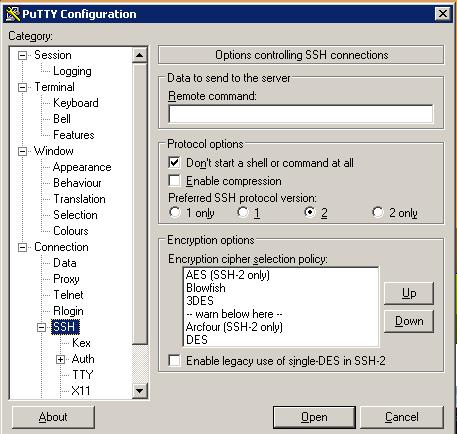
4. Now using the configuration you can logon to remote server.
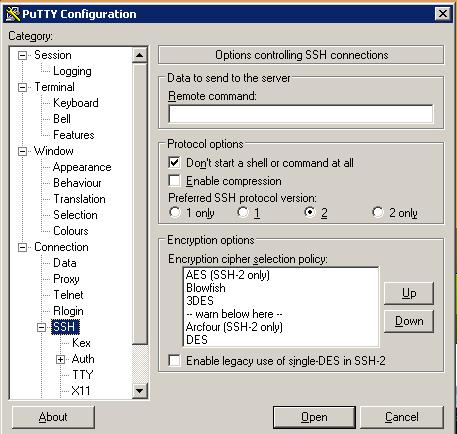
5. Now you can use socket proxy via “127.0.0.1”, port is 1395.
Dec 19, 2013
TechnologyAfter 4 days struggling, I finally make bluetooth headset working on my ArchLinux. Following is the detailed how-to which shows how to enable bluetooth playing.
###Software Installation
Currently blueman is still the best bluetooth management software, we can install it via:
	$ yaourt blueman
	1 aur/blueman-bzr 726-2 [installed] (38)
	    GTK+ bluetooth management utility
Then we have to install bluez related items:
	$ pacman -S bluez-utils bluez-libs python2-pybluez
	$ yaourt -S bluez4
	$ yaourt pulseaudio-bluez4
###Bluetooth Configuration
First make sure your bluetooth service is enabled.
	$ sudo systemctl start bluetooth
	$ sudo systemctl enable bluetooth
Now we need to make change to following files:
	[Trusty@XXXyyy ~]$ cat /etc/bluetooth/audio.conf

	[General]
	Enable=Socket

	[A2DP]
	SBCSources=1
Now we can manually startup blueman manager via:
$ blueman-manager
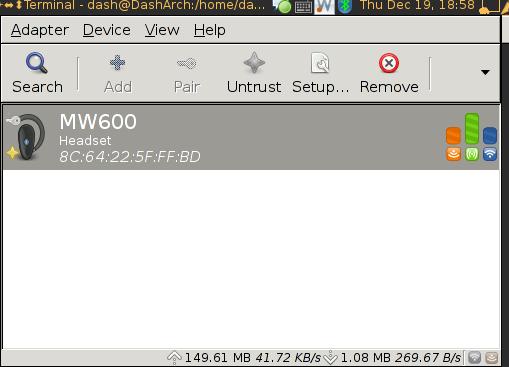
Click “Search” to find the avaiable headset, pair, trust, setup. Right click the found headset, choose “Audio Sink”, if successful, you will see the equipment has been successfully added into the system.
Add blueman automatically to the system startup script. We can add it into the awsome window manager:
	autorunApps =
	{
	--.........
	"blueman-manager",
	--.........
	}
###PulseAudio Configuration
First we have to define the alsa device in /etc/asound.conf:
	pcm.btheadset {
	   type plug
	   slave {
	       pcm {
	           type bluetooth
	           device 8C:64:goewugowugoeu
	           profile "auto"
	       }
	   }
	   hint {
	       show on
	       description "BT Headset"
	   }
	}
	ctl.btheadset {
	  type bluetooth
	}
Now via “aplay -l” we can see the following item:
	$ aplay -L
	null
	    Discard all samples (playback) or generate zero samples (capture)
	pulse
	    PulseAudio Sound Server
	btheadset
	    BT Headset
In fact currently we can play sounds via mplayer, by specifying its default audio path is OK. But we want to make this audio sink path globally.
The steps for manually enabling the audio sink path via following steps:
Load device of btheadset
$ pactl load-module module-alsa-sink device=btheadset
Load bluetooth discover module
$ pacmd load_module module-bluetooth-discover
List the available cards
$ pactl list cards short
The upper output is still one audio card, but all we care is the audio sink, so we list all of the available audio sinks via:
	$ pactl list sinks short
	0	alsa_output.pci-0000_00_1b.0.analog-stereo	module-alsa-card.c	s16le 2ch 44100Hz	SUSPENDED
	1	alsa_output.btheadset	module-alsa-sink.c	s16le 2ch 44100Hz	SUSPENDED
Set the default audio sink to bluetooth headset:
	$ pacmd set-default-sink 1
Congratulations! Now you can listen to music via bluetooth headset!
###Automatically Configuration
Following is the configuration for my machine, you have to adjust the parameters according to yourself:
Comment the following items in /etc/pulse/default.pa, the module-bluetooth-policy should be commented, or the pulse audio will not start:
	### Automatically load driver modules for Bluetooth hardware
	#.ifexists module-bluetooth-policy.so
	#load-module module-bluetooth-policy
	#.endif
	#
	.ifexists module-bluetooth-discover.so
	load-module module-bluetooth-discover
	.endif
Surely you will start bluetooth daemon by default:
$ sudo systemctl enable bluetooth
Add “blueman-applet” into the awesome startup file(.config/awesome/rc.lua).
The right steps for using bluetooth:
- Startup Your machine with bluetooth background and blueman-applet enabled.
- Power on your bluetooth headset. If your key is accepted permanately, the bluetooth headset will connect automatically.
- Manually add the audio sink via “pactl load-module module-alsa-sink device=btheadset”.
- Set the default route path of the audio sink via “pacmd set-default-sink 1” ( all of the audio sink could be listed via “pactl list sinks short”)
Now you can enjoy the bluetooth, for convenient, I made an alias:
alias enableblue='pactl load-module module-alsa-sink device=btheadset && pacmd set-default-sink 1"
Dec 19, 2013
TechnologySince trying to enable BT headset failed on Ubuntu12.04 Server, I decide to try xubuntu version. So I download the image from http://joggler.exotica.org.uk/ubuntu/, then extract it to get the image.
###Get the filesystem
Use fdisk to get the img layout
	root@joggler:/media/nfs/xubuntu# fdisk -l xubuntu_12.04-v1.4-ext4.img
	                      Device Boot      Start         End      Blocks   Id  System
	xubuntu_12.04-v1.4-ext4.img1   *        2048      126975       62464    e  W95 FAT16 (LBA)
	xubuntu_12.04-v1.4-ext4.img2          126976      626687      249856   82  Linux swap / Solaris
	xubuntu_12.04-v1.4-ext4.img3          626688     7800831     3587072   83  Linux
So we can caculate the offset is 626688X512=320864256.
Use following commands to copy the filesystem out to the actual disk:
	$ mount ./xubuntu_12.04-v1.4-ext4.img  -o offset=320864256 /mnt3/
	$ mount /dev/uba5 /mnt
	$ cp -ar /mnt3/* /mnt/
My disk layout is:
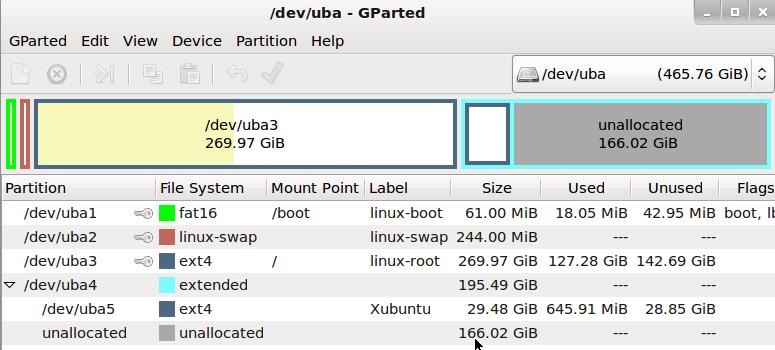 ###Modification for bootup Xubuntu
####Add new item for grub:
Get the disk labels:
	$ ls /dev/disk/by-label/
	Xubuntu  linux-boot  linux-root  linux-swap  mmc-boot  mmc-root
The newly added label “Xubuntu” is the one we store the filesystem of Xubuntu. We need to add a new item to point at this partition.
	root@joggler:/boot# cat grub.cfg
	loadfont /unicode.pf2
	terminal_output gfxterm
	set timeout=5
	menuentry "XUbuntu 12.04 LTS (Precise) - 3.2.32joggler1" {
	  linux /vmlinuz-3.2.32joggler1 root=LABEL=Xubuntu ro quiet splash text
	  initrd /initrd.img-3.2.32joggler1
	}
#####Change the fstab
We have to change the root partition to “Xubuntu”
	root@joggler:/mnt3# cat /mnt3/etc/fstab
	# /etc/fstab: static file system information.
	#
	# Use 'blkid -o value -s UUID' to print the universally unique identifier
	# for a device; this may be used with UUID= as a more robust way to name
	# devices that works even if disks are added and removed. See fstab(5).
	#
	# <file system> <mount point>   <type>  <options>       <dump>  <pass>
	proc             /proc		proc	nodev,noexec,nosuid	0       0
	LABEL=Xubuntu	 /		ext4	errors=remount-ro,noatime		0       1
	LABEL=linux-boot /boot		vfat	defaults		0       0
	LABEL=linux-swap none		swap	sw			0       0
Now reboot to see if we could enter xubuntu? Since we cannot use keyboard in grub, we could only enable one distribution, this is different from the tranditional grub.
####Configure Bluetooth
Install module for pulseaudio
apt-get install pulseaudio-module-bluetooth
Then reboot. Currently connect the bluetooth, then in pulseaudio you will select the corresponding sound card. Enjoy it!
Tips for avoiding auto hiberate of usb disk, as root:
	$ crontab -e
	*/4 * * * * fdisk -l /dev/uba >/dev/null
Now your disk will never be hiberate, avoiding system from broken.


 ###Modification for bootup Xubuntu
####Add new item for grub:
Get the disk labels: