May 9, 2014
TechnologyGet Current Weather Data
Now we begin to change our APP to a real funny staff. First we change the hello.py and begin to write our own “genhtml.py”
$ mv hello.py genhtml.py
$ cat Procfile
web: gunicorn genhtml:app
We know there is an python library which we could install from pip named “pywapi”, simply install it via:
(venv2) $ pip install pywapi
If your pip’s version is 1.5.1, then notice you have to use following command for installing the pywapi:
(venv2) $ pip install pywapi --allow-external pywapi --allow-unverified pywapi
Downloading/unpacking pywapi
  pywapi is potentially insecure and unverifiable.
  Downloading pywapi-0.3.8.tar.gz
  Running setup.py (path:/home/Trusty/code/herokuWeatherApp/venv/build/pywapi/setup.py) egg_info for package pywapi

Installing collected packages: pywapi
  Running setup.py install for pywapi

Successfully installed pywapi
Cleaning up...
Now change the genhtml.py to following content:
import os
from flask import Flask

import pywapi
import string

app = Flask(__name__)

@app.route('/')

# Generate the Nanjing Weather Data
def genhtml():
    Yahoo_Result = pywapi.get_weather_from_yahoo('CHXX0099')
    Current_Temp = string.lower(Yahoo_Result['condition']['temp'])
    Current_Humi = string.lower(Yahoo_Result['atmosphere']['humidity'])
    Tomorrow_Forecast = Yahoo_Result['forecasts'][0]
    Twenty_Four_Hours = Yahoo_Result['forecasts'][1]
    Fourty_Eight_Hours = Yahoo_Result['forecasts'][2]
    Seventy_Two_Hours = Yahoo_Result['forecasts'][3]
    return Current_Temp
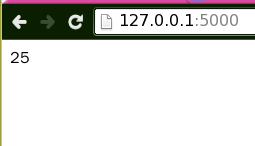
After modification, we use “foreman start” for previewing the result, we can see the webpage returns the current temperature of Nanjing, its value is 25, as in following picture:

This shows the pywapi could be work together with other components, we will continue for next step.
###Deployment On Heroku
You need to change the requirement.txt file like following:
$ cat requirements.txt
--allow-all-external
--allow-unverified pywapi
Flask==0.10.1
Jinja2==2.7.2
MarkupSafe==0.23
Werkzeug==0.9.4
gunicorn==18.0
itsdangerous==0.24
pywapi==0.3.8
wsgiref==0.1.2
Then run “git push heroku master”, open your browser and visit http://python-weather-app.herokuapp.com/, the output the same as in local.
By now, we have created a very simple app on getting the current temperature of nanjing, next chapter we will use database for timely record the data.
May 9, 2014
TechnologyDatabase Introduction
Heroku Postgres Installation
Before using postgres, we have to install this add-ons, we call this step “attach Heroku POSTGRES to heroku application”:
$ heroku addons
python-weather-app has no add-ons.
$ heroku addons:add heroku-postgresql:dev
Adding heroku-postgresql:dev on python-weather-app... done, v7 (free)
Attached as HEROKU_POSTGRESQL_OLIVE_URL
Database has been created and is available
 ! This database is empty. If upgrading, you can transfer
 ! data from another database with pgbackups:restore.
Use `heroku addons:docs heroku-postgresql` to view documentation.
$ heroku addons | grep POSTGRES
heroku-postgresql:dev  HEROKU_POSTGRESQL_OLIVE
If you want to refer the documentation of heroku postgres, simply use following command:
$ heroku addons:docs heroku-postgresql
Opening heroku-postgresql docs... done
A new browser window will be opened and you can view the help here.
View the configuration of heroku postgres via:
$ heroku pg:info
=== HEROKU_POSTGRESQL_OLIVE_URL (DATABASE_URL)
Plan:        Dev
Status:      Available
Connections: 0
PG Version:  9.3.4
Created:     2014-05-09 11:25 UTC
Data Size:   6.4 MB
Tables:      0
Rows:        0/10000 (In compliance)
Fork/Follow: Unsupported
Rollback:    Unsupported
10000 rows means, if we use 24 rows per day, then around 1 year this database will be fulfilled. But anyway, at the very beginning developing, we won’t consider the latter problem.
After you installed the postgre for around 5 minutes, you can use following commands for displaying your database:
$ heroku pg:ps
 pid | state | source | running_for | waiting | query
-----+-------+--------+-------------+---------+-------
(0 rows)
Now you can connect to pg via following command:
$ heroku pg:psql
---> Connecting to HEROKU_POSTGRESQL_OLIVE_URL (DATABASE_URL)
psql (9.3.4)
SSL connection (cipher: DHE-RSA-AES256-SHA, bits: 256)
Type "help" for help.

d47ena4men35jn=>
What for next?
Local Postgres Installation
Install postgres via:
$ sudo pacamn -S postgre
$ sudo -i -u postgres
[postgres@DashArch ~]$ initdb --locale en_US.UTF-8 -E UTF8 -D '/var/lib/postgres/data'
# In another terminal, enable and start the service
$ sudo systemctl start postgresql
$ sudo systemctl enable postgresql
Now add current user into the postgres user:
[postgres@DashArch ~]$ createuser --interactive
Enter name of role to add: Trusty
Shall the new role be a superuser? (y/n) y
# Now 'Trusty' as postgres user, can create the weatherData database.
$ createdb weatherData
Basic user of postgres:
$ psql -d weatherData
psql (9.3.4)
Type "help" for help.

weatherData=# \help
......
weatherData=# \q
$
Connect Database In Python(Local Way)
Install the python packages:
$ pip install psycopg2
$ pip freeze
# Add the psycopg2 related line into the requirements.txt
A simple example on how to connect Database and view the content of the database:
[Trusty@~]$ sudo -u postgres createuser jim
[Trusty@~]$ sudo -u postgres createdb testdb -O jim
[Trusty@~/code/herokuWeatherApp]$ source venv/bin/activate
(venv)[Trusty@~/code/herokuWeatherApp]$ python
Python 2.7.6 (default, Feb 26 2014, 12:07:17)
[GCC 4.8.2 20140206 (prerelease)] on linux2
Type "help", "copyright", "credits" or "license" for more information.
>>> import psycopg2
>>> import sys
>>> con = None
>>> con = psycopg2.connect(database='testdb', user='jim')
>>> cur = con.cursor()
>>> cur.execute('SELECT version()')
>>> ver = cur.fetchone()
>>> print ver
('PostgreSQL 9.3.4 on x86_64-unknown-linux-gnu, compiled by gcc (GCC) 4.8.2 20140206 (prerelease), 64-bit',)
>>> con.close()
>>> quit()
(venv)[Trusty@~/code/herokuWeatherApp]$
Connect Heroku Postgres
Now commit our modifications into heroku, and verify to see if we can really do some magic things with postgres:
$ git add .
$ git commit -m "commit for postgres"
$ git push heroku master
Install a new library:
$ pip install flask-sqlalchemy
$ pip freeze  # grep the line and add it into the requirement.txt
Promoting the URL to DATABASE_URL:
$ heroku pg:promote HEROKU_POSTGRESQL_OLIVE_URL
Promoting HEROKU_POSTGRESQL_OLIVE_URL (DATABASE_URL) to DATABASE_URL... done
Then Add the following lines into genhtml.py:
from flask.ext.sqlalchemy import SQLAlchemy
app.config['SQLALCHEMY_DATABASE_URI'] = os.environ['DATABASE_URL']
db = SQLAlchemy(app)

##############FenGe_Line####################
class User(db.Model):
    id = db.Column(db.Integer, primary_key=True)
    name = db.Column(db.String(80))
    email = db.Column(db.String(120), unique=True)

    def __init__(self, name, email):
        self.name = name
        self.email = email

    def __repr__(self):
        return '<Name %r>' % self.name
Commit again and begin for verifying the database via CLI:
Create a python interactive command window via:
>>> from genhtml import db
>>> db.create_all()
>>> from genhtml import User
>>> user = User('John Doe', 'john.doe@example.com')
>>> db.session.add(user)
>>> db.session.commit()
>>> all_users =User.query.all()
>>> print all_users
[<Name u'John Doe'>]
Now we can see 1 record has been inserted into the database:
[Trusty@~/code/herokuWeatherApp]$ heroku pg:info
=== HEROKU_POSTGRESQL_OLIVE_URL (DATABASE_URL)
Plan:        Dev
Status:      Available
Connections: 2
PG Version:  9.3.4
Created:     2014-05-09 11:25 UTC
Data Size:   6.5 MB
Tables:      1
Rows:        1/10000 (In compliance)
Fork/Follow: Unsupported
Rollback:    Unsupported
How to see the inserted data?
$ heroku pg:psql
---> Connecting to HEROKU_POSTGRESQL_OLIVE_URL (DATABASE_URL)
psql (9.3.4)
SSL connection (cipher: DHE-RSA-AES256-SHA, bits: 256)
Type "help" for help.

d47ena4men35jn=> select current_database();
 current_database
------------------
 d47ena4men35jn
(1 row)

d47ena4men35jn=> \dt
           List of relations
 Schema | Name | Type  |     Owner
--------+------+-------+----------------
 public | user | table | yjusdsrpwpplxp
(1 row)

d47ena4men35jn=> \d user;
                                 Table "public.user"
 Column |          Type          |                     Modifiers
--------+------------------------+---------------------------------------------------
 id     | integer                | not null default nextval('user_id_seq'::regclass)
 name   | character varying(80)  |
 email  | character varying(120) |
Indexes:
    "user_pkey" PRIMARY KEY, btree (id)
    "user_email_key" UNIQUE CONSTRAINT, btree (email)

d47ena4men35jn=> SELECT * FROM public.user;
 id |   name   |        email
----+----------+----------------------
  1 | John Doe | john.doe@example.com
(1 row)
We can use python’s interface for add/delete records, drop tables, etc.
May 9, 2014
TechnologyLocal Database Sync
First fetch the remote database to localdb via following command:
$ heroku pg:pull DATABASE_URL mylocaldb --app python-weather-app
This command will pull down your database down and create a copy version locally. You can easily view all of the database via psql mylocaldb.
As root, edit following files:
# pwd
/var/lib/postgres/data
# vim postgresql.conf
listen_addresses = 'localhost'		# what IP address(es) to listen on;
					# comma-separated list of addresses;
					# defaults to 'localhost'; use '*' for all
					# (change requires restart)
port = 5432				# (change requires restart)
# vim pb_hba.conf
# IPv4 local connections:
host    all             all             127.0.0.1/32            trust
host    all             all             127.0.0.1/32            md5
After editing, save the file and restart the postgresql service.
Connecting to LocalDatabase
Following shows how to add/query the records. Now your environment could be totally debugged locally.
>>> import psycopg2
>>> psycopg2.connect(database="mylocaldb",user="Trusty",password="",host="127.0.0.1",port="5432")
<connection object at 0x30f0cd0; dsn: 'dbname=mylocaldb user=Trusty password=xx host=127.0.0.1 port=5432', closed: 0>
>>> db_conn = 'postgresql+psycopg2://Trusty:@localhost/mylocaldb'
>>> app = Flask(__name__)
>>> app.config['SQLALCHEMY_DATABASE_URI'] = db_conn
>>> db = SQLAlchemy(app)
>>> db.create_all()
>>> class User(db.Model):
...     id = db.Column(db.Integer, primary_key=True)
...     name = db.Column(db.String(80))
...     email = db.Column(db.String(120), unique=True)
...     def __init__(self, name, email):
...         self.name = name
...         self.email = email
...     def __repr__(self):
...         return '<Name %r>' % self.name
...
>>> user = User('John Doe', 'john.doe@example.com')
>>> all_users=User.query.all()
>>> print all_users
[<Name u'John Doe'>]
>>> user1 = User('Jim Green', 'jim.green@english.com')
>>> db.session.add(user1)
>>> db.session.commit()
In genhtml.py we need to do corresponding changes in order to enable the local database.
May 8, 2014
TechnologyNetwork Envorinment Introduction
The network envoriment in daily working envoriment is very bad, thus I have to think for a solution, which could improve my network speed.
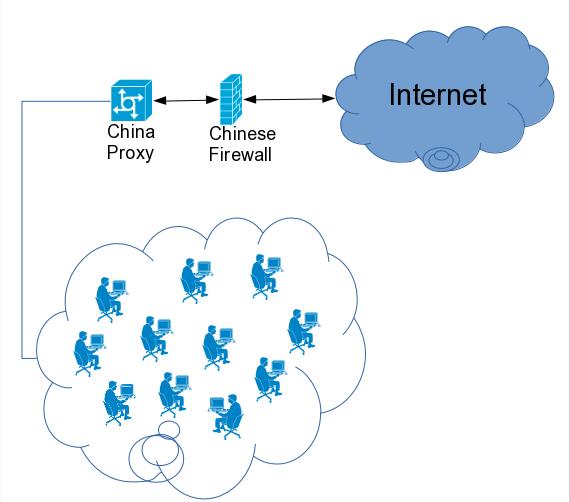
Following picture describes the network topology of the daily working.

From the picture we can see, several users shared a very narrow path, and this path have to go through chinese firewall, this firewall is ghastly, because it will filter some sensitive website which is not welcomed by CN gov.
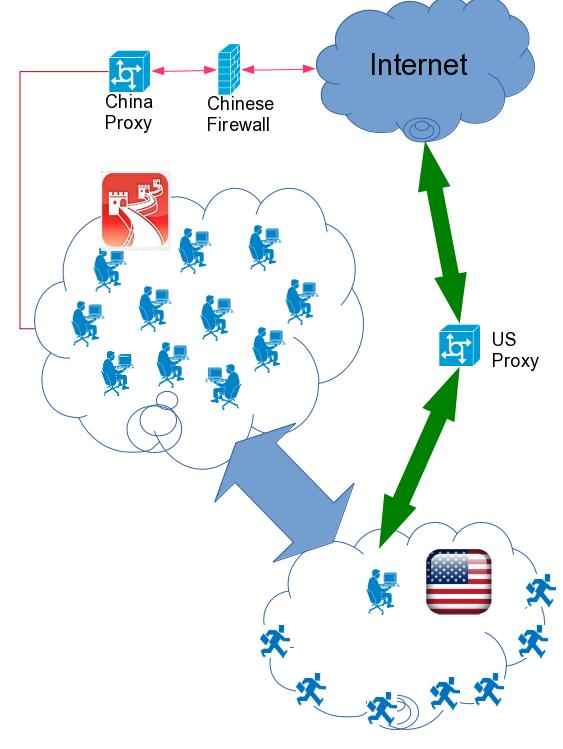
Our VPN Introduction
There are very wide VPN(Virtual Private Network) between CN and US, the US networking don’t have to pass through the firewall.
Another big surprise is created by the time difference, when chinese are working, lots of american people are out of office.

Surely we can make full use of our whole company’s network condition.
Solution 1: SSH Forwarding
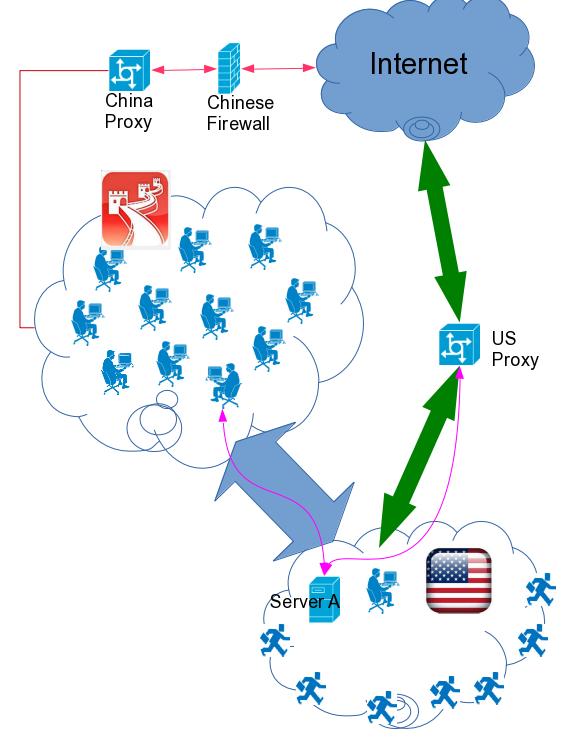
First we will find a server which could forward ssh, just like in the picture.

Then we can use following command for setup a ssh tunnel, which could forwarding our network flow to us proxy:
$ ssh -C -L YourMachine:Port:USProxy:USProxy_Port YouAccount@ForwardingServer
Then in your browser or your application, use http://YourMachine:Port as a proxy.
Solution 2: TCP Tunnel Forwarding
Not every server can open ssh forwarding for you. For example, in following server, tcp forwarding is forbidden:
$ cat /etc/ssh/sshd_config
# Port forwarding
AllowTcpForwarding no
Thus we have to setup our own tcp tunnel manually.
Netcat Way
Use following way you can use netcat for creating a very simple tunnel, which could forwarding all of your flow to US proxy, these operation have to be done on server:
$ mkdir /tmp/fifo
$ nc -lvvp -k 2323 0</tmp/fifo | nc -k USproxy USProxy_Port 1>fifo
Then set the local proxy to http://server_ip:2323, then you can reached the proxy.
Tunnel Way
Netcat way is OK, but the netcat version is very old on US Server, it can’t support ‘-k’ option, for ‘-k’ option is only supported by openbsd-netcat, and because the server is too old(It’s Sun OS 5.10, or solaris? ), so we have to find other ways.
Luckily I find a small tool, which could fit for our requirement.
$ wget http://www.cri.ensmp.fr/~coelho/tunnel.c
$ gcc -o tunnel tunnel.c -lsocket
This compiling will complain ‘herror’ is not supported, thus we have to comment them, or change them from ‘herror’ to ‘printf’, anyway, the error happens seldomly.
Use following command for setting up a tunnel in server:
$ ./tunnel -Lr server_ip:1080 proxy:80
Then in your own PC, set proxy to http://server_ip:1080, you can reach the internet through your own tunnel, which will guide your traffic from VPN to US, then to Internet.
Make Tunnel Invisible
Normally system administrator won’t like tunnel on server, maybe they will scan the server and find out the port occupation. So we have to do some modification to tunnel.c.
First, change the name of the executable file:
$ mv tunnel.c autrace.c
$ gcc -o autrace autrace.c -lsocket
So now, you can run your tunnel program via ‘./autrace -Lr localhost:1080 proxy:80’.
But this is not so safe, administrator will also find the port, then they will track this port, and find your tricks, so we have to hidden the port words.
In autrace.c, do following changes in corresponding lines:
//  Around line 128, change the ip/port into your own.

/* default connexion. */
#define LHOST "138.138.138.138" /* this really means 127.0.0.1, thus no network! */
#define LPORT "4444"
/* DHOST: <same as chosen LHOST> */
//#define DPORT "23"        /* telnet port */
#define DHOST "139.139.139.139"
#define DPORT "8888"

// Around line 1023, this is actually a bug.
 dhosts = getenv("DHOST"); 1023
Now you can run command like:
$ ./autracce -s
Make Tunnel Only Serve for you
We have to forbidden other user use our tunnel, because http://server_ip:port is open to all of the person in VPN.
We add following ACL rule in the autrace.c:
// in main(), around line 935
  /* Initialize the parameter for ACL(Access Control List) */
  struct sockaddr_in sa;
  inet_pton(AF_INET, "Your_IP_Address", &(sa.sin_addr));
  allow_address = ntohl(sa.sin_addr.s_addr);

// in main(), around line 1187
      /* In here, we will do filter, filter specified ip address */
      /* Compare the allowed ip address with the incomming's ip address */
      if( allow_address != (ntohl(client_addr.sin_addr.s_addr)))
      {
        fprintf(stderr, "Sorry, you are not welcomed!\n");
        /* No more receive/send any data */
        shutdown(client_socket, 2);
      }
The code will check the incoming client’s ip address, and comparing it to our pre-defined ip address(Your_IP_Address), if they are not equal, our server will directly close the socket, so the client will receive refuse information.
Now you have a very safe and reliable path will will let you reach the internet via wide VPN and swift US network, enjoy it.
May 8, 2014
TechnologySee if your equipment support “Wake On LAN” feature:
$ ethtool enp0s25 | grep "Wake"
Cannot get wake-on-lan settings: Operation not permitted
If you got this feature, then install wol:
$ pacman -S wol
Record the mac address of your equipment which you want to wake up, in a living machine, if you want to wake it, simply use following command:
# wol -i HOSTNAME_OR_IP MACADDRESS
The next consideration is, how to keep a wake-up equipment 24-hours, I suggest you use BeagleBone or Raspberry PI, or you can research how to use arduino and write your own applications.


