Jun 24, 2014
TechnologyFollowing is my tmux cheet sheet, it will be updated from time to time.
Create a new tmux session:
$ tmux new
Given session name:
$ tmux new -s session-name
Detach: ctrl + b, ‘d`.
List existing session:
$ tmux ls
Attached to existing session:
$ tmux a -t session-name
Attached to first session:
$ tmux a
Jun 18, 2014
TechnologyMongoDB
Install MongoDB via:
$ sudo pacman -S mongodb
$ sudo systemctl start mongodb
$ sudo systemctl enable mongodb
$ mongodb
Later I will cover this topic.
MySQL
Installation of MySQL
The implementation chosen by Arch Linux is called MariaDB, install it via:
$ sudo pacman -S mariadb
Configuration steps:
$ sudo systemctl start mysqld.service
[Trusty@~]$ sudo mysql_secure_installation
/usr/bin/mysql_secure_installation: line 379: find_mysql_client: command not found

NOTE: RUNNING ALL PARTS OF THIS SCRIPT IS RECOMMENDED FOR ALL MariaDB
      SERVERS IN PRODUCTION USE!  PLEASE READ EACH STEP CAREFULLY!

In order to log into MariaDB to secure it, we'll need the current
password for the root user.  If you've just installed MariaDB, and
you haven't set the root password yet, the password will be blank,
so you should just press enter here.

Enter current password for root (enter for none):
OK, successfully used password, moving on...

Setting the root password ensures that nobody can log into the MariaDB
root user without the proper authorisation.

Set root password? [Y/n] Y
New password:
Re-enter new password:
Password updated successfully!
Reloading privilege tables..
 ... Success!


By default, a MariaDB installation has an anonymous user, allowing anyone
to log into MariaDB without having to have a user account created for
them.  This is intended only for testing, and to make the installation
go a bit smoother.  You should remove them before moving into a
production environment.

Remove anonymous users? [Y/n] Y
 ... Success!

Normally, root should only be allowed to connect from 'localhost'.  This
ensures that someone cannot guess at the root password from the network.

Disallow root login remotely? [Y/n] Y
 ... Success!

By default, MariaDB comes with a database named 'test' that anyone can
access.  This is also intended only for testing, and should be removed
before moving into a production environment.

Remove test database and access to it? [Y/n] Y
 - Dropping test database...
 ... Success!
 - Removing privileges on test database...
 ... Success!

Reloading the privilege tables will ensure that all changes made so far
will take effect immediately.

Reload privilege tables now? [Y/n] Y
 ... Success!

Cleaning up...

All done!  If you've completed all of the above steps, your MariaDB
installation should now be secure.

Thanks for using MariaDB!
Now you can login the mariadb via:
$ mysql -u root -p
MariaDB [(none)]> SHOW DATABASES;
+--------------------+
| Database           |
+--------------------+
| information_schema |
| mysql              |
| performance_schema |
+--------------------+
3 rows in set (0.00 sec)
Node.js of MariaDB
Redis
Running result:
127.0.0.1:6379> SET my.key test
OK
127.0.0.1:6379> KEYS my.key
1) "my.key"
127.0.0.1:6379> VALUES my.key
(error) ERR unknown command 'VALUES'
127.0.0.1:6379> GET my.key
"test"
127.0.0.1:6379> keys *
 1) "user:jeff@amazon.com:followers"
 2) "user:jeff@amazon.com:follows"
 3) "user:bill@microsoft.com:followers"
 4) "mykey"
 5) "rq:job:b9b76e04-8bb7-4652-83e9-4453de981554"
 6) "rq:queue:default"
 7) "user:mark@facebook.com:data"
 8) "_kombu.binding.celeryev"
 9) "user:fred@fedex.com:data"
10) "user:jeff@amazon.com:data"
11) "rq:queues"
12) "user:bill@microsoft.com:follows"
13) "_kombu.binding.celery"
14) "my.key"
15) "user:bill@microsoft.com:data"
127.0.0.1:6379> KEYS my.key
1) "my.key"
127.0.0.1:6379> SET online.users 0
OK
127.0.0.1:6379> onlien.users
(error) ERR unknown command 'onlien.users'
127.0.0.1:6379> online.users
(error) ERR unknown command 'online.users'
127.0.0.1:6379> KEYS online.users
1) "online.users"
127.0.0.1:6379> GET online.users
"0"
127.0.0.1:6379> INCR online.users
(integer) 1
127.0.0.1:6379> INCR onlien.users
(integer) 1
127.0.0.1:6379> INCR online.users
(integer) 2
127.0.0.1:6379> HSET profile.1 name Guillermo
(integer) 1
127.0.0.1:6379> HGETALL profile.1
1) "name"
2) "Guillermo"
127.0.0.1:6379> HSET profile.1 last Rauch
(integer) 1
127.0.0.1:6379> HGETALL profile.1
1) "name"
2) "Guillermo"
3) "last"
4) "Rauch"
127.0.0.1:6379> HSET profile.1 programmer 1
(integer) 1
127.0.0.1:6379> HGETALL profile.1
1) "name"
2) "Guillermo"
3) "last"
4) "Rauch"
5) "programmer"
6) "1"
127.0.0.1:6379> HDEL profile.1 programmer
(integer) 1
127.0.0.1:6379> HGETALL profile.1
1) "name"
2) "Guillermo"
3) "last"
4) "Rauch"
127.0.0.1:6379> RPSH profile.1.jobs "job 1"
(error) ERR unknown command 'RPSH'
127.0.0.1:6379> RPUSH profile.1.jobs "job 1"
(integer) 1
127.0.0.1:6379> HGET profile.1
(error) ERR wrong number of arguments for 'hget' command
127.0.0.1:6379> HGETALL profile.1
1) "name"
2) "Guillermo"
3) "last"
4) "Rauch"
127.0.0.1:6379> LRANGE profile.1.jobs 0 -1
1) "job 1"
127.0.0.1:6379>
127.0.0.1:6379> RPUSH profile.1.jobs "job 2"
(integer) 2
127.0.0.1:6379> LRANGE profile.1.jobs 0 -1
1) "job 1"
2) "job 2"
127.0.0.1:6379> RPUSH profile.1.jobs "job 3"
(integer) 3
127.0.0.1:6379> LRANGE profile.1.jobs 0 -1
1) "job 1"
2) "job 2"
3) "job 3"
DataSet in Redis:
127.0.0.1:6379> SADD myset "a member"
(integer) 1
127.0.0.1:6379> SMEMBERS myset
1) "a member"
127.0.0.1:6379> SADD myset "a second member"
(integer) 1
127.0.0.1:6379> SMEMEBERS myset
(error) ERR unknown command 'SMEMEBERS'
127.0.0.1:6379> SMEMBERS myset
1) "a second member"
2) "a member"
127.0.0.1:6379> SREM myset "a second member"
(integer) 1
127.0.0.1:6379> SMEMBERS myset
1) "a member"
Jun 16, 2014
TechnologyFollowing is the steps for installing ArchLinux on Surface Pro, from the very beginning.
Prerequisite
First you have to download the iso from http://www.archlinux.org/download, Mine is 2014.06.01.
Also I use a USB-LAN adapter which holds the following information: ASIX Electronics Corp. AX88772B.
A 8G Flash Disk, 80G USB3.0 USB HardDisk. I also use a 4-Port USB2.0 HUB which carries a AC/DC Adapter for using 3 equipemts(FlashDisk/USB Adapter/USB Disk).
Make the bootable flash disk via:
# dd if=/path/to/archlinux.iso of=/dev/sdX bs=1M && sync
After it finished we insert the flash disk into the USB HUB, boot-up the Surface Pro Holding both the Power Key and Volumn - Key. Shortly we will go into the archlinux installtion shell.
Installation Of ArchLinux
These steps are mainly refers to following URL:
https://bbs.archlinuxcn.org/viewtopic.php?id=1037
First start-up the sshd so we can remotely login onto the terminal, thus we could easily copy-paste the commands.
Make partitions on disk
GPT Partition:
cgdisk /dev/sdX
The Partition I made is as following:
# fdisk -l /dev/sdb

Disk /dev/sdb: 74.5 GiB, 80026361856 bytes, 156301488 sectors
Units: sectors of 1 * 512 = 512 bytes
Sector size (logical/physical): 512 bytes / 512 bytes
I/O size (minimum/optimal): 512 bytes / 512 bytes
Disklabel type: gpt
Disk identifier: CEFF8C6A-A06A-46DF-9D10-F4C593C32CA0

Device           Start          End   Size Type
/dev/sdb1         2048      1050623   512M EFI System
/dev/sdb2      1050624      5244927     2G Linux swap
/dev/sdb3      5244928    156301454    72G Linux filesystem
Notice we have to make a seperated EFI partition, because surface pro is UEFI enablbed. We also have a 2-Gigabyte swap partition and remains all of the reset as the root partition.
Now make the filesystems on the disk:
# mkfs.ext4 /dev/sdb3
# mkswap /dev/sdb2
# mkfs.vfat -F32 /dev/sdb1
If you are using SSD, then format the ext4 without journal will greatly extend your SSD
lifetime.
But this option is not OK?
# mkfs.ext4 -O "^has_journal" /dev/sd
# mkfs.ext4 /dev/sdb2
# tune2fs -O ^has_journal /dev/sdb2
# tune2fs -o discard /dev/sdb2
Enable the swap partion:
# swapon /dev/sdb2
Installation Of Basic System
After creating the partition, mount them into the corresponding position:
# mount /dev/sdb3 /mnt
# mkdir -p /mnt/boot/EFI/
# mount /dev/sdb1 /mnt/boot/EFI/
Install the basic system:
pacstrap -i /mnt base
Generate the fstab file:
# genfstab -U -p /mnt >> /mnt/etc/fstab
Examine the generate the fstab:
# file /mnt/etc/fstab
# cat /mnt/etc/fstab
Now you have the basic system installed the /dev/sdb, next step we will enter the system and configure this newly installed system.
Enter the system via:
# arch-chroot /mnt /bin/bash
Locale:
# vim /etc/locale.gen
# locale-gen
Default Language:
echo LANG=en_US.UTF-8>/etc/locale.conf
Timezone:
# ln -s /usr/share/zoneinfo/Asia/Shanghai /etc/localtime
HostName:
# echo SurfacePro>/etc/hostname
Auto-configuring the network at startup:
# systemctl start dhcpcd.service
# systemctl enable dhcpcd.service
Set the password for root user:
# passwd
Install grub with efi support:
# pacman -S grub efibootmgr
# grub-install --target=x86_64-efi --efi-directory=/boot/EFI --bootloader-id=arch_grub --recheck
Generate the configure files:
# grub-mkconfig -o /boot/grub/grub.cfg
Finish
Return to the installtion environment:
exit
Umount new partion:
# umount -R /mnt
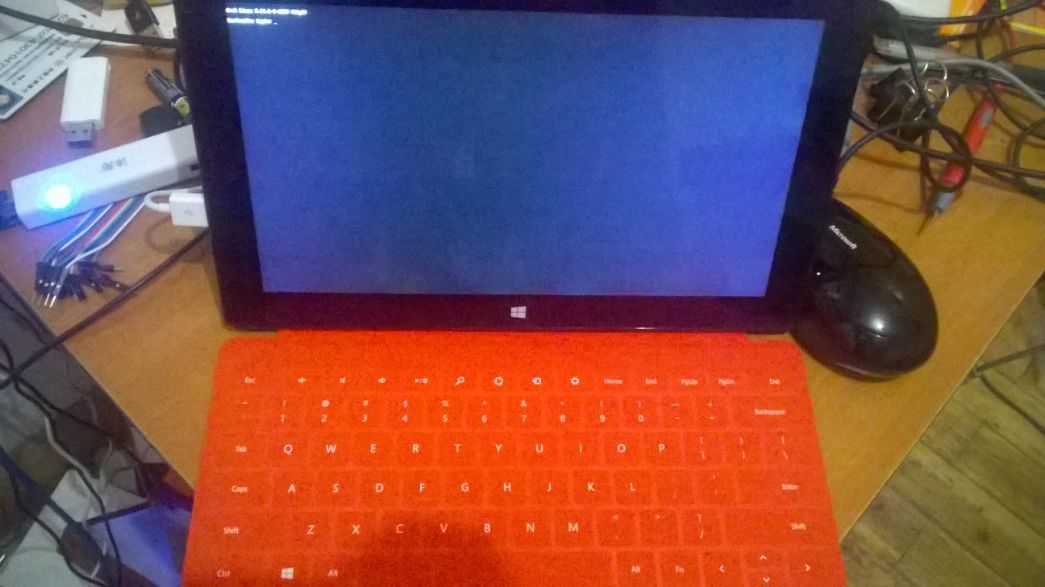
Reboot via shutdown -h now and next time remove the flash-disk, also press power-up and volumn-down key together, this time you will be leading the usb-disk powered system.
ScreenShot:
See following picture:
Jun 16, 2014
TechnologySystem Management
Users and Groups
Install zsh and use zsh as the newly added users’s default SHELL:
# pacman -S zsh
# useradd -m -g root -G audio -s /bin/zsh Trusty
Then we add the newly added user into the sudo group and configure the sudo parameters:
# pacman -S sudo
# visudo
Trusty ALL=(ALL) NOPASSWD: ALL
Defaults env_keep += "LANG LANGUAGE LINGUAS LC_* _XKB_CHARSET http_proxy https_proxy ftp_proxy ftps_proxy"
Now the user is OK, and you can directly use newly added user for login, I suggest you swiftly switch to the newly added user, because using root is not a good idea, it’s not safe.
And we can copy the existing zshrc file from the company machine.
Yaourt
Add following command into /etc/pacman.conf:
[archlinuxfr]
SigLevel = Never
Server = http://repo.archlinux.fr/$arch
Then:
sudo pacman -Syu && sudo pacman -S yaourt
Packages
Install following packages:
# pacman -S chromium firefox xorg xorg-xinit awesome xf86-video-intel xf86-video-ati pidgin thunderbird wget libreoffice gnome-terminal tigervnc xfce4 evince gimp smplayer alsa-utils gvim eclipse git subversion wireshark-gtk tcpdump ddd gdb meld qemu virtualbox wqy-bitmapfont wqy-microhei wqy-microhei-lite wqy-zenhei fcitx fcitx-libpinyin rox gpicview conky fcitx-googlepinyin nodejs cronie ntfs-3g dmenu lm_sensors pm-utils
Configure:
[Trusty@~]$ cat ~/.xinirc
exec awesome
[Trusty@~]$ cat ~/.vnc/xstartup
#!/bin/sh

export XKL_XMODMAP_DISABLE=1
exec startxfce4
Configure crontab:
crontab -e
*/4 * * * * sudo fdisk -l /dev/sdb
Configure lm_sensors:
# yes | sensors-detect
Brightness of the screen(Too light!!!! should be darker!!!):
$ sudo echo 1240>/sys/class/brightness/intel_backlight/brightness
Network Configration(Wireless)
The wireless configuration on SurfacePro is quite annoying procedure, so following are
the steps for configurating it.
Install NetworkManager:
$ sudo pacman -S networkmanager
Disable the dhcpd.service of systemd, cause the networkmanager will have its own dhcp
client for configurating:
$ sudo systemctl --type=service
$ sudo systemctl disable dhcpcd.service
Now enable and start the NetworkManager.service:
$ sudo systemctl enable NetworkManager.service
Using the applet for configurating the Network Manager:
$ sudo pacman -S network-manager-applet
Call nm-applet via:
$ nm-applet
Configure the wireless connection, the NM will automatically store it so now you could
reboot for using the wifi(Make sure you have removed the wired connection).
Auto-Login Awesome
Since awesome will using the terminal by default, while I use synergyc for connecting
to the synergys server, this will cause me to using surface pro’s keyboard, so enable
auto-login for avoiding this.
Install lightdm via:
$ sudo pacman -S lightdm
$ sudo systemctl enable lightdm.service
Install lightdm-greeter via:
$ sudo pacman -S lightdm-gtk-greeter
$ sudo vim /etc/lightdm/lightdm.conf
greeter-session=lightdm-gtk-greeter
The greeter session could be view under ls -l /usr/share/xgreeters.
Configure the auto-login for awesome:
# vim /etc/lightdm/lightdm.conf

[Seat:*]
pam-service=lightdm
pam-autologin-service=lightdm-autologin
autologin-user=username
autologin-user-timeout=0
session-wrapper=/etc/lightdm/Xsession


# groupadd -r autologin
# gpasswd -a username autologin
Now restart the machine and it will automatically falls into the awesome login session.
fcitx
Always a big problem!!!!!
$ sudo pacman -S fcitx fcitx-googlepinyin fcitx-configtool fcitx-qt4 fcitx-qt5
fcitx-gtk2
in /etc/locale.conf:
# Enable UTF-8 with Australian settings.
LANG="en_US.UTF-8"

# Keep the default sort order (e.g. files starting with a '.'
# should appear at the start of a directory listing.)
LC_COLLATE="C"

# Set the short date to YYYY-MM-DD (test with "date +%c")
LC_TIME="en_US.UTF-8"
Configure it via:
$ vim .xprofile
export GTK_IM_MODULE=fcitx
export QT_IM_MODULE=fcitx
export XMODIFIERS=@im=fcitx
Restart the surfacepro, now you could using fcitx along with awesome/lightdm/firefox(need fcitx-gtk2)
Jun 11, 2014
TechnologyYes, two weeks ago I bought a surface pro, following is the steps for me to discover on Surface Pro.
Remote Viewer
Since the remote desktop server is not installed on surface pro, I have to install the remote viewer, I choose TeamViewer, the steps is quite easy. But it requires both side(client and server)both could reach internet.
TeamViewer Download:
http://www.teamviewer.com/zhcn/download/windows.aspx
You can also install teamviewer from the yaourt of ArchLinux.
