
Quick-start for setting up WP and VPN Server on DigitalOcean
Oct 20, 2014Technology
Prerequisite
First you should check your Linux Version, for this tutorial is only works for ubuntu, that means, if you run archlinux/centos/debian on DigitalOcean, this tutorial won’t be fit for your need.
root@justfordemo:~# cat /etc/issue
Ubuntu 14.04.1 LTS \n \l
Upgrade to the newest system via:
root@justfordemo:~# apt-get update && apt-get upgrade
Enter Y if system asks you to confirm.
NGINX and PHP
Following commands refers to:
https://www.digitalocean.com/community/tutorials/how-to-install-linux-nginx-mysql-php-lemp-stack-on-ubuntu-14-04 and https://www.digitalocean.com/community/tutorials/how-to-install-wordpress-with-nginx-on-ubuntu-14-04.
Install nginx
Install the nginx server via:
# apt-get install nginx
Get the ip address via:
# ip addr show eth0 | grep inet | awk '{ print $2; }' | sed 's/\/.*$//'
10.0.0.6
fe80::a00:27ff:fe38:b7c5
Use you browser to visit http://10.0.0.6, you will see following page which indiciates the nginx works for you.
Install mysql server
Install it via:
apt-get install mysql-server
When you see following window, choose your password(You should remember this password, for it’s for administration!!!)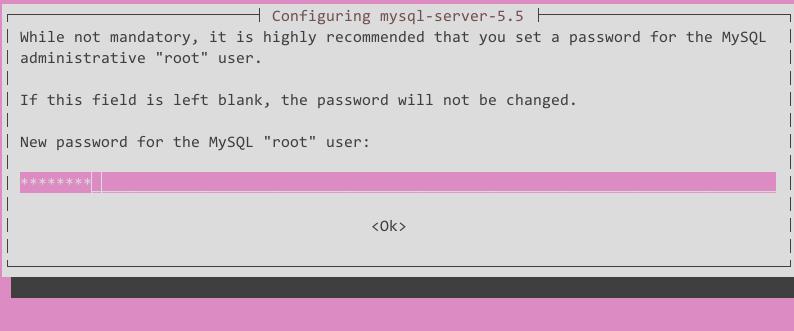
Then you should run following commands for install the database and enable secure installation. The suggested answer is listed as following:
root@justfordemo:~# mysql_install_db
root@justfordemo:~# mysql_secure_installation
Change the root password? [Y/n] n
Remove anonymous users? [Y/n] Y
Disallow root login remotely? [Y/n] Y
Remove test database and access to it? [Y/n] Y
Reload privilege tables now? [Y/n] Y
Install PHP
Install php for processing:
# apt-get install php5-fpm php5-mysql
Open the main php5-fpm configuration file with root privileges:
# nano /etc/php5/fpm/php.ini
Change
;cgi.fix_pathinfo=1
to
cgi.fix_pathinfo=0
Save and restart the php5-fpm service:
# service php5-fpm restart
php5-fpm stop/waiting
php5-fpm start/running, process 15959
Enable php prcessor in NGINX
Change the configuration file /etc/nginx/sites-available/default:
server {
    listen 80 default_server;
    listen [::]:80 default_server ipv6only=on;

    root /usr/share/nginx/html;
    index index.html index.htm;

    server_name localhost;

    location / {
        try_files $uri $uri/ =404;
    }
}
to
server {
    listen 80 default_server;
    listen [::]:80 default_server ipv6only=on;

    root /usr/share/nginx/html;
    index index.php index.html index.htm;

    server_name server_domain_name_or_IP;

    location / {
        try_files $uri $uri/ =404;
    }

    error_page 404 /404.html;
    error_page 500 502 503 504 /50x.html;
    location = /50x.html {
        root /usr/share/nginx/html;
    }

    location ~ \.php$ {
        try_files $uri =404;
        fastcgi_split_path_info ^(.+\.php)(/.+)$;
        fastcgi_pass unix:/var/run/php5-fpm.sock;
        fastcgi_index index.php;
        include fastcgi_params;
    }
}
Visit http://10.0.0.6/info.php(assume our ipaddress is 10.0.0.6), then the picture may seems like following: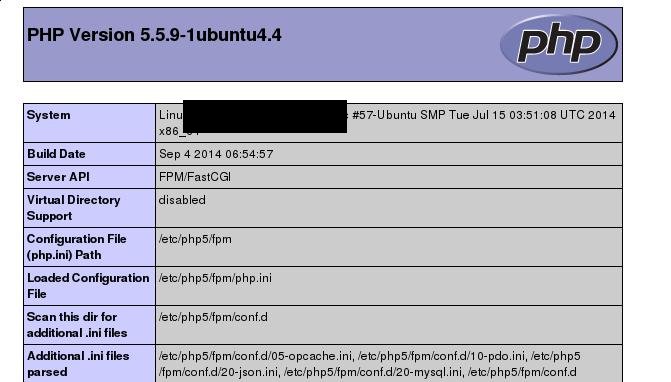
Now your webserver with php support is ready for use.
Wordpress
Create MYSQL database and users
The steps is quite simple, listed as following:
root@justfordemo:~# mysql -u root -p
Enter password:
Welcome to the MySQL monitor.  Commands end with ; or \g.
Your MySQL connection id is 48
Server version: 5.5.40-0ubuntu0.14.04.1 (Ubuntu)

Copyright (c) 2000, 2014, Oracle and/or its affiliates. All rights reserved.

Oracle is a registered trademark of Oracle Corporation and/or its
affiliates. Other names may be trademarks of their respective
owners.

Type 'help;' or '\h' for help. Type '\c' to clear the current input statement.

mysql> CREATE DATABASE wordpress;
Query OK, 1 row affected (0.00 sec)

mysql> CREATE USER wordpressuser@localhost IDENTIFIED BY 'password';
Query OK, 0 rows affected (0.00 sec)

mysql> GRANT ALL PRIVILEGES ON wordpress.* TO wordpressuser@localhost;
Query OK, 0 rows affected (0.00 sec)

mysql> FLUSH PRIVILEGES;
Query OK, 0 rows affected (0.01 sec)

mysql> exit
Bye
Wordpress
Download the latest wordpress installation file in home directory:
# cd ~
# wget http://wordpress.org/latest.tar.gz
Unzip the tar.gz file and install, but we have to install php-gd and libssh2-php first:
# apt-get install php5-gd libssh2-php
# tar xzvf latest.tar.gz
# cd wordpress
# cp wp-config-sample.php wp-config.php
# nano wp-config.php
. . .
// ** MySQL settings - You can get this info from your web host ** //
/** The name of the database for WordPress */
define('DB_NAME', 'wordpress');

/** MySQL database username */
define('DB_USER', 'wordpressuser');

/** MySQL database password */
define('DB_PASSWORD', 'password');
. . .
Make wordpress running directory and copy the source code here:
# mkdir -p /var/www/html
# rsync -avP ~/wordpress/ /var/www/html/
# chown -R www-data:www-data /var/www/html/*
# cd /var/www/html/
root@justfordemo:/var/www/html# mkdir wp-content/uploads
root@justfordemo:/var/www/html# chown -R :www-data /var/www/html/wp-content/uploads
Modify nginx blocks
# cp /etc/nginx/sites-available/default /etc/nginx/sites-available/wordpress
# nano /etc/nginx/sites-available/wordpress
server {
        listen 80 default_server;
        listen [::]:80 default_server ipv6only=on;

        root /var/www/html;
        index index.php index.html index.htm;

        server_name your_domain.com;

        location / {
                # try_files $uri $uri/ =404;
                try_files $uri $uri/ /index.php?q=$uri&$args;
        }

        error_page 404 /404.html;

        error_page 500 502 503 504 /50x.html;
        location = /50x.html {
                root /usr/share/nginx/html;
        }

        location ~ \.php$ {
                try_files $uri =404;
                fastcgi_split_path_info ^(.+\.php)(/.+)$;
                fastcgi_pass unix:/var/run/php5-fpm.sock;
                fastcgi_index index.php;
                include fastcgi_params;
        }
}
Now restart the service via:
# ln -s /etc/nginx/sites-available/wordpress /etc/nginx/sites-enabled/
# service nginx restart
# service php5-fpm restart
Now visit:
http://10.0.0.6/ you will get the wordpress configuration window, Enjoy it!!!