Oct 27, 2014
TechnologySSHD Timeout
Trouble
When you login to some remote ssh machine, after 1 or 2 minutes, the server will hint you:
Connection closed by foreign host.
Solution
This trouble happens on Ubuntu14.04, because we don’t set the timeout intervals. So we could add following 2 lines into the /etc/ssh/sshd_config
ClientAliveInterval 60
ClientAliveCountMax 3
AliveInterval means we could keep the client alive for 60 minutes. AliveCountMax means when server send 3 times request to ssh client, if client didn’t send back reply message, then the ssh connection will be lost.
Restart the ssh via service ssh restart and now you won’t got this annoying trouble.
DNS
Since I use dnsencrypt at home, so once it enabled, all of the query goes to the 127.0.0.1, I have to turn it back at company.
[Trusty@~]$ cat /etc/resolv.conf
# Generated by resolvconf
nameserver 10.0.0.1
search lan
alias disdns='sudo systemctl stop dnscrypt-proxy.service'
$ disdns
By doing this you could reach the internet.
Oct 25, 2014
TechnologyIn this chapter we will continue to migrate driver on LCD, first we want to get the LCD information.
LCD Info
From the LCD we could see “LTV350QV-F0E”, Search it on google and we know it’s SAMSUNG TFT 3.5-inch 320*240 LTV350QV-F0E lcd panel.
Its datasheet could be downloaded from:
http://www.datasheet-pdf.com/datasheet-html/L/T/V/LTV350QV-F0E_Samsung.pdf.html
TFT means (Thin Film Transistor).
Beware, the kernel we should choose is uImage_T1_F0E_320x240_ts, because we bought the Package 1 of the development board, they shipped us with Samsung screen .
Code Modification
Kernel configuration modification:
Device Drivers --->
	Graphics support --->
		<*> Support for frame buffer devices
			Support for buffer devices --->
				<*> S3C2410 LCD framebuffer support
		Backlight & LCD device sipport --->
			<*>Lowlevel LCD controls
		Display device support --->
			<*> Display panel/monitor support
		Console display driver support --->
			<*> Framebuffer Console support
			[*] Framebuffer Console Rotation
			[*] Select compiled-in fonts
			[*] VGA 8x8 font
			[*] VGA 8x16 font
			[*] Mini 4x6 font
			[*] Sparc console 8x16 font
		[*] Bootup logo --->
			--- Bootup logo
			[*] Standard 224-color Linux logo
arch/arm/mach-s3c2440/mach-smdk2440.c:
static struct s3c2410fb_display smdk2440_lcd_cfg __initdata = {

        .lcdcon5        = S3C2410_LCDCON5_FRM565 |
                          S3C2410_LCDCON5_INVVCLK |
                          S3C2410_LCDCON5_INVVLINE |
                          S3C2410_LCDCON5_INVVFRAME |
                        // S3C2410_LCDCON5_PWREN |
                          S3C2410_LCDCON5_HWSWP,

        .type           = S3C2410_LCDCON1_TFT,

        .width          = 320,    // 240,
        .height         = 240,    //320,

        .pixclock       = 100000,   //HCLK/10   166667,
        .xres           = 320,    //240,
        .yres           = 240,    //320,
        .bpp            = 16,
        .left_margin    = 17,     //HFPD+1     20,
        .right_margin   = 17,     //HBPD+1     8,
        .hsync_len      = 13,     //HSPW+1     4,
        .upper_margin   = 5,      //VBPD+1     8,
        .lower_margin   = 5,      //VFPD+1     7,
        .vsync_len      = 9,      //VSPW+1     4,
};

static struct s3c2410fb_mach_info smdk2440_fb_info __initdata = {
        .displays       = &smdk2440_lcd_cfg,
        .num_displays   =  1,
        .default_display = 0,
 //#if 0

        .gpccon         = 0xaaaa56a9,    //0xaa940659,
        .gpccon_mask    = 0xffffffff,
        .gpcup          = 0xffffffff,    //0x0000ffff,
        .gpcup_mask     = 0xffffffff,
        .gpdcon         = 0xaaaaaaaa,    //0xaa84aaa0,
        .gpdcon_mask    = 0xffffffff,
        .gpdup          = 0xffffffff,    //0x0000faff,
        .gpdup_mask     = 0xffffffff,
//#endif
        .lpcsel         = 0,     //((0xCE6) & ~7) | 1<<4,
};
Enable the lcd:
static struct platform_device *smdk2410_devices[] __initdata = {
&s3c_device_usb,
&s3c_device_lcd,
arch/arm/mach-s3c2410/include/mach/regs-lcd.h:
#define S3C2410_LCDCON1_MMODE (0<<7)
drivers/video/s3c2410fb.c, after around line 52:
//LTV350QV_FOE_V0.0
 static void LTV350QV_Short_Delay(u_char time)
 {
  ndelay(150);
 }


#define LTV350QV_FOE 0x1d //device ID
typedef struct _LTV350qv_spi_data_{
unsigned char Device_ID; //ID of the device
unsigned int Index; //index of register
unsigned long Structure; //structure to be writed
}LTV350QV_SPI_Data;
//micro for LTV350QV_FOE
#define CS_H __raw_writel(__raw_readl(S3C2410_GPCDAT) |(1<< 8),S3C2410_GPCDAT)//MAKE_HIGH(LTV350QV_CS)
#define CS_L __raw_writel(__raw_readl(S3C2410_GPCDAT)&~(1<< 8),S3C2410_GPCDAT)//MAKE_LOW(LTV350QV_CS)
#define SCLK_H __raw_writel(__raw_readl(S3C2410_GPCDAT) |(1<< 9),S3C2410_GPCDAT)//MAKE_HIGH(LTV350QV_SCL)
#define SCLK_L __raw_writel(__raw_readl(S3C2410_GPCDAT)&~(1<< 9),S3C2410_GPCDAT)//MAKE_LOW(LTV350QV_SCL)
#define SDI_H __raw_writel(__raw_readl(S3C2410_GPCDAT) |(1<<10),S3C2410_GPCDAT)//MAKE_HIGH(LTV350QV_SDI)
#define SDI_L __raw_writel(__raw_readl(S3C2410_GPCDAT)&~(1<<10),S3C2410_GPCDAT)//MAKE_LOW(LTV350QV_SDI)
#define RST_H __raw_writel(__raw_readl(S3C2410_GPDDAT) |(1<< 0),S3C2410_GPDDAT)//MAKE_HIGH(LTV350QV_RST)
#define RST_L __raw_writel(__raw_readl(S3C2410_GPDDAT)&~(1<< 0),S3C2410_GPDDAT)//MAKE_LOW(LTV350QV_RST)
//
static void LTV350QV_Register_Write(LTV350QV_SPI_Data regdata)
{
u_char i,temp1;
u_int temp2;
u_long temp3;
unsigned long flags;
//write index
temp1=regdata.Device_ID<<2 | 0<<1 | 0<<0; //register index
temp2=regdata.Index;
temp3=(temp1<<24) | (temp2<<8);
local_irq_save(flags);
CS_L;
LTV350QV_Short_Delay(1);
for(i=0;i<24;i++)
{
SCLK_L;
if(temp3 & (1<<(31-i)) ) //if is H
SDI_H;
else
SDI_L;
LTV350QV_Short_Delay(1); //setup time
SCLK_H;
LTV350QV_Short_Delay(1); //hold time
}
CS_H;
LTV350QV_Short_Delay(5);
//write instruction
temp1=regdata.Device_ID<<2 | 1<<1 | 0<<0; //instruction
temp2=regdata.Structure;
temp3=(temp1<<24) | (temp2<<8);
CS_L;
LTV350QV_Short_Delay(1);
for(i=0;i<24;i++)
{
SCLK_L;
if(temp3 & (1<<(31-i)) ) //if is H
SDI_H;
else
SDI_L;
LTV350QV_Short_Delay(1);
SCLK_H;
LTV350QV_Short_Delay(1);
}
CS_H;
local_irq_restore(flags);
}

static void LTV350QV_Write(u_int index, u_int regdata)
{
LTV350QV_SPI_Data WriteData;
WriteData.Device_ID = LTV350QV_FOE;
WriteData.Index = index;
WriteData.Structure = regdata;
LTV350QV_Register_Write(WriteData);
}

static void LTV350QV_Power_ON(void)
{
LTV350QV_Write( 9, 0x0000);
mdelay(150);
LTV350QV_Write( 9, 0x4000);
LTV350QV_Write(10, 0x2000);
LTV350QV_Write( 9, 0x4055);
mdelay(550);
LTV350QV_Write( 1, 0x409d);
LTV350QV_Write( 2, 0x0204);
LTV350QV_Write( 3, 0x0100);
LTV350QV_Write( 4, 0x3000);
LTV350QV_Write( 5, 0x4003);
LTV350QV_Write( 6, 0x000a);
LTV350QV_Write( 7, 0x0021);
LTV350QV_Write( 8, 0x0c00);
LTV350QV_Write(10, 0x0103);
LTV350QV_Write(11, 0x0301);
LTV350QV_Write(12, 0x1f0f);
LTV350QV_Write(13, 0x1f0f);
LTV350QV_Write(14, 0x0707);
LTV350QV_Write(15, 0x0307);
LTV350QV_Write(16, 0x0707);
LTV350QV_Write(17, 0x0000);
LTV350QV_Write(18, 0x0004);
LTV350QV_Write(19, 0x0000);
mdelay(200);
LTV350QV_Write( 9, 0x4a55);
LTV350QV_Write( 5, 0x5003);
}


static void s3c2440fb_init_ltv350qv(void)
{
__raw_writel(0xaa9556a9, S3C2410_GPCCON); //Initialize VD[7:0],LCDVF[2:0],VM,VFRAME,VLINE,VCLK,LEND
//LCDVF[0],[1],[2]---output;VD[0],[1],[2]----output.
__raw_writel(0xffffffff, S3C2410_GPCUP); // Disable Pull-up register
LTV350QV_Power_ON() ; //init LCD model
__raw_writel(0xaaaaaaaa, S3C2410_GPDCON);
__raw_writel(0xffffffff, S3C2410_GPDUP);
// __raw_writel(3, S3C2410_LCDINTMSK); // MASK LCD Sub Interrupt
// __raw_writel(0, S3C2410_TPAL); // Disable Temp Palette
// __raw_writel(0, S3C2410_LPCSEL); // Disable LPC3600
}
Then add following sentense before the “return 0” of static int s3c2410fb_init_registers(struct fb_info *info):
s3c2440fb_init_ltv350qv();
Now recompile the kernel, you will see framebuffer OK.
Comment all of the function content of drivers/char/vt.c blank_screen_t(unsigned long dummy), this will disable the LCD’s display from closing.
Directly boot from tftp
Avoiding flash into the nand.
>tftp 30000000 uImage
dm9000 i/o: 0x18000300, id: 0x90000a46
> bootm
Oct 25, 2014
TechnologySerial Port Support
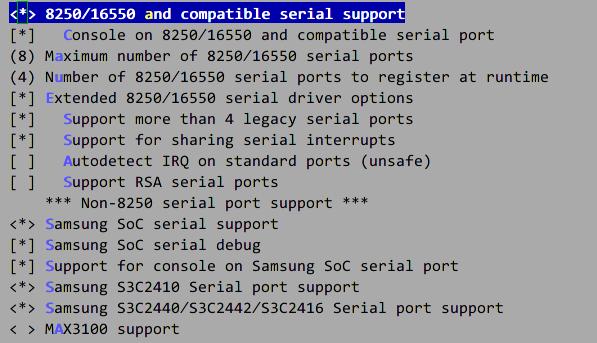
Enable the Device Driver—-> Character deivces —-> Serial drivers —-> Samsung related settings, My setting is listed as following:

Then you will see serial output during kernel boot.
DM9000 Support
Add following code into the linux/arch/arm/mach-s3c2440/mach-smdk2440.c:
#include <linux/serial_core.h>
+ /* Added dm9000 support for utu2400 */
+ #include <linux/dm9000.h>
#include <linux/platform_device.h>

#include <plat/common-smdk.h>

+ /* DM9000 Base address for SMDK2440 */
+ #define MACH_SMDK2440_DM9K_BASE (S3C2410_CS3 + 0x300)

static struct map_desc smdk2440_iodesc[] __initdata = {

+ /* Added for dm9000 */
+ static struct resource smdk2440_dm9k_resource[] =
+ {
+     [0] =
+      {
+           .start = MACH_SMDK2440_DM9K_BASE,
+           .end   = MACH_SMDK2440_DM9K_BASE + 3,
+           .flags = IORESOURCE_MEM
+      },
+     [1] =
+      {
+           .start = MACH_SMDK2440_DM9K_BASE + 4,
+           .end   = MACH_SMDK2440_DM9K_BASE + 7,
+           .flags = IORESOURCE_MEM
+      },
+     [2] =
+     {
+         .start = IRQ_EINT9,
+         .end   = IRQ_EINT9,
+         .flags = IORESOURCE_IRQ | IORESOURCE_IRQ_HIGHEDGE,
+     }
+ };
+
+ /*
+  * The DM9000 has no eeprom, and it's MAC address is set by
+  * the bootloader before starting the kernel.
+  */
+ static struct dm9000_plat_data smdk2440_dm9k_pdata =
+ {
+ 	.flags        = (DM9000_PLATF_16BITONLY | DM9000_PLATF_NO_EEPROM),
+ };
+
+ static struct platform_device smdk2440_device_eth =
+ {
+ 	.name        = "dm9000",
+ 	.id      = -1,
+ 	.num_resources = ARRAY_SIZE(smdk2440_dm9k_resource),
+ 	.resource  = smdk2440_dm9k_resource,
+ 	.dev       = {
+ 		.platform_data   = &smdk2440_dm9k_pdata,
+ 	},
+ };

static struct platform_device *smdk2440_devices[] __initdata = {
	&s3c_device_ohci,
	&s3c_device_lcd,
	&s3c_device_wdt,
	&s3c_device_i2c0,
	&s3c_device_iis,
+  	&smdk2440_device_eth,
};
Then select the dm9000 support from:
Device Driver—-> Network device support -> Ethernet(10 or 100Mbit) —-> DM9000 support
Now testing the kernel, you will see the kernel starts with dm9000 support, thus we could use NFS for booting the system.
Oct 25, 2014
TechnologyBuilding Filesystems
Use following script for building the basic filesystem:
$ cat mkrootfs
#!/bin/sh
echo "------Create rootfs directons start...--------"
mkdir rootfs
cd rootfs
echo "--------Create root,dev....----------"
mkdir bin boot dev etc home lib mnt proc root sbin sys tmp usr var  www
mkdir etc/init.d etc/rc.d etc/sysconfig
mkdir usr/sbin usr/bin usr/lib usr/modules
echo "make node in dev/console dev/null"
mknod -m 666 dev/console c 5 1
mknod -m 666 dev/null c 1 3
mkdir mnt/etc mnt/jffs2 mnt/yaffs mnt/data mnt/temp
mkdir var/lib var/lock var/run var/tmp
chmod 1777 tmp
chmod 1777 var/tmp
echo "-------make direction done---------"
Run it and you will get an folder which contains the newly created directory structure.
$ sudo ./mkrootfs
------Create rootfs directons start...--------
--------Create root,dev....----------
make node in dev/console dev/null
-------make direction done---------
$ ls rootfs
bin  boot  dev  etc  home  lib  mnt  proc  root  sbin  sys  tmp  usr  var  www
After making the filesystem, you should install all of the kernel modules into your fs:
$ make modules_install ARCH=arm INSTALL_MOD_PATH=The_PATH_TO_YOUR_ROOTFS
BusyBox
Busybox provides almost all of the tools used in system, first we should download and cross-compile it.
$ wget http://www.busybox.net/downloads/busybox-1.22.1.tar.bz2
$ tar xjvf busybox-1.22.1.tar.bz2
$ cd busybox-1.22.1
$ vim Makefile
+ CROSS_COMPILE ?= arm-linux-
# bbox: we may have CONFIG_CROSS_COMPILER_PREFIX in .config,
$ make menuconfig
Parameters:
Build Options---> Build BusyBox as a static binary(no shared libs)
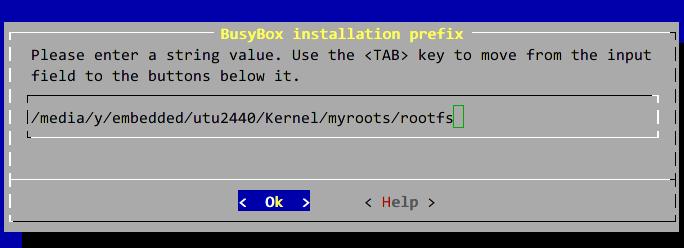
Installation Options--> Busybox installation prefix(See following pictures)
Linux Module Utilities-->  Default directory containing modules(/lib/modules)
Linux System Utilities --->
[*]Support /etc/mdev.conf
[*]Support command execution at device addition/removal
Init Utilities --->
"Support reading an inittab file"
"Support running commands with a controlling-tty"

Then Make and make install:
$ make && make install
Now list the rootfs you have created you could see a new file named linuxrc is located under the / directory. Also you will see lots of executable files under the /bin which links to the /bin/busybox.
Startup Configuration
Create the /etc/group file:
$ cat etc/group
root:*:0:
daemon:*:1:
bin:*:2:
sys:*:3:
adm:*:4:
tty:*:5:
disk:*:6:
lp:*:7:lp
mail:*:8:
news:*:9:
u p:*:10:
proxy:*:13:
kmem:*:15:
dialout:*:20:
fax:*:21:
voice:*:22:
cdrom:*:24:
floppy:*:25:
tape:*:26:
s o:*:27:
a io:*:29:
sshd:*:74:
ppp:x:99:
500:x:500:plg
501:x:501:fa
Edit the /etc/passwd file:
$ cat etc/passwd
root::0:0:root:/:/bin/sh
ftp::14:50:FTP User:/var/ftp:
bin:*:1:1:bin:/bin:
daemon:*:2:2:daemon:/sbin:
nobody:*:99:99:Nobody:/:
sky::502:502:Linux User,,,:/home/sky:/bin/sh
Add the hostname:
$ cat etc/sysconfig/HOSTNAME
utu2440
Edit the inittab file:
$ cat etc/inittab
#etc/inittab
::sysinit:/etc/init.d/rcS

# Start an "askfirst" shell on /dev/tty2-4
console::askfirst:-/bin/sh
tty2::askfirst:-/bin/sh
tty3::askfirst:-/bin/sh
tty4::askfirst:-/bin/sh

# /sbin/getty invocations for selected ttys
tty4::respawn:/sbin/getty 38400 tty5
tty5::respawn:/sbin/getty 38400 tty6


::ctrlaltdel:/sbin/reboot
::shutdown:/bin/umount -a –r
$ chmod 777 etc/init.d/rcS
Edit etc/init.d/rcS, this file will be executed everytime we bootup the linux system:
$ cat etc/init.d/rcS
#!/bin/sh
PATH=/sbin:/bin:/usr/sbin:/usr/bin
runlevel=S
prevlevel=N
umask 022
export PATH runlevel prevlevel
echo "----------mount all----------------"
mount -a
echo /sbin/mdev>/proc/sys/kernel/hotplug
mdev -s
### Added from utu2440

trap ":" INT QUIT TSTP
##################################
#/bin/mount -t tmpfs tmpfs /dev
#/bin/mount -t sysfs sysfs /sys

##################################
mkdir /dev/pts
/bin/mknod /dev/pts/0 c 136 0
/bin/mknod /dev/pts/1 c 136 1
/bin/mknod /dev/pts/2 c 136 2
/bin/mknod /dev/pts/3 c 136 3
/bin/mknod /dev/pts/4 c 136 4
/bin/mknod /dev/pts/5 c 136 5


/bin/mount -t devpts devpts /dev/pts
#/bin/mount -t proc none /proc
ln -s /dev/ts0 /dev/h3600_tsraw
/sbin/ifconfig eth0 10.0.0.15
/usr/sbin/telnetd -l /bin/login
echo "After telnetd"
/usr/bin/tty>/root/tty.txt
Create a new fstab file:
$ cat etc/fstab
#device mount-point  type       option      dump  fsck  order
proc      /proc             proc      defaults        0      0
none     /tmp              ramfs     defaults       0       0
sysfs     /sys              sysfs      defaults        0      0
mdev    /dev              ramfs     defaults        0       0
Testing filesystem
Set the nfs boot options:
utu-bootloader=>>>setenv bootargs 'console=ttySAC0 init=/linuxrc root=/dev/nfs nfsroot=10.0.0.11:/media/nfs/rootfs,proto=tcp,nolock ip=10.0.0.15:10.0.0.1:10.0.0.1:255.255.255.0:www.yctek.com:eth0:off'
utu-bootloader=>>>setenv bootargs 'console=ttySAC0 init=/linuxrc root=/dev/nfs nfsroot=10.0.0.11:/media/nfs/rootfs,proto=tcp,nolock ip=10.0.0.15'
then we could boot into the nfs based filesystem.
Please press Enter to activate this console. NET: Registered protocol family 10

[root@www ~]#
[root@www ~]# uname -a
Linux www 2.6.39 #6 Mon Oct 20 16:12:43 CST 2014 armv4tl GNU/Linux
Oct 25, 2014
TechnologyRTC
Activate
RealTime Clock functionality could be easily activated via:
$ vim arch/arm/mach-s3c2440/mach-smdk2440.c
static struct platform_device *smdk2440_devices[] __initdata = {
	&s3c_device_ohci,
+	 &s3c_device_rtc,
	&s3c_device_lcd,
Configure the Kernel:
Device Drivers—-> RealTime Clock —-> Samsung S3C series Soc RTC
Save and exit, then make Image.
Test RTC
Before we have following configuration:
[root@www ~]# date
Thu Jan  1 01:07:51 UTC 1970
Now we switch to new kernel which contains RTC support:
[root@www ~]# ls -l /dev/rtc*
crw-rw----    1 root     root      254,   0 Jan  1 00:00 /dev/rtc0
[root@www ~]# date -s 201410251348
Sat Oct 25 13:48:00 UTC 2014
[root@www ~]# hwclock -w
Add following lines into /etc/init.d/rcS for automatically update systemtime from RTC:
[root@www ~]# cat /etc/init.d/rcS
echo "update time from RTC"
hwclock -s
date
Reboot to see whether RTC works or not:
# date
Sat Oct 25 13:51:34 UTC 2014
If we enable the NTPD, then this board could serve as the Network Time Protocol Server in Ethernet.
LCD
Coding
First we attached the LCD touch screen to our development board, it will displayed a blank screen, while this blank screen will turn into graphic windows after we enabled the LCD Driver.
We should carefully view yc2440-core.pdf, to find the LCD controller pin.

From the picture we could see the LCD’s backlight is controlled via CPU’s LCD_PWREN/EINT12/GPG4.
Add the backlight.c in kernel source tree:
$ pwd
/media/y/embedded/utu2440/Kernel/linux-2.6.39/drivers/video/backlight
[Trusty@/media/y/embedded/utu2440/Kernel/linux-2.6.39/drivers/video/backlight]$ cat SMDK2440_backlight.c
Now the content should be:
#include <linux/errno.h>
#include <linux/kernel.h>
#include <linux/module.h>
#include <linux/slab.h>
#include <linux/input.h>
#include <linux/init.h>
#include <linux/serio.h>
#include <linux/delay.h>
#include <linux/clk.h>
#include <linux/miscdevice.h>
#include <linux/gpio.h>

#include <asm/io.h>
#include <asm/irq.h>
#include <asm/uaccess.h>
#include <mach/regs-clock.h>
#include <plat/regs-timer.h>

#include <mach/regs-gpio.h>
#include <linux/cdev.h>

#undef DEBUG
//#define DEBUG
#ifdef DEBUG
#define DPRINTK(x...) {printk(__FUNCTION__"(%d): ",__LINE__);printk(##x);}
#else
#define DPRINTK(x...) (void)(0)
#endif

#define DEVICE_NAME     "backlight"


static unsigned int bl_state;

static inline void set_bl(int state)
{
        bl_state = !!state;
        s3c2410_gpio_setpin(S3C2410_GPG(4), bl_state);
}

static inline unsigned int get_bl(void)
{
        return bl_state;
}

static ssize_t dev_write(struct file *file, const char *buffer, size_t count, loff_t * ppos)
{
        unsigned char ch;
        int ret;
        if (count == 0) {
                return count;
        }
        ret = copy_from_user(&ch, buffer, sizeof ch) ? -EFAULT : 0;
        if (ret) {
                return ret;
        }

        ch &= 0x01;
        set_bl(ch);

        return count;
}

static ssize_t dev_read(struct file *filp, char *buffer, size_t count, loff_t *ppos)
{
        int ret;
        unsigned char str[] = {'0', '1' };

        if (count == 0) {
                return 0;
        }

        ret = copy_to_user(buffer, str + get_bl(), sizeof(unsigned char) ) ? -EFAULT : 0;
        if (ret) {
                return ret;
        }
        return sizeof(unsigned char);
}

static struct file_operations dev_fops = {
        owner:  THIS_MODULE,
        read:   dev_read,
        write:  dev_write,
};

static struct miscdevice misc = {
        .minor = MISC_DYNAMIC_MINOR,
        .name = DEVICE_NAME,
        .fops = &dev_fops,
};

static int __init dev_init(void)
{
        int ret;

        ret = misc_register(&misc);

        printk (DEVICE_NAME"\tinitialized\n");

        s3c2410_gpio_cfgpin(S3C2410_GPG(4), S3C2410_GPIO_OUTPUT);
        set_bl(1);
        return ret;
}


static void __exit dev_exit(void)
{
        misc_deregister(&misc);
}

module_init(dev_init);
module_exit(dev_exit);
MODULE_LICENSE("GPL");
MODULE_AUTHOR("Utu2440 Inc.");
Add the Kconfig items for our newly added SMDK2440_backlight:
$ cat /media/y/embedded/utu2440/Kernel/linux-2.6.39/drivers/video/backlight/Kconfig
config BACKLIGHT_SMDK2440
	tristate "Backlight Driver for utu2440"
	depends on BACKLIGHT_LCD_SUPPORT && FB_S3C2410
	help
	  Backlight driver for utu2440
Enable the Makefile Item:
$ cat /media/y/embedded/utu2440/Kernel/linux-2.6.39/drivers/video/backlight/Makefile
obj-$(CONFIG_BACKLIGHT_SMDK2440)	+= SMDK2440_backlight.o
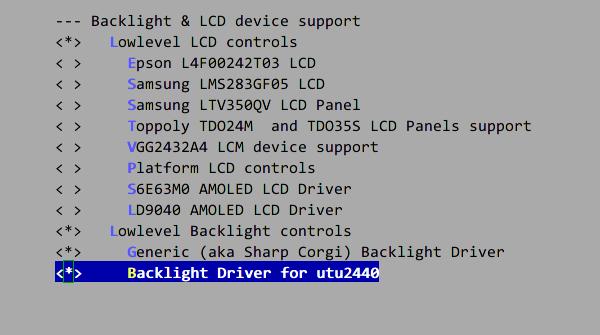
Now configure the Kernel like following image:

Compile and generate the uImage:
$ make
$ cp arch/arm/boot/zImage ./ && mkimage -A arm -O linux -n $(date --iso-8601=seconds) -C NONE -a 0x30008000 -e 0x30008000 -d zImage uImage
Verification
Replace the newly built kernel on utu2440, first your screen remains turned on.
Change the backlight on utu2440:
[root@www ~]# echo 0>/dev/backlight
[root@www ~]# echo 1>/dev/backlight
[root@www ~]# ls /dev/backlight
/dev/backlight
But this command is not stable, we could only turn off the backlight, then won’t call it alive again.
Change back to 2.6.32
The ioctl function changes in 2.6.39, thus we have to use .unlocked_ioctl, so we won’t actually control the backlight, switch the kernel version to 2.6.32, do following changes:
Change again the code:
$ vim SMDK2440_backlight.c
#include <linux/errno.h>

#include <linux/kernel.h>
#include <linux/module.h>
#include <linux/slab.h>
#include <linux/input.h>
#include <linux/init.h>
#include <linux/serio.h>
#include <linux/delay.h>
#include <linux/clk.h>
#include <linux/miscdevice.h>
#include <asm/io.h>
#include <asm/irq.h>
#include <asm/uaccess.h>
#include <mach/regs-clock.h>
#include <plat/regs-timer.h>
#include <mach/regs-gpio.h>
#include <linux/cdev.h>
#include <linux/gpio.h>

//定义背光驱动的名称为 backligh,将会出现在/dev/backlight

#define DEVICE_NAME "backlight"

#define DEVICE_MINOR 5 //次设备号,这里我们将设备注册为misc设备,这种设备的主设备号都为10

extern void s3c2410_gpio_setpin(unsigned int pin, unsigned int to);
extern void s3c2410_gpio_cfgpin(unsigned int pin, unsigned int function);

static int smdk2440_backlight_ioctl(struct inode *inode,
                                    struct file *file,
                                    unsigned int cmd,
                                    unsigned long arg)
{
	printk("We received cmd %d\n", cmd);
switch(cmd)
{
   case 0:
       //当接收的命令为0时,就将GPG4引脚设为低电平,关闭背光
       s3c2410_gpio_setpin(S3C2410_GPG(4), 0);
       printk(DEVICE_NAME " turn off!\n");
       return 0;
   case 1:
       //当接收的命令为1时,就将GPG4引脚设为高电平,开启背光
       s3c2410_gpio_setpin(S3C2410_GPG(4), 1);
       printk(DEVICE_NAME " turn on!\n");
        return 0;
   default:
          return -EINVAL;
}
}

//设备操作集
static struct file_operations dev_fops =
{
.owner = THIS_MODULE,
//.unlocked_ioctl = smdk2440_backlight_ioctl,
.ioctl = smdk2440_backlight_ioctl,
};

static struct miscdevice misc =
{
.minor = DEVICE_MINOR,
.name = DEVICE_NAME,
.fops = &dev_fops,
};

static int __init dev_init(void)
{
   int ret;
    ret = misc_register(&misc); //注册成misc设备
   if(ret < 0)
    {
      printk("Register misc device fiald!");
     return ret;
    }
   //将GPG4口配置成输出口

   s3c2410_gpio_cfgpin(S3C2410_GPG(4), S3C2410_GPIO_OUTPUT);

   s3c2410_gpio_setpin(S3C2410_GPG(4), 1);         //启动内核时打开背光

   return ret;
}

static void __exit dev_exit(void)
{
   misc_deregister(&misc); //注销该misc设备
}

module_init(dev_init);
module_exit(dev_exit);
MODULE_LICENSE("GPL");
MODULE_AUTHOR("DreamCatcher");

MODULE_DESCRIPTION("Backlight control for mini2440");
Then define a test_lcd.c like:
#include <stdio.h>
#include <stdlib.h>
#include <fcntl.h>
#include <sys/ioctl.h>

int main(int argc, char **argv)
{
    unsigned int turn;
    int fd;

//检测命令后面带的参数
if(argc == 1 || argc > 2)
{
    printf("Usage: backlight_test on|off!\n");
    exit(1);
}

//打开背光设备
fd = open("/dev/backlight", O_RDWR);

if(fd < 0)
{
    printf("Open Backlight Device Faild!\n");
    exit(1);
}

//判断输入的参数
if(strcmp(argv[1], "on") == 0)
{
    printf("Yes, you input on!\n");
    turn = 1;
    ioctl(fd, 1);
}
else if(strcmp(argv[1], "off") == 0)
{
    printf("Yes, you input off!\n");
    turn = 0;
    ioctl(fd, 0);
}
else
{
    printf("Usage: backlight_test on|off!\n");
    exit(1);
}

printf("turn is %d\n", turn);

//进行IO控制
//long ret=ioctl(fd, turn);

//关闭背光设备
close(fd);
return 0;
}
Compile the lcd_test via:
$ arm-linux-gcc -o lcd_test lcd_test.c
$ cp lcd_test.c /media/nfs/rootfs/root/
Test the lcd backlight setting functionality via:
[root@www root]# ./lcd_test on
Yes, you input on!
turn is 1
[root@www root]# ./lcd_test off
Yes, you input off!
turn is 0
So until now, you have mastered the LCD backlight, you could freely turn on/off it.


