Nov 5, 2014
TechnologyProblem
The mysql server always keep crash, with following log under /var/log/mysql/error.log:
141104 23:06:46 InnoDB: Fatal error: cannot allocate memory for the buffer pool
So this is the memory problem, we should allocate more memory for our VPS.
Solution
Add swap partition:
First check the swap partition:
root@xxx:/var/log# free -m
             total       used       free     shared    buffers     cached
Mem:           490        464         25         28         61        172
-/+ buffers/cache:        230        259
Swap:            0          0          0
root@xxx:/var/log# swapon -s
Filename                                Type            Size    Used    Priority
Now create a swapfile:
# dd if=/dev/zero of=/swapfile bs=1M count=1024
1024+0 records in
1024+0 records out
1073741824 bytes (1.1 GB) copied, 2.16285 s, 496 MB/s
# ls /swapfile -l -h
-rw-r--r-- 1 root root 1.0G Nov  5 00:58 /swapfile
Setting the swapfile:
root@xxx:/var/log# chmod 600 /swapfile
root@xxx:/var/log# swapon /swapfile
swapon: /swapfile: read swap header failed: Invalid argument
root@xxx:/var/log# mkswap /swapfile
Setting up swapspace version 1, size = 1048572 KiB
no label, UUID=64b727dd-0d7e-45ff-9235-cd9ba84b062f
root@xxx:/var/log# swapon /swapfile
Now use free command you could check swap file enabled:
root@xxx:/var/log# free -m
             total       used       free     shared    buffers     cached
Mem:           490        458         31         28         25        229
-/+ buffers/cache:        204        285
Swap:         1023          0       1023
Add it permanately into the /etc/fstab:
/swapfile none swap sw 0 0
Configure the parameters:
root@xxx:/var/log# cat /proc/sys/vm/swappiness
60
root@xxx:/var/log# sysctl vm.swappiness=10
vm.swappiness = 10
root@xxx:/var/log# cat /proc/sys/vm/swappiness
10
root@xxx:/var/log# vim /etc/sysctl.conf
vm.swappiness=10
vm.vfs_cache_pressure = 50
root@xxx:/var/log# cat /proc/sys/vm/vfs_cache_pressure
100
root@xxx:/var/log# cat /proc/sys/vm/vfs_cache_pressure
50
Now the mysql server should be good.
Disable wp-admin login password
Disable the login password.
# vim /etc/apache2/apache2.conf
#<DirectoryMatch ^.*/wp-admin/>
#    AuthType Basic
#    AuthName "Please login to your droplet via SSH for login details."
#    AuthUserFile /etc/apache2/.htpasswd
#    Require valid-user
#<DirectoryMatch>
root@xxx:~# service apache2 restart
 * Restarting web server apache2
Change the password for login details
$ htpasswd .htpasswd user2
Nov 4, 2014
TechnologyCheetsheet For Using NFS
Following configuration use the 192.168.1.221’s tftp server and 192.168.1.11’s nfs server, why I use different nfs server because 192.168.1.11 runs ubuntu and could reached by nfs client easily.
setenv ipaddr 192.168.1.16
setenv serverip 192.168.1.221
tftpboot ${fdtaddr} am335x-boneblack.dtb
tftpboot ${kloadaddr} uImage
setenv bootargs console=ttyO0,115200n8 root=/dev/nfs rw nfsroot=192.168.1.11:/srv/nfs4/BBBrootfs ip=192.168.1.1 rootwait
bootm ${kloadaddr} - ${fdtaddr}
How to start more services
Current we only got following output:
procd: - init -
//.......
procd: - init complete -
From the Kernel Source code we know the init startup sequence:
$ cd /media/y/embedded/BBB/svnco/trunk/build_dir/target-arm_cortex-a9+vfpv3_uClibc-0.9.33.2_eabi/linux-omap/linux-3.14.4
$ cd init
$ vim main.c
if (!try_to_run_init_process("/etc/preinit") ||
	    !try_to_run_init_process("/sbin/init") ||
	    !try_to_run_init_process("/etc/init") ||
	    !try_to_run_init_process("/bin/init") ||
	    !try_to_run_init_process("/bin/sh"))
		return 0;
The preinit is called by /etc/preinit, while in this file, we found:
for pi_source_file in /lib/preinit/*; do
        . $pi_source_file
done
This means all of the preinit script is listed under NFS Server’s /lib/preinit/ folder.
Add our own preinit startup file:
[root@TrustyArch preinit]# ls
02_default_set_state  30_failsafe_wait             70_initramfs_test  90_init_console~
10_indicate_failsafe  40_run_failsafe_hook         80_mount_root      99_10_failsafe_login
10_indicate_preinit   50_indicate_regular_preinit  90_init_console    99_10_run_init
[root@TrustyArch preinit]# vim 90_init_console
#!/bin/sh
# Copyright (C) 2006-2010 OpenWrt.org
# Copyright (C) 2010 Vertical Communications

init_console() {
    preinit_echo "Called 90_init_console here!"
    if [ "$pi_suppress_stderr" = "y" ]; then
        exec <$M0 >$M1 2>&0
    else
        exec <$M0 >$M1 2>$M2
    fi
}

boot_hook_add preinit_essential init_console
[root@TrustyArch preinit]# chmod 777 90_init_console
[root@TrustyArch preinit]# rm -f 90_init_console~
Now restart the BBB, to see if really take effects.
Also add a new file named 50_choose_console, with the setted M0 and M1, you could get your console.
$ cat 50_choose_console
#!/bin/sh
# Copyright (C) 2006-2010 OpenWrt.org
# Copyright (C) 2010 Vertical Communications

choose_console() {
    # the shell really doesn't like having stdin/out closed
    # that's why we use /dev/pty/m0 and m1 (or equivalent) as replacement
    # for /dev/console if there's no serial console available

    if grep -q devfs /proc/filesystems; then
        M0=/dev/pty/m0
        M1=/dev/pty/m1
        M2=/dev/pty/m1
    elif [ -x /sbin/hotplug2 ]; then
        M0=/dev/ptmx
        M1=/dev/ptmx
        M2=/dev/ptmx
    elif [ -x /sbin/udevd ]; then
        M0=/dev/pty/ptmx
        M1=/dev/pty/ptmx
        M2=/dev/pty/ptmx
    fi
    dd if=/dev/console of=/dev/null bs=1 count=0 >/dev/null 2>/dev/null && {
        M0=/dev/console
        M1=/dev/console
        M2=/dev/console
    }
}

boot_hook_add preinit_essential choose_console
But I still cannot get the terminal.
Nov 2, 2014
TechnologyThis changes use the socks proxy for git.
Install connect-proxy in aur:
yaourt -S connect-proxy
Edit the proxy definition file:
[Trusty@~]$ cat socks5.sh
#!/bin/sh
connect -S 127.0.0.1:1394 "$@"
Now directly set the
export GIT_PROXY_COMMAND=/home/Trusty/socks5.sh
Or change the proxy definition via:
[core]
        gitproxy = /home/Trusty/socks5.sh
Nov 2, 2014
TechnologyPrerequisite
You have a tftp server and NFS server configured, in my environment these 2 server runs on ArchLinux, ip address is 10.0.0.221, while BBB takes another ip address, for example, 10.0.0.16.
NFS Server Preparation
Create the nfs server’s rootfs for BBB Black ,and open all of the priviledges :
# pwd
/media/y/embedded/BBB/svnco/trunk/bin/omap
# mkdir /srv/nfs4/BBBrootfs
# tar xzvf openwrt-omap-Default-rootfs.tar.gz -C /srv/nfs4/BBBrootfs/
# chmod 777 -R /srv/nfs4/BBBrootfs/
Now you have the NFS Server available.
TFTP Server Preparation
Since we are using u-boot for booting, we need create uImage, but in OpenWRT, its default generated file is zImage, so we need use following command for generate our own uImage:
# mkimage -A arm -O linux -T kernel -C none -a 0x80008000 -e 0x80008000 -n "Linux" -d ./zImage ./uImage
Image Name:   Linux
Created:      Sun Nov  2 20:39:08 2014
Image Type:   ARM Linux Kernel Image (uncompressed)
Data Size:    1710568 Bytes = 1670.48 kB = 1.63 MB
Load Address: 80008000
Entry Point:  80008000
Also we have to copy the dtd file into our tftp folder:
[root@TrustyArch omap]# pwd
/media/y/embedded/BBB/svnco/trunk/bin/omap
[root@TrustyArch omap]# cp dtbs/am335x-boneblack.dtb /srv/tftp/
Easy Making Script
Following script will easy your life:
$ cat ~/autobuildnfs.sh
# First copy the kernel and dtd files into the tftp server
echo "##### Start copy to /srv/tftp####"
cp /media/y/embedded/BBB/svnco/trunk/bin/omap/openwrt-omap-zImage /srv/tftp/
cp /media/y/embedded/BBB/svnco/trunk/bin/omap/dtbs/am335x-boneblack.dtb /srv/tftp/
echo "###############Finished Copy!!!###############"
# Generate the uImage in /srv/tftp folder
mkimage -A arm -O linux -T kernel -C none -a 0x80008000 -e 0x80008000 -n "Linux" -d /srv/tftp/openwrt-omap-zImage /srv/tftp/uImage
# Remove the BBBrootfs content, all of them should be deleted.
rm -rf /srv/nfs4/BBBrootfs/
mkdir -p /srv/nfs4/BBBrootfs
# Now extract the newly generatd rootfs into the /srv/nfs4/BBBrootfs
tar xzvf /media/y/embedded/BBB/svnco/trunk/bin/omap/openwrt-omap-Default-rootfs.tar.gz -C /srv/nfs4/BBBrootfs/
U-boot Configuration
CheetSheet
When system startup, click ‘enter’ for getting the u-boot prompt interface, then set following:
setenv ipaddr 10.0.0.16
setenv serverip 10.0.0.221
tftpboot ${fdtaddr} am335x-boneblack.dtb
tftpboot ${kloadaddr} uImage
setenv bootargs console=ttyO0,115200n8 root=/dev/nfs rw nfsroot=10.0.0.221:/srv/nfs4/BBBrootfs ip=10.0.0.16:::::eth0
bootm ${kloadaddr} - ${fdtaddr}
CheetSheet2
setenv ipaddr 192.168.1.16
setenv serverip 192.168.1.221
tftpboot ${fdtaddr} am335x-boneblack.dtb
tftpboot ${kloadaddr} uImage
# For NFS
setenv bootargs console=ttyO0,115200n8 root=/dev/nfs rw nfsroot=192.168.1.221:/srv/nfs4/BBBrootfs ip=192.168.1.16:::::eth0 rootpath=/etc/preinit
# NFS with 192.168.1.1
setenv bootargs console=ttyO0,115200n8 root=/dev/nfs rw nfsroot=192.168.1.221:/srv/nfs4/BBBrootfs ip=192.168.1.1:::::eth0 rootpath=/etc/preinit
# For SD-Card
setenv bootargs console=ttyO0,115200n8 root=/dev/mmcblk0p2 ro rootfstype=ext4 rootwait
bootm ${kloadaddr} - ${fdtaddr}
setting and testing the network
Set the ipaddr, and save it into the u-boot, next time you won’t set it again.
U-Boot# setenv ipaddr 10.0.0.16
U-Boot# printenv ipaddr
ipaddr=10.0.0.16
U-Boot# setenv serverip 10.0.0.221
U-Boot# ping 10.0.0.221
link up on port 0, speed 100, full duplex
Using cpsw device
host 10.0.0.221 is alive
U-Boot# saveenv
Load Files From TFTP
Use following commands for loading uImage and dtb files from 10.0.0.221:
U-Boot# tftpboot ${fdtaddr} am335x-boneblack.dtb
U-Boot# tftpboot ${kloadaddr} uImage
Set NFS Startup Parameter
Following will let the kernel startup from the nfs server.
setenv bootargs console=ttyO0,115200n8 root=/dev/nfs rw nfsroot=10.0.0.221:/srv/nfs4/BBBrootfs ip=10.0.0.16:::::eth0
Now startup:
bootm ${kloadaddr} - ${fdtaddr}
Start Debugging Under NFS
First we met following error:
[    1.015532] List of all partitions:
[    1.019292] No filesystem could mount root, tried:
[    1.024439] Kernel panic - not syncing: VFS: Unable to mount root fs on unknown-block(0,255)
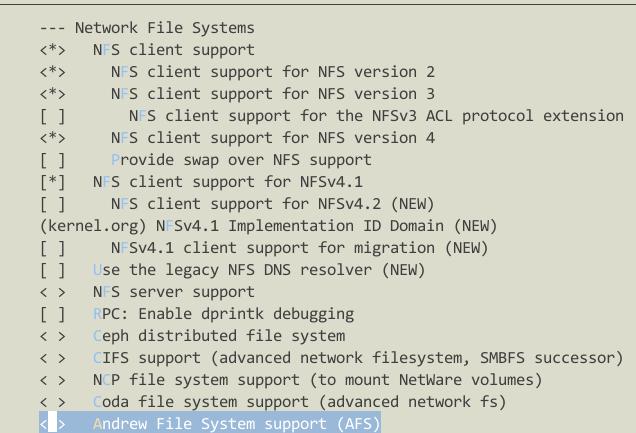
This is because we don’t enable NFS and ROOT on NFS in kernel configuration.
File System -> Network File System -> NFS Client Support, etc, see following picture:
Nov 1, 2014
TechnologyThis article will try to build and run OpenWRT on BBB(BeagleBone Black)
Checkout Code
Checkout the code from openwrt.org:
[Trusty@/media/y/embedded/BBB/OpenWRT]$ svn checkout -r 40887 svn://svn.openwrt.org/openwrt/trunk/
......
Checked out revision 40887.
Since the wiki said the only workable version for BBB is r40887, we just checkout this specified version.
Currently only runs with openwrt/trunk (r40887) and kernel 3.14.4. Kernel 3.13.7 (as in r40887 on target/linux/omap) will boot the device, but as soon as you attach a USB device, it will freeze.
Patches
Download the patch file from:http://bpaste.net/show/322887/
$ wget https://bpaste.net/raw/322887
$ wget https://bpaste.net/raw/322885
$ wget https://bpaste.net/raw/322902
$ mv 322885 Config_Kernel
$ mv 322902 Config_WRT
$ mv 322887 Patch_r40887
Notice, the first file should remove the unnecessary lines(patch for the source code).
Apply the patch:
[Trusty@/media/y/embedded/BBB/OpenWRT_r40887]$ ls
Patch_r40887  Patch_r40887~  trunk
[Trusty@/media/y/embedded/BBB/OpenWRT_r40887]$ cd trunk
[Trusty@/media/y/embedded/BBB/OpenWRT_r40887/trunk]$ patch -p1 <../Patch_r40887
patching file target/linux/omap/Makefile
patching file target/linux/omap/config-default
Now your source file has been patched with the file that you downloaded.
Build OpenWRT
In ArchLinux install quilt:
$ sudo pacman -S quilt
Then initialize the kernel building via:
$ make target/linux/{clean,prepare} V=99
$ make kernel_oldconfig
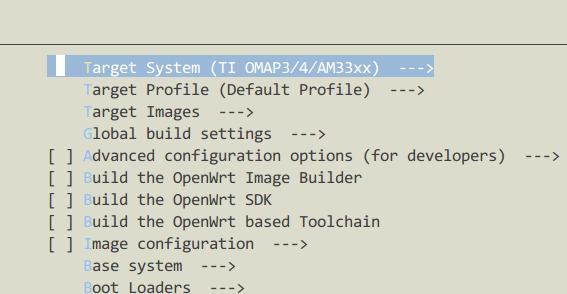
$ make kernel_menuconfig # kernel config
$ make menuconfig # OpenWRT config
When make target/linux/{clean, prepare} you should notice configure like this:
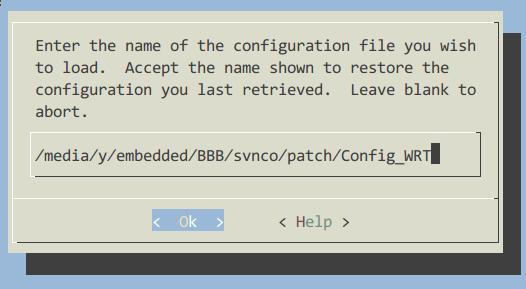
Then Load the downloaded .config file:
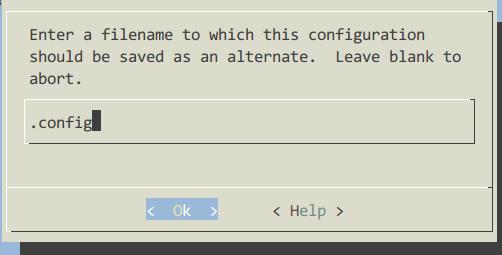
Save to .config file:
Your configuration should be seem like this:
When make the menuconfigs, load our configured kernel patch file.
Make:
$ make V=99 -j4
During building it will hint for some errors, solution is listed as:
1. Enable the network support during make kernel_menuconfig
2. Configure the git under proxy.
Flash into SD Card
After building, the result should be available at:
$ pwd
/media/y/embedded/BBB/OpenWRT_r40887/trunk/bin/omap
$ ls
dtbs  md5sums  openwrt-omap-Default-rootfs.tar.gz  openwrt-omap-squashfs.img  openwrt-omap-zImage  packages  uboot-omap-am335x_evm  uboot-omap-omap3_beagle  uboot-omap-omap3_overo  uboot-omap-omap4_panda
Now insert a SD card and make the bootable sd card for BBB:
Since the Card we inserted has a Disklabel type of gpt, like following:
Disk /dev/sdd: 7.4 GiB, 7948206080 bytes, 15523840 sectors
Units: sectors of 1 * 512 = 512 bytes
Sector size (logical/physical): 512 bytes / 512 bytes
I/O size (minimum/optimal): 512 bytes / 512 bytes
Disklabel type: gpt
Disk identifier: F2D07CAF-BDA3-426B-AD79-DB2F3F27B3B8
So first we want to change it from gpt to dos, just like:
Disklabel type: dos
Use gdisk for converting the partition type from “GPT” to “MBR”, the command should be r(reovery and transformation options)-> g(convert GPT into MBR and exit) -> w(write the MBR partition table to disk and exit) -> y(Confirum).
Now the partition should be:
Device     Boot  Start      End  Sectors  Size Id Type
/dev/sdd1         2048   100351    98304   48M  e W95 FAT16 (LBA)
/dev/sdd2       100352 15523839 15423488  7.4G 83 Linux
Make filesystems via:
# mkfs.vfat -n boot /dev/sdd1
# mkfs.ext4 /dev/sdd2
Copy the existing boot partition (other sd cards) to newly created SD card.
# pwd
/run/media/Trusty/boot
# cp /media/y/embedded/BBB/OpenWRT_r40887/trunk/bin/omap/openwrt-omap-zImage ./zImage
In the second partition(/dev/sdd2), unextract the filesystem:
$ cp /media/y/embedded/BBB/OpenWRT_r40887/trunk/bin/omap/openwrt-omap-Default-rootfs.tar.gz  ./
$ tar xzvf openwrt-omap-Default-rootfs.tar.gz
$ ls
bin  dev  etc  lib  lost+found  mnt  openwrt-omap-Default-rootfs.tar.gz  overlay  proc  rom  root  sbin  sys  tmp  usr  var  www
Besure your start-up parameter are like:
# For just using the same mmc part 2
console=ttyO0,115200n8
mmcroot=/dev/mmcblk0p2 ro
mmcrootfstype=ext4 rootwait fixrtc
After started the kernel, it will stucked.
