Nov 23, 2014
TechnologyDay 3 - Flask
First install the virtualenv environment via:
$ brew install pyenv-virtualenv
Create the 2.7 virtualenv of python, first you have to install 2.7(before you could use list for listing all of the aviable versions), then use following command for creating the 2.7 virtualenv for developing flask:
$ eval "$(pyenv init -)"
$ pyenv install --list
$ pyenv install 2.7
$ pyenv virtualenv 2.7 venv_For_Flask_2.7
$ pyenv versions
$ pyenv activate venv_For_Flask_2.7
(venv_For_Flask_2.7)Yosemite:~ Trusty$ pip install flask
Git clone the project from github, then install via the requirement.txt:
$ git clone https://github.com/shekhargulati/instant-flask-web-development-book-app.git scheduleapp
$ cd scheduleapp/
$ pip install -r requirements.txt
$ python manage.py create_tables
$ python manage.py runserver
Now you could visit the http://localhost:5000 for viewing the result.
Since you created this appliation, so it’s very easy for deploying it on Openshift.
Install rhc on Mac, before install, make sure your network is configured OK(mine is set the proxy via ):
sudo gem install rhc
Run following command for setup the rhc on your own machine:
rhc setup
Deploy the app via following command;
MacBook-Air-di-Trusty:schedulingapp Trusty$ rhc create-app schedapp python-2.7 postgresql-9.2 --from-code=https://github.com/shekhargulati/schedapp-openshift.git
After deployment, the following app will be available for accessing:
http://schedapp-kkkttt.rhcloud.com/
Day 4 - PredictionIO
Install Vagrant and its plug-ins:
$ sudo pacman -S vagrant
$ vagrant plugin install vagrant-login vagrant-share
Download the latest PredictionIO-Vagrant:
$ wget https://github.com/PredictionIO/PredictionIO-Vagrant/archive/v0.8.2.tar.gz
For working under proxy, install vagrant-proxyconf plugins:
$ vagrant plugin install vagrant-proxyconf
Add following to
  # Proxy Setting
  config.proxy.http = "http://1xx.x.xx.xxx:2xxx"
  config.proxy.https = "http://1xx.x.xx.xxx:2xxx"
  config.proxy.no_proxy = "localhost,127.0.0.1"
end
Following the tutorial may cause error, so I follow the guideline from the official website:
$ vagrant box add precise64 http://files.vagrantup.com/precise64.box
Then go the downloaded folder and start the vagrant:
$ pwd
/media/y/Vagrant/PredictionIO/PredictionIO-Vagrant-0.8.2
$ vagrant up
Now login into the vagrant machine and add the new user:
$ vagrant ssh
vagrant@precise64:~$ /opt/PredictionIO/bin/users
Warning: JAVA_HOME environment variable is not set.

PredictionIO CLI User Management

1 - Add a new user
2 - Update email of an existing user
3 - Change password of an existing user
Please enter a choice (1-3): 1
Adding a new user
Email: kkkttt@gmail.com
Password: ********
Retype password: ********
First name: Trusty
Last name: mao
User added
For settingup the vagrant in opensuse:
$ wget https://dl.bintray.com/mitchellh/vagrant/vagrant_1.6.5_x86_64.rpm
$ rpm -ivh vagrant_1.6.5_x86_64.rpm
$ which vagrant
/usr/bin/vagrant
$ vagrant box add precise64 http://files.vagrantup.com/precise64.box
$ vagrant plugin install vagrant-proxyconf
Previous version won’t create the user successfully, then I switch to 0.6.5, thus everything goes OK.
After Added the users, you could visit the webpage at “http://localhost:9000”
Add the application named “blog-recommender” in the webpage.
Eclipse Setup
The Url for input in the elipse is:
http://download.eclipse.org/technology/m2e/releases
Install the m2eclipse via following methods:
 Then:
Then:

Create project via:

You will encounter error, simply download the catelog file from:
http://repo1.maven.org/maven2/archetype-catalog.xml_
Then add the catalog file like following:
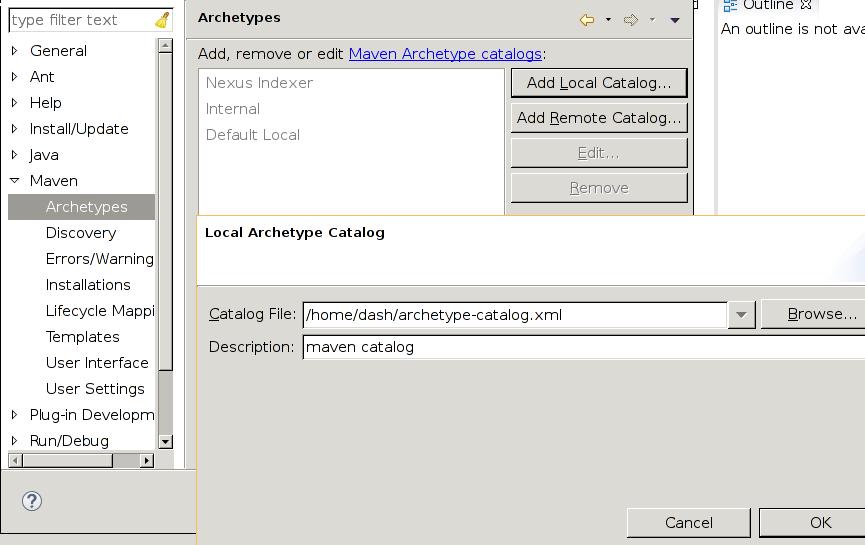
Now re-create the project :
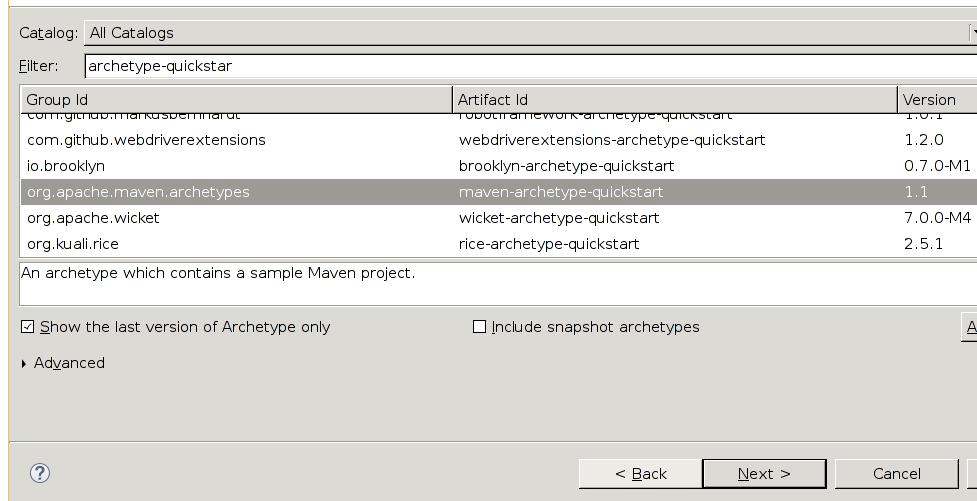
But this won’t solve the problem, we have to install maven manually in ArchLinux:
$ sudo pacman -S maven
$ # fetch the files from:
	http://mirrors.ibiblio.org/pub/mirrors/maven2/org/apache/maven/archetypes/maven-archetype-quickstart/
	maven-archetype-quickstart-1.1.jar
$ mvn install:install-file -DgroupId=org.apache.maven.archetypes -DartifactId=maven-archetype-webapp -Dversion=1.0 -Dpackaging=jar -Dfile=maven-archetype-weba
pp-1.0.jar
Now re-new the configuration.
This method is not OK, finally I downloaded the Eclipse Kepler and place it under the /media/y/Vagrant/eclipse, this time it could create the project successfully, but it failed when creating classes, complaing that missing some dependencies.
Nov 23, 2014
Technology昨晚的安装还是没能解决问题,所以今天重新来一次。
安装步骤
1. 插入Yosemite USB安装盘,选择"Ignore caches and inject kext"后按回车,进入到Yosemite安装界面。这时候的语言界面是意大利语的。分区选择Utility-> Utility Disco, 点击磁盘,按Inizilalizza, 输入Name后按Inizializza. 再一次确认也是Inizilalizza. 分区完毕后点x返回到安装界面,点击Continua-> Continua-> Accetta后选择Hard磁盘, Continua. 这时弹出拷贝窗口,需要等待大概15分钟时间用于拷贝/安装到磁盘。安装完毕后会自动重启。
2. 重启后需要选择"Boot Mac OS X from Hard”, 空格后选择"Ignore caches and inject kext” 后回车,这时会进入到一个配置界面。首选选择时区,点击Mostra tuite后选择你要的时区后, Continua, 然后选择键盘布局,USA, Continua, 网络配置选择"II mio computer non si connette a Internet”, Continua, Continua, 而后选择Non trasferrie informazioni adesso, Continua, Accetto, Accetta, 接着输入用户名/密码, Continua, 再一次Continua后进入Configuro iL Mac界面后,登录成功。
3. 在登录后的界面里,首先安装Clover到系统硬盘Hard,这样下一次我们就可以不用插入优盘以进行引导了。Clover安装时选择Install in UEFI和Drivers64UEFI。而后用UEFI Mount加载上系统真正的UEFI分区后,把根目录下的EFI目录全盘拷贝到系统UEFI分区下。同时使用KextDrop.dmg drop同用的Kext到系统。重启。
4. Drop Yosemite自己的驱动后,重启。这时候的声卡,USB, 蓝牙等应该都已经驱动上了。由于我们使用了修改过的Display驱动,DP口现在也应该是好的。开始安装有线/无线驱动。安装完毕后系统自动要求重启。
5. 重启完毕后可以直接链入网络,为了可以访问App Store, 删除掉系统里所有网络配置,删除掉/Library/Preferences/SystemConfiguration/NetworkInterfaces.plist, 重启。这将使得我们手动配置网卡的build-in模式。
6. 手动添加网络,打开App Store,尝试安装一个软件,看是否如愿,如果OK,那么恭喜你。如果不OK,接着走下一步。我这里出现的错误是"Your device or computer could not be verified, Contact support for assistance.” 下载NullEthernet包,drop之。并使用MaciASL, Apply patch.txt. 完成这些后重启。
7. 重启后依然无法访问,吃欧冠内心删除所有的网卡驱动,重新删除/L/P/S/NetworkInterfaces.plist, 重启。重新添加USB网卡,访问App Store. 好了,现在你可以访问,享受之。
可能存在的问题
插入USB无线网卡可能会造成系统不稳定。譬如蓝牙丢失之类。这和驱动的稳定性有关系。所以在我的SurfacePro上我打算采用不稳定的驱动,我会采用一个便携式路由器把无线转成有线的功能。
Nov 22, 2014
TechnologyIn fact this series is not only for customization of the surface pro, it becomes the written-tips for what I’ve installed on my ArchLinux. So later all of the necessary packages installation I will record them here.
1. postgres
Install via:
sudo pacman -S postgresql
Start postgresql service:
$ sudo systemctl start postgresql
Now begin to configurate the postgres:
$ sudo -i -u postgres
[postgres@kkkttt ~]$ initdb --locale en_US.UTF-8 -E UTF8 -D '/var/lib/postgres/data'
[postgres@kkkttt ~]$ createuser --interactive
Enter name of role to add: kkkt
Shall the new role be a superuser? (y/n) y
Test of create temp db via:
[kkkt@/usr/lib/systemd/system]$ createdb kkkttmp
2. dhclient
Sometime we really need this dhclient for debugging. Especially when you want to get the specified port address.
sudo pacman -S dhclient
3. dnscrypt-proxy
At most of the times the dns will be pulluted, so need this guy for sending the encrypted quest and get the response the safe DNS provider.
sudo pacman -S dnscrypt-proxy
4. cmake
For making some opensource projects:
sudo pacman -S cmake
5. cbatticon
This little tool is for displaying battery status at the tray, install it via:
sudo pacman -S cbatticon
Add it to the singleview/dualview/triview setting files.
6. nitrogen
For setting up different picture at startup.
$ sudo pacman -S nitrogen
Add following line into the startup file:
$ nitrogen --restore
7. nmap
For scannning all of the living machine in the LAN.
sudo pacman -S namp
Scan via:
nmap -sP 192.168.1.*
Nov 22, 2014
TechnologyJust for recording the steps, later I will use it for re-installation.
1. Insert the FlashDisk, re-partition the harddisk, and install the system. After everything is OK, restart.
2. Choose start from HardDisk(ignore the caches and eject kext), Now the system will ask you for configuration, Select US-keyboard/Canada, after entering the system, simply change the language from Italian to English.
Install Clover to the Harddisk. The default installtion will failed, then you have to manually mount the EFI partition, and copy the EFI/ folder under the “/” directory to EFI partition.
Copy the DSDT and SSDT from the Surface downloaded folder. config.plist from http://www.insanelymac.com/forum/topic/301884-guide-surface-pro-1st-gen-yosemite-clean-installation/page-2#entry2077531
Use kdrop for dropping the kext files under Surface/ folder, don’t install yosemite specified. Ignore the apple’s framebuffer.
Then restart. This time we could remove the flashdisk to let SurfacePro start by itself.
3. After restarted, remove the EFI in / folder(Not the EFI folder!!!), then dropped the Yosemited specifed kext. Restart.
4. Install the dp kext, and replace the dp related config.plist, Restart.
5. Install the ethernet card, mine have the USB ethernet adapter and also USB wireless adapter, install the ethernet adapter first, mine is AX8872 usb adapter, simply download the package from webiste, install it. Then restart.
Restart and the system becomes not stable, it seems the AX8872 harms the system.
Re-dropped the Yosemite specified KEXT, for try. After re-dropped, restart the system.
Seems no effect, OK,finally we remove the EFI and re-copy the EFI into the system( Go back to step 2, recover the EFI and re-dropped the kexts excpect Yosemite specified), and restart.
Now the video seems OK, re-dropped the yosemite specified kexts, then restart.
Now Usb Ethernet Adapter is OK. Enable the ssh and now we could remotely sent files to it.
Install the USB Wireless adapter’s driver via: TL-WN725N_v2_USB_MacOS10.8.zip, this one is simply downloaded for r8188eu chipset, mine is “fast” but it’s actually the copy of TP-LINK WN725N.
Since we replaced the EFI with the original EFI, we have to re-dropped the framebuffer and replace the dsdt file and replace the EFI’s config.plist for supporting DP output. Now restart.
Notice, normally if you replaced the dsdt file, the restart procedure may be pretty long, and it possibly runs into error cases.
6. Fortunately we runs into the correct case, so last step we install the NullEthernet driver. This driver enables your ethernet card acts like a built-in card, thus you could visit app store. First you dropped the kext, then you use a tool named MaciASL for editing the dsdt file, patched the “patch.txt”, save to dsdt, and restart.
6-1 Bad Luck, the system got very slow again, so go back to Step 2, remove the installed EFI, then re-dropped the kexts excepts the Yosemite and others, restart.
6-2 The video goes OK, continue for dropping yosemite specified Kexts, then restart.
6-3 At this moment we still could not reached App store, so installed the DisPlay Port patches, and re-start.
6-4 Finally we could re-install the NullEthernet Drivers. But wait!!! Because this time I installed the fucking injector. This package causes the system un-stable again. And it seems the system is pretty slow, but we still got login window, simply go to /S/L/E, and remove the installed NUllEthernetInjector.kext. Then use disk utils for checking the volumn and repare the permission.. REstart to see the effect.
6-5 No recover, go back to 6-1 ~ 6-3.
6-6 Install the NullEthernet.kext, and applied the pathes, restart and wait for result.
6-7 Failed, I doubt if it’s because the wireless and ethernet adapter both OK, so remove wireless, and do the experiment again.
6-8 This time didn’t replace the dp , But installed the NullEthernet and applied the patch. Then delete all of the configuration of the network card, and also removed all of the devices and the configuration file under the /L/Preferences/Systemconfig/network.plist OK.
Nov 22, 2014
TechnologyHeroku Postgres
I wrote the weather app which holds at:
http://python-weather-app.herokuapp.com
At around half a year it grows around 7MB, so I begin to think of how to back it and migrate to other platforms.
Following is the steps for viewing and operation on postgres database:
$ heroku login
$ heroku config
$ heroku addons | grep POSTGRES
$ heroku pg:info
Backup
Install the addons of pgbackups for backing up the existing databases:
$ heroku addons:add pgbackups
$ heroku pgbackups:capture
Use following command for store the backup locally:
$ curl -o latest.dump `heroku pgbackups:url`
$ pg_restore --verbose --clean --no-acl --no-owner -h localhost -U Trusty -d weatherdb latest.dump
View the data
Using following commands for viewing the data:
$ psql weatherdb
weatherdb=# \dt;
          List of relations
 Schema |    Name     | Type  | Owner
--------+-------------+-------+-------
 public | avg_weather | table | Trusty
 public | user        | table | Trusty
 public | weather     | table | Trusty
(3 rows)
weatherdb=# select * from weather;
weatherdb=# select * from avg_weather;
By this you could dump all of the datas which already held in this postgres database.
