Nov 27, 2014
TechnologyDay 9 - TextBlob
Installation:
Yosemite:TextBlob Trusty$ mkdir myapp
Yosemite:TextBlob Trusty$ cd myapp/
Yosemite:myapp Trusty$ virtualenv venv --python=python2.7
Running virtualenv with interpreter /usr/bin/python2.7
New python executable in venv/bin/python
Installing setuptools, pip...done.
Yosemite:myapp Trusty$ . venv/bin/activate
(venv)Yosemite:myapp Trusty$ pip install textblob
$ pip install -U textblob
$ python -m textblob.download_corpora
After adding the textblob, create flask:
$ pip install flask
$ vim app.py
$ mkdir templates
$ touch templates/index.html
Modify the app.py for listening on all of the ip addresses:
if __name__ == "__main__":
    app.run(host='0.0.0.0',debug=True)
Then python app.py could get you to the website and run your apps.
The analyze code is listed as following:
            $.get('/api/v1/sentiment/'+input,function(result){

                if(result.polarity < 0.0){

                    $('#result').addClass("alert alert-danger")   .text(input);
                } else if( result.polarity >= 0.0 && result.polarity <= 0.5){
                    $('#result').addClass("alert alert-warning").text(input);
                }else{
                    $('#result').addClass("alert alert-success").text(input);
                }

            })
You could easily update the apps to your rhc.
Day 10 - PhoneGap
Android
Install steps:
$ sudo npm install -g phonegap
$ sudo npm install -g cordova
$ phonegap create reader --id io.reader --name Reader30
$ sudo android
sudo android is for installing the android SDK, we have to select revision 19 for phonegap currently support 19.
$ cordova platform add android
$ sudo pacman -S apache-ant
$ phonegap run android
Now you could see a screen which displayed “Device Ready”.
Install some plugins for accessing the equipment:
cordova plugin add org.apache.cordova.geolocation
cordova plugin add org.apache.cordova.dialogs
Edit steps:
$ vim www/index.html 	# Add front page
$ rm -f www/js/index.js
$ cp -r ../example/30technologies30days-mobile-app/www/js/vendor ./www/js
$ cp -r ../example/30technologies30days-mobile-app/www/css/vendor ./www/css
$ vim www/js/app.js
$ vim www/index.html	# Add form
$ vim www/js/app.js
Now run phonegap run android you could see the app runs on your android emulator.
IOS
In ios, we could use following command for installing the ios specified resources.
(venv)Yosemite:PhoneGap Trusty$ cd reader/
(venv)Yosemite:reader Trusty$ cordova platform add ios
$ sudo npm install -g ios-deploy
$ sudo npm install -g ios-sim
$ phonegap run ios
Nov 26, 2014
TechnologyDay 5 - GruntJS
Install via:
$ sudo npm install grunt-cli -g
After running you could see grunt is avaiable:
$ which grunt
/usr/local/bin/grunt
Automatically create the package.json via npm init.
Yosemite:GruntJS Trusty$ mkdir blog
Yosemite:GruntJS Trusty$ cd blog
Yosemite:blog Trusty$ npm init
This utility will walk you through creating a package.json file.
It only covers the most common items, and tries to guess sane defaults.

See `npm help json` for definitive documentation on these fields
and exactly what they do.

Use `npm install <pkg> --save` afterwards to install a package and
save it as a dependency in the package.json file.

Press ^C at any time to quit.
name: (blog)
version: (1.0.0)
description: My awesome blog
entry point: (index.js)
test command:
git repository:
keywords:
author:
license: (ISC)
About to write to /Users/Trusty/Code/30Days/GruntJS/blog/package.json:

{
  "name": "blog",
  "version": "1.0.0",
  "description": "My awesome blog",
  "main": "index.js",
  "scripts": {
    "test": "echo \"Error: no test specified\" && exit 1"
  },
  "author": "",
  "license": "ISC"
}


Is this ok? (yes) yes
Yosemite:blog Trusty$ cat package.json
{
  "name": "blog",
  "version": "1.0.0",
  "description": "My awesome blog",
  "main": "index.js",
  "scripts": {
    "test": "echo \"Error: no test specified\" && exit 1"
  },
  "author": "",
  "license": "ISC"
}
Run following command will install grunt locally and also update the dependencies, also update the package.json:
Yosemite:blog Trusty$ sudo npm install grunt --save-dev
Yosemite:blog Trusty$ cat package.json
{
  "name": "blog",
  "version": "1.0.0",
  "description": "My awesome blog",
  "main": "index.js",
  "scripts": {
    "test": "echo \"Error: no test specified\" && exit 1"
  },
  "author": "",
  "license": "ISC",
  "devDependencies": {
    "grunt": "^0.4.5"
  }
}
`

Yosemite:blog Trusty$ cat package.json
{
  "name": "blog",
  "version": "1.0.0",
  "description": "My awesome blog",
  "main": "index.js",
  "scripts": {
    "test": "echo \"Error: no test specified\" && exit 1"
  },
  "author": "",
  "license": "ISC",
  "devDependencies": {
    "grunt": "^0.4.5"
  }
}
Yosemite:blog Trusty$ grunt
A valid Gruntfile could not be found. Please see the getting started guide for
more information on how to configure grunt: http://gruntjs.com/getting-started
Fatal error: Unable to find Gruntfile.
Yosemite:blog Trusty$ vim Gruntfile.js
Yosemite:blog Trusty$ mkdir js
Yosemite:blog Trusty$ cd js/
Yosemite:js Trusty$ touch app.js
Yosemite:js Trusty$ vim app.js
function hello(name) {
	return "Hello, " + name;
}
function bye(name) {
	return "Bye, " + name;
}
Yosemite:js Trusty$ vim ../
Gruntfile.js   Gruntfile.js~  js/            node_modules/  package.json
Yosemite:js Trusty$ vim ../Gruntfile.js
module.exports = function(grunt) {
	grunt.initConfig({
		uglify: {
				build: {
					       src: ['js/app.js'],
					       dest: 'js/app.min.js'
				       }
			}
	});

	grunt.loadNpmTasks('grunt-contrib-uglify');
	grunt.registerTask('default', ['uglify']);
};
Yosemite:js Trusty$ cd ..
Yosemite:blog Trusty$ ls
Gruntfile.js	Gruntfile.js~	js		node_modules	package.json
Yosemite:blog Trusty$ grunt
>> Local Npm module "grunt-contrib-uglify" not found. Is it installed?
Warning: Task "uglify" not found. Use --force to continue.

Aborted due to warnings.
Yosemite:blog Trusty$ sudo grunt
>> Local Npm module "grunt-contrib-uglify" not found. Is it installed?
Warning: Task "uglify" not found. Use --force to continue.

Aborted due to warnings.
Yosemite:blog Trusty$ sudo npm install grunt-contrib-uglify --save-dev
npm WARN package.json blog@1.0.0 No repository field.
npm WARN package.json blog@1.0.0 No README data
grunt-contrib-uglify@0.6.0 node_modules/grunt-contrib-uglify
├── uri-path@0.0.2
├── loTrusty@2.4.1
├── chalk@0.5.1 (escape-string-regexp@1.0.2, ansi-styles@1.1.0, supports-color@0.2.0, has-ansi@0.1.0, strip-ansi@0.3.0)
├── uglify-js@2.4.15 (uglify-to-browserify@1.0.2, async@0.2.10, optimist@0.3.7, source-map@0.1.34)
└── maxmin@1.0.0 (figures@1.3.5, pretty-bytes@1.0.1, gzip-size@1.0.0)
Yosemite:blog Trusty$ grunt
Running "uglify:build" (uglify) task
>> 1 file created.

Done, without errors.
Yosemite:blog Trusty$ cat js/app.min.js
function hello(a){return"Hello, "+a}function bye(a){return"Bye, "+a}Yosemite:blog Trusty$
See, grunt will doing the boring tasks for us without any errors.
Day 6 - Grails
ArchLinux Setting
Install grails under ArchLinux:
sudo pacman -S grails
Then in eclipse, search Help > Eclipse Marketplace for “Grails” , it will hint you for installing grails.
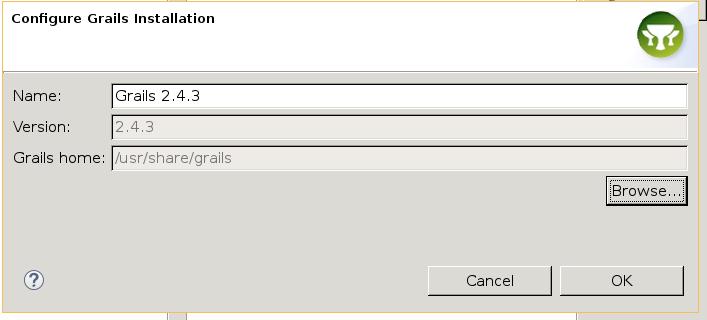
File -> New -> Project -> Grails Project. First time it will ask you for setting the grails home directory.
Set the project like:

Choose Grails perspective.
MAC Setting
Download the eclipse from:
https://eclipse.org/downloads/
Download the Java SE from:
http://support.apple.com/kb/DL1572
After installation, search the Marketplace for “Grails” install the grails for eclipse Luna.
Install Grails:
$ brew install grails
$ which grails
/usr/local/bin/grails
When configure the Grails project for the first time, the installation is /usr/local/Cellar/grails/2.4.4/libexec, then create a new project named “linkbin”.
Create new “domain class” named “User” and “Story”
Replace the class User via:
class User {
	String email
	String fullName
	static constraints = {
		email unique:true , blank : false , email:true
		fullName size:5..100  , blank : false
	}

}
Replace the class Story via:
package linkbin

class Story {
	String link
	String description
	Date submittedOn

	static constraints = {
		link url : true , blank : false ,unique : true
		description size : 10..1000 , blank : false
	}
}
Connect the User and Story Class, first modify the Story and User Class:
package linkbin
class Story {
    String link
    String description
    Date submittedOn
    static belongsTo = [user : User]
    static constraints = {
        link url : true , blank : false ,unique : true
        description size : 10..1000 , blank : false
    }
    static mapping = {
        table 'stories'
    }
}
User Class:
package linkbin
class User {
	String email
	String fullName
	static hasMany = [stories : Story]
	static constraints = {
		email unique:true , blank : false , email:true
		fullName size:5..100  , blank : false
	}
	static mapping = {
		table 'users'
	}
}
Then generate the Controller and view:
domain-> linkbin-> User.groovy-> Grails Tools -> Grails Command Wizard, input linkbin.User and click “Finish”. The same steps are the same for Story.
Now the CRUD controller and viewpoint will be generated.
Right-click the project and “Run as Grails App”, then you could
Now create the openshift app via following command:
$ rhc create -app linkbin tomcat-7 postgresql-9.2
This will automatically create the apps on openshift, and hit you like:
Your application 'linkbin' is now available.

  URL:        http://linkbin-kkkkkkktttt.rhcloud.com/
  SSH to:     xxxxxxxxxxxx@linkbin-kkkkkkktttt.rhcloud.com
  Git remote: ssh://xxxxxxxx@linkbin-kkkkkkktttt.rhcloud.com/~/git/linkbin.git/
  Cloned to:  /Users/Trusty/Documents/workspace/linkbin/linkbin

Run 'rhc show-app linkbin' for more details about your app.
And go to the linkbin folder:
git rm -rf src/ pom.xml
git commit -am "deleted default source code"
Modify the conf/Datasource.groovy file’s configuration:
		production {
			dataSource {
				dbCreate = "update"
				driverClassName = "org.postgresql.Driver"
				dialect = org.hibernate.dialect.PostgreSQLDialect
			uri = new URI(System.env.OPENSHIFT_POSTGRESQL_DB_URL)
			url = "jdbc:postgresql://"+uri.host+uri.path+"/"+System.env.OPENSHIFT_APP_NAME
				username = System.env.OPENSHIFT_POSTGRESQL_DB_USERNAME
				password = System.env.OPENSHIFT_POSTGRESQL_DB_PASSWORD
			}
		}
Generate the war file via:
“Grails Command Wizard”, use “war” command, the name of its generation is " target/ROOT.war”, then the ROOT.war will be generated, copy it to the webapps under linkbin:
$ git add .
$ git commit -am "linkbin app deployed to cloud"
$ git push
After push we could visit the above url for visiting the apps.
Nov 25, 2014
TechnologyAdd following lines into your _config.yml:
sidebar: collapse
Then regenerate the whole website.
Changing Navigation
Add “About Me” navigation:
$ cat source/_includes/custom/navigation.html
<ul class="main-navigation">
  <li><a href="{{ root_url }}/">Blog</a></li>
  <li><a href="{{ root_url }}/blog/archives">Archives</a></li>
  <li><a href="{{ root_url }}/about">About Me</a></li>
</ul>
Add customized tags:
  <li><a href="{{ root_url }}/blog/categories/linux/">Linux</a></li>
  <li><a href="{{ root_url }}/blog/categories/embedded/">Embedded</a></li>
Add Customized Background
Edit the sass/cumstom/_style.css, change following content:
html {
  background: #555555 url("/images/pagebackground.jpg");
  //background: #555555;
}
Now regenerate the website, ten you got the modified background website.
Nov 24, 2014
TechnologyPrepare
First go to http://downloads.openwrt.org/barrier_breaker/14.07/ar71xx/generic/, find the “wr703n”, download the 2 files.
$ ls -l openwrt*
-rw-r----- 1 Trusty root 3932160 Nov 24 13:50 openwrt-ar71xx-generic-tl-wr703n-v1-squashfs-factory.bin
-rw-r----- 1 Trusty root 3342340 Nov 24 13:50 openwrt-ar71xx-generic-tl-wr703n-v1-squashfs-sysupgrade.bin
sysupgrade.bin is for upgrading.
Upgrade
System-> Backup/Flash Firmware.
Flash New firmware image, choose File. Select the sysupgrade.bin, Upgrade.
Tehn you have to wait for the changes to be applied, around half a miniutes, then everything will be OK.
Use Flash Disk For Booting
Cause the inner storage is only 4M-BYTE, we have to enlarge it via adding the external flash disk .
$ opkg update
$ opkg install block-mount kmod-usb-storage fdisk
Comparing to Attitude Adjustment, the kmod-fs-ext4 couldn’t be installed, thus we have to formt the flash disk into ext3 format.
Cause we won’t installed the kmod-fs-ext4, so the external system couldn’t be used, this time just flash back the Attitude Adjustment.
Rootfs on External Storage
Copy the filesystem into the external disk:
root@OpenWrt:/mnt/sda2# tar -C /overlay -cvf - . | tar -C /mnt/sda2 -xf -
root@OpenWrt:/mnt/sda2# ls
etc         lib         lost+found  mnt         sbin        usr
Configure the /etc/config/fstab:
config mount
        option target   /overlay
        option device   /dev/sda2
        option fstype   ext3
        option options  rw,sync
        option enabled  1
        option enabled_fsck 0
Reboot and you got 8G rootfs enabled router.
Wireless-> Wired.
First set the wireless port to client mode:
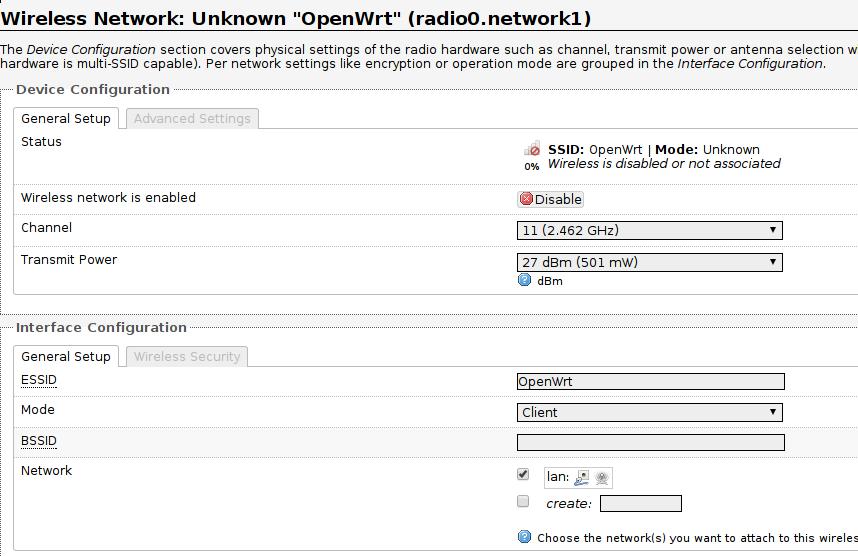
Then set the wired port to static address:
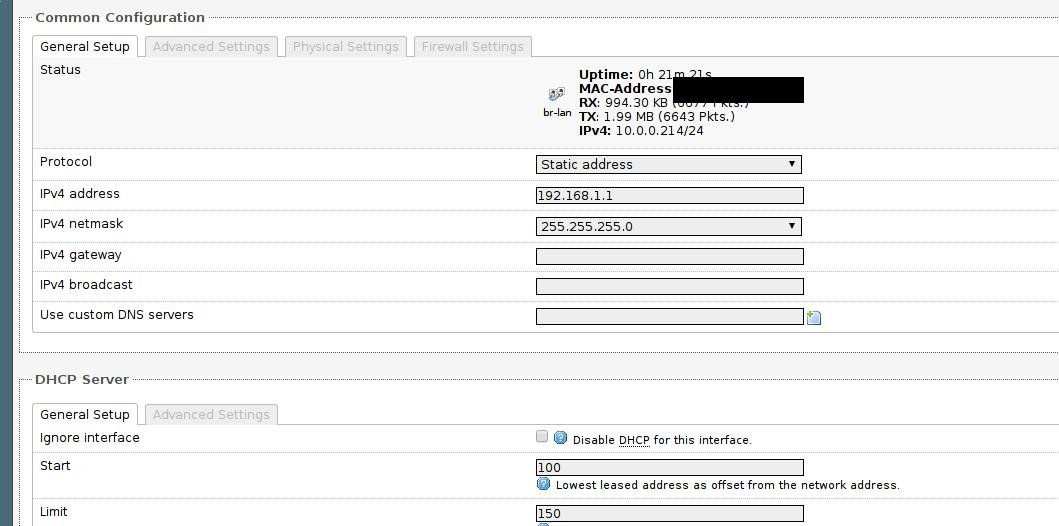
Now reset your router and connect the ethernet port with a line, the equipments who only have ethernet could use router’s wireless signal for accessing the network.
Later when I study in the library, this router could easily transfer the signal from wireless to wired and let surfacePro work properly.
Nov 23, 2014
TechnologySometips for recording how to cross the greatfxxewall:
SSH
Use following command for forwarding your flow to remote machine:
alias enablexx='ssh -C -qTfnN -D 1395 root@xxx.xxx.xxx.xxx
xxx.xxx.xxx.xxx should be the machine outside of China.
Then in your browser set the proxy to 127.0.0.1:1395, while this is the socket proxy, so choose sock4/sock5 for configuration parameters.
DNS Cryption
For the DNS flow will be hijacked by greatfxxxewall, we have to encrypt all of the traffics for DNS Querying.
DNSCrypt is a piece of software that encrypts DNS traffic between the user and a DNS resolver, preventing spying, spoofing or man-in-the-middle attacks.
Install it via:
$ sudo pacman -S dnscrypt-proxy
Then modify the /etc/resolv.conf content to:
# Generated by resolvconf
nameserver 127.0.0.1
Previously it would be 10.0.0.1, but after we enabled the DNS cryption, we will use our own dns server as in 127.0.0.1.
Note: In office I won’t change this file because the DNS is safe in ALU.
Start/Stop the service via:
### encrypt my dns flow
alias enabledns='sudo systemctl start dnscrypt-proxy.service'
alias disdns='sudo systemctl stop dnscrypt-proxy.service'
Above 2 lines has been written to ~/.zshrc, so everytime I just type enable/dis(dns) I could enable/disable the DNS encryption.
