Dec 13, 2014
TechnologyWordpress
Install it via:
$ docker pull tutum/wordpress
Run it via:
$ docker run -p 80:80 tutum/wordpress &
Now configure the backend, and you could directly access http://Your_IP_Address for this wordpress website.
Import Database And Static Files
Since I have an old website, I want to import it in this container, following is the steps of how-to.
The exising database runs on Debian 7, and its platform is arm-based, see if we could directly retrieve the wordpress and extract them into it.
Use mysqldump for extracting the existing wordpress file
$ mysqldump -u root -p[root-password] wordpress>~/wordpress.mysql
Then copy the wordpress.mysql to the remote server.
Replacement
Be sure to use gedit for replacing the old fxx***.iiiouge.biz:7777 to 1xx.xxx.xxx.xxx then all of your links will be acts well.
Then upload the /var/www/ directory to your server’s corresponding directory, here ours is /var/www/html, eg. /app
Import the MYSQL Datafile
Attached to running wordpress in DO via:
$ docker ps
CONTAINER ID        IMAGE                    COMMAND                CREATED             STATUS              PORTS                          NAMES
cfddafcc96f5        tutum/wordpress:latest   "/run.sh"              25 hours ago        Up 25 hours         3306/tcp, 0.0.0.0:80->80/tcp   drunk_brown
$ docker exec -it cfddafcc96f5 bash
This will give you a terminal for accessing the running container. Examine the wordpress running environments:
The WP files are located at /var/www/html, the mysql file locates at /var/lib/mysql/wordpress, then how to import the old wordpress website is the things we want to solve.
Install phpMyAdmin for importing the database:
$ sudo apt-get install phpmyadmin apache-utils
$ sudo vim /etc/apache2/apache2.conf
Include /etc/phpmyadmin/apache.conf
$ sudo service apache2 restart
Include /etc/phpmyadmin/apache.conf
$ sudo service apache2 restart
Now you could directly access the phpMyAdmin page with username root and empty password, this is dangerous, but we just for demononstration, needn’t care it.
Use phpMyAdmin for importing the sql file which we extracted from the old wordpress.
Trouble shooting
When uploading the www file and replaced, the connection shows:
数据库连接错误
您在wp-config.php文件中提供的数据库用户名和密码可能不正确,或者无法连接到localhost上的数据库服务器,这意味着您的主机数据库服务器已停止工作。

您确认您提供的用户名和密码正确么?
您确认您提供的主机名正确么?
您确认数据库服务器运行正常么?
This is because we provided the wrong password for the mysql, change it to the username root and nopassword.
Restart the apache2 server now your website acts good.
Hide phpMyAdmin Page the username root and nopassword.
$ sudo nano /etc/phpmyadmin/apache.conf
<Directory /usr/share/phpmyadmin>
        Options FollowSymLinks
        DirectoryIndex index.php
        AllowOverride All
        [...]
Add the htaccess method via:
$ sudo nano /usr/share/phpmyadmin/.htaccess
AuthType Basic
AuthName "Restricted Files"
AuthUserFile /etc/apache2/.phpmyadmin.htpasswd
Require valid-user
Then set the password for root via:
$ sudo htpasswd -c /etc/apache2/.phpmyadmin.htpasswd root
After doing this, restart the apache2 service, now your phpMyAdmin page is under the protection of the username and the password.
Dec 12, 2014
TechnologyBackground
I tried to use 192.168.1 network for debugging, but after I change back from 10.0.0. to 192.168.1. the router got no interface for luci and http. So following is the steps for recovering from the fail router.
Solution
First I tried to recover the luci and uhttpd, but after a while I think maybe I could swith to a newer version.
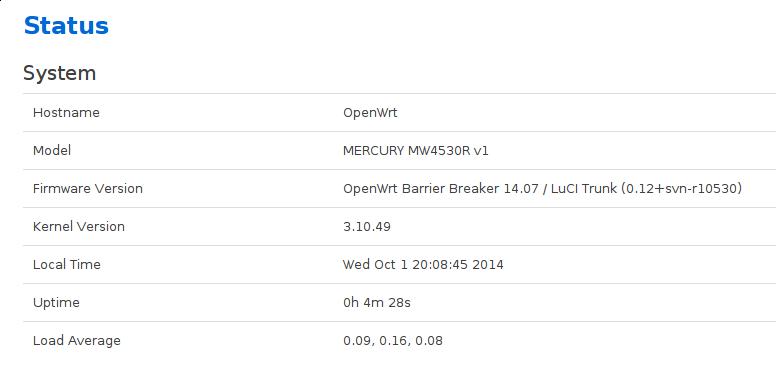
The newest version currently is " ‘Barrier Breaker’ “, its version number is 14.07.
My router is Mercury 4530R, which have the following configuration:
CPU	Ram	Flash	Network	USB	Serial	JTag
Atheros	128MiB	8MiB	4LAN + 2WIFI	Yes	Yes	?
LUCI upgrade failed:
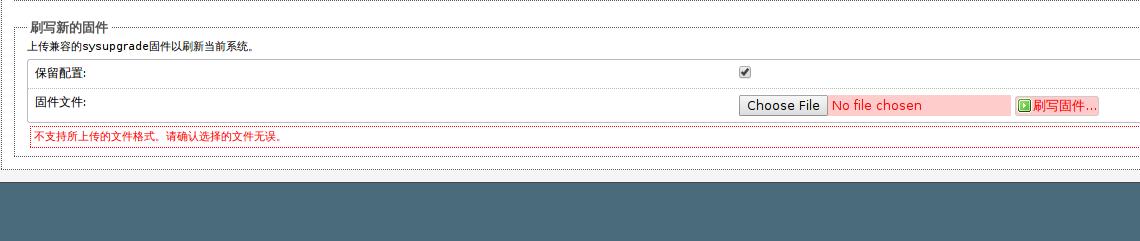
The reason:
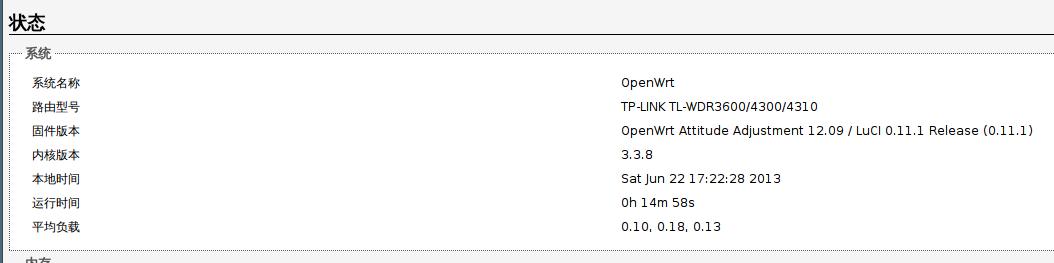
Because in early 2012 Autumn, the official supporting for 4530R is not release, so we modified the machineID, to let 4530R to use TP-Link’s patched images, this will display our system as for 4310, but not for 4530R.
Sysupgrade in CLI
First check the free memory:
root@OpenWrt:~# free
             total         used         free       shared      buffers
Mem:        126788        26636       100152            0         1780
-/+ buffers:              24856       101932
Swap:            0            0            0
Download the sysupgrade file:
# cd /tmp
# wget http://downloads.openwrt.org/barrier_breaker/14.07/ar71xx/generic/openwrt-ar71xx-generic-mw4530r-v1-squashfs-sysupgrade.bin
# ls -l openwrt-ar71xx-generic-mw4530r-v1-squashfs-sysupgrade.bin
-rw-r--r--    1 root     root       3342340 Jun 22 17:28 openwrt-ar71xx-generic-mw4530r-v1-squashfs-sysupgrade.bin
Problem when checking:
# sysupgrade -v openwrt-ar71xx-generic-mw4530r-v1-squashfs-sysupgrade.bin
Invalid image, hardware ID mismatch, hw:43100001 image:45300001.
Image check 'platform_check_image' failed.
Ignore the Image check:
root@OpenWrt:/tmp# sysupgrade -F openwrt-ar71xx-generic-mw4530r-v1-squashfs-sysupgrade.bin
Invalid image, hardware ID mismatch, hw:43100001 image:45300001.
Image check 'platform_check_image' failed but --force given - will update anyway!
Saving config files...
Sending TERM to remaining processes ... uhttpd dnsmasq smbd nmbd ntpd hotplug2 syslogd klogd hotplug2 ubusd netifd
Sending KILL to remaining processes ... uhttpd
Switching to ramdisk...
Performing system upgrade...
Unlocking firmware ...

Writing from <stdin> to firmware ...
Appending jffs2 data from /tmp/sysupgrade.tgz to firmware...TRX header not found
Error fixing up TRX header

Upgrade completed
Rebooting system...
After a while, your router is flashed to the new system.
More Happily Play with FlashDisk
Cause 8M Flash is not enough for playing lots of things, I plug-in a 2G FlashDisk into the usb port as the external disk.
$ ssh root@192.168.1.1
root@OpenWrt:~# export http_proxy=http://1xx.xx.xxx.xxx:2xxxx
root@OpenWrt:~# df -h
Filesystem                Size      Used Available Use% Mounted on
rootfs                    4.6M    292.0K      4.3M   6% /
/dev/root                 2.3M      2.3M         0 100% /rom
tmpfs                    61.7M    588.0K     61.1M   1% /tmp
/dev/mtdblock3            4.6M    292.0K      4.3M   6% /overlay
overlayfs:/overlay        4.6M    292.0K      4.3M   6% /
tmpfs                   512.0K         0    512.0K   0% /dev
root@OpenWrt:~# opkg update
......
root@OpenWrt:~# opkg install block-mount kmod-usb-storage fdisk kmod-fs-ext4 kmod-usb-storage-extras kmod-scsi-generic
......
root@OpenWrt:~# df -h
Filesystem                Size      Used Available Use% Mounted on
rootfs                    4.6M    836.0K      3.8M  18% /
Now format the flash-disk and plug it into the usb port. Reboot the router and now via fdisk -l you will see the plugged-in flashdisk:
Device    Boot Start       End  Blocks  Id System
/dev/sda1       2048   3948543 1973248  83 Linux
Transfer Filesystem to External Disk
The steps is listed as:
pivot overlay:
root@OpenWrt:~# mkdir /mnt/sda1
root@OpenWrt:~# mount /dev/sda1 /mnt/sda1/
root@OpenWrt:~# tar -C /overlay -cvf - . | tar -C /mnt/sda1 -xf -
root@OpenWrt:~# ls /mnt/sda1/
etc         lib         lost+found  mnt         sbin        usr
pivot root:
mkdir -p /tmp/cproot
mount --bind / /tmp/cproot
tar -C /tmp/cproot -cvf - . | tar -C /mnt/sda1 -xf -
umount /tmp/cproot
Configuration file:
$ block detect
config 'mount'
        option  target  '/mnt/sda1'
        option  uuid    'f6857dac-a12a-49c9-b567-f05a61100bd7'
        option  enabled '0'

$ cat /etc/config/fstab
config global
        option anon_swap '0'
        option anon_mount '0'
        option auto_swap '1'
        option auto_mount '1'
        option delay_root '5'
        option check_fs '0'

config mount
        option target '/overlay'
        option  uuid    'f6857dac-a12a-49c9-b567-f05a61100bd7'
        option enabled '1'
        option fstype 'ext4'
Now reboot the router and you got a 2G based storage router:
root@OpenWrt:~# df -h
Filesystem                Size      Used Available Use% Mounted on
rootfs                    1.8G     12.6M      1.7G   1% /
You could play happily in this router.
Further Optimization
Includes:
1. Fixed ip address configurations.
2. Port forwarding. Router-> Port Forwarding.
3. SSH Server Replacement, from dropbear to opensshd.
# opkg update
# opkg install openssh-server
# uci set dropbear.@dropbear[0].Port=2222
# uci commit dropbear
# /etc/init.d/dropbear restart
# /etc/init.d/sshd enable
# /etc/init.d/sshd start
# /etc/init.d/dropbear disable
# /etc/init.d/dropbear stop
# ssh-keygen
# opkg install openssh-client
4. Time sync.
With the previous installed sshd, you could add yourself to remote server’s trusted users. then add files of time.sh for syncing time.
Refers to local link /blog/2014/02/11/write-local-ntp-sync-server/
5. Sharing the mouse between Yosemite and ArchLinux, change the configuration files.
Finally we got all of these done:
root@OpenWrt:~/.ssh# uptime
 12:45:31 up 6 min,  load average: 0.22, 0.14, 0.06
root@OpenWrt:~/.ssh# date
Fri Dec 12 12:45:33 CST 2014
root@OpenWrt:~/.ssh# uname -a
Linux OpenWrt 3.10.49 #3 Wed Oct 1 14:00:51 CEST 2014 mips GNU/Linux
Enable ssh WAN access:
uci add firewall rule
uci set firewall.@rule[-1].src=wan
uci set firewall.@rule[-1].target=ACCEPT
uci set firewall.@rule[-1].proto=tcp
uci set firewall.@rule[-1].dest_port=22
uci commit firewall
/etc/init.d/firewall restart
Updated in 2022Aug13
Should add following:
root@eddie:~# cat /etc/rc.local
# Put your custom commands here that should be executed once
# the system init finished. By default this file does nothing.
export PREINIT=1
mount_root
exit 0
Also have to refers to
https://openwrt.org/docs/guide-user/additional-software/extroot_configuration
for reference.
Dec 11, 2014
Technology前提条件
在MAC上把玩Panamax前,需要安装Virtualbox, Vagrant, 而后, 用下列命令安装Panamax:
$ brew install http://download.panamax.io/installer/brew/panamax.rb
$ panamax init
这将开始下载CoreOS镜像,需要等一段时间。
In fact the panamax could also be installed on ArchLinux rather than only in Ubuntu, simply run:
$ curl http://download.panamax.io/installer/ubuntu.sh | bash
Trouble Shooting
Init failed
$ panamix init
A different VM with name panamax-vm has been created already. Please re-install or delete panamax-vm VM and try again.
Use following command for listing all of the virtualmachines:
VBoxManage list vms
Didn’t found the panamax related infos.
Finally solve the problem via:
[Trusty@~/.vagrant.d]$ pwd
/home/Trusty/.vagrant.d
[Trusty@~/.vagrant.d]$ mv plugins.json plugins.json.back
[Trusty@~/.vagrant.d]$ mv gems gems.back
Frozen String
The error code:
/opt/vagrant/embedded/gems/gems/vagrant-1.7.0/lib/vagrant/util/subprocess.rb:28:in `encode!': can't modify frozen String (RuntimeError)
Is it because I upgraded to the latest vagrant?
I couldnot roll back to vagrant1.6, so I upgraded to the vagrant-git, its version is 1.7.1, from the yaourt repository, thus I could get the installation continue.
OpenSuse Way
First remove the installed virtualbox:
$ zypper remove virtualbox
$ zypper in libvncserver0 LibVNCServer-devel
Install the 4.3 version of virtualbox:
$ wget http://download.opensuse.org/repositories/home:/Warhammer40k:/stuff/openSUSE_13.1/x86_64/VirtualBox-custom-4.3-4.3.20-1.1.x86_64.rpm
$ rpm -ivh VirtualBox-custom-4.3-4.3.20-1.1.x86_64.rpm
Now doing the same as we noticed above.
But the panamax init got following error messages:
==> panamax-vm: Clearing any previously set network interfaces...
There was an error while executing `VBoxManage`, a CLI used by Vagrant
for controlling VirtualBox. The command and stderr is shown below.

Command: ["hostonlyif", "create"]

Stderr: 0%...
Progress state: NS_ERROR_FAILURE
VBoxManage: error: Failed to create the host-only adapter
VBoxManage: error: VBoxNetAdpCtl: Error while adding new interface: failed to open /dev/vboxnetctl: No such file or directory
VBoxManage: error: Details: code NS_ERROR_FAILURE (0x80004005), component HostNetworkInterface, interface IHostNetworkInterface
VBoxManage: error: Context: "int handleCreate(HandlerArg*, int, int*)" at line 66 of file VBoxManageHostonly.cpp
Dec 10, 2014
TechnologyBackground
Building the Environment
First clone the Vagrant Repo from:
$ pwd
/media/y/Vagrant/CoreOS
$ git clone https://github.com/coreos/coreos-vagrant.git
$ cd coreos-vagrant
$ cp config.rb.sample config.rb
$ cp user-data.sample user-data
Cluster Setting
Edit the config.rb, for configurating the instance and the official CoreOS channel:
# Size of the CoreOS cluster created by Vagrant
$num_instances=3
# Official CoreOS channel from which updates should be downloaded
$update_channel='stable'
Now start the vagrant and view its status:
$ vagrant up
$ vagrant status
Current machine states:

core-01                   running (virtualbox)
core-02                   running (virtualbox)
core-03                   running (virtualbox)
$ vagrant ssh core-1
After you login to the coreOS, you could view the status of this virtual machine. Each of the machine have 1 Core, 1G ram, 20G harddisk.
Single Machine
Just comment the following lines of the config.rb:
# $num_instances=3
This will bring one instance of vagrant based CoreOS machine.
NodeJS
I want to write my APPs using NodeJS, thus I want to setup the NodeJS dev environment on CoreOS based Docker. Following are the steps:
First configure the proxy of docker:
$ sudo mkdir /etc/systemd/system/docker.service.d
$ sudo vim http-proxy.conf
[Service]
Environment="HTTP_PROXY=http://proxy.example.com:8080"
To apply the change, reload the unit and restart docker:
$ systemctl daemon-reload
$ systemctl restart docker
Now you could use docker for pulling back some container and run.
$ docker search base
$ docker pull base
$ docker images
$ docker run base /bin/bash -c "ls /"
$ docker run base /bin/bash -c "cat /etc/issue"
Since the network is not good, I created the droplet on DigitalOcean, and installed CoreOS.
Dockerized
http://blogs.aws.amazon.com/application-management/post/Tx1ZLAHMVBEDCOC/Dockerizing-a-Python-Web-App
Steps is listed as following:
$ git clone git@github.com:awslabs/eb-py-flask-signup.git
$ cd eb-py-flask-signup
$ git checkout master
$ vim Dockerfile
FROM ubuntu:14.04

# Install Python Setuptools
RUN apt-get install -y python-setuptools

# Install pip
RUN easy_install pip

# Add and install Python modules
ADD requirements.txt /src/requirements.txt
RUN cd /src; pip install -r requirements.txt

# Bundle app source
ADD . /src

# Expose
EXPOSE  5000

# Run
CMD ["python", "/src/application.py"]
$ docker build -t eb-py-sample .
$ docker run -d \
     -e APP_CONFIG=application.config.example \
     -e AWS_ACCESS_KEY_ID=$AWS_ACCESS_KEY_ID \
     -e AWS_SECRET_ACCESS_KEY=$AWS_SECRET_ACCESS_KEY \
     -p 8080:5000 \
     eb-py-sample
Then open http://localhost:8000 to see your own app.
Dec 6, 2014
TechnologySince the RESTful API is a little bit hard for setup, I ignore the Day10 and Day11, jump to Day 12, OpenCV.
Day 12 - OpenCV
Get the jar file
First download the opencv from:
http://sourceforge.net/projects/opencvlibrary/files/latest/download
$ unzip *.zip
$ cd opencv-2.4.10
$ cmake -G "Unix Makefiles" -D CMAKE_CXX_COMPILER=/usr/bin/g++ -D CMAKE_C_COMPILER=/usr/bin/gcc -D WITH_CUDA=ON ..
$ make -j4 && make install
Trouble shooting when generating openCV jar file:
Correct output should be:
--   Java:
--     ant:                         /bin/ant (ver 1.9.4)
--     JNI:                         /usr/lib/jvm/java-7-openjdk/include /usr/lib/jvm/java-7-openjdk/include/linux /usr/lib/jvm/java-7-openjdk/include
--     Java tests:                  YES
Add JNi
export JAVA_HOME=/usr/lib/jvm/java-7-openjdk/
Then build with following command:
$ cmake -G "Unix Makefiles" -D CMAKE_CXX_COMPILER=/usr/bin/g++ -D CMAKE_C_COMPILER=/usr/bin/gcc -D WITH_CUDA=ON -D BUILD_SHARED_LIBS=OFF -D BUILD_NEW_PYTHON_SUPPORT=NO .. && make
For MACOS, you should install:
$ brew install ant
$ export JAVA_HOME=`/usr/libexec/java_home -v 1.6`
Then re-compile and now you could get the jar file under build/bin/.
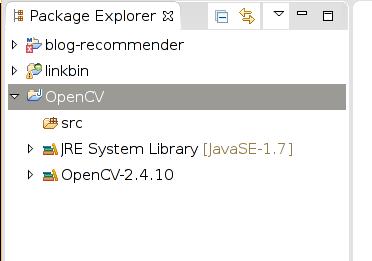
Development on OpenCV
Using eclipse LUNA.
(venv)[Trusty@~/code/30days/Day12OpenCV/opencv-2.4.10/build/bin]$ pwd
/home/Trusty/code/30days/Day12OpenCV/opencv-2.4.10/build/bin
(venv)[Trusty@~/code/30days/Day12OpenCV/opencv-2.4.10/build/bin]$ ls *.jar
opencv-2410.jar
Add the new User Libraries:
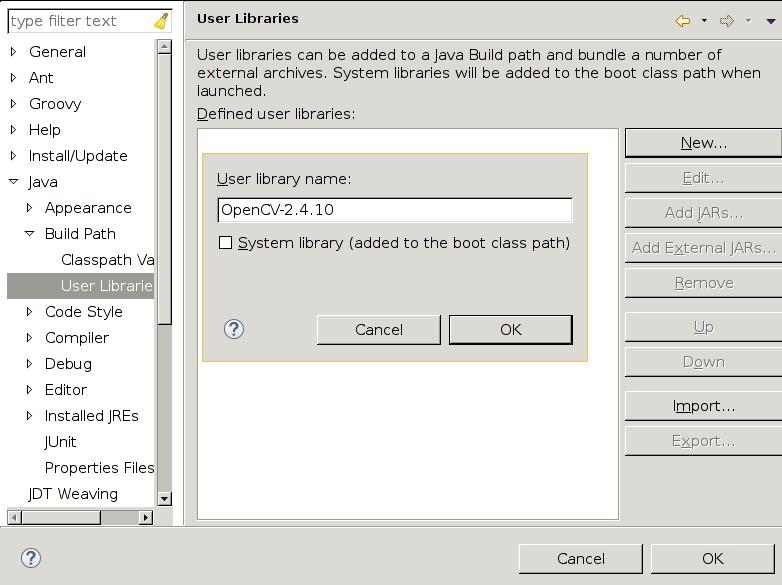
The detailed configuration steps could be refered to the http://segmentfault.com/a/1190000000358809, After configuration your User Libraries should be looked like this:
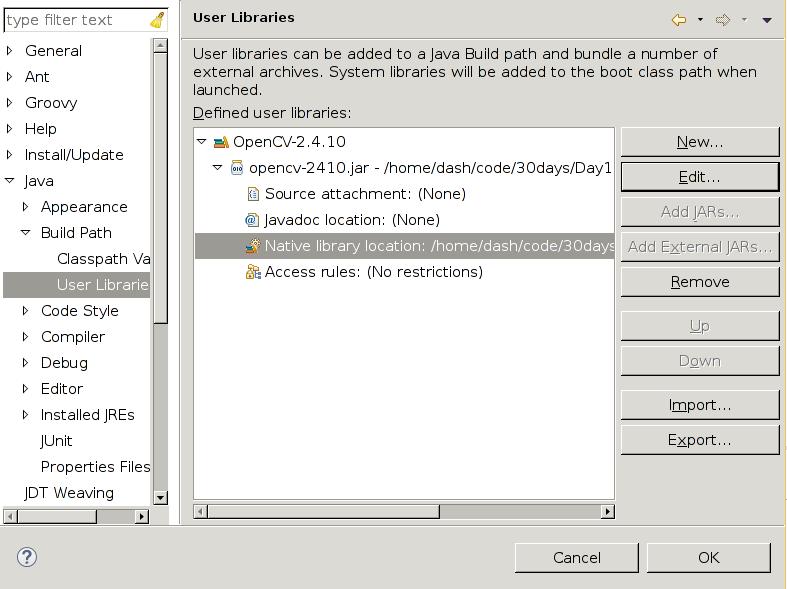
Add User Libraries thus you could see the configuration of the lib is looked like:
Code is like following:
package facedetection;
import org.opencv.core.Core;
import org.opencv.core.Mat;
import org.opencv.core.MatOfRect;
import org.opencv.core.Point;
import org.opencv.core.Rect;
import org.opencv.core.Scalar;
import org.opencv.highgui.Highgui;
import org.opencv.objdetect.CascadeClassifier;

public class MyFaceDetectionClass {
    public static void main(String[] args) {

        System.loadLibrary(Core.NATIVE_LIBRARY_NAME);
        System.out.println("\nRunning FaceDetector");

        CascadeClassifier faceDetector = new CascadeClassifier(MyFaceDetectionClass.class.getResource("haarcascade_frontalface_alt.xml").getPath());
        Mat image = Highgui
                .imread(MyFaceDetectionClass.class.getResource("shekhar.JPG").getPath());

        MatOfRect faceDetections = new MatOfRect();
        faceDetector.detectMultiScale(image, faceDetections);

        System.out.println(String.format("Detected %s faces", faceDetections.toArray().length));

        for (Rect rect : faceDetections.toArray()) {
            Core.rectangle(image, new Point(rect.x, rect.y), new Point(rect.x + rect.width, rect.y + rect.height),
                    new Scalar(0, 255, 0));
        }

        String filename = "ouput.png";
        System.out.println(String.format("Writing %s", filename));
        Highgui.imwrite(filename, image);
    }
}
Then you should place the xml file and the JPG file under the java class, after doing this, run the application, then you will got the png file generate with face detected.
Day 13 - Dropwizard
First you should install mondb in ArchLinux:
$ sudo pacman -S mongodb
Then in eclipse, create a new Maven project with the template of “maven-archetype-quickstart”, with the following configuration of Artifact Id and Group id.
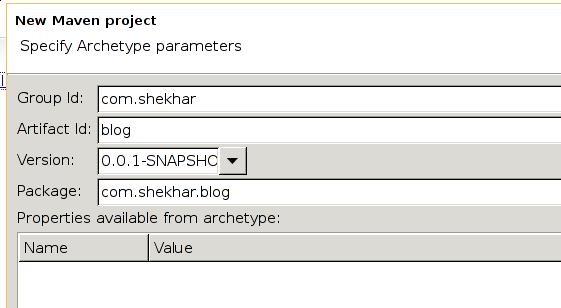
The default pom.xml should be modified,
Since the network environment is not stable, I created a vncserver at the VPS, and use VPS for developing.
In vps:
sudo apt-get install eclipse
sudo apt-get install mongodb
then install the maven from: http://download.eclipse.org/technology/m2e/releases/1.3
