Mar 16, 2015
TechnologyMore Nodes
I imported 2 3-G mem size nodes. 2 Nodes were created manually.
First we should set the constraint via:
$ juju bootstrap --metadata-source ~/.juju/metadata --upload-tools -v --show-log --constraints="mem=3G"
Then we can verify and imported these machines via:
$ juju get-constraints
$ juju add-machine
$ juju status
$ juju deploy --to 1 mysql
Deploy OpenStack
In first node, do following:
$ juju deploy --to 0 juju-gui
$ juju deploy --to lxc:0 mysql && juju deploy --to lxc:0 keystone && juju deploy --to lxc:0 nova-cloud-controller && juju deploy --to lxc:0 glance && juju deploy --to lxc:0 rabbitmq-server && juju deploy --to lxc:0 openstack-Trustyboard && juju deploy --to lxc:0 cinder
Then deploy the nova-compute node via:
$ juju deploy nova-compute
Mar 16, 2015
TechnologyLocal Repository
Sometimes when I run bootstrap, the procedure will failed, that’s because the Fucking GFW somethines will blocking some critical packet flow. Thus I have to setup the local repository.
Refers to:
https://jujucharms.com/docs/howto-privatecloud
Use juju --debug sync-tools we could sync the tools for local usage.
Use local tools for bootstrap is:
First generate the tools under the specified directory:
juju metadata generate-tools -d ~/.juju/metadata
Then use it via:
juju bootstrap --metadata-source ~/.juju/metadata --upload-tools -v --show-log
To add an constraint to bootstrap on large memory system:
$ juju bootstrap --metadata-source ~/.juju/metadata --upload-tools -v --show-log --constraints="mem=2G"
Now you will start a computer which have more than 2G Memory, verify it via:
Trusty@MassTestingUbuntu1404:~$ juju status
environment: maas
machines:
  "0":
    agent-state: started
    agent-version: 1.21.3.1
    dns-name: 4GJujuNode.maas
    instance-id: /MAAS/api/1.0/nodes/node-f03c5290-cbb6-11e4-b7bd-5254002e6eef/
    series: trusty
    hardware: arch=amd64 cpu-cores=2 mem=3072M tags=virtual
    state-server-member-status: has-vote
services: {}
Next we will deploy on more nodes.
Trouble-Shooting On Maas
Install on ubuntu14.04 it will failed when configuring the postgresql.
Should its configuration have some problems?
First I use the ppa repository, but I noticed that in the previous successful installation, my installation is not start from ppa, but from official, so this time, from official.
The problem is because the postgresql is not configured properly, so doing following steps for installing the correct configuration of the postgresql:
$ sudo locale-gen en_US en_US.UTF-8 zh_CN zh_CN.UTF-8
$ sudo dpkg-reconfigure locales
$ sudo pg_createcluster 9.3 main --start
$ sudo apt-get install maas
$ sudo apt-get install maas-dhcp maas-dns
Now you could install more newer version of the maas and etc.
Mar 12, 2015
TechnologyWe just continue to use MAAS for deploying cluster.
Images
Install following packages for enable local installation repository:
$ sudo apt-get install simplestreams ubuntu-cloudimage-keyring apache2
$ sudo apt-get install iptraf nethogs
Run following commands for importing the images of mass from official repository to local webserver.
root@MassTestOnUbuntu1404:~# sstream-mirror --keyring=/usr/share/keyrings/ubuntu-cloudimage-keyring.gpg http://maas.ubuntu.com/images/ephemeral-v2/daily/ /var/www/html/maas/images/ephemeral-v2/daily 'arch=amd64' 'subarch~(generic|hwe-t)' 'release~(trusty|precise)' --max=1
If you have the pre-downloaded packages, simply de-compress it to the corresponding directory.
root@MassTestOnUbuntu1404:/var/www/html/maas/images# mv ephemeral-v2/ ephemeral-v2.back
root@MassTestOnUbuntu1404:/var/www/html/maas/images# tar xjvf /home/Trusty/ephemeral-v2.tar.bz2  -C ./
After de-compression, your local image service could be detected via visit following webpage:
http://10.17.17.202/maas/images/ephemeral-v2/daily/streams/v1/index.sjson
Visit following webpage, then edit the default gateway and the DNS server:
http://10.17.17.202/MAAS/networks/maas-eth0/edit/
Default GateWay: 10.17.17.1
DNS Servers: 114.114.114.114
Then Save Network can let you save your network configuration.
Click Configuration Button, and update the Ubuntu -> Main archive (required) from:
http://archive.ubuntu.com/ubuntu
to:
http://mirrors.aliyun.com/ubuntu/
This repository enable the installed system for retrieving the install packages, use aliyun we could get much more faster speed.
Change the Boot Images -> Sync URL (required) from:
http://maas.ubuntu.com/images/ephemeral-v2/releases/
to
http://10.17.17.202/maas/images/ephemeral-v2/daily/
This will enable the Boot Images Sync URLs, use local repository will greatly improve the bootup speed.
Now build the Images like following images:

After a while, your Boot Image will be ready.
Add Maas Ssh Key
Do following steps for generate the ssh key pairs for user maas:
$ sudo mkdir /home/maas
$ sudo chown maas:maas /home/maas/
$ sudo chsh maas
Changing the login shell for maas
Enter the new value, or press ENTER for the default
        Login Shell [/bin/false]: /bin/bash
Trusty@MassTestOnUbuntu1404:~$ sudo su - maas
maas@MassTestOnUbuntu1404:~$ ssh-keygen
Generating public/private rsa key pair.
After these steps, copy the /home/maas/.ssh/id_rsa.pub to your clipboard, then copy it under:
http://10.17.17.202/MAAS/account/prefs/sshkey/add/
Now the ssh-key has been added into your MAAS system.
You could also copy the api key of your maas, later we will use it.
Mine is: ntQBr8QTPgeTyfYuMq:HGKFChwM65QXtABNS4:SK7bnuGNDN7fLB9k7HNspYLch4kc6RLs
Now the maas controller is ready, next step is create the virtual machine and let it be managed by controller.
Mar 12, 2015
TechnologyFollowing is the steps for creating virtual nodes and let it be administrated by MAAS Cluster.
Node Creation
First create a null iso via touch none.iso, later we will use this iso for booting the node.
Create a new virtual machine -> select “Local installation media(ISO images or CDROM) -> Use Local Iso image(/home/Trusty/none.iso) -> Memory 512MB, CPU 1 Core -> Disk 20 GB -> name: MASSTestNode0 -> Customize configuration before install -> Finish.
Customization:
Boot Option, select NIC and Disk1.
Disk1 Option, select advanced -> virtio.
NIC Option, select “virtualization network maasisotest NAT”, virtio.
Click “Begin Installation”, start installation, and quickly shut it off.
Clone it to 3 nodes. Then click start and let it startup via ipxe. After a while they will be powered off.
MAAS Network Configuration
We want to make MAAS controller be the pxe server in this isolated network, so we visit following webpage and do configuration:
“Edit Cluster Controller” -> Edit Interface eth0 -> Mangement(DNS and DHCP)
Router IP: 10.17.17.1
DHCP dynamic IP range low value: 10.17.17.101
DHCP dynamic IP range high value: 10.17.17.199
Then “Save Interface” and let this MASS controller serves all of the created nodes.
MAAS Node Configuration
Now after bootup the newly created nodes, your nodes page will be looks like following:

Click them and edit like following steps:
First in your host machine run sudo virsh list --all to get the corresponding virtual machines.
Then use sudo virsh dumpxml xxxx | grep mac to get the corresponding mac address, then fill the contents.
For example:
$ sudo virsh dumpxml MASSTestNode0 | grep mac
    <type arch='x86_64' machine='pc-i440fx-2.2'>hvm</type>
      <mac address='52:54:00:2f:68:e3'/>
Then the configuration images is like following:
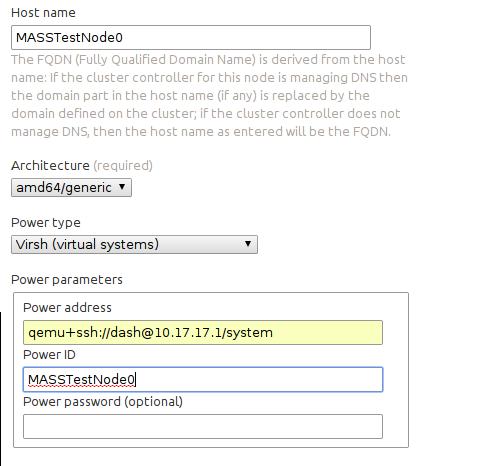
Also you should login as user maas and do following command to let you access remote’s qemu:
$ sudo apt-get install libvirt-bin
$ ssh-copy-id Trusty@10.17.17.1
$ virsh -c qemu+ssh://Trusty@10.17.17.1/system list --all
Then save node, and select it, in bulk actions, select “Commision Selected Nodes”, it will start commision, and after its successful, it will be looked like “ready” state. Remember its previous state is “New”.
Also comission the other 2 nodes.
The next step we will let Juju runs on MAAS, and build more fantanstic applications.
Mar 12, 2015
TechnologyFrom now we will start deploying Juju to our MAAS cluster.
Installation of Juju
The installation steps are:
$ sudo add-apt-repository ppa:juju/stable
$ sudo apt-get update
$ sudo apt-get install juju-quickstart juju-core
$ sudo apt-get install juju-local juju
Configuration of Juju
First initialize the configuration:
$ juju init
A boilerplate environment configuration file has been written to /home/Trusty/.juju/environments.yaml.
Edit the file to configure your juju environment and run bootstrap.
Now we have to edit the environments.yaml, to manually specify our own configuration.
$ cat /home/Trusty/.juju/environments.yaml
default: maas
environments:
    maas:
        type: maas
        maas-server: 'http://10.17.17.202/MAAS/'
        maas-oauth: 'ntQBr8QTPgeTyfYuMq:HGKFChwM65QXtABNS4:SK7bnuGNDN7fLB9k7HNspYLch4kc6RLs'
        bootstrap-timeout: 1800
Run juju bootstrap for automatically configure the juju’s run environment.
If you want to know the detailed debug info, simply run juju bootstrap --show-log to view the full logs.
Deploy Juju Services:
We want to setup a wordpress APP, so deploy the nodes via following commands:
$ juju deploy wordpress && juju deploy mysql
Added charm "cs:trusty/wordpress-1" to the environment.
Added charm "cs:trusty/mysql-23" to the environment.
Now examine the juju’s status via:
$ juju status
Then we add the relationship between wordpress and mysql:
$ juju add-relation wordpress mysql
Expose wordpress via:
$ juju expose wordpress
Upgrade juju version:
$ sudo add-apt-repository ppa:juju/stable
$ sudo vim /etc/apt/sources.list
deb http://ppa.launchpad.net/juju/stable/ubuntu trusty main
deb-src http://ppa.launchpad.net/juju/stable/ubuntu trusty main
$ sudo apt-get update && sudo apt-get install juju
With the newest juju we could do more safer operation, or some strange things will happen.
Seems sometimes it’s not so stable. Why? Maybe because its configuratiojj
Tried another computer.
