Mar 19, 2015
TechnologyContinue to deploy OpenContrail based on OpenStack.
First we install the bzr for fetching back the charms:
$ sudo apt-get install bzr
Clone the repository to local Mass Controller Machine:
$ bzr branch lp:~robert-ayres/+junk/contrail-deployer
Install juju-deployer for deploying:
$ sudo apt-get install juju-deployer
Change the memory size.
Mar 18, 2015
TechnologyThis article is not for opencontril itself, but for migration of the existing environment to local machines.
Environment
Machine configuration is listed as:
192.168.10.233 u12-control
192.168.10.234 u12-compute1
192.168.10.235 u12-compute2

192.168.1.79   s179
The control node and 2 compute nodes are running in machine s179, the tasks for me to do is for moving them from s179 to 2 physical machine.
Use Remote KVM Server
First we copy our ssh-key to the remote s179 machine, so next time we won’t enter any passwd for accessing the remote libvirtd:
$ ssh-copy-id root@192.168.1.79
In our own machine, we listed remote’s machines via:
$ virsh -c qemu+ssh://root@192.168.1.79/system list --all
 Id    Name                           State
----------------------------------------------------
 14    u14-ui                         running
 16    u14-compute2                   running
 22    u14-compute1                   running
 39    de1-contro                     running
 -     centos6.4-management-01        shut off
 -     centos6.4-management-02        shut off
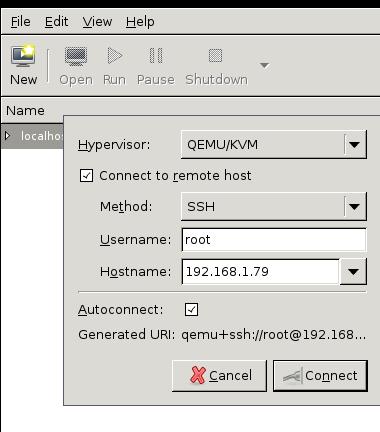
Add connection via: File-> Add New Connection, then configure like following:
Migration(Static)
First scp the image file to to destination machine, this will take a while.
Dump the xml via:
$ virsh dumpxml xxxxx>xxxx.xml
Scp the xml file to destination machine and move to /etc/libvirt/qemu/, change the priviledge of the file:
$ sudo chmod 777 /home/clouder/iso/Ubuntu1404-Newly-Installed-with-Update.img
Edit the corresponding configuration in the xml file:
$ sudo vim /etc/libvirt/qemu/xxxx.xml
.....
<source file='/home/clouder/iso/Ubuntu1404-Newly-Installed-with-Update.img'/>
.....
Define the xml under the /etc/libvirt/qemu/ folder:
root@pc121:/etc/libvirt/qemu# virsh define ./Ubuntu1404-Newly-Installed-with-Update.xml
Domain Ubuntu1404-Newly-Installed-with-Update defined from ./Ubuntu1404-Newly-Installed-with-Update.xml
Install the guest tool and use it for editing the virtual machine:
$ sudo apt-get install libguestfs-tools
$ sudo virt-edit -d Ubuntu1404-Newly-Installed-with-Update /etc/network/interfaces
After change the network configuration, we could start the machine via virsh start Ubuntu1404-Newly-Installed-with-Update, it will have the newly edited ip address.
If we use different host machine, then change the following definition in xml file:
$ sudo vim /etc/libvirt/qemu/xxxx.xml
<devices>
    <emulator>/usr/bin/qemu-system-x86_64</emulator>
.......
Mar 17, 2015
TechnologyThis will record the complete steps for deploying MAAS in a newly installed machine.
Installation
The start point should be at Ubuntu14.04.
$ sudo add-apt-repository  ppa:maas-maintainers/maas-test
$ sudo vim /etc/apt/sources.list
# Add maas repository
deb http://ppa.launchpad.net/maas-maintainers/testing/ubuntu trusty main
deb-src http://ppa.launchpad.net/maas-maintainers/testing/ubuntu trusty main
$ sudo add-apt-repository ppa:juju/stable
$ sudo vim /etc/apt/sources.list
# Add juju repository
deb http://ppa.launchpad.net/juju/stable/ubuntu trusty main
deb-src http://ppa.launchpad.net/juju/stable/ubuntu trusty main
$ sudo apt-get update && sudo apt-get upgrade
$ sudo apt-get install maas-test maas-dhcp maas-dns juju juju-core juju-local juju-quickstart firefox git
Tips: for enable the vncserver on Ubuntu, do following:
$ sudo apt-get install tightvncserver lxde
$ vncserver
$ vim ~/.vnc/xstartup
#!/bin/sh

xrdb $HOME/.Xresources
xsetroot -solid grey
#x-terminal-emulator -geometry 80x24+10+10 -ls -title "$VNCDESKTOP Desktop" &
#x-window-manager &
# Fix to make GNOME work
export XKL_XMODMAP_DISABLE=1
# /etc/X11/Xsession
startlxde &
$ vncserver -kill :1 && vncserver
The MAAS Controller relies on a google’s theme which is blocked by GFW, so we have to use proxychains for acrossing it, please notice these operation could be done on host machine, or Maas Controller itself..
$ git clone https://github.com/rofl0r/proxychains-ng.git
$ ./configure --prefix=/usr && make && make install
$ sudo cp src/proxychain4.conf /etc
$ sudo vim /etc/proxychains4.conf
$ sudo apt-get install midori
$ proxychains4 midori 10.17.17.202/MAAS
Configure the MAAS Controller via:
$ sudo maas-region-admin createadmin
[sudo] password for Trusty:
Username: root
Password:
Again:
Email: root@localhost
This enabled the admin username/password, refresh the 10.17.17.202/MAAS you could login to the MAAS Controller.
Configuration
Image Configuration
First download the images fromt the official repository via(On MaasController):
$ sudo apt-get install simplestreams ubuntu-cloudimage-keyring apache2
$ sudo bash
# proxychains4 sstream-mirror --keyring=/usr/share/keyrings/ubuntu-cloudimage-keyring.gpg http://maas.ubuntu.com/images/ephemeral-v2/daily/ /var/www/html/maas/images/ephemeral-v2/daily 'arch=amd64' 'subarch~(generic|hwe-t)' 'release~(trusty|precise)' --max=1
^C
$ pwd
/var/www/html/maas/images
$ sudo mv ephemeral-v2/ ephemeral-v2.back
[sudo] password for Trusty:
$ sudo tar xjf /home/Trusty/ephemeral-v2.tar.bz2 -C ./
Then Change the configuration in browser of opened http://10.17.17.202/MAAS:
Click Configuration Button, and update the Ubuntu -> Main archive (required) from:
http://archive.ubuntu.com/ubuntu
to:
http://mirrors.aliyun.com/ubuntu/
This repository enable the installed system for retrieving the install packages, use aliyun we could get much more faster speed.

Change the Boot Images -> Sync URL (required) from:
http://maas.ubuntu.com/images/ephemeral-v2/releases/
to
http://10.17.17.202/maas/images/ephemeral-v2/daily/
This will enable the Boot Images Sync URLs, use local repository will greatly improve the bootup speed.
Network Configuration
Since the midori’s effect is not good, install qupzilla:
$ sudo apt-get install qupzilla
$ proxychains4 quazilla http://10.17.17.202/MAAS
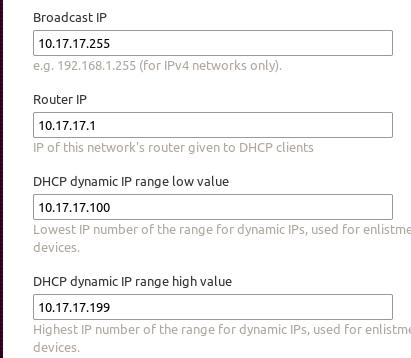
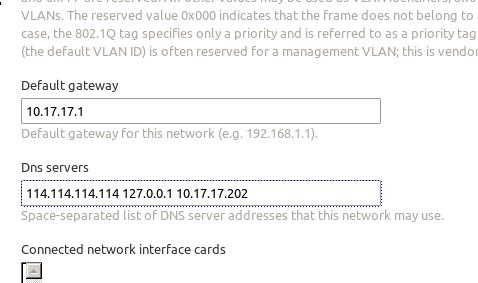
Under Cluster->Interfaces->eth0->Edit, change it to Management(DNS and DHCP), and then modify following items:
MAAS ssh key should be generated via following steps:
Trusty@MassController:~$ sudo mkdir /home/maas
[sudo] password for Trusty:
Trusty@MassController:~$ sudo chown maas:maas /home/maas/
Trusty@MassController:~$ sudo chsh maas
Changing the login shell for maas
Enter the new value, or press ENTER for the default
        Login Shell [/bin/false]: /bin/bash
Trusty@MassController:~$ sudo su - maas
maas@MassController:~$ ssh-keygen
Generating public/private rsa key pair.
Copy the generated key to http://10.17.17.202/MAAS/account/prefs/sshkey/add/ And remember the api-key, for later we will use it for generating nodes information.
Enable the remote control of your host’s libvirt:
$ sudo apt-get install libvirt-bin
maas@MassController:~$ ssh-copy-id root@10.17.17.1
maas@MassController:~$ virsh -c qemu+ssh://root@10.17.17.1/system list  --all
 Id    Name                           State
----------------------------------------------------
 2     MaasController                 running
 -     Ubuntu1404Maas                 shut off
 -     Ubuntu203                      shut off
Also we have to configure the network under http://10.17.17.202/MAAS/networks/maas-eth0/edit/:
Also we should manually edit the MaasController’s network configuration via:
$ cat /etc/network/interfaces
auto lo
iface lo inet loopback
# The primary network interface
auto eth0
# iface eth0 inet dhcp
iface eth0 inet static
        address 10.17.17.202
        netmask 255.255.255.0
        network 10.17.17.0
        broadcast 10.17.17.255
        gateway 10.17.17.1
        # dns-* options are implemented by the resolvconf package, if installed
        dns-nameservers 114.114.114.114 127.0.0.1 10.17.17.202
Restart and the network configuration is OK, notice only we set 127.0.0.1 as the dns server, we could enable the local FQDN.
Add Nodes
Create the vm in virt-manager, its start-up is via PXE, and with 3G Mem, 60G space, 2-Core which copies the Host CPU.
Then in browser edit like following:
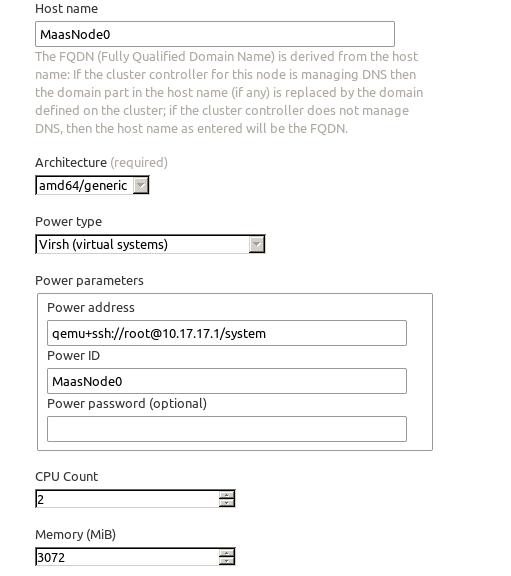
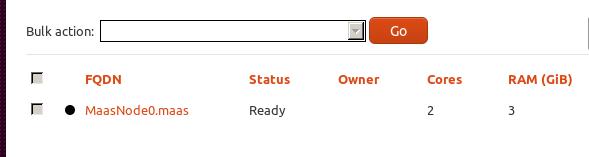
Then in the Nodes, select the node, and commision selected node.After commission, the status will be changed to ready.
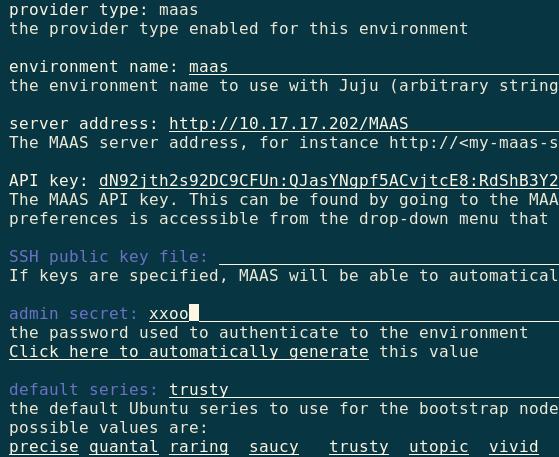
Juju Configuration
Use following command for quickstart juju:
$ juju-quickstart -i
The configuration image is listed as:
Generate the local tools:
$ mkdir .juju/metadata
Trusty@MassController:~$ juju metadata generate-tools -d ~/.juju/metadata
Then start the node via:
$ juju bootstrap --metadata-source ~/.juju/metadata --upload-tools -v --show-log --constraints="mem=3G"
After it success, the juju and MAAS environment is ready for use.
Mar 17, 2015
TechnologyThis part is for deploying OpenStack using Juju and let it run in single node.
Environment Preparation
2 virtual machines created using virt-manager, each of them has 2 core, 3Gigabyte Memory, around 60G Disk space.
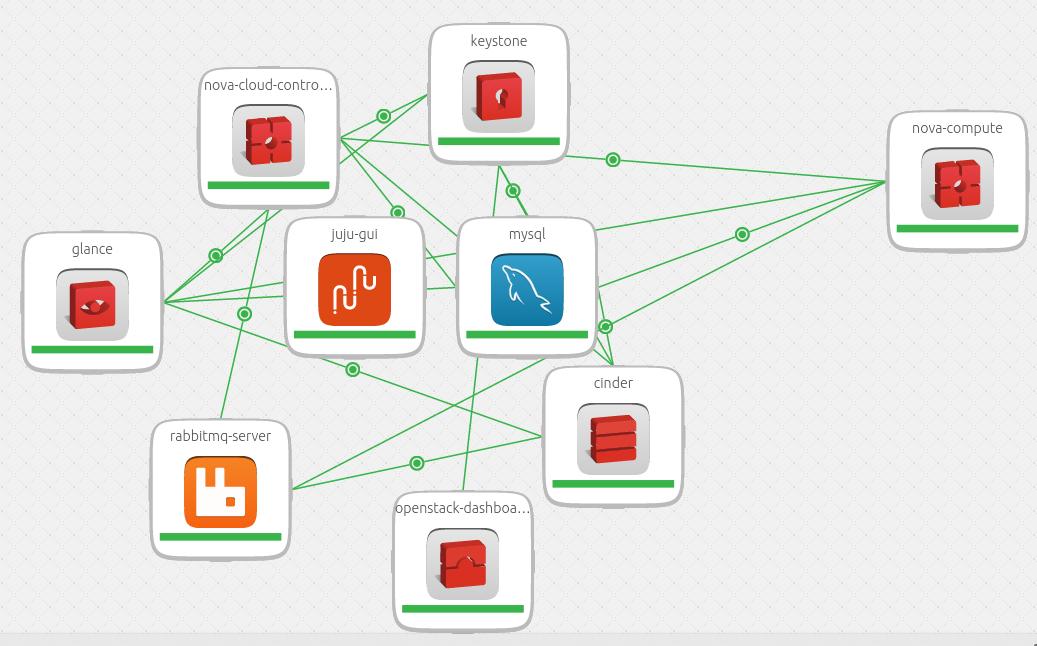
Deploy
The most of the nodes are deployed in container.
$ juju deploy --to 0 juju-gui
$ juju deploy --to lxc:0 mysql
$ juju deploy --to lxc:0 keystone
$ juju deploy --to lxc:0 nova-cloud-controller
$ juju deploy --to lxc:0 glance
$ juju deploy --to lxc:0 rabbitmq-server
$ juju deploy --to lxc:0 openstack-Trustyboard
$ juju deploy --to lxc:0 cinder
The compute node is deployed in a machine which enable the nested virtualization.
$ juju deploy nova-compute
Add each other’s relationship:
$ juju add-relation mysql keystone
$ juju add-relation nova-cloud-controller mysql
$ juju add-relation nova-cloud-controller rabbitmq-server
$ juju add-relation nova-cloud-controller glance
$ juju add-relation nova-cloud-controller keystone
$ juju add-relation nova-compute nova-cloud-controller
$ juju add-relation nova-compute mysql
$ juju add-relation nova-compute rabbitmq-server:amqp
$ juju add-relation nova-compute glance
$ juju add-relation glance mysql
$ juju add-relation glance keystone
$ juju add-relation glance cinder
$ juju add-relation mysql cinder
$ juju add-relation cinder rabbitmq-server
$ juju add-relation cinder nova-cloud-controller
$ juju add-relation cinder keystone
$ juju add-relation openstack-Trustyboard keystone
Then change the password of keystone via:
$ juju set keystone admin-password="helloworld"
Detect the ipaddress of the openstack-Trustyboards via:
$ juju status openstack-Trustyboard
$ http://ip_address_of_Trustyboard/horizon
The final result is listed like:
Mar 17, 2015
TechnologyUse Local Charms
Retrieve the charms via:
$ sudo apt-get install charm-tools
$ cat autocharms.sh
juju charm get nova-cloud-controller /home/Trusty/charms/trusty
juju charm get keystone /home/Trusty/charms/trusty
juju charm get glance  /home/Trusty/charms/trusty
juju charm get cinder /home/Trusty/charms/trusty
juju charm get rabbitmq-server /home/Trusty/charms/trusty
juju charm get openstack-Trustyboard /home/Trusty/charms/trusty
juju charm get nova-compute /home/Trusty/charms/trusty
# juju charm get nova-compute /home/Trusty/charms/trusty
$ du -hs /home/Trusty/charms/trusty/*
1.5M    /home/Trusty/charms/trusty/cinder
1.6M    /home/Trusty/charms/trusty/glance
1.7M    /home/Trusty/charms/trusty/keystone
824K    /home/Trusty/charms/trusty/mysql
1.9M    /home/Trusty/charms/trusty/nova-cloud-controller
1.6M    /home/Trusty/charms/trusty/nova-compute
1.2M    /home/Trusty/charms/trusty/openstack-Trustyboard
1.2M    /home/Trusty/charms/trusty/rabbitmq-server
Deploy via:
juju deploy --to lxc:1 --repository=/home/Trusty/charms/ local:trusty/mysql
juju deploy --to lxc:1 --repository=/home/Trusty/charms/ local:trusty/keystone
juju deploy --to lxc:1 --repository=/home/Trusty/charms/ local:trusty/nova-cloud-controller
juju deploy --to lxc:1 --repository=/home/Trusty/charms/ local:trusty/glance
juju deploy --to lxc:1 --repository=/home/Trusty/charms/ local:trusty/rabbitmq-server
juju deploy --to lxc:1 --repository=/home/Trusty/charms/ local:trusty/openstack-Trustyboard
juju deploy --to lxc:1 --repository=/home/Trusty/charms/ local:trusty/cinder
Backup
Backup the existing environment via:
$ juju backup create --filename backupOpenStack.tgz
$ ls -l *.tgz
-rw-r--r-- 1 Trusty Trusty  25595066 Mar 17 17:23 juju-backup-20150317-1723.tgz
The store method will be covered later.
