Mar 27, 2015
TechnologyI bought a SBH Sony Bluetooth headset, following is the steps for adding it to system.
Ubuntu Installation
Install bluetooth related software:
$ sudo apt-get install -y blueman-manager bluetooth
$ vim ~/.config/awesome/rc.lua
autorunApps =
{
--.........
"blueman-manager",
"fcitx",
Add Device
Use Blueman for adding the equiment, first click the SBH headset to let it enter discover mode, also in blueman we enable the discover mode too, when setup the equipment, the code you have to enter is 0000.
The device kindle is not headset, but the a2dp?
Add Configuration for ALSA
Edit the /etc/asound.conf, my configuration file is listed as following:
pcm.btheadset {
   type plug
   slave {
       pcm {
           type bluetooth
           device xxx.xxx.xxx.xxx
           profile "auto"
       }
   }
   hint {
       show on
       description "BT Headset"
   }
}
ctl.btheadset {
  type bluetooth
}
pcm.sbhbtheadset {
   type plug
   slave {
       pcm {
           type bluetooth
           device xxx.xxx.xxx.xxx
           profile "auto"
       }
   }
   hint {
       show on
       description "SBH BT Headset"
   }
}
ctl.sbhbtheadset {
  type bluetooth
}
The first equipment is another bluetooth headset. We define our SDH to sdhbtheadset.
Examine our added equipment via following command:
$ aplay -L
default
    Playback/recording through the PulseAudio sound server
null
    Discard all samples (playback) or generate zero samples (capture)
pulse
    PulseAudio Sound Server
btheadset
    BT Headset
sbhbtheadset
    SBH BT Headset
Send Sound
The commands are listed as following:
$ pactl load-module module-alsa-sink device=sbhbtheadset
17
[Trusty@~]$ pacmd load_module module-bluetooth-discover
Welcome to PulseAudio! Use "help" for usage information.
>>> Unknown command: load_module module-bluetooth-discover
>>> %
[Trusty@~]$ pactl list sinks short
1       alsa_output.sbhbtheadset        module-alsa-sink.c      s16le 2ch 44100Hz      SUSPENDED
[Trusty@~]$ pacmd set-default-sink 1
Welcome to PulseAudio! Use "help" for usage information.
>>> >>> %
Now you are ready for listening Music via bluetooth headset, enjoy it.
Mar 26, 2015
TechnologyAdd Specified Machine
We could add the specified name of the machine:
$ juju add-machine MaasOpenContrail6.maas
While the name of MaasOpenContrail6.maas is the name which we could get from the MAAS webUI.
Get/Set Constraints
We could dynamically set constraints for adding/removing new machines or unit, get/set it via:
$ juju get-constraints
mem=3072M
$ juju set-constraints "mem=1024M"
$ juju get-constraints
mem=1024M
Sometimes we need to add tags to specified maas units, the following webpage is for reference:
http://en.community.dell.com/techcenter/os-applications/w/wiki/7432.using-tags-with-maas-and-juju-in-ubuntu-server-14-04-lts
https://maas.ubuntu.com/docs/tags.html
Remove specified service
Get the status of the specified service via:
$ juju status neutron-api
services:
  neutron-api:
    charm: cs:trusty/neutron-api-9
    exposed: false
    life: dying
    units:
      neutron-api/0:
        agent-state: error
        agent-state-info: 'hook failed: "install"'
        agent-version: 1.21.3.1
        life: dying
        machine: "6"
        public-address: MaasOpenContrail7.maas
networks:
  maas-eth0:
    provider-id: maas-eth0
    cidr: 10.17.17.0/24
Resolved this service’s located units first:
Trusty@MassController:~/Code/deploy$ juju resolved neutron-api/0
Now remove the service via:
Trusty@MassController:~/Code/deploy$ juju remove-service neutron-api
Sometimes you need to type in resolved the unit for several times.
Finally, if your machine runs into error state, you could destroy it forcely via:
$ juju destroy-machine x --force
Mar 24, 2015
TechnologySince the deployment meets some problem, I have to consider doing some tricks in the MAAS controller, to let the deployment much more easier and time-saving, following is the steps for setting up such environment.
Resize Maas Controller Disk
Since the Mass Controller machine only have 40G size harddisk, it will be not enough if we enable the repository cache for guest machines, thus we have to resize the disk.
First shutdown the virtual machine.
Resize the qcow2 file via:
# virsh dumpxml MassController | grep qcow2
      <driver name='qemu' type='qcow2' cache='none'/>
      <source file='/home/juju/img/MassController.qcow2'/>
# qemu-img resize /home/juju/img/MassController.qcow2 +40GB
Image resized.
# qemu-img info /home/juju/img/MassController.qcow2
image: /home/juju/img/MassController.qcow2
file format: qcow2
virtual size: 80G (85899345920 bytes)
disk size: 9.4G
cluster_size: 65536
# virsh start MassController
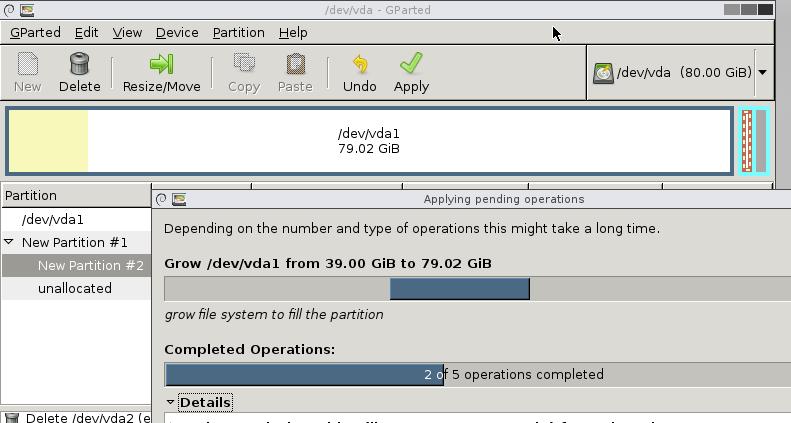
Now use a liveCD for startup the machine, this will bootup the machine into a iso booted environment.
$ wget http://downloads.sourceforge.net/gparted/gparted-live-0.21.0-1-i586.iso
Bootup the machine and resize like following:
squid-deb-proxy
In Mass Controller machine, install following packages:
$ sudo apt-get install squid-deb-proxy avahi-utils
$ sudo start squid-deb-proxy
Every client should install following package:
$ sudo apt-get install squid-deb-proxy-client
Don’t install squid-deb-proxy, because it will cause maas to be removed.
In fact MAAS manages its own squid, named maas-proxy, which could be examined via:
$ ps -ef | grep squid
proxy      763     1  0 Mar23 ?        00:00:07 /usr/sbin/squid3 -N -f /etc/maas/maas-proxy.conf
Trusty      3892  3861  0 00:13 pts/5    00:00:00 grep --color=auto squid
This may cause all of the packages, or images be cached in squid, but it will be very helpful if we want to speedup the installation speed.
configure the squide’s cache directory size via:
$ sudo vim /etc/maas/maas-proxy.conf

cache_dir ufs /var/spool/squid 100 16 256
By default, the cache_dir directory may be commented.

/var/spool/squid – This is the directory folder where squid will use to swap cache your server web files
100 – The amount of disk space to use in MB for your caching directory
16 – the first-level subdirectories which will be created in your cache directory
256 – The number of second-level subdirectories which will be created under each first level directory
We should add following configuration under the configure.yaml of the .juju/:
    maas-server: http://10.17.17.200/MAAS
    http-proxy: http://10.17.17.200:8000
    #https-proxy: http://10.17.17.200:3128
    no-proxy: localhost,10.17.17.0/24
    apt-http-proxy: http://10.17.17.200:8000
    #apt-https-proxy: http://10.17.17.200:3128
    apt-ftp-proxy: http://10.17.17.200:8000
    type: maas
After configuration, the bootstrap and add-machine will succesfully deployed.
Mar 23, 2015
TechnologySince the OpenContrail deploy is using local deployment, that means, directly deploy to local machine. But the lab lack of the environment of the local ubuntu based machine, so I want to deploy a service to local first, then transform the whole project from local deployment to MAAS deployment.
In a Ubuntu14.04 machine, do following steps.
$ sudo add-apt-repository ppa:juju/stable
$ sudo vim /etc/apt/source.list
# This is for juju
deb http://ppa.launchpad.net/juju/stable/ubuntu trusty main
deb-src http://ppa.launchpad.net/juju/stable/ubuntu trusty main
$ sudo apt-get install juju juju-core juju-local juju-quickstart
$ sudo apt-get install charm-tools
$ sudo apt-get install uvtool-libvirt uvtool
Configure the juju for using local:
$ git clone https://github.com/juju/plugins.git ~/.juju-plugins
$ vim ~/.zshrc
# Add juju_plugins to global path
PATH=$PATH:$HOME/.juju-plugin
$ source ~/.zshrc
$ juju init
$ vim ~/.juju/environments.yaml
local:
 type: local

 # <Commented Section>

 # The default series to deploy the state-server and charms on.
 #
 default-series: precise
 #
 ## ** add these lines to support KVM and LXC deployment **
 lxc-use-clone: true
 container: kvm
Start the machine via:
$ juju bootstrap --debug
Add the machines via:
[Trusty@~]$  juju set-constraints mem=512M
[Trusty@~]$  juju add-machine --constraints "root-disk=16G mem=1G"
created machine 1
[Trusty@~]$ juju status
environment: local
machines:
  "0":
    agent-state: started
    agent-version: 1.21.3.1
    dns-name: localhost
    instance-id: localhost
    series: trusty
    state-server-member-status: has-vote
  "1":
    instance-id: pending
    series: precise
services: {}
After a long wait, it will boot a machine which have 1G and 1 Core, and let it running.
Mar 23, 2015
TechnologyPreparation
First we have to create 4 images which will hold our own opearating system.
 1016  qemu-img create -f qcow2 OpenContrail0.qcow2 40G
 1017  qemu-img create -f qcow2 OpenContrail1.qcow2 40G
 1018  qemu-img create -f qcow2 OpenContrail3.qcow2 40G
 1019  qemu-img create -f qcow2 OpenContrail2.qcow2 40G
 1020  ls
 1021  history
# pwd
/home/juju/img/OpenContrail
# qemu-img create -f qcow2 OpenContrail0.qcow2 40G
# qemu-img create -f qcow2 OpenContrail1.qcow2 40G
# qemu-img create -f qcow2 OpenContrail3.qcow2 40G
# qemu-img create -f qcow2 OpenContrail2.qcow2 40G
# ls
OpenContrail0.qcow2  OpenContrail1.qcow2  OpenContrail2.qcow2  OpenContrail3.qcow2
Second, we create the four nodes in the virt-manager, each of them have 3G Memory, and have the cpu copied. Their network deployed to the newly added isolated network.
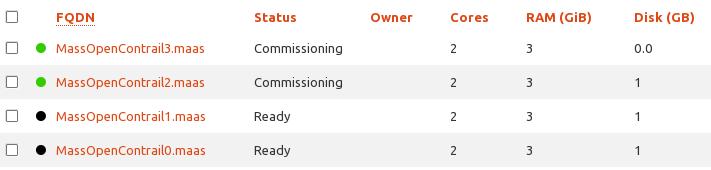
After commission, the status should be “ready”.
Juju
Copy the new environment named OpenContrail:
$ cat ~/.juju/environments.yaml
# This file has been generated by juju quickstart v2.0.1
# at 2015-03-19 06:36:40 UTC.

default: maas
environments:
  maas:
    admin-secret: xxxx
    default-series: trusty
    maas-oauth: u8HmYg24sUxerux4N8:kcYJ8mJdePBSe4DfxD:H4qFjEpLP86Lw6xnxjHG5qrHY3abPYzZ
    maas-server: http://10.17.17.200/MAAS
    type: maas
  OpenContrail:
    admin-secret: xxxx
    default-series: trusty
    maas-oauth: u8HmYg24sUxerux4N8:kcYJ8mJdePBSe4DfxD:H4qFjEpLP86Lw6xnxjHG5qrHY3abPYzZ
    maas-server: http://10.17.17.200/MAAS
    type: maas
Then juju switch and examine you are currently operate at OpenContrail via juju switch -l, the result should be OpenContrail.
Bootstrap the environment via:
$ juju bootstrap --metadata-source ~/.juju/metadata --upload-tools -v --show-log --constraints="mem=3G"
Use juju show-log will display the logs for juju.
Deploy from local repository:
$ export JUJU_REPOSITORY=/home/Trusty/Code/deployOpenContrail/contrail-deployer/charms
$ juju deploy --to 0 juju-gui
$ juju deploy --to lxc:0 mysql
$ juju deploy --to lxc:0 keystone
$ juju deploy --to lxc:0 nova-cloud-controller
$ juju deploy --to lxc:0 glance
$ juju deploy --to lxc:0 rabbitmq-server
$ juju deploy --to lxc:0 openstack-Trustyboard
$ juju deploy --to lxc:0 cinder
$ juju deploy --to lxc:0 neutron-api
$ juju deploy --to lxc:0 quantum-gateway
HomeWorking
First I created the local charm repository, and then start deploying.
Problem is lxc template download is too time-wasting, thus I have to manually download the images and let it run as if the cache image is available.
root@MassOpenContrail2:/var/cache/lxc/cloud-trusty# du -hs *
178M    ubuntu-14.04-server-cloudimg-amd64-root.tar.gz
root@MassOpenContrail2:/var/cache/lxc/cloud-trusty# pwd
/var/cache/lxc/cloud-trusty
Use local repository for deploying other version’s container, then run a cassandra:
juju deploy --to lxc:0 --repository=/home/Trusty/Code/deployOpenContrail/contrail-deployer/src/charms local:precise/cassandra
