May 14, 2015
TechnologyThe reference material is mainly from:
http://www.cobblerd.org/manuals/quickstart/
Prepartion
First install the CentOS6.6, choose the basic server.
After installation, update to the latest system via yum -y update.
Disable the SELinux via:
# vim /etc/selinux/config
#SELINUX=enforcing                                                                                                                       │
SELINUX=disabled
Then restart the compute.
Add epel repository:
# wget -O /etc/yum.repos.d/epel.repo http://mirrors.aliyun.com/repo/epel-6.repo
# yum update
# yum install -y cobbler cobbler-web
Configuration
Change the default password:
# openssl passwd -1                                                                                                     │
Password:                                                                                                                                 │
Verifying - Password:                                                                                                                     │
igaowugoauwgoueougo
[root@CobblerServer ~]# vim /etc/cobbler/settings
default_password_crypted: "agowuoguwoawoguwoe"
Set the Server and Next_Server to the specified IP Address, DO NOT use 0.0.0.0:
# default, localhost
server: 10.3.3.3.

# default, localhost
next_server: 10.3.3.3
Enable the dhcp managed:
manage_dhcp: 0
Edit the dhcp template via:
vi /etc/cobbler/dhcp.template
subnet 10.3.3.0 netmask 255.255.255.0 {
     option routers             10.3.3.1;
     range dynamic-bootp        10.3.3.4 10.3.3.254;
     option domain-name-servers 114.114.114.114, 8.8.8.8;
     option subnet-mask         255.255.255.0;
     filename                   "/pxelinux.0";
     default-lease-time         21600;
     max-lease-time             43200;
     next-server                $next_server;
}
Start and check the service status:
[root@CobblerServer ~]# service cobblerd start
Starting cobbler daemon:                                   [  OK  ]
[root@CobblerServer ~]# chkconfig cobblerd on
[root@CobblerServer ~]# chkconfig httpd on
[root@CobblerServer ~]# service cobblerd status
cobblerd (pid 1564) is running...
Better you restart the machine and verify your installation via:
[root@CobblerServer ~]# cobbler check
The following are potential configuration items that you may want to fix:

1 : dhcpd is not installed
2 : some network boot-loaders are missing from /var/lib/cobbler/loaders, you may run 'cobbler get-loaders' to download them, or, if you only want to handle x86/x86_64 netbooting, you may ensure that you have installed a *recent* version of the syslinux package installed and can ignore this message entirely.  Files in this directory, should you want to support all architectures, should include pxelinux.0, menu.c32, elilo.efi, and yaboot. The 'cobbler get-loaders' command is the easiest way to resolve these requirements.
3 : change 'disable' to 'no' in /etc/xinetd.d/rsync
4 : since iptables may be running, ensure 69, 80/443, and 25151 are unblocked
5 : debmirror package is not installed, it will be required to manage debian deployments and repositories
6 : ksvalidator was not found, install pykickstart
7 : fencing tools were not found, and are required to use the (optional) power management features. install cman or fence-agents to use them
OOOOPs, so many errors, so first install dhcpd:
# yum install -y dhcpd
# chkconfig dhcpd on
# chkconfig xinetd on
Manullly edit the dhcpd configuration file as in following files:
[root@CobblerServer ~]# cat /etc/dhcp/dhcpd.conf
#
# DHCP Server Configuration file.
#   see /usr/share/doc/dhcp*/dhcpd.conf.sample
#   see 'man 5 dhcpd.conf'
#
# create new
# specify domain name
option domain-name "server.world";
# specify name server's hostname or IP address
option domain-name-servers 114.114.114.114;
# default lease time
default-lease-time 600;
# max lease time
max-lease-time 7200;
# this DHCP server to be declared valid
authoritative;
# specify network address and subnet mask
subnet 10.3.3.0 netmask 255.255.255.0 {
    # specify the range of lease IP address
    range dynamic-bootp 10.3.3.4 10.3.3.254;
    # specify broadcast address
    option broadcast-address 10.3.3.255;
    # specify default gateway
    option routers 10.3.3.1;
}
# service dhcpd restart
One trouble after another, solve them:
Get Loaders:
[root@CobblerServer ~]# cobbler get-loaders
Enable the rsync configuration:
  # vim /etc/xinetd.d/rsync
        disable = no
Add the following lines into the /etc/sysconfig/iptables:
:OUTPUT ACCEPT [0:0]
-A INPUT -p udp -m multiport --dports 69,80,443,25151 -j ACCEPT
-A INPUT -p tcp -m multiport --dports 69,80,443,25151 -j ACCEPT
-A INPUT -m state --state ESTABLISHED,RELATED -j ACCEPT
Or:
# iptables -I INPUT -p udp -m multiport --dports 69,80,443,25151 -j ACCEPT
# iptables -I INPUT -p tcp -m multiport --dports 69,80,443,25151 -j ACCEPT
The difference is the latter won’t last for long once the machine got restarted.
Install following packages:
[root@CobblerServer ~]# yum install -y debmirror pykickstart cman
Now check again:
$ cobbler check
$ cobbler sync
Import ISO
I use the CentOS7 iso(CentOS-7-x86_64-Everything-1503-01.iso).
[root@CobblerServer ~]# mount -o loop -t iso9660 ./CentOS-7-x86_64-Everything-1503-01.iso  /mnt
[root@CobblerServer ~]# cobbler import --name=CentOS-7 --arch=x86_64 --path=/mnt
path=/mnt
task started: 2015-05-14_035209_import
task started (id=Media import, time=Thu May 14 03:52:09 2015)
Found a candidate signature: breed=redhat, version=rhel6
Found a candidate signature: breed=redhat, version=rhel7
Found a matching signature: breed=redhat, version=rhel7
Adding distros from path /var/www/cobbler/ks_mirror/CentOS-7-x86_64:
creating new distro: CentOS-7-x86_64
trying symlink: /var/www/cobbler/ks_mirror/CentOS-7-x86_64 -> /var/www/cobbler/links/CentOS-7-x86_64
creating new profile: CentOS-7-x86_64
associating repos
checking for rsync repo(s)
checking for rhn repo(s)
checking for yum repo(s)
starting descent into /var/www/cobbler/ks_mirror/CentOS-7-x86_64 for CentOS-7-x86_64
processing repo at : /var/www/cobbler/ks_mirror/CentOS-7-x86_64
need to process repo/comps: /var/www/cobbler/ks_mirror/CentOS-7-x86_64
looking for /var/www/cobbler/ks_mirror/CentOS-7-x86_64/repodata/*comps*.xml
Keeping repodata as-is :/var/www/cobbler/ks_mirror/CentOS-7-x86_64/repodata
*** TASK COMPLETE ***
Check it via:
[root@CobblerServer ~]# cobbler distro list
   CentOS-7-x86_64
[root@CobblerServer ~]# cobbler profile list
   CentOS-7-x86_64
[root@CobblerServer ~]# cobbler distro report --name=CentOS-7-x86_64
Name                           : CentOS-7-x86_64
Architecture                   : x86_64
TFTP Boot Files                : {}
Breed                          : redhat
Comment                        :
Fetchable Files                : {}
Initrd                         : /var/www/cobbler/ks_mirror/CentOS-7-x86_64/images/pxeboot/initrd.img
Kernel                         : /var/www/cobbler/ks_mirror/CentOS-7-x86_64/images/pxeboot/vmlinuz
Kernel Options                 : {}
Kernel Options (Post Install)  : {}
Kickstart Metadata             : {'tree': 'http://@@http_server@@/cblr/links/CentOS-7-x86_64'}
Management Classes             : []
OS Version                     : rhel7
Owners                         : ['admin']
Red Hat Management Key         : <<inherit>>
Red Hat Management Server      : <<inherit>>
Template Files                 : {}
Installation
Install the system, via setup a machine which boot from PXE in the same subnet, then this machine will hint you with installing the corresponding system.
The new system’s username/password is the same as we set in the cobbler configuration file.
Enable Web Interface
Change the default password via:
$ cp /etc/cobbler/users.digest /etc/cobbler/users.digest.back
$ htdigest /etc/cobbler/users.digest "Cobbler" cobbler
Now restart the cobblerd, you could visit following URL for visiting the Web Inteface:
http://10.3.3.3/cobbler_web
Import Multiple ISOs
Import the first iso as usual.
# mount -o loop -t iso9660 ./CentOS-6.6-x86_64-bin-DVD1.iso  /mnt
# cobbler import --name=CentOS-6.6 --arch=x86_64 --path=/mnt
The Second iso first mount to /mnt1/ directory, then import with following command:
#  rsync -a '/mnt1/' /var/www/cobbler/ks_mirror/CentOS-6.6-x86_64/ --exclude-from=/etc/cobbler/rsync.exclude --progress
#  COMPSXML=$(ls /var/www/cobbler/ks_mirror/CentOS-6.6-x86_64/repodata/*comps*.xml)
#  createrepo -c cache -s sha --update --groupfile ${COMPSXML} /var/www/cobbler/ks_mirror/CentOS-6.6-x86_64
Verify it via:
# cobbler distro list
# cobbler profile list
# cobbler distro report --name=CentOS-6.6-x86_64
Verify it via installing a new machine running CentOS6.6.
Trouble-Shooting on fence
Lacking of fence equipment.
Trouble shooting for controlling the Systems(which is the node information which added into cobbler system).
For Power Management:
[root@CobblerServer ~]# cobbler system poweroff --name Node1
task started: 2015-05-14_064600_power
task started (id=Power management (off), time=Thu May 14 06:46:00 2015)
cobbler power configuration is:
      type   : virsh
      address: qemu+ssh://root@10.3.3.1/system
      user   : root
      id     : CobblerTest
running: /usr/sbin/fence_virsh
received on stdout:
received on stderr: Unable to connect/login to fencing device
May 11, 2015
TechnologyThanks for the Great File Wall, my ssh connection to my vps is not stable, so I use following scripts for automatically maintain the ssh conneciton, once the connection down, it will restart immediately.
$ vim autokeepssh.sh
#!/bin/bash

while [ '' == '' ]
do
        # Use ssh -R for reverse ssh
        ssh_d_process_num=`ps aux|grep -E 'ssh -NfR' |grep -v grep |wc -l`
        if [ "$ssh_d_process_num" == "0" ]; then
                # Automatically start the ssh proxy
                echo "Autostart!"
                ssh -NfR 4389:localhost:22 Trusty@xxx.xxx.xxx.xxx -p xxxx &
        #else
        #       echo 'ssh -d running'
        fi

        sleep 5
done
-R means I started a reverse connection.
May 11, 2015
TechnologyThis article record how to setup the pxe server and setup the CentOS quick installation repository, using it we could quickly setup the CentOS on new machine.
Installation
To install following packages for preparing the environment:
$ sudo apt-get install dnsmasq tftpd-hpa apache2 system-config-kickstart
Configure the apache2’s default configuration file:
$ sudo vim /etc/apache2/sites-enabled/000-default.conf
        DocumentRoot /var/www/
Configure the dnsmasq via following command:
$ sudo vim /etc/dnsmasq.conf
bogus-priv
filterwin2k
interface=eth0
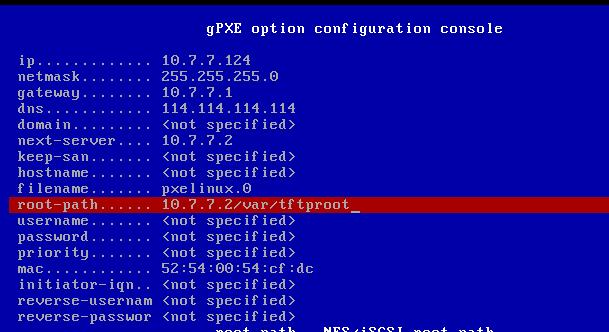
domain=nova.com
dhcp-range=10.7.7.100,10.7.7.150,12h
dhcp-option=3,10.7.7.1
dhcp-option=6,114.114.114.114
dhcp-option=121,10.7.7.0/24
dhcp-boot=/var/tftproot/pxelinux.0
enable-tftp
tftp-root=/var/tftproot
dhcp-authoritative
Copy the pxelinux.0 from an installed CentOS, and copy it to /var/tftproot/
[root:~]# scp /usr/share/syslinux/pxelinux.0 Trusty@10.7.7.2:/home/Trusty
Trusty@WolfHunterPXE:~$ sudo cp /home/Trusty/pxelinux.0 /var/tftproot/
Prepare the Repository
We need to copy the installation media into the corresponding directory:
$ sudo mkdir -p /var/www/CentOS
$ sudo mount CentOS-6.3-x86_64-bin-DVD1.iso /mnt
$ sudo cp -rf /mnt/* /var/www/CentOS
$ sudo mkdir -p /mnt1
$ sudo mount CentOS-6.3-x86_64-bin-DVD2.iso /mnt1
$ sudo cp -rf /mnt1/Packages/* /var/www/CentOS/Packages/
Copy the CentOS’s kernel and kernel-startup file into the /var/tftproot/CentOS directory:
$ sudo mkdir -p /var/tftproot/CentOS
$ sudo cp /mnt/images/pxeboot/initrd.img /var/tftproot/CentOS
$ sudo cp /mnt/images/pxeboot/vmlinuz /var/tftproot/CentOS
Now your repository for installation is ready.
Configuration
Edit the boot.msg file for user choosen:
$ sudo vim /var/tftproot/boot.msg
### START INSTALLING ######
Choose installation type(0/1/2),the DEFAULT is 100:
0 CentOS-6.3-64-No-RAID-Basic
1 CentOS-6.3-64-No-RAID-minidesktop-virtualization-for testing
When user choose the corresponding items, then /var/tftproot/pxelinux.cfg/default file will choose the correspoiding files.
Trusty@WolfHunterPXE:~$ sudo mkdir -p /var/tftproot/pxelinux.cfg
Trusty@WolfHunterPXE:~$ sudo vim /var/tftproot/pxelinux.cfg/default
default 100
display boot.msg

# Label 100 , boot from hddisk
LABEL 100
localboot 0x80

### Label 0, minimal CentOS
label 0
kernel CentOS/vmlinuz
append ks=http://10.7.7.2/cfg/Centos-minibasic.cfg vga=normal initrd=CentOS/initrd.img devfs=nomount ramdisk_size=9216 nofb

### Label 1, minimal-Desktop CentOS
label 1
kernel CentOS/vmlinuz
append ks=http://10.7.7.2/cfg/Centos-minidesktop.cfg vga=normal initrd=CentOS/initrd.img devfs=nomount ramdisk_size=9216 nofb

prompt 1
timeout 900
Get kickstart file
In a installed CentOS Server, install system-config-kickstart via:
$ sudo yum install system-config-kickstart
Run sudo system-config-kickstart for getting the graphical configuration window, like following:
Customize the partition:
Do other configurations, after everything is OK, save it.
An example cfg file is listed as following:
# cat minidesktop.cfg
#platform=x86, AMD64, or Intel EM64T
#version=DEVEL
# Firewall configuration
firewall --disabled
# Install OS instead of upgrade
install
# Use network installation
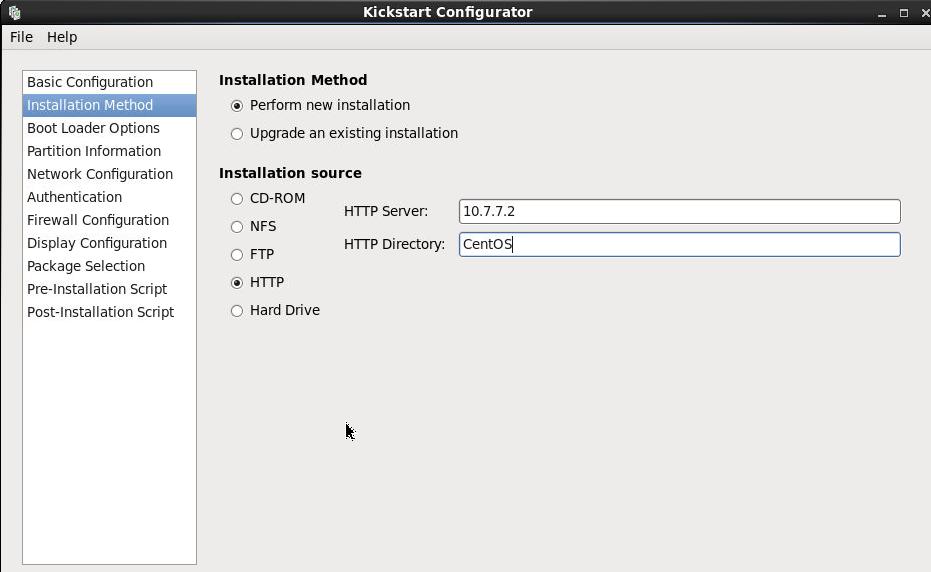
url --url="http://10.7.7.2/CentOS"
# Root password
rootpw --iscrypted $1$aRvLvJNH$ElcmZ2Msl4MbD.fHdnos9.
# System authorization information
auth --useshadow --passalgo=sha512
# Use graphical install
graphical
firstboot --disable
# System keyboard
keyboard us
# System language
lang en_US
# SELinux configuration
selinux --disabled
# Installation logging level
logging --level=info
# System timezone
timezone Asia/Hong_Kong
# System bootloader configuration
bootloader --location=mbr
# Clear the Master Boot Record
zerombr
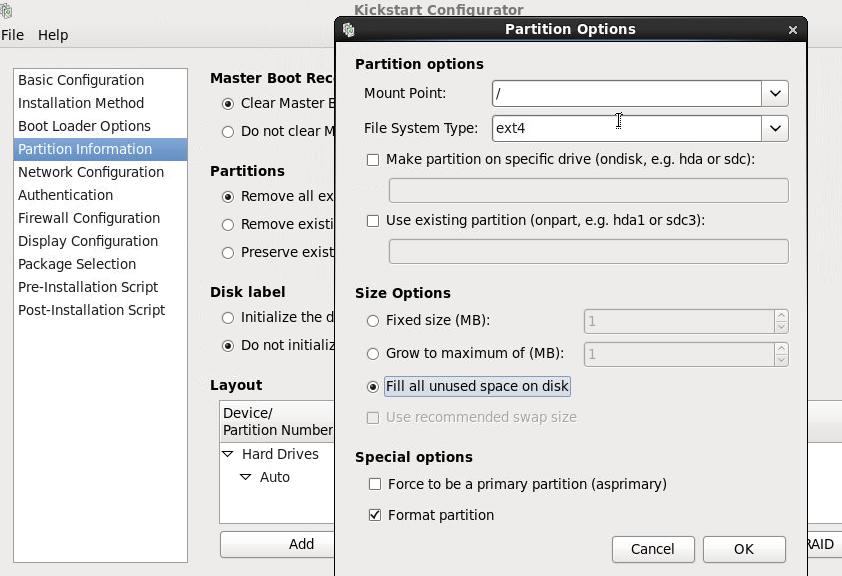
# Partition clearing information
clearpart --all
# Disk partitioning information
part swap --fstype="swap" --size=1024
part / --asprimary --fstype="ext4" --grow --size=1
%packages
@basic-desktop
@chinese-support
@internet-browser
@x11
-ibus-table-cangjie
-ibus-table-erbi
-ibus-table-wubi
%end
Copy it under the /var/www/cfg/CentOS-minidesktop.cfg.
Trusty@WolfHunterPXE:~$ sudo mkdir -p /var/www/cfg
Trusty@WolfHunterPXE:~$ sudo cp minidesktop.cfg /var/www/cfg/CentOS-minidesktop.cfg
Testing
Now create a new machine , set its bootup to pxe-network.
Trouble Shooting, only need for CentOS:
- Ctrl+B
- dhcp net0
- config

- Ctrl+X
- autoboot
May 11, 2015
TechnologyThe material is learned from:
http://paulcodr.co/blog/2015/yumrepo-server-local/
Steps
Local ISO Preparation:
[root@localhost ~]# mkdir isos bin
[root@localhost ~]# ls isos
CentOS-6.6-x86_64-bin-DVD1.iso  CentOS-6.6-x86_64-bin-DVD2.iso
Download the scripts:
# cd bin
# wget http://paulcodr.co/download/yum-scripts.zip
# unzip yum-scripts.zip
Archive:  yum-scripts.zip
   creating: yum-scripts/
  inflating: yum-scripts/yum-create-server-centos6.6.sh
  inflating: yum-scripts/yum-rsync-minimal-centos6.6.sh
Change the priviledges:
[root@localhost bin]# chown -R root:root /root/isos
[root@localhost bin]# chmod 750 -R /root/bin
Execute the script:
[root@localhost bin]# mv yum-scripts/* ./
[root@localhost bin]# ls
yum-create-server-centos6.6.sh  yum-rsync-minimal-centos6.6.sh  yum-scripts  yum-scripts.zip
[root@localhost bin]# ./yum-create-server-centos6.6.sh 2>&1 | tee createserver.log
Verify it via:
[root@localhost bin]#  du -hs /data/www/yumrpms/centos6.6/6.6/os/x86_64
5.6G    /data/www/yumrpms/centos6.6/6.6/os/x86_64
[root@localhost bin]#  ls -lh /data/www/yumrpms/centos6.6/
total 4.0K
lrwxrwxrwx 1 apache apache    3 May 11 12:49 6 -> 6.6
drwxr-xr-x 3 apache apache 4.0K May 11 12:47 6.6
Verify it on another PC:
[root:/home/juju/iso]# curl http://10.7.7.124/yumrpms/centos6.6/6/os/x86_64/
.....
</table>
<address>Apache/2.2.15 (CentOS) Server at 10.7.7.124 Port 80</address>
</body></html>
Change the rsync repository in yum-rsync-minimal-cent6.6.sh:
rsync://mirrors.yun-idc.com/centos/
Then:
[root@localhost bin]# ./yum-rsync-minimal-centos6.6.sh 2>&1 | tee syncserver.log
Wait for rsync……
May 6, 2015
Technology前面在HA类型的Fuel OpenStack基础上集成了OpenContrail,然而在实际的开发和测试中,用HA类型比较浪费硬件资源,因此这次我把部署节点从7个压缩到3个,做多节点上非HA类型的OpenStack集成OpenContrail.
先决条件
这次只用三台机器来做部署,分别为:
2-Core, 3G内存, 100G硬盘, 用于安装OpenStack Controller.
2-Core, 2G内存, 100G硬盘, 用于安装OpenStack Compute. 注意这台机器需要Copy Host CPU configuration, 以激活KVM。
2-Core, 3G内存, 100G硬盘, 用于安装Contrail.
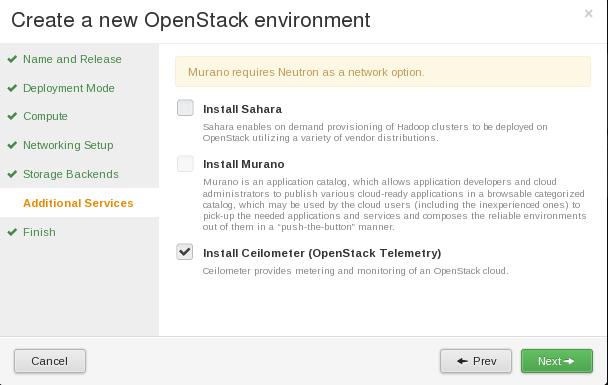
创建出来的两个用于部署的OpenStack环境如下:

值得注意的是,在OpenStack的配置中,我们激活了Ceilometer,用于统计,所以需要额外增加一台2G内存大小的虚拟机。
安装
安装过程和HA的过程大同小异,配置好网络以后,现在I3OpenStack中部署好OpenStack,而后用provision的方式将I3Contrail中的Contrail部署节点机器安装为Ubuntu的格式。
这里的具体配置过程可以参考《使用Fuel部署OpenContrail(1)》到《使用Fuel部署OpenContrail(3)》.
一切就绪后,我们进入到配置过程.
配置
详细配置如下:
(Contrail) 配置Contrail部署节点
删除不用的网络端口, 并配置ifccfg-eth4后重启:
# cd /etc/network/interfaces.d/
# rm -f ifcfg-eth1
# rm -f ifcfg-eth2
# rm -f ifcfg-eth3
# vim ifcfg-eth4
    auto eth4
    iface eth4 inet static

    address 10.77.77.100
    netmask 255.255.255.0
    gateway 10.77.77.1

    post-up  ethtool  -K  eth4  gso off  gro off || true
# reboot
确保在Contrail部署节点上,可以ping通OpenStack Controller的10.55.55.0/24网络。
配置本地安装源:
# echo 'deb http://10.20.0.2:8080/contrail/ /' > /etc/apt/sources.list.d/contrail.list
# echo -e "Package: *\nPin: release l=Ubuntu\nPin-Priority: 100" > /etc/apt/preferences
# >/etc/apt/sources.list
# apt-get update
# apt-get install -y python-paramiko contrail-fabric-utils contrail-setup
# pip install --upgrade --no-deps --index-url=”” /opt/contrail/python_packages/Fabric-1.7.0.tar.gz
开始配置用于部署的testbed.py文件,可以看到,比起HA部署方式来看,我们减少了一些节点定义,去掉了HA有关的配置:
# vim  /opt/contrail/utils/fabfile/testbeds/testbed.py
    from fabric.api import env
    #Management ip addresses of hosts in the cluster
    #os_ctrl01 = 'root@10.55.55.6'
    #os_ctrl02 = 'root@10.55.55.7'
    #os_ctrl03 = 'root@10.55.55.8'
    os_ctrl01 = 'root@10.55.55.7'

    c_ctrl01 = 'root@10.77.77.100'
    #c_ctrl02 = 'root@10.77.77.11'
    #c_ctrl03 = 'root@10.77.77.12'
    c_db01 = 'root@10.77.77.100'
    #c_db02 = 'root@10.77.77.11'
    #c_db03 = 'root@10.77.77.12'
    #External routers
    # ext_routers = [('gateway01', '<Gateway_node1_LOOPBACK_ip>'), ('gateway02', '<Gateway_node2_LOOPBACK_ip>')]
    #Autonomous system number
    router_asn = 64512
    #Host from which the fab commands are triggered to install and provision
    deploy_node = 'root@10.77.77.100'
    #Role definition of the hosts.
    env.roledefs = {
    'all': [c_ctrl01, c_db01],
    'cfgm': [c_ctrl01],
    'openstack': [os_ctrl01],
    'control': [c_ctrl01],
    'compute': [],
    'collector': [c_ctrl01],
    'webui': [c_ctrl01],
    'database': [c_db01],
    'build': [deploy_node],
    'storage-master': [],
    'storage-compute': [],
    }
    #Openstack admin password
    env.openstack_admin_password = 'admin'
    env.password = 'r00tme'
    #Passwords of each host
    env.passwords = {
    os_ctrl01: 'r00tme',
    # os_ctrl02: 'r00tme',
    # os_ctrl03: 'r00tme',
    c_ctrl01: 'r00tme',
    #c_ctrl02: 'r00tme',
    #c_ctrl03: 'r00tme',
    c_db01: 'r00tme',
    # c_db02: 'r00tme',
    # c_db03: 'r00tme',
    deploy_node: 'r00tme',
    }
    #For reimage purpose
    env.ostypes = {
    os_ctrl01: 'ubuntu',
    # os_ctrl02: 'ubuntu',
    # os_ctrl03: 'ubuntu',
    c_ctrl01: 'ubuntu',
    # c_ctrl02: 'ubuntu',
    # c_ctrl03: 'ubuntu',
    c_db01: 'ubuntu',
    # c_db02: 'ubuntu',
    # c_db03: 'ubuntu',
    deploy_node: 'ubuntu',
    }
    env.openstack = {
    'service_token' : 'xqnCCCs2'
    }
    # env.ha = {
    # 'internal_vip': '10.55.55.4',
    # 'external_vip': '172.16.0.4',
    # 'contrail_internal_vip': '10.77.77.9',
    # 'contrail_external_vip': '10.77.77.9',
    # }
    env.keystone = {
    'service_tenant': 'services',
    'admin_token': 'xqnCCCs2',
    }
    multi_tenancy = True
从Fuel节点控制机上拷贝公钥文件,用于快速部署
# scp 10.20.0.2:/root/.ssh/id_rsa /root/.ssh/id_rsa
# chmod 0600 /root/.ssh/id_rsa
在节点上部署仓库,安装必要包,同意SUN协议:
# fab -P -R control -w -- 'ls /etc/apt/preferences || echo -e "Package: *\nPin: release \
l=Ubuntu\nPin-Priority: 100" > /etc/apt/preferences'
# fab -P -R control -w -- 'DEBIAN_FRONTEND=noninteractive apt-get -y --force-yes \
--allow-unauthenticated install python-crypto python-netaddr python-paramiko \
contrail-fabric-utils contrail-setup'
# fab -P -R control -w -- 'pip install --upgrade --no-deps --index-url="" \
/opt/contrail/python_packages/ecdsa-0.10.tar.gz'
# fab -P -R control -w -- 'pip install --upgrade --no-deps --index-url="" \
/opt/contrail/python_packages/Fabric-1.7.0.tar.gz'
# fab -P -R control -w -- 'echo "sun-java6-plugin shared/accepted-sun-dlj-v1-1 boolean \
true" | /usr/bin/debconf-set-selections' && fab -P -R control -w -- 'echo "sun-java6-bin shared/accepted-sun-dlj-v1-1 boolean \
 true" | /usr/bin/debconf-set-selections' && fab -P -R control -w -- 'echo "debconf shared/accepted-oracle-license-v1-1 select \
true" | sudo debconf-set-selections' && fab -P -R control -w -- 'echo "debconf shared/accepted-oracle-license-v1-1 seen \
 true" | sudo debconf-set-selections'
安装特定版本的tzdata, 安装和配置数据库,并检查状态:
# fab -P -R control -w -- 'DEBIAN_FRONTEND=noninteractive apt-get -y --force-yes \
 --allow-unauthenticated install tzdata=2014e-0ubuntu0.12.04' && fab install_database && fab setup_database && fab -R database -w -- "contrail-status"
# nodetool status
安装和配置cfgm, control, collector, webui,keepalived等, 并配置tenant服务:
# fab install_cfgm && fab install_control && fab install_collector && fab install_webui && fab setup_contrail_keepalived
# fab -P -R control -w -- 'service keepalived restart'
# fab -P -R control -w -- "sed -i '49s/service/services/g' \
/usr/local/lib/python2.7/dist-packages/contrail_provisioning/config/quantum_in_keystone_setup.py"
# fab setup_cfgm
# fab setup_control && fab setup_collector && fab setup_webui
(OpenStack Controller节点)检查neutron endpoint的方法,看是否有10.77.77.100的字段出现:
# keystone service-list
# keystone endpoint-list
(OpenStack Controller节点)顺便,我们要拿到rabbit_hosts的密码,供下面使用:
# cat /etc/rabbitmq/rabbitmq.config | grep default_pass
    {default_pass,        <<"nFyBhsrP">>},
配置rabbit:
# fab -P -R control -w -- 'openstack-config --del /etc/neutron/neutron.conf DEFAULT rabbit_host'
# fab -P -R control -w -- 'openstack-config --set /etc/neutron/neutron.conf DEFAULT rabbit_hosts 10.55.55.7:5672'
# fab -P -R control -w -- 'openstack-config --set /etc/neutron/neutron.conf DEFAULT rabbit_userid \
   nova'
# fab -P -R control -w -- 'openstack-config --set /etc/neutron/neutron.conf DEFAULT \
  rabbit_password nFyBhsrP'
# fab -P -R control -w -- 'service neutron-server restart'
配置contrail-api使用OpenStack Controller上的rabbit服务:
# fab -P -R control -w -- 'perl -pi -e \
 "s/rabbit_server.*$/rabbit_server=10.55.55.7/" /etc/contrail/contrail-api.conf'
# fab -P -R control -w -- 'perl -pi -e "s/rabbit_port.*$/rabbit_port=5672/" \
 /etc/contrail/contrail-api.conf'
# fab -R control -w -- "perl -pi -e 'print \"rabbit_password=nFyBhsrP\n\" \
 if \$_ =~ rabbit_port' /etc/contrail/contrail-api.conf"
# fab -P -R control -w -- "perl -pi -e 'print \"rabbit_user=nova\n\" if \$_ =~ rabbit_port' \
 /etc/contrail/contrail-api.conf"
# fab -P -R control -w -- "service contrail-api restart"
替换neutron的插件为OpenContrail:
# cp -r contrail-repo/neutron_plugin_contrail/plugins/opencontrail /usr/share/pyshared/neutron_plugin_contrail/plugins/
# cd /opt/contrail/utils
# fab -P -R cfgm -w -- 'service neutron-server restart'
重启BGP,METADATA,ENCAPSULATION:
# fab prov_control_bgp && fab prov_metadata_services && fab prov_encap_type
验证:
# fab verify_cfgm
# fab verify_control
# fab verify_collector
# fab verify_webui
# fab -R control -w -- "contrail-status"
# fab -P -R control -w -- 'update-rc.d supervisor-support-service disable'
现在访问:
https://10.77.77.100:8143
Contrail的组件已经被配置完毕,接下来配置Compute节点,以引入Vrouter等。
(OpenStack Controller节点)
删除ifcfg-eth4的配置后重启OpenStack Controller节点, 修改nova.conf文件:
# vim /etc/nova/nova.conf
[DEFAULT]
network_api_class = nova.network.neutronv2.api.API
neutron_url = http://10.77.77.100:9696
neutron_admin_tenant_name = services
neutron_admin_username = neutron
neutron_admin_password = xqnCCCs2
neutron_url_timeout = 300
neutron_admin_auth_url = http://10.55.55.7:35357/v2.0/
firewall_driver = nova.virt.firewall.NoopFirewallDriver
enabled_apis = ec2,osapi_compute,metadata
security_group_api = neutron
service_neutron_metadata_proxy = True
重启服务:
# service nova-api restart
# service nova-scheduler restart
# service nova-conductor restart
删除已注册的nova-network组件:
# source ~/openrc
# for i in $(nova service-list|grep nova-network|awk '{print $2}'); \
do nova service-delete $i;done
接下来配置Compute节点.
(Compute节点)
引入本地安装仓库:
#  echo 'deb http://10.20.0.2:8080/contrail/ /' >/etc/apt/sources.list.d/contrail.list
# echo -e "Package: *\nPin: release l=Ubuntu\nPin-Priority: 100" > /etc/apt/preferences
# >/etc/apt/sources.list
# apt-get update
删除已有的vswitch模块,并验证:
# apt-get purge -y openvswitch-switch nova-network nova-api
# apt-get purge -y  nova-network nova-api
# aptitude search -F '%p' '~i' | grep openvswitch
删除OVS内核模块:
# lsmod | grep openvswitch && rmmod openvswitch
删除virtual网络,即virbr0端口:
# virsh net-destroy default
# virsh net-undefine default
删除除ifcfg-eth4和ifcfg-eth0的其他端口,并重启,重启后用下列命令检查是否有iptables NAT规则存在,理论上应该是空的:
# iptables -L -t nat
安装vrouter:
# apt-get install -y contrail-openstack-vrouter
配置vhosts,vrouter需要使用这个端口,指定IP地址为10.77.77.101:
# vim /etc/network/interfaces.d/ifcfg-vhost0
auto vhost0
iface vhost0 inet static
    netmask 255.255.255.0
    network_name application
    address 10.77.77.101
    gateway 10.77.77.1
    mtu 1300
# vim /etc/network/interfaces.d/ifcfg-eth4
auto eth4
iface eth4 inet manual

up ip l set eth4 up
down ip l set eth4 down

post-up  ethtool  -K  eth4  gso off  gro off || true
创建agent-param文件:
# mv /etc/contrail/agent_param.tmpl /etc/contrail/agent_param
# vim /etc/contrail/agent_param
dev=eth4
设置vroute-agent配置:
# vim /etc/contrail/contrail-vrouter-agent.conf
[DEFAULT]
headless_mode=true
[DISCOVERY]
server=10.77.77.100
max_control_nodes=1
[HYPERVISOR]
type=kvm
[NETWORKS]
control_network_ip=10.77.77.101
[VIRTUAL-HOST-INTERFACE]
name=vhost0
ip=10.77.77.101/24
gateway=10.77.77.1
physical_interface=eth4
配置节点管理参数,地址指向Contrail控制器的IP:
# vim /etc/contrail/vrouter_nodemgr_param
DISCOVERY=10.77.77.100
配置nova-compute:
 # openstack-config --set /etc/nova/nova.conf DEFAULT neutron_url http://10.77.77.100:9696
 # openstack-config --set /etc/nova/nova.conf DEFAULT neutron_admin_auth_url http://10.55.55.7:35357/v2.0/
 # openstack-config --set /etc/nova/nova.conf DEFAULT network_api_class nova_contrail_vif.contrailvif.ContrailNetworkAPI
 # openstack-config --set /etc/nova/nova.conf DEFAULT neutron_admin_tenant_name services
 # openstack-config --set /etc/nova/nova.conf DEFAULT neutron_admin_username neutron
 # openstack-config --set /etc/nova/nova.conf DEFAULT neutron_admin_password xqnCCCs2
 # openstack-config --set /etc/nova/nova.conf DEFAULT neutron_url_timeout 300
 # openstack-config --set /etc/nova/nova.conf DEFAULT firewall_driver nova.virt.firewall.NoopFirewallDriver
 # openstack-config --set /etc/nova/nova.conf DEFAULT security_group_api neutron
 # service supervisor-vrouter restart
验证所有的vrouter服务都是active状态的:
# contrail-status
== Contrail vRouter ==
supervisor-vrouter:           active
contrail-vrouter-agent        active
contrail-vrouter-nodemgr      active
更改/etc/libvirt/qemu.confg中的cgroup_device_acl部分:
cgroup_device_acl = [
"/dev/null", "/dev/full", "/dev/zero",
"/dev/random", "/dev/urandom",
"/dev/ptmx", "/dev/kvm", "/dev/kqemu",
"/dev/rtc", "/dev/hpet","/dev/net/tun",
]
在每个OpenStack Compute节点上,添加iptables规则如下并保存:
# iptables -I INPUT 1 -s 169.254.0.0/16 -i vhost0 -j ACCEPT -m comment --comment "metadata service"
# iptables -I INPUT 1 -p tcp -m multiport --destination-ports 2049,8085,9090,8102,33617,39704,44177,55970,60663 -j ACCEPT -m comment --comment "juniper contrail rules"
# iptables-save > /etc/iptables/rules.v4
重启libvirt-bin和nova-compute服务:
# service libvirt-bin restart
# service nova-compute restart
(Contrail Controller节点)更改vrouter的配置, !!!注意,这是在Contrail Deploy的那个节点运行的!!!!, host_name的结果可以在compute节点上通过hostname命令来获得 :
# python /opt/contrail/utils/provision_vrouter.py --host_name node-18 --host_ip 10.77.77.101 --api_server_ip 10.77.77.100 --admin_user neutron --admin_password xqnCCCs2 --admin_tenant_name services --oper add
VGW配置
OpenContrail支持多种配置,例如Juniper vSRX, Juniper MX, Cisco ASR等,但这些都需要专有硬件的支持(路由器),我们仅仅采用软件路由器Vrouter, 这里我们配置VGW:
# export PYTHONPATH=/usr/lib/python2.7/dist-packages/contrail_vrouter_api/gen_py/instance_service
# python /opt/contrail/utils/provision_vgw_interface.py --oper create --interface vgw --subnets 10.88.88.0/24 --routes 0.0.0.0/0 --vrf default-domain:admin:ext:ext
更新/etc/contrail/contrail-vrouter-agent.con中的[GATEWAY-0]部分:
[GATEWAY-0]
routing_instance=default-domain:admin:ext:ext
interface=vgw
ip_blocks=10.88.88.0/24
routes=0.0.0.0/0
重新启动supervisor-vrouter进程:
# service supervisor-vrouter restart
重启其他所有的encapsulation方法,除了MPLS On UDP:
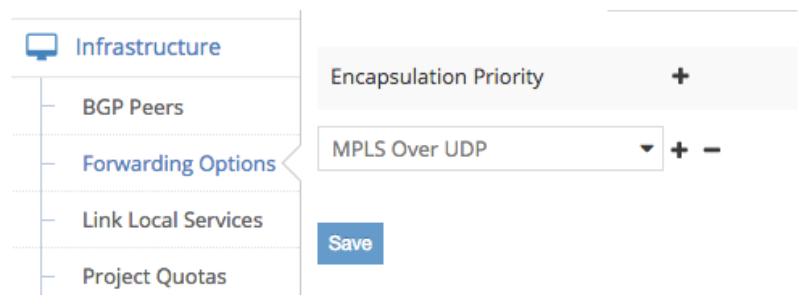
最后结果如下:
总结
非HA方式部署,需要花费内存为:
3+3+2+2=10G, 再加上Fuel Controller本身的3G,在16G的台式机上可以做到。
