May 25, 2015
TechnologyIn order to make exsiting kvm based machine to be lxc container, following is the steps.
Refers to:
https://www.stgraber.org/2012/03/04/booting-an-ubuntu-12-04-virtual-machine-in-an-lxc-container/
First we want to convert the qcow2 format image to raw format, by following command:
$ qemu-img convert u12-debug-ui.qcow2 Contrail.raw
This will take a very long time, because qcow2 file will expand to a whole images, like mine, the Contrail.raw in fact expands to 100G size.
LXC the KVM
Since we have the raw image file, we could create a new configuration file for starting the machine:
 myvm.conf
lxc.network.type = veth
lxc.network.flags = up
lxc.network.link = br0
lxc.network.name = eth0
lxc.network.ipv4 = xxx.xxx.10.230/24
lxc.network.ipv4.gateway = xxx.xxx.0.176
#lxc.network.link = lxcbr0
lxc.utsname = myvminlxc

lxc.tty = 4
lxc.pts = 1024
lxc.rootfs = /dev/mapper/loop0p1
lxc.arch = amd64
lxc.cap.drop = sys_module mac_admin

lxc.cgroup.devices.deny = a
# Allow any mknod (but not using the node)
lxc.cgroup.devices.allow = c *:* m
lxc.cgroup.devices.allow = b *:* m
# /dev/null and zero
lxc.cgroup.devices.allow = c 1:3 rwm
lxc.cgroup.devices.allow = c 1:5 rwm
# consoles
lxc.cgroup.devices.allow = c 5:1 rwm
lxc.cgroup.devices.allow = c 5:0 rwm
#lxc.cgroup.devices.allow = c 4:0 rwm
#lxc.cgroup.devices.allow = c 4:1 rwm
# /dev/{,u}random
lxc.cgroup.devices.allow = c 1:9 rwm
lxc.cgroup.devices.allow = c 1:8 rwm
lxc.cgroup.devices.allow = c 136:* rwm
lxc.cgroup.devices.allow = c 5:2 rwm
# rtc
lxc.cgroup.devices.allow = c 254:0 rwm
#fuse
lxc.cgroup.devices.allow = c 10:229 rwm
#tun
lxc.cgroup.devices.allow = c 10:200 rwm
#full
lxc.cgroup.devices.allow = c 1:7 rwm
#hpet
lxc.cgroup.devices.allow = c 10:228 rwm
#kvm
lxc.cgroup.devices.allow = c 10:232 rwm
Now setup the image file via, this will use the /dev/mapper/loop0p1 as the root partition:
$ sudo kpartx -a Contrail.img
Now start the machine via:
$ sudo lxc-start -n myvminlxc -f ./myvm.conf
Your machine will boot into the lxc, and its behavior is the same as the kvm based machine.
TroubleShooting
The root could not login into the lxc, because of the selinux enabled in the Ubuntu Host, simply disable it in /etc/selinux/config by:
$ sudo vim /etc/selinux/config
#SELINUX=permissive
SELINUX=disabled
Added it into the startup file in /etc/rc.local, it’s ugly, and it will cause the first tty died. But, first use it:
kpartx -a /home/xxxxx/iso/Contrail.raw
lxc-start -n myvminlxc -f /home/xxxxx/iso/myvm.conf
May 24, 2015
TechnologyMySQL数据库
绝大多数的OpenStack服务使用SQL数据库来存储信息,一般情况下数据库运行在控制节点上,这里我们使用MariaDB或者MySQL来作为SQL数据库。
安装, 注意安装过程中需要输入密码:
# apt-get install mariadb-server python-mysqldb
配置, 主要是更改了bind的地址,添加了一些有用选项,并支持UTF-8编码:
$ sudo vim /etc/mysql/my.cnf
[mysqld]
...
bind-address = 10.55.55.2
...
default-storage-engine = innodb
innodb_file_per_table
collation-server = utf8_general_ci
init-connect = 'SET NAMES utf8'
character-set-server = utf8
完成安装,包括重启服务及加密数据库服务:
# service mysql restart
# mysql_secure_installation
消息服务器
OpenStack使用message broker用来在各种服务器之间调度操作和协调状态信息,通常情况下消息服务器也运行在控制节点上,OpenStack支持RabbitMQ, Qpid和ZeroMQ, 这里使用RabbitMQ.
安装:
# apt-get install rabbitmq-server
配置,首先我们需要设定rabbitMQ使用的密码:
# rabbitmqctl change_password guest RABBIT_PASS
Changing password for user "guest" ...
...done.
如果是RabbitMQ 3.3.0或者更新的版本,则需要激活guest用户的远程访问权限。
检查RabbitMQ版本:
# rabbitmqctl status | grep rabbit
Status of node rabbit@Controller ...
 {running_applications,[{rabbit,"RabbitMQ","3.2.4"},
这里我们的版本是3.2.4所以不需要做任何修改,直接重启RabbitMQ服务即可。若是3.3.0以后的版本,则需要参考官方文档作更为详细的配置。
# service rabbitmq-server restart
鉴权(Identity)服务
鉴权服务的作用主要有:
1. 跟踪用户及其权限。
2. 提供可用服务的服务类别及API endpoint.
详细的关于Identity的介绍可以参见OpenStack官方文档。只有理解了其理念后才能明了OpenStack架构中各种服务的角色和地位.
首先创建keystone所需要的数据库:
# mysql -u root -p
Enter password:
Welcome to the MariaDB monitor.  Commands end with ; or \g.
Your MariaDB connection id is 36
Server version: 5.5.43-MariaDB-1ubuntu0.14.04.2 (Ubuntu)

Copyright (c) 2000, 2015, Oracle, MariaDB Corporation Ab and others.

Type 'help;' or '\h' for help. Type '\c' to clear the current input statement.

MariaDB [(none)]> CREATE DATABASE keystone;
Query OK, 1 row affected (0.00 sec)

MariaDB [(none)]> GRANT ALL PRIVILEGES ON keystone.* TO 'keystone'@'localhost' \
    -> IDENTIFIED BY 'KEYSTONE_PASSWD';
Query OK, 0 rows affected (0.01 sec)

MariaDB [(none)]> GRANT ALL PRIVILEGES ON keystone.* TO 'keystone'@'%' \
    -> IDENTIFIED BY 'KEYSTONE_PASSWD';
Query OK, 0 rows affected (0.00 sec)

MariaDB [(none)]> quit;
Bye
创建一个随机值,用于管理token在初始化配置时使用:
# openssl rand -hex 10
760bc221f4dc966693e5
安装和配置组件:
# apt-get install keystone python-keystoneclient
配置, 更改admin_token为刚才生成的随机数:
$ sudo vim /etc/keystone/keystone.conf
[DEFAULT]
...
admin_token = 760bc221f4dc966693e5
...
[database]
...
connection = mysql://keystone:KEYSTONE_DBPASS@Controller/keystone
...
[token]
...
provider = keystone.token.providers.uuid.Provider
driver = keystone.token.persistence.backends.sql.Token
...
[revoke]
...
driver = keystone.contrib.revoke.backends.sql.Revoke
...
[DEFAULT]
...
verbose = True
修改完毕后,使用以下命令来同步Identity服务数据库:
# su -s /bin/sh -c "keystone-manage db_sync" keystone
重启鉴权服务,删除Ubuntu使用的默认sqlite数据库, 并完成安装:
# service keystone restart
# rm -f /var/lib/keystone/keystone.db
使用下列命令来激活cron任务,以便每小时判断tokens的存活时间:
# (crontab -l -u keystone 2>&1 | grep -q token_flush) || echo '@hourly /usr/bin/keystone-manage token_flush >/var/log/keystone/keystone-tokenflush.log 2>&1' >> /var/spool/cron/crontabs/keystone
创建tenants, users, roles
# export OS_SERVICE_TOKEN=760bc221f4dc966693e5
# export OS_SERVICE_ENDPOINT=http://Controller:35357/v2.0
# keystone tenant-create --name admin --description "Admin Tenant"
+-------------+----------------------------------+
|   Property  |              Value               |
+-------------+----------------------------------+
| description |           Admin Tenant           |
|   enabled   |               True               |
|      id     | 6f5f440aa9de4b2fa205f43df073ddfa |
|     name    |              admin               |
+-------------+----------------------------------+
# keystone user-create --name admin --pass XXXXXXXXX --email xxxxxxxx@gmail.com
+----------+----------------------------------+
| Property |              Value               |
+----------+----------------------------------+
|  email   |        XXXXXXXX@gmail.com        |
| enabled  |               True               |
|    id    | 7bc9be5493e345518a384383872ab274 |
|   name   |              admin               |
| username |              admin               |
+----------+----------------------------------+
# keystone role-create --name admin
+----------+----------------------------------+
| Property |              Value               |
+----------+----------------------------------+
|    id    | 65b6ccaa3b434c848ccb757be43d6b41 |
|   name   |              admin               |
+----------+----------------------------------+
# keystone user-role-add --user admin --tenant admin --role admin
# keystone tenant-create --name demo --description "Demo Tenant"
+-------------+----------------------------------+
|   Property  |              Value               |
+-------------+----------------------------------+
| description |           Demo Tenant            |
|   enabled   |               True               |
|      id     | 459c25933274483fb01ce66d9514add6 |
|     name    |               demo               |
+-------------+----------------------------------+
# keystone user-create --name demo --tenant demo --pass xxxxx --email xxxxxxx@gmail.com
+----------+----------------------------------+
| Property |              Value               |
+----------+----------------------------------+
|  email   |        xxxxxxx@gmail.com        |
| enabled  |               True               |
|    id    | b2f3d8a239b34edfb50fa67c5aca8f83 |
|   name   |               demo               |
| tenantId | 459c25933274483fb01ce66d9514add6 |
| username |               demo               |
+----------+----------------------------------+
# keystone tenant-create --name service --description "Service Tenant"
+-------------+----------------------------------+
|   Property  |              Value               |
+-------------+----------------------------------+
| description |          Service Tenant          |
|   enabled   |               True               |
|      id     | 08a675be93a04cca8a74159a3eefa288 |
|     name    |             service              |
+-------------+----------------------------------+
# keystone service-create --name keystone --type identity --description "OpenStack Identity"
+-------------+----------------------------------+
|   Property  |              Value               |
+-------------+----------------------------------+
| description |        OpenStack Identity        |
|   enabled   |               True               |
|      id     | bf7613d9563c47a9af80ecdb4f26f3f5 |
|     name    |             keystone             |
|     type    |             identity             |
+-------------+----------------------------------+
# keystone endpoint-create --service-id $(keystone service-list | awk '/ identity / {print $2}') --publicurl http://Controller:5000/v2.0 --internalurl http://Controller:5000/v2.0 --adminurl http://Controller:35357/v2.0 --region regionOne
+-------------+----------------------------------+
|   Property  |              Value               |
+-------------+----------------------------------+
|   adminurl  |   http://Controller:35357/v2.0   |
|      id     | c2c7a6c24b1d411b996f2e30fefc70b6 |
| internalurl |   http://Controller:5000/v2.0    |
|  publicurl  |   http://Controller:5000/v2.0    |
|    region   |            regionOne             |
|  service_id | bf7613d9563c47a9af80ecdb4f26f3f5 |
+-------------+----------------------------------+
验证, 详细的说明参见OpenStack官方文档:
# unset OS_SERVICE_TOKEN OS_SERVICE_ENDPOINT
# keystone --os-tenant-name admin --os-username admin --os-password xxxxx --os-auth-url http://Controller:35357/v2.0 token-get
+-----------+----------------------------------+
|  Property |              Value               |
+-----------+----------------------------------+
|  expires  |       2015-05-24T16:43:08Z       |
|     id    | 612b529c9c754b87a153abd39284aff6 |
| tenant_id | 6f5f440aa9de4b2fa205f43df073ddfa |
|  user_id  | 7bc9be5493e345518a384383872ab274 |
+-----------+----------------------------------+
# keystone --os-tenant-name admin --os-username admin --os-password xxxxx --os-auth-url http://Controller:35357/v2.0 tenant-list
+----------------------------------+---------+---------+
|                id                |   name  | enabled |
+----------------------------------+---------+---------+
| 6f5f440aa9de4b2fa205f43df073ddfa |  admin  |   True  |
| 459c25933274483fb01ce66d9514add6 |   demo  |   True  |
| 08a675be93a04cca8a74159a3eefa288 | service |   True  |
+----------------------------------+---------+---------+
# keystone --os-tenant-name admin --os-username admin --os-password xxxxx --os-auth-url http://Controller:35357/v2.0 user-list
+----------------------------------+-------+---------+--------------------+
|                id                |  name | enabled |       email        |
+----------------------------------+-------+---------+--------------------+
| 7bc9be5493e345518a384383872ab274 | admin |   True  | xxxxxxx@gmail.com |
| b2f3d8a239b34edfb50fa67c5aca8f83 |  demo |   True  | xxxxxxx@gmail.com |
+----------------------------------+-------+---------+--------------------+
# keystone --os-tenant-name admin --os-username admin --os-password xxxxx --os-auth-url http://Controller:35357/v2.0 role-list
+----------------------------------+----------+
|                id                |   name   |
+----------------------------------+----------+
| 9fe2ff9ee4384b1894a90878d3e92bab | _member_ |
| 65b6ccaa3b434c848ccb757be43d6b41 |  admin   |
+----------------------------------+----------+
# keystone --os-tenant-name demo --os-username demo --os-password xxxxx --os-auth-url http://controller:35357/v2.0 token-get
+-----------+----------------------------------+
|  Property |              Value               |
+-----------+----------------------------------+
|  expires  |       2015-05-24T16:46:34Z       |
|     id    | 0d8a9472b0f547dfabc62594b4fb146f |
| tenant_id | 459c25933274483fb01ce66d9514add6 |
|  user_id  | b2f3d8a239b34edfb50fa67c5aca8f83 |
+-----------+----------------------------------+
# keystone --os-tenant-name demo --os-username demo --os-password xxxxx --os-auth-url http://controller:35357/v2.0 user-list
You are not authorized to perform the requested action: admin_required (HTTP 403)
创建脚本
# cat admin-openrc.sh
export OS_TENANT_NAME=admin
export OS_USERNAME=admin
export OS_PASSWORD=xxxxx
export OS_AUTH_URL=http://Controller:35357/v2.0
# cat demo-openrc.sh
export OS_TENANT_NAME=demo
export OS_USERNAME=demo
export OS_PASSWORD=xxxxx
export OS_AUTH_URL=http://Controller:5000/v2.0
下次使用时直接用source admin-openrc.sh或者source demo-openrc.sh即可。
镜像服务
添加镜像服务:
root@Controller:~# mysql -u root -p
Enter password:
Welcome to the MariaDB monitor.  Commands end with ; or \g.
Your MariaDB connection id is 40
Server version: 5.5.43-MariaDB-1ubuntu0.14.04.2 (Ubuntu)

Copyright (c) 2000, 2015, Oracle, MariaDB Corporation Ab and others.

Type 'help;' or '\h' for help. Type '\c' to clear the current input statement.

MariaDB [(none)]> CREATE DATABASE glance;
Query OK, 1 row affected (0.00 sec)

MariaDB [(none)]> GRANT ALL PRIVILEGES ON glance.* TO 'glance'@'localhost' IDENTIFIED BY 'xxxxx';
Query OK, 0 rows affected (0.00 sec)

MariaDB [(none)]> GRANT ALL PRIVILEGES ON glance.* TO 'glance'@'%' IDENTIFIED BY 'xxxxx';
Query OK, 0 rows affected (0.00 sec)

MariaDB [(none)]> quit;
Bye
创建glance用户:
# source  /home/dash/admin-openrc.sh
# keystone user-create --name glance --pass xxxxx
+----------+----------------------------------+
| Property |              Value               |
+----------+----------------------------------+
|  email   |                                  |
| enabled  |               True               |
|    id    | a3108e4267154acd809f3978d360e6cd |
|   name   |              glance              |
| username |              glance              |
+----------+----------------------------------+
赋予glance用户admin权限:
# keystone user-role-add --user glance --tenant service --role admin
创建service entity和service end-point:
 keystone service-create --name glance --type image --description "OpenStack Image Service"
+-------------+----------------------------------+
|   Property  |              Value               |
+-------------+----------------------------------+
| description |     OpenStack Image Service      |
|   enabled   |               True               |
|      id     | 8736ca50fdf741afb5fcc2d078b1cd9b |
|     name    |              glance              |
|     type    |              image               |
+-------------+----------------------------------+
# keystone endpoint-create --service-id $(keystone service-list | awk '/ image / {print $2}') --publicurl http://Controller:9292 --internalurl http://Controller:9292 --adminurl http://Controller:9292 --region regionOne
+-------------+----------------------------------+
|   Property  |              Value               |
+-------------+----------------------------------+
|   adminurl  |      http://Controller:9292      |
|      id     | 340f40f0558c4a5b8fa88089aee69767 |
| internalurl |      http://Controller:9292      |
|  publicurl  |      http://Controller:9292      |
|    region   |            regionOne             |
|  service_id | 8736ca50fdf741afb5fcc2d078b1cd9b |
+-------------+----------------------------------+
安装服务组件:
# apt-get install glance python-glanceclient
配置:
# vim /etc/glance/glance-api.conf
[database]
...
connection = mysql://glance:GLANCE_DBPASS@controller/glance
[keystone_authtoken]
...
auth_uri = http://controller:5000/v2.0
identity_uri = http://controller:35357
admin_tenant_name = service
admin_user = glance
admin_password = GLANCE_PASS
[paste_deploy]
...
flavor = keystone
[glance_store]
...
default_store = file
filesystem_store_datadir = /var/lib/glance/images/
[DEFAULT]
...
notification_driver = noop
[DEFAULT]
...
verbose = True
配置/etc/glance/glance-registry.conf文件,完成以下配置:
[database]
...
connection = mysql://glance:GLANCE_DBPASS@controller/glance

[keystone_authtoken]
...
auth_uri = http://controller:5000/v2.0
identity_uri = http://controller:35357
admin_tenant_name = service
admin_user = glance
admin_password = GLANCE_PASS
[paste_deploy]
...
flavor = keystone
[DEFAULT]
...
notification_driver = noop
[DEFAULT]
...
notification_driver = noop
同步数据库:
# su -s /bin/sh -c "glance-manage db_sync" glance
重启服务,删除默认的sqlite数据库:
# service glance-registry restart
# service glance-api restart
# rm -f /var/lib/glance/glance.sqlite
验证:
# wget http://download.cirros-cloud.net/0.3.3/cirros-0.3.3-x86_64-disk.img
# source ~/admin-openrc.sh
# glance image-create --name "cirros-0.3.3-x86_64" --file ~/cirros-0.3.3-x86_64-disk.img --disk-format qcow2 --container-format bare --is-public True --progress
[=============================>] 100%
+------------------+--------------------------------------+
| Property         | Value                                |
+------------------+--------------------------------------+
| checksum         | 133eae9fb1c98f45894a4e60d8736619     |
| container_format | bare                                 |
| created_at       | 2015-05-24T16:25:32                  |
| deleted          | False                                |
| deleted_at       | None                                 |
| disk_format      | qcow2                                |
| id               | 3d45ea58-731c-4eb5-bf30-db1b4bfe4f57 |
| is_public        | True                                 |
| min_disk         | 0                                    |
| min_ram          | 0                                    |
| name             | cirros-0.3.3-x86_64                  |
| owner            | 6f5f440aa9de4b2fa205f43df073ddfa     |
| protected        | False                                |
| size             | 13200896                             |
| status           | active                               |
| updated_at       | 2015-05-24T16:25:32                  |
| virtual_size     | None                                 |
+------------------+--------------------------------------+
# glance image-list
+--------------------------------------+---------------------+-------------+------------------+----------+--------+
| ID                                   | Name                | Disk Format | Container Format | Size     | Status |
+--------------------------------------+---------------------+-------------+------------------+----------+--------+
| 3d45ea58-731c-4eb5-bf30-db1b4bfe4f57 | cirros-0.3.3-x86_64 | qcow2       | bare             | 13200896 | active |
+--------------------------------------+---------------------+-------------+------------------+----------+--------+
控制节点基本上配置成功,明天继续。
May 24, 2015
Technology目的
最近在研究解耦OpenStack,以及OpenStack的各种网络模型,下面是一个最简单的用于搭建OpenStack Juno的过程。
硬件及网络准备
物理服务器
物理服务器: i5-4460/32G 内存,128G SSD+3T IDE,事实上这个教程跑完你也用不到这么强悍的配置,理论上在8G的物理机器上就可以运行完本文。
物理服务器操作系统: Ubuntu14.04
虚拟机:
虚拟机1, Controller: 1 processor, 2 GB memory, and 5 GB storage.
虚拟机2, Network: 1 processor, 512 MB memory, and 5 GB storage.
虚拟机3, Compute: 1 processor, 2 GB memory, and 10 GB storage.
网络规划
Management: 10.55.55.0/24, 只用于管理的网络,公网无法访问。简单来说,这个网络用于OpenStack各个组件之间的相互通信。
Tunnel: 10.66.66.0/24, 用于计算节点和网络节点之间的通信。这个隧道使得虚拟机的实例可以和相互通信。
External: 192.168.1.0/24, 用于虚拟机实例的Internet访问。
当然我们可以添加额外的存储网络,这里为了简单起见我们不使用cinder服务,使用单纯的虚拟机镜像即可。
节点网络名规划
Controller节点: controller.openstack.local, 10.55.55.2(管理网络), N/A, N/A.
Network节点: Network.openstack.local, 10.55.55.3(管理网络), 10.66.66.3(隧道网络), 192.168.1.3(Internet公网).
Compute节点: Compute.openstack.local, 10.55.55.4(管理网络), 10.66.66.4(隧道网络).
一个参考的例图如下:

按照上述的描述我们创建三台虚拟机,并进行初始化配置。
虚拟机初始化配置
下面罗列的代码是我在本机上的创建过程,仅供参考:
$ pwd
/media/repo/Image/3NodeOpenStack
$ qemu-img create -f qcow2 -b /media/repo/Image/UbuntuBase.qcow2 OpenStackController.qcow2
Formatting 'OpenStackController.qcow2', fmt=qcow2 size=107374182400 backing_file='/media/repo/Image/UbuntuBase.qcow2' encryption=off cluster_size=65536 lazy_refcounts=off
$ qemu-img create -f qcow2 -b /media/repo/Image/UbuntuBase.qcow2 OpenStackNetwork.qcow2
Formatting 'OpenStackNetwork.qcow2', fmt=qcow2 size=107374182400 backing_file='/media/repo/Image/UbuntuBase.qcow2' encryption=off cluster_size=65536 lazy_refcounts=off
$ qemu-img create -f qcow2 -b /media/repo/Image/UbuntuBase.qcow2 OpenStackCompute.qcow2
Formatting 'OpenStackCompute.qcow2', fmt=qcow2 size=107374182400 backing_file='/media/repo/Image/UbuntuBase.qcow2' encryption=off cluster_size=65536 lazy_refcounts=off
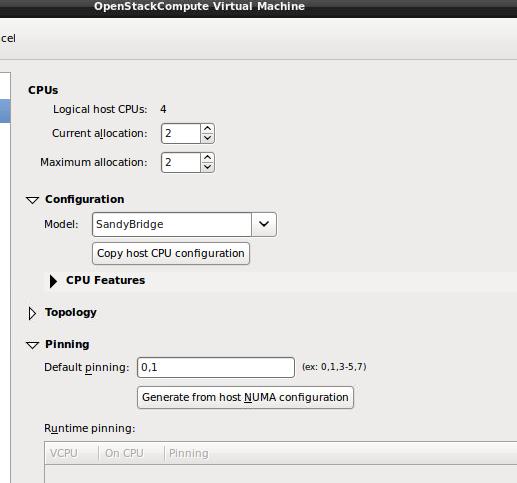
创建虚拟机的时候, OpenStackCompute节点需要把CPU的参数带下去,如下图所示:
各个节点的network定义文件如下:
控制节点:
# The loopback network interface
auto lo
iface lo inet loopback

# The primary network interface
auto eth0
iface eth0 inet static
address 10.55.55.2
netmask 255.255.255.0
gateway 10.55.55.1
dns-nameservers 114.114.114.114
网络节点:
# The loopback network interface
auto lo
iface lo inet loopback

# The primary network interface
auto eth0
iface eth0 inet static
address 10.55.55.3
netmask 255.255.255.0
gateway 10.55.55.1
dns-nameservers 114.114.114.114


auto eth1
iface eth1 inet static
address 10.66.66.3
netmask 255.255.255.0

auto eth2
iface eth2 inet static
address 192.168.1.3
netmask 255.255.255.0
计算节点:
auto lo
iface lo inet loopback

# The primary network interface
auto eth0
iface eth0 inet static
address 10.55.55.4
netmask 255.255.255.0
gateway 10.55.55.1
dns-nameservers 114.114.114.114

auto eth1
iface eth1 inet static
address 10.66.66.4
netmask 255.255.255.0
每个节点分别更改其/etc/hostname为对应的名字,而每台机器上的/etc/hosts也做对应的修改,例如Controlle节点上的例子如下:
$ cat /etc/hosts
127.0.0.1       localhost
127.0.1.1       Controller
10.55.55.2      Controller
10.55.55.3      Network
10.55.55.4      Compute
......

$ cat /etc/hostname
Controller
网络配置完毕后,保证可以通过ping Controller等命令达到互通。
在进入到后续步骤前,更新所有节点到最新状态:
$ sudo apt-get update && sudo apt-get upgrade && sudo apt-get dist-upgrade && sudo reboot
NTP 服务器/客户端配置
使用NTP来保证各个节点之间的时间同步,对后续加入的各个节点,同样需要使用NTP来同步该节点时间。我们将Controller作为NTP服务器,在Controller上,安装和配置NTP服务器:
NTP服务器
# apt-get -y install ntp
# vim /etc/ntp.conf
    # 修改成大陆时间
    server 2.cn.pool.ntp.org
    server 1.asia.pool.ntp.org
    server 2.asia.pool.ntp.org
    # 修改 restrict 設定
    restrict -4 default kod notrap nomodify
    restrict -6 default kod notrap nomodify
# service ntp restart
NTP客户端
其他的节点上都需要安装NTP客户端并使用NTP服务器时间同步。
# apt-get -y install ntp
# vim /etc/ntp.conf
    # 設定 controller 為參照的 time server
    # 並將其他 server 開頭的設定進行註解
    server 10.55.55.2 iburst
# service ntp restart
检查结果是否正确:
root@JunoNetwork:~# ntpq -c peers
     remote           refid      st t when poll reach   delay   offset  jitter
==============================================================================
 Controller  59.106.180.168   3 u    1   64    1    0.239  447024.   0.049
接下来真正进入OpenStack的安装和配置过程。
源设定
Juno的源没有被包含在Ubuntu14.04的官方源中(官方源中版本为IceHouse),所以通过下列命令添加OpenStack Juno源:
所有节点上(Controller,Network,Compute):
$ sudo apt-get install ubuntu-cloud-keyring
$ sudo bash
# echo "deb http://ubuntu-cloud.archive.canonical.com/ubuntu" "trusty-updates/juno main" > /etc/apt/sources.list.d/cloudarchive-juno.list
# apt-get update && apt-get -y dist-upgrade
第一部分就先到这里。
May 23, 2015
TechnologyInstallation
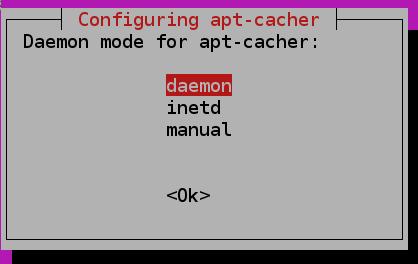
Install apt-cacher via following command:
$ sudo apt-get install apt-cacher
Choose “Daemon” When you see following picture:
Configuration
Make sure the configuration AUTOSTART=1 in /etc/default/apt-cacher.
Enable allowed_hosts=* in /etc/apt-cacher/apt-cacher.conf.
Now restart the machine, and check the apt-cacher service via following command:
$ ps -ef | grep apt
www-data   825     1  0 20:34 ?        00:00:00 /usr/bin/perl /usr/sbin/apt-cacher -R 3 -d -p /var/run/apt-cacher.pid
$ sudo netstat -anp | grep 3142
tcp6       0      0 :::3142                 :::*                    LISTEN      825/perl
Now when you setup the machines, point the http-proxy into this machine, it will automatically cache the packages.
May 22, 2015
TechnologyCobbler Profiles
For getting the profiles and get the detailed information of the profile.
# cobbler profile list
   ubuntu1404-x86_64
# cobbler profile help
usage
=====
cobbler profile add
cobbler profile copy
cobbler profile dumpvars
cobbler profile edit
cobbler profile find
cobbler profile getks
cobbler profile list
cobbler profile remove
cobbler profile rename
cobbler profile report
# cobbler profile report ubuntu1404-x86_64
......
Kickstart                      : /var/lib/cobbler/kickstarts/sample.seed
......
Use Local Repository
For adding the repository via following command, you could use your local repository:
$ sudo cobbler repo add --name=local-trusty --breed=apt --arch=x86_64 --mirror=http://xxxxxxxxxxxxxx/ubuntu --apt-components=main,restricted,universe,multiverse --apt-dists=trusty,trusty-updates,trusty-security
$ sudo cobbler repo sync
After syncing, the folder will contains all of the packages:
# pwd
/var/www/cobbler/ks_mirror/ubuntu1404-x86_64
# ls
boot  dists  doc  EFI  install  isolinux  md5sum.txt  pics  pool  preseed  README.diskdefines  ubuntu
Edit the sample seed via:
# cp /var/lib/cobbler/kickstarts/sample.seed /var/lib/cobbler/kickstarts/local.seed
# vim /var/lib/cobbler/kickstarts/local.seed

    d-i mirror/http/hostname string $http_server
    # d-i mirror/http/directory string $install_source_directory
    d-i mirror/http/directory string /cobbler/ks_mirror/ubuntu1404-x86_64/ubuntu/
    d-i mirror/http/proxy string
    d-i apt-setup/security_host string $http_server
    d-i apt-setup/security_path string /cobbler/ks_mirror/Ubuntu-14.04-x86_64/ubuntu
    d-i apt-setup/services-select multiselect none
Then Modify the profile’s kickstart via:
# cobbler profile edit --name=ubuntu1404-x86_64 --kickstart=/var/lib/cobbler/kickstarts/local.seed
After modification, next time if you re-install the compute, it will directly get the packages from the local repository.
