Jul 7, 2015
TechnologyCloudstack Agent Repository
Setup the CloudStack Agent Repository via:
# yum install yum-plugin-downloadonly
# vim /etc/yum.repos.d/cloudstack.repo
[cloudstack]
name=cloudstack
baseurl=http://cloudstack.apt-get.eu/rhel/4.3/
enabled=1
gpgcheck=0
# mkdir Code
# yum install --downloadonly --downloaddir=/root/Code/ cloud-agent
Now all of the installation rpm packages has been downloaded to directory, simply upload them to a server, use createrepo . to generate the repository, and link them to nginx’s root directory.
Mine is under:
http://192.168.0.79/4.4.3CloudStackAgent/
Agent Installation Steps
In a new deployed machine:
# mv CentOS-* /root/
[root@node161 yum.repos.d]# cat cloudstack.repo
[cloudstack]
name=cloudstack
baseurl=http://192.168.0.79/4.4.3CloudStackAgent/
enabled=1
gpgcheck=0
# yum install -y cloud-agent
Configure qemu and libvirt:
[root@node161 yum.repos.d]# cp /etc/libvirt/qemu.conf /etc/libvirt/qemu.conf.orig
[root@node161 yum.repos.d]# sed -i '/#vnc_listen = "0.0.0.0"/ a vnc_listen = "0.0.0.0"' /etc/libvirt/qemu.conf
[root@node161 yum.repos.d]# diff -du /etc/libvirt/qemu.conf.orig /etc/libvirt/qemu.conf


# cp /etc/libvirt/libvirtd.conf /etc/libvirt/libvirtd.conf.orig
# sed -i '/#listen_tls = 0/ a listen_tls = 0' /etc/libvirt/libvirtd.conf
# sed -i '/#listen_tcp = 1/ a listen_tcp = 1' /etc/libvirt/libvirtd.conf
# sed -i '/#tcp_port = "16509"/ a tcp_port = "16509"' /etc/libvirt/libvirtd.conf
# sed -i '/#auth_tcp = "sasl"/ a auth_tcp = "none"' /etc/libvirt/libvirtd.conf
# sed -i '/#mdns_adv = 1/ a mdns_adv = 0' /etc/libvirt/libvirtd.conf
# diff -du /etc/libvirt/libvirtd.conf.orig  /etc/libvirt/libvirtd.conf

[root@node161 yum.repos.d]# cp /etc/sysconfig/libvirtd /etc/sysconfig/libvirtd.orig
[root@node161 yum.repos.d]# sed -i '/#LIBVIRTD_ARGS="--listen"/ a LIBVIRTD_ARGS="--listen"' /etc/sysconfig/libvirtd
[root@node161 yum.repos.d]# diff -du /etc/sysconfig/libvirtd.orig  /etc/sysconfig/libvirtd
[root@node161 yum.repos.d]# rm -f /etc/libvirt/libvirtd.conf.orig

# cat /etc/hosts
127.0.0.1   localhost localhost.localdomain localhost4 localhost4.localdomain4
::1         localhost localhost.localdomain localhost6 localhost6.localdomain6
127.0.0.1       node161
Now you could add the host into the cloudstack management interface.
Jul 6, 2015
TechnologyCreate Networking In XenCenter
Create the networking under the XenCenter UI’s tab “Networking”.
Networking Setting
Enable the ip forward:
# vim /etc/sysctl.conf
net.ipv4.ip_forward = 1
# sysctl -p
# cat /proc/sys/net/ipv4/ip_forward
1
Use iptables for forwarding the network flow:
# iptables -A FORWARD --in-interface xapi0 -j ACCEPT
# iptables --table nat -A POSTROUTING --out-interface eth0 -j MASQUERADE
But this didn’t bring up the internal networking, after discussing with college, edit the file:
[root@xenserver-WolfHunter ~]# cat /etc/sysconfig/iptables
+++++  *nat
+++++  :PREROUTING ACCEPT [7019:539216]
+++++  :INPUT ACCEPT [77:3825]
+++++  :OUTPUT ACCEPT [104:6495]
+++++  :POSTROUTING ACCEPT [53:3228]
+++++  -A POSTROUTING -o xenbr0 -j MASQUERADE
+++++  COMMIT
*filter
:INPUT ACCEPT [0:0]
:FORWARD ACCEPT [0:0]
:OUTPUT ACCEPT [0:0]
:RH-Firewall-1-INPUT - [0:0]
-A INPUT -j RH-Firewall-1-INPUT
++++ -A FORWARD -i xapi0 -j ACCEPT
-A FORWARD -j RH-Firewall-1-INPUT
-A RH-Firewall-1-INPUT -i lo -j ACCEPT
-A RH-Firewall-1-INPUT -p icmp --icmp-type any -j ACCEPT
# DHCP for host internal networks (CA-6996)
-A RH-Firewall-1-INPUT -p udp -m udp --dport 67 --in-interface xenapi -j ACCEPT
-A RH-Firewall-1-INPUT -m conntrack --ctstate ESTABLISHED,RELATED -j ACCEPT
# Linux HA hearbeat (CA-9394)
-A RH-Firewall-1-INPUT -m conntrack --ctstate NEW -m udp -p udp --dport 694 -j ACCEPT
-A RH-Firewall-1-INPUT -m conntrack --ctstate NEW -m tcp -p tcp --dport 22 -j ACCEPT
-A RH-Firewall-1-INPUT -m conntrack --ctstate NEW -m tcp -p tcp --dport 80 -j ACCEPT
-A RH-Firewall-1-INPUT -m conntrack --ctstate NEW -m tcp -p tcp --dport 443 -j ACCEPT
-A RH-Firewall-1-INPUT -j REJECT --reject-with icmp-host-prohibited
COMMIT
Restart XenServer and waiting for verification.
Jul 4, 2015
TechnologyProseed File
d-i time/zone string Asia/Shanghai

# Setup the installation source
d-i mirror/country string manual
d-i mirror/http/hostname string $http_server
#d-i mirror/http/directory string $install_source_directory
d-i mirror/http/directory string /cobbler/ks_mirror/Ubuntu-14.04-x86_64/ubuntu
d-i mirror/http/proxy string
d-i apt-setup/security_host string $http_server
d-i apt-setup/security_path string /cobbler/ks_mirror/Ubuntu-14.04-x86_64/ubuntu
Local Repository
In one installed machine, do following for getting the repository of all of the installed packages:
$ sudo apt-get install dselect
$ dpkg --get-selections | grep -v deinstall>InstalledPackage.txt
$ awk {'print $1'} InstalledPackage.txt | xargs apt-get download
Use nginx for sharing the repository:
$ sudo apt-get install -y nginx
$ sudo vim /etc/nginx/site-enabled/default
server {
        listen 80 default_server;
        listen [::]:80 default_server ipv6only=on;

        root /var/www/html;
        index index.html index.htm;

        # Make site accessible from http://localhost/
        server_name localhost;

        location / {
                # First attempt to serve request as file, then
                # as directory, then fall back to displaying a 404.
                try_files $uri $uri/ =404;
                autoindex on;
                # Uncomment to enable naxsi on this location
$ sudo service nginx restart
Now generate the repository server:
$ mkdir -p /var/www/html/amd64
$ mv /root/Code/*.deb /var/www/html/amd64
$ cd /var/www/html/
$ dpkg-scanpackages amd64/ | gzip -9c > amd64/Packages.gz
$ mv /root/Code/InstalledPackage.txt /var/www/html
Use Local Repository
Change the repoisoty setting:
root@Ubuntu-14:~# cat /etc/apt/sources.list
deb http://192.168.1.111 amd64/
root@Ubuntu-14:~# apt-get update &&  apt-get install -y dselect
root@Ubuntu-14:~# dselect update
root@Ubuntu-14:~# wget http://192.168.1.11/InstalledPackage.txt
root@Ubuntu-14:~# dpkg --set-selections < InstalledPackage.txt && apt-get -u dselect-upgrade
After updating, you have the same system as your server.
Jul 3, 2015
TechnologyPreparation
Prepare the disks:
[root:/home/juju/img]# mkdir Raid0
[root:/home/juju/img]# cd Raid0/
[root:/home/juju/img/Raid0]# ls
[root:/home/juju/img/Raid0]# qemu-img create -f qcow2 disk0.qcow2 10G
Formatting 'disk0.qcow2', fmt=qcow2 size=10737418240 encryption=off cluster_size=65536
[root:/home/juju/img/Raid0]# qemu-img create -f qcow2 disk1.qcow2 10G
Formatting 'disk1.qcow2', fmt=qcow2 size=10737418240 encryption=off cluster_size=65536
[root:/home/juju/img/Raid0]# qemu-img create -f qcow2 disk2.qcow2 10G
Formatting 'disk2.qcow2', fmt=qcow2 size=10737418240 encryption=off cluster_size=65536
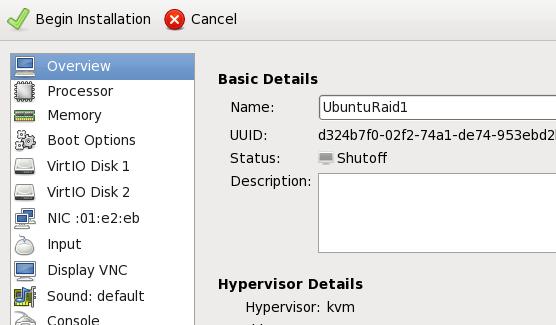
Prepare the Virtual Machine:

Partition
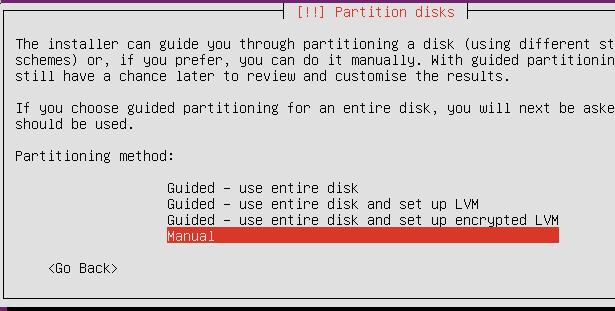
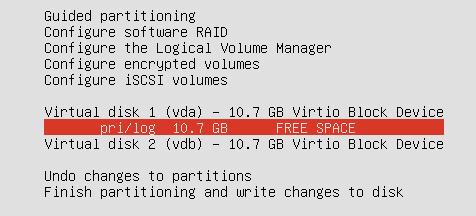
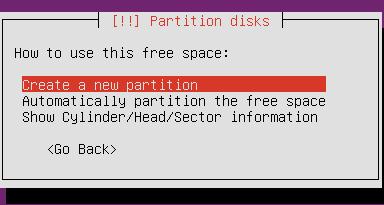
Raid
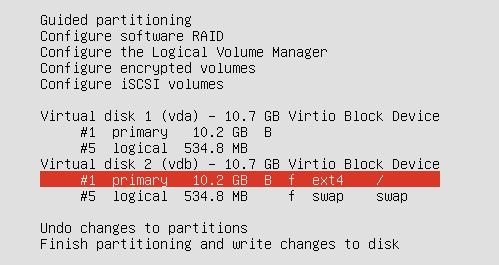
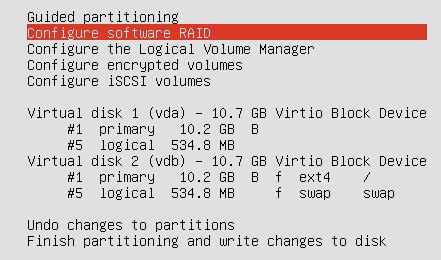
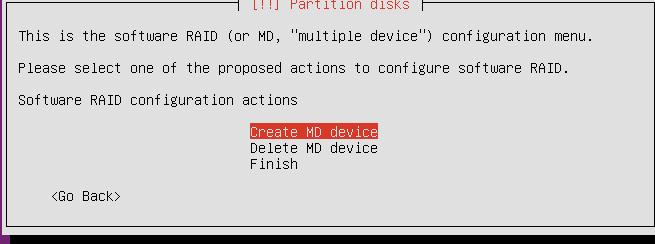
Configure the Software Raid0:

After Configuration of SoftRaid1, the screen displayed like:
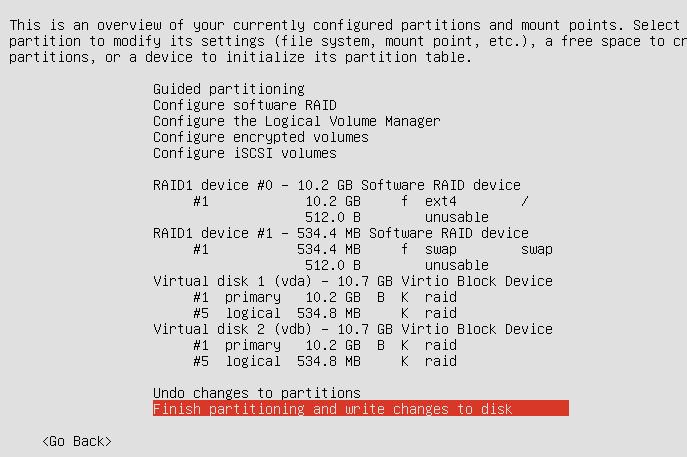
Continue to install.
Verify Raid.
Use df and fdisk to verify the partition information:
clouder@UbuntuRaid1:~$ df -h
Filesystem      Size  Used Avail Use% Mounted on
/dev/md0        9.3G  870M  7.9G  10% /
none            4.0K     0  4.0K   0% /sys/fs/cgroup
udev            235M  4.0K  235M   1% /dev
tmpfs            50M  440K   49M   1% /run
none            5.0M     0  5.0M   0% /run/lock
none            246M     0  246M   0% /run/shm
none            100M     0  100M   0% /run/user
clouder@UbuntuRaid1:~$ sudo fdisk -l
[sudo] password for clouder:

Disk /dev/vda: 10.7 GB, 10737418240 bytes
255 heads, 63 sectors/track, 1305 cylinders, total 20971520 sectors
Units = sectors of 1 * 512 = 512 bytes
Sector size (logical/physical): 512 bytes / 512 bytes
I/O size (minimum/optimal): 512 bytes / 512 bytes
Disk identifier: 0x00035942

   Device Boot      Start         End      Blocks   Id  System
/dev/vda1   *        2048    19922943     9960448   fd  Linux raid autodetect
/dev/vda2        19924990    20969471      522241    5  Extended
/dev/vda5        19924992    20969471      522240   fd  Linux raid autodetect

Disk /dev/vdb: 10.7 GB, 10737418240 bytes
255 heads, 63 sectors/track, 1305 cylinders, total 20971520 sectors
Units = sectors of 1 * 512 = 512 bytes
Sector size (logical/physical): 512 bytes / 512 bytes
I/O size (minimum/optimal): 512 bytes / 512 bytes
Disk identifier: 0x000715e9

   Device Boot      Start         End      Blocks   Id  System
/dev/vdb1   *        2048    19922943     9960448   fd  Linux raid autodetect
/dev/vdb2        19924990    20969471      522241    5  Extended
/dev/vdb5        19924992    20969471      522240   fd  Linux raid autodetect

Disk /dev/md0: 10.2 GB, 10190979072 bytes
2 heads, 4 sectors/track, 2488032 cylinders, total 19904256 sectors
Units = sectors of 1 * 512 = 512 bytes
Sector size (logical/physical): 512 bytes / 512 bytes
I/O size (minimum/optimal): 512 bytes / 512 bytes
Disk identifier: 0x00000000

Disk /dev/md0 doesn't contain a valid partition table

Disk /dev/md1: 534 MB, 534446080 bytes
2 heads, 4 sectors/track, 130480 cylinders, total 1043840 sectors
Units = sectors of 1 * 512 = 512 bytes
Sector size (logical/physical): 512 bytes / 512 bytes
I/O size (minimum/optimal): 512 bytes / 512 bytes
Disk identifier: 0x00000000

Disk /dev/md1 doesn't contain a valid partition table
Verify the raid status:
root@UbuntuRaid1:/etc/initramfs-tools/conf.d# cat /proc/mdstat
Personalities : [linear] [multipath] [raid0] [raid1] [raid6] [raid5] [raid4] [raid10]
md1 : active raid1 vda5[0] vdb5[1]
      521920 blocks super 1.2 [2/2] [UU]

md0 : active raid1 vda1[0] vdb1[1]
      9952128 blocks super 1.2 [2/2] [UU]

unused devices: <none>
Query the status of SoftRaid1:
root@UbuntuRaid1:/etc/initramfs-tools/conf.d# sudo mdadm --query --detail /dev/md0
/dev/md0:
        Version : 1.2
  Creation Time : Fri Jul  3 11:24:46 2015
     Raid Level : raid1
     Array Size : 9952128 (9.49 GiB 10.19 GB)
  Used Dev Size : 9952128 (9.49 GiB 10.19 GB)
   Raid Devices : 2
  Total Devices : 2
    Persistence : Superblock is persistent

    Update Time : Fri Jul  3 11:46:19 2015
          State : clean
 Active Devices : 2
Working Devices : 2
 Failed Devices : 0
  Spare Devices : 0

           Name : UbuntuRaid1:0  (local to host UbuntuRaid1)
           UUID : bc091921:c198c219:7162e35c:bfff3c4e
         Events : 19

    Number   Major   Minor   RaidDevice State
       0     253        1        0      active sync   /dev/vda1
       1     253       17        1      active sync   /dev/vdb1
Remove One Disk
Remove one, and see if it could be startup.
Result:
Done, it could start into the system.
clouder@UbuntuRaid1:~$ cat /proc/mdstat
Personalities : [linear] [multipath] [raid0] [raid1] [raid6] [raid5] [raid4] [raid10]
md1 : active (auto-read-only) raid1 vda5[1]
      521920 blocks super 1.2 [2/1] [_U]

md0 : active raid1 vda1[1]
      9952128 blocks super 1.2 [2/1] [_U]

unused devices: <none>
Add A New Empty Disk
Add a new disk into the system, and first partition.
$ sudo fdisk -l

Disk /dev/vdb: 10.7 GB, 10737418240 bytes
16 heads, 63 sectors/track, 20805 cylinders, total 20971520 sectors
Units = sectors of 1 * 512 = 512 bytes
Sector size (logical/physical): 512 bytes / 512 bytes
I/O size (minimum/optimal): 512 bytes / 512 bytes
Disk identifier: 0x00000000

Disk /dev/vdb doesn't contain a valid partition table
Clone the partition table from the vda to the newly added partion:
$ sudo sfdisk -d /dev/vda > vda.desc
$ cat vda.desc
$ sudo sfdisk /dev/vdb<./vda.desc
Now Add the new disk for usage:
clouder@UbuntuRaid1:~$ cat /proc/mdstat
Personalities : [linear] [multipath] [raid0] [raid1] [raid6] [raid5] [raid4] [raid10]
md1 : active (auto-read-only) raid1 vda5[1]
      521920 blocks super 1.2 [2/1] [_U]

md0 : active raid1 vda1[1]
      9952128 blocks super 1.2 [2/1] [_U]

unused devices: <none>
clouder@UbuntuRaid1:~$ sudo mdadm --manage /dev/md0 --add /dev/vdb1
mdadm: added /dev/vdb1
clouder@UbuntuRaid1:~$ sudo mdadm --manage /dev/md1 --add /dev/vdb5
mdadm: added /dev/vdb5
clouder@UbuntuRaid1:~$ cat /proc/mdstat
Personalities : [linear] [multipath] [raid0] [raid1] [raid6] [raid5] [raid4] [raid10]
md1 : active raid1 vdb5[2] vda5[1]
      521920 blocks super 1.2 [2/1] [_U]
        resync=DELAYED

md0 : active raid1 vdb1[2] vda1[1]
      9952128 blocks super 1.2 [2/1] [_U]
      [===>.................]  recovery = 16.6% (1662144/9952128) finish=1.8min speed=75552K/sec

unused devices: <none>
Known Bugs
Error and Solution:
error:  Diskfilter writes are not supported

Edit :/etc/grub.d/10_linux

Replace 'quick_boot="1"' with 'quick_boot="0"'

Then :

sudo update-grub
Jun 29, 2015
TechnologyFirst edit your kickstart file, add following line before the end of your kickstart:
[root@z_WHServer kickstarts]# pwd
/var/lib/cobbler/kickstarts
[root@z_WHServer kickstarts]# cat sample_end.ks
# Start final steps
+ $SNIPPET('publickey_root')
$SNIPPET('kickstart_done')
# End final steps
%end
And the publickey_root should be edited as following:
[root@z_WHServer snippets]# pwd
/var/lib/cobbler/snippets
[root@z_WHServer snippets]# cat publickey_root
# Install CobblerServer's(10.47.58.2) public key for root user
cd /root
mkdir --mode=700 .ssh
cat >> .ssh/authorized_keys << "PUBLIC_KEY"
ssh-rsa AAAAB3NzaC1yc2EAAAABIwAAAQEA3B3GtGuKY0l2Ak9+WSkorY7R+Cx5/u3RMua/7GrvP05IPywQdkR+mqwdRydNjyhB96nHlYZtr8Fbfn5iwqn0j8dz8wmTZicBNeRqIdbe/YUje5NjXxDXjYda63VfDhpgzJ53KICTx6pBhGaeOKS/U5HqCpDbF7ODP8siU7bRhk1LkIQ6VwZYUg7b0oR+Sw6XJ31Z7gs4CWF6zfjfQQoF7EoMA+dnqvt2K4PQPXNSBJQx3qb9jyXIXvo333PcfIX6mD1TW1wDAIXLm4qz4mi7C8Ax9h+T/D98r08WX360vC5Tzr8feXMs6H4il4s4Ftq7RVoqCNKmG3AB1LTp4AQAzw== root@z_WHServer
PUBLIC_KEY
chmod 600 .ssh/authorized_keys
cat >> .ssh/config <<EOF
StrictHostKeyChecking no
UserKnownHostsFile /dev/null
EOF
Better you run cobber sync after updating your kickstart file.
