Jul 29, 2015
TechnologyInstallation
The newest version is 2.6.9.
# wget -qO - http://download.opensuse.org/repositories/home:/libertas-ict:/cobbler26/xUbuntu_15.04/Release.key | sudo apt-key add -
# sudo add-apt-repository "deb http://download.opensuse.org/repositories/home:/libertas-ict:/cobbler26/xUbuntu_15.04/ ./"
# sudo apt-get install cobbler
Jul 29, 2015
TechnologyServer Installation && Configration
Server have 2-core and 3072MB, running CentOS6.6, IP address is 10.9.10.2.
Installation:
# rpm -Uvh http://yum.spacewalkproject.org/2.3/RHEL/6/x86_64/spacewalk-repo-2.3-4.el6.noarch.rpm
# wget -O /etc/yum.repos.d/epel.repo http://mirrors.aliyun.com/repo/epel-6.repo
# yum update
# yum install -y spacewalk-postgresql
Now add a new repository:
# cat /etc/yum.repos.d/jpackage-generic.repo
[jpackage-generic]
name=JPackage generic
#baseurl=http://mirrors.dotsrc.org/pub/jpackage/5.0/generic/free/
mirrorlist=http://www.jpackage.org/mirrorlist.php?dist=generic&type=free&release=5.0
enabled=1
gpgcheck=1
gpgkey=http://www.jpackage.org/jpackage.asc
Met some problems on CentOS6.6, mainly the dependencies problem, switches to CentOS7(10.9.10.100) :
Install it via:
# rpm -Uvh http://yum.spacewalkproject.org/2.3/RHEL/7/x86_64/spacewalk-repo-2.3-4.el7.noarch.rpm
Setup Database for spacewalk:
# yum install spacewalk-setup-postgresql
Install spacewalk with postgresql as its backend database:
# yum install spacewalk-postgresql
Install spacecmd for using cmd of spacewalker:
# yum install -y spacecmd
Configuration
Configuration, first remove the possible db, then setup.
# /usr/bin/spacewalk-setup-postgresql remove --db
rhnschema --user rhnuser
# spacewalk-setup --disconnected
** Database: Setting up database connection for PostgreSQL backend.
Database "rhnschema" does not exist
** Database: Installing the database:
** Database: This is a long process that is logged in:
** Database:   /var/log/rhn/install_db.log
*** Progress: ##
** Database: Installation complete.
** Database: Populating database.
*** Progress: ############################
* Configuring tomcat.
* Setting up users and groups.
** GPG: Initializing GPG and importing key.
** GPG: Creating /root/.gnupg directory
You must enter an email address.
Admin Email Address? xxxxxx@gmail.com
* Performing initial configuration.
* Activating Spacewalk.
** Loading Spacewalk Certificate.
** Verifying certificate locally.
** Activating Spacewalk.
* Configuring apache SSL virtual host.
Should setup configure apache's default ssl server for you (saves original ssl.conf)
[Y]? y
** /etc/httpd/conf.d/ssl.conf has been backed up to ssl.conf-swsave
* Configuring jabberd.
* Creating SSL certificates.
CA certificate password?
Re-enter CA certificate password?
Organization? Lxxzxxx University
Organization Unit [SpaceWalker]? XXU
Email Address [xxxxx@gmail.com]? XXXXX@gmail.com
City? LxxZxx
State? xxxx
Country code (Examples: "US", "JP", "IN", or type "?" to see a list)? CN
** SSL: Generating CA certificate.
** SSL: Deploying CA certificate.
** SSL: Generating server certificate.
** SSL: Storing SSL certificates.
* Deploying configuration files.
* Update configuration in database.
* Setting up Cobbler..
Cobbler requires tftp and xinetd services be turned on for PXE provisioning
functionality. Enable these services [Y]? Y
* Restarting services.
Installation complete.
Visit https://SpaceWalker to create the Spacewalk administrator account.
Open the iptables rules:
# iptables -A INPUT -p tcp -m multiport --dport 22,443,5222,69,5432 -j ACCEPT
For better use the spacewalk’s utilities, install the following packages:
# yum install -y spacewalk-utils
With this package, you could use spacewalk-common-channels and other commands.
Setup Repository
Add a channel of CentOS7:
[root@SpaceWalker ~]# /usr/bin/spacewalk-common-channels -v -u YourUserName -p \
YourPassword -a x86_64 -k unlimited 'centos7*'
Connecting to http://localhost/rpc/api
Base channel 'CentOS 7 (x86_64)' - creating...
* Activation key 'centos7-x86_64' - creating...
* Child channel 'CentOS 7 Addons (x86_64)' - creating...
** Activation key '1-centos7-x86_64' - adding child channel...
* Child channel 'CentOS 7 Plus (x86_64)' - creating...
** Activation key '1-centos7-x86_64' - adding child channel...
* Child channel 'CentOS 7 Contrib (x86_64)' - creating...
** Activation key '1-centos7-x86_64' - adding child channel...
* Child channel 'CentOS 7 Extras (x86_64)' - creating...
** Activation key '1-centos7-x86_64' - adding child channel...
* Child channel 'CentOS 7 FastTrack (x86_64)' - creating...
** Activation key '1-centos7-x86_64' - adding child channel...
* Child channel 'CentOS 7 Updates (x86_64)' - creating...
** Activation key '1-centos7-x86_64' - adding child channel...
Now in the SpaceWalk Backend you will see:
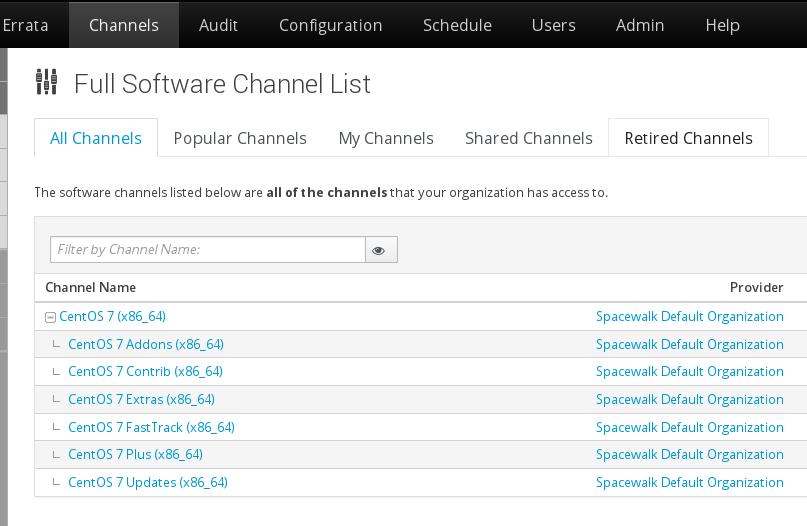
Import ISO as the repository:
# mkdir /var/distro-trees/centos7_64 -p
# chmod 755 /var/
# chmod 755 /var/distro-trees/
# chmod 755 /var/distro-trees/centos7_64/
# mount -t nfs 192.168.0.79:/home/juju /mnt
#  mount -t iso9660 -o loop /mnt/iso/CentOS-7-x86_64-Everything-1503-01.iso \
/var/distro-trees/centos7_64/
# wget https://127.0.0.1/pub/RHN-ORG-TRUSTED-SSL-CERT -O \
/usr/share/rhn/RHN-ORG-TRUSTED-SSL-CERT --no-check-certificate
# /usr/bin/rhnpush -v --channel=centos7-x86_64 --server=https://localhost/APP
--dir="/var/distro-trees/centos7_64/Packages"
Connecting to https://localhost/APP
Username: xxxxxx
Password:
The import process will cost pretty long times.
Cobbler Configuration
Via cobbler check and fix some errors, notice in CentOS7, the rsyncd is managed via
systemd, so we just enable the rsyncd via:
# systemctl enable rsyncd.service
# systemctl start rsyncd.service
debmirror missing:
# wget http://archive.ubuntu.com/ubuntu/pool/universe/d/debmirror/debmirror_2.10ubuntu1.tar.gz
# tar -xzvf debmirror_2.10ubuntu1.tar.gz
# ...
# cd debmirror-2.10ubuntu1
# make
# cp debmirror /usr/bin/
# cp debmirror.1 /usr/share/man/man1/
# yum install -y cpan
# cpan install Net::INET6Glue
rsync won’t be a problem.
# mount -t iso9660 -o loop /media/material/iso/CentOS-7-x86_64-Everything-1503.iso  /mnt1
# cp -ar /mnt1/*  /var/distro-trees/centos7_64
Now create the distribution:
# spacecmd -u YourUserName -p YourPassword -- distribution_create -n centos7 -p /var/distro-trees/centos7_64/ -b centos7-x86_64 -t rhel_6
Steps:
# yum install -y spacewalk-postgresql spacewalk-setup-postgresql spacecmd spacewalk-utils firefox
[root@localhost ~]# cat /etc/yum.repos.d/SpaceWalk22.repo
[SpaceWalk22]
name=SpaceWalk22
baseurl=http://192.168.1.11/SpaceWalk22
enabled=1
gpgcheck=0
Use Answer File
Define the answer file and deploy using answer.txt:
# cat /root/Code/spacewalker/answer.txt
admin-email = root@localhost
ssl-set-org = Spacewalk Org
ssl-set-org-unit = spacewalk
ssl-set-city = My City
ssl-set-state = My State
ssl-set-country = US
ssl-password = spacewalk
ssl-set-email = root@localhost
ssl-config-sslvhost = Y
db-backend=postgresql
db-name=spaceschema
db-user=spacewalk
db-password=spacewalk
db-host=localhost
db-port=5432
enable-tftp=N
Reconfigure the LC:
$ sudo su postgres
$ psql
#
# UPDATE pg_database SET datallowconn = TRUE WHERE datname = 'template0';
# \c template0
# UPDATE pg_database SET datistemplate = FALSE WHERE datname = 'template1';
# drop database template1;
# CREATE DATABASE template1 ENCODING = 'utf8' TEMPLATE = template0 LC_CTYPE =
'en_US.utf8' LC_COLLATE = 'en_US.utf8';
# UPDATE pg_database SET datistemplate = TRUE WHERE datname = 'template1';
# \c template1
# UPDATE pg_database SET datallowconn = FALSE WHERE datname = 'template0';
# \q
Now use the answser file for configure the spacewalk installation:
# spacewalk-setup --disconnected --answer-file=/root/Code/spacewalker/answer.txt
Verify the installation, first visit https://Your_IP, to setup the username/password.
Create the channel,
# /usr/bin/spacewalk-common-channels -v -u Username -p Password \
-a x86_64 -k unlimited  'centos7*'
# mkdir /var/distro-trees/centos7_64 -p
# chmod 755 /var/
# chmod 755 /var/distro-trees/
# chmod 755 /var/distro-trees/centos7_64/
# cp -ar ContentOfISO /var/distro-trees/centos7_64/
#  spacecmd  -u YourUserName -p YourPass -- distribution_create -n centos7 -p \
/var/distro-trees/centos7_64/ -b centos7-x86_64 -t rhel_7
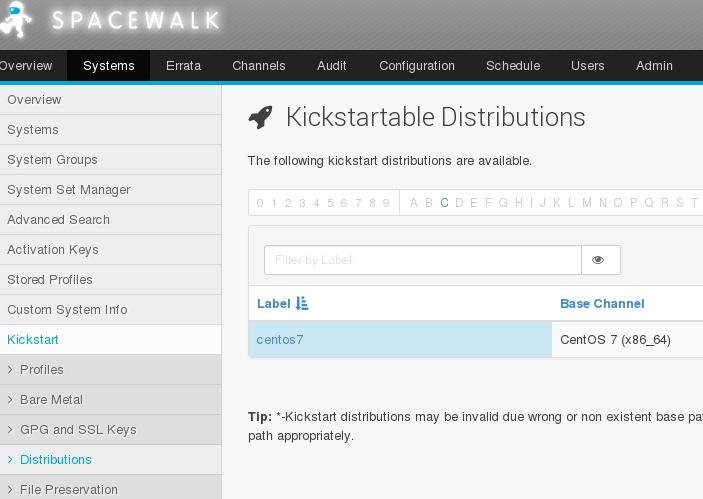
Now check the installed distribution under(System->Kickstart->Distributions):
Check the kickstart via create the new kickstart file, fail again, why….
2.2.1 Version
Use 2.2.1 version:
$ vim jpackage.repo
$ rpm -Uvh http://yum.spacewalkproject.org/2.2/RHEL/6/x86_64/spacewalk-repo-2.2-1.el6.noarch.rpm
$ sudo yum clean all && sudo yum makecache
2.2.3 Version - Correct way
Disable the cobbler package in epel repository via:
# vim epel.repo
[epel]
name=Extra Packages for Enterprise Linux 7 - $basearch
baseurl=http://mirrors.aliyun.com/epel/7/$basearch
        http://mirrors.aliyuncs.com/epel/7/$basearch
#mirrorlist=https://mirrors.fedoraproject.org/metalink?repo=epel-7&arch=$basearch
failovermethod=priority
enabled=1
gpgcheck=0
gpgkey=file:///etc/pki/rpm-gpg/RPM-GPG-KEY-EPEL-7
### Blacklist cobbler and cobbler-web package ###
exclude=cobbler*
Cause the spacewalk has its own cobbler packages in repository, by addeding epel’s
cobbler into blacklist we could continue the setup.
Jul 28, 2015
TechnologyInstallation
Landscape is now in PPA repository, add it via:
$ sudo apt-get install software-properties-common
$ sudo add-apt-repository ppa:landscape/15.01
$ sudo apt-get update
$ sudo apt-get install landscape-server-quickstart
During the installation will ask you the configuration of postfix, specify local.
Configuration
First time you login into the LandScape Root machine, you have to setup your email
address and your password.
Then you could visit https://YourIPAddress for the configuration page.
Add the node into the Landscape Root Node.
In to-be-added node, copy the root node’s /etc/ssl/certs/landscape_server_ca.crt to
/etc/landscape, and modify the following configuration:
# vim /etc/landscape/client.conf
ssl_public_key = /etc/landscape/landscape_server_ca.crt
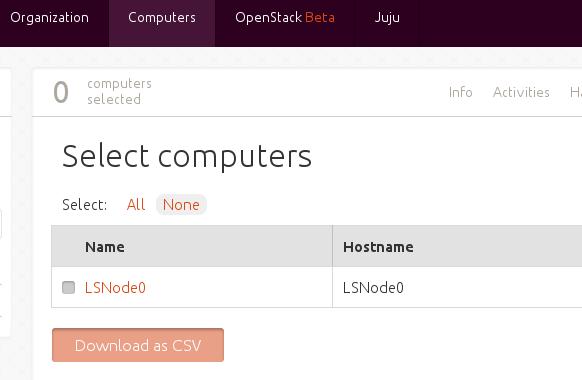
Now register the node into the Root Node.
$ sudo apt-get install landscape-client
$ sudo landscape-config --computer-title "LSNode0" --account-name standalone \
--url https://packer-ubuntu-1404-server/message-system --ping-url \
http://packer-ubuntu-1404-server/ping
The following steps is to use or configurating the landscape based cluster
administration.
Jul 27, 2015
TechnologyInstallation
Install Packer via:
$ wget https://dl.bintray.com/mitchellh/packer/packer_0.8.2_linux_amd64.zip
$ unzip packer_0.8.2_linux_amd64.zip
$ mv packer* ~/bin
$ export PATH=~/bin:$PATH
KVM Based Image Build
Fetch the kickstart configuration file.
$ mkdir ~/Code/packer
$ wget https://gist.githubusercontent.com/mitchellh/7328271/raw/9035b8e26d001f14a2a960d3cec65eceb0e716ea/centos6-ks.cfg
# vim centos6-ks.cfg
	### Replace your own repository URL
Create the json definition file for the packer build:
$  packer validate first.json
Template validated successfully.
$ cat first.json
{
  "builders":
  [
    {
      "type": "qemu",
      "iso_url": "/media/opensuse/dash/iso/CentOS-6.6-x86_64-bin-DVD1.iso",
      "iso_checksum": "7b1fb1a11499b31271ded79da6af8584",
      "iso_checksum_type": "md5",
      "output_directory": "output_centos_tdhtest",
      "ssh_wait_timeout": "30s",
      "shutdown_command": "shutdown -P now",
      "disk_size": 5000,
      "format": "qcow2",
      "headless": false,
      "accelerator": "kvm",
      "http_directory": "httpdir",
      "http_port_min": 10082,
      "http_port_max": 10089,
      "ssh_host_port_min": 2222,
      "ssh_host_port_max": 2229,
      "ssh_username": "root",
      "ssh_password": "YourPassword",
      "ssh_port": 22,
      "ssh_wait_timeout": "90m",
      "vm_name": "tdhtest",
      "net_device": "virtio-net",
      "disk_interface": "virtio",
      "boot_wait": "5s",
      "boot_command":
      [
        "<tab> text ks=http://192.168.1.79/centos6-cdrom.cfg<enter><wait>"
      ]
    }
  ]
}
$  packer validate first.json
Template validated successfully.
Now start build via:
packer build first.json
KickStart File
An Template:
[root:/var/www/html]# cat centos6-cdrom.cfg
#platform=x86, AMD64, or Intel EM64T
#version=DEVEL
# Firewall configuration
firewall --enabled --ssh --service=ssh
# Install OS instead of upgrade
install
# Use CDROM installation media
cdrom

rootpw  YourPassword
authconfig --enableshadow --passalgo=sha512

# System keyboard
keyboard uk
# System language
lang en_GB
# SELinux configuration
selinux --enforcing
# Do not configure the X Window System
skipx
# Installation logging level
logging --level=info

# Reboot after installation
reboot

# System timezone
timezone --isUtc Asia/Shanghai
# Network information
network  --bootproto=dhcp --device=eth0 --onboot=on
# System bootloader configuration
bootloader --append="crashkernel=auto rhgb quiet" --location=mbr --driveorder="vda"

# Partition clearing information
zerombr
clearpart --all  --drives=vda

# Disk partitioning information
part /boot --fstype="ext4" --size=500
part pv.008002 --grow --size=1
volgroup vg_centos --pesize=4096 pv.008002
logvol / --fstype=ext4 --name=lv_root --vgname=vg_centos --grow --size=1024
--maxsize=51200
logvol swap --name=lv_swap --vgname=vg_centos --grow --size=1024 --maxsize=1024

%packages --nobase
@core
at
acpid
cronie-noanacron
crontabs
logrotate
mailx
mlocate
openssh-clients
openssh-server
rsync
sendmail
tmpwatch
vixie-cron
which
wget
yum
-biosdevname
-postfix
-prelink
%end
Build And Output
$ packer  build second.json
qemu output will be in this color.

==> qemu: Downloading or copying ISO
    qemu: Downloading or copying:
file:///media/opensuse/dash/iso/CentOS-6.6-x86_64-bin-DVD1.iso
==> qemu: Creating hard drive...
==> qemu: Starting HTTP server on port 10088
==> qemu: Found port for SSH: 2224.
==> qemu: Looking for available port between 5900 and 6000
==> qemu: Found available VNC port: 5947
==> qemu: Starting VM, booting from CD-ROM
==> qemu: Waiting 5s for boot...
==> qemu: Connecting to VM via VNC
==> qemu: Typing the boot command over VNC...
==> qemu: Waiting for SSH to become available...
==> qemu: Connected to SSH!
==> qemu: Gracefully halting virtual machine...
Build 'qemu' finished.

==> Builds finished. The artifacts of successful builds are:
--> qemu: VM files in directory: output_centos_tdhtest
$ ls
output_centos_tdhtest  packer_cache  second.json
$ ls -l output_centos_tdhtest
total 1411208
-rw-r--r-- 1 dash dash 1445134336 Jul 27 16:11 tdhtest
Next time we will investigate ubuntu installation.
Ubuntu
Ubuntu64.json:
{
    "variables": {
        "ssh_name": "kappataumu",
        "ssh_pass": "kappataumu",
        "hostname": "packer-test"
    },

    "builders": [{
        "type": "virtualbox-iso",
        "guest_os_type": "Ubuntu_64",

        "vboxmanage": [
            ["modifyvm", "{{.Name}}", "--vram", "32"]
        ],

        "disk_size" : 10000,

        "iso_url": "http://192.168.0.79/ubuntu-12.04.3-server-amd64.iso",
        "iso_checksum": "2cbe868812a871242cdcdd8f2fd6feb9",
        "iso_checksum_type": "md5",

        "http_directory" : "ubuntu_64",
        "http_port_min" : 9001,
        "http_port_max" : 9001,

        "ssh_username": "{{user `ssh_name`}}",
        "ssh_password": "{{user `ssh_pass`}}",
        "ssh_wait_timeout": "20m",

        "shutdown_command": "echo {{user `ssh_pass`}} | sudo -S shutdown -P now",

        "boot_command" : [
            "<esc><esc><enter><wait>",
            "/install/vmlinuz noapic ",
            "preseed/url=http://192.168.0.79/ubuntu1204preseed.cfg ",
            "debian-installer=en_US auto locale=en_US kbd-chooser/method=us ",
            "hostname={{user `hostname`}} ",
            "fb=false debconf/frontend=noninteractive ",
            "keyboard-configuration/modelcode=SKIP keyboard-configuration/layout=USA ",
            "keyboard-configuration/variant=USA console-setup/ask_detect=false ",
            "initrd=/install/initrd.gz -- <enter>"
        ]
    }]
}
KVM Based:
{
    "variables": {
        "user": "adminubuntu",
        "password": "adminubuntu"
    },

    "builders":
    [
        {
            "name": "ubuntu-1404-server",

            "type": "qemu",
            "format": "qcow2",
            "accelerator": "kvm",
            "disk_size": 100000,

            "iso_url": "http://192.168.0.79/ubuntu-14.04-server-amd64.iso",
            "iso_checksum": "01545fa976c8367b4f0d59169ac4866c",
            "iso_checksum_type": "md5",

            "http_directory": "http",

            "ssh_username": "{{user `user`}}",
            "ssh_password": "{{user `password`}}",
        "ssh_wait_timeout": "90m",
            "shutdown_command": "echo '{{user `password`}}'|sudo -S shutdown -P now",

            "boot_wait": "2s",
            "boot_command": [
                "<esc><esc><enter><wait>",
                "/install/vmlinuz url=http://192.168.0.79/TrustyPreseed.cfg ",
                "debian-installer=en_US auto locale=en_US kbd-chooser/method=us ",
                "hostname={{ .Name }} ",

                "keyboard-configuration/modelcode=SKIP ",
                "keyboard-configuration/layout=USA ",
                "keyboard-configuration/variant=USA ",

                "passwd/user-fullname={{user `user`}} ",
                "passwd/user-password-again={{user `password`}} ",
                "passwd/user-password={{user `password`}} ",
                "passwd/username={{user `user`}} ",

                "initrd=/install/initrd.gz -- <enter>"
            ]
        }
    ]
}
The Preseed File:
# Some inspiration:
# *
https://github.com/chrisroberts/vagrant-boxes/blob/master/definitions/precise-64/preseed.cfg
# * https://github.com/cal/vagrant-ubuntu-precise-64/blob/master/preseed.cfg

# English plx
d-i debian-installer/language string en
d-i debian-installer/locale string en_US.UTF-8
d-i localechooser/preferred-locale string en_US.UTF-8
d-i localechooser/supported-locales en_US.UTF-8

# Including keyboards
d-i console-setup/ask_detect boolean false
d-i keyboard-configuration/layout select USA
d-i keyboard-configuration/variant select USA
d-i keyboard-configuration/modelcode string pc105


# Just roll with it
d-i netcfg/get_hostname string this-host
d-i netcfg/get_domain string this-host

d-i time/zone string UTC
d-i clock-setup/utc-auto boolean true
d-i clock-setup/utc boolean true


# Choices: Dialog, Readline, Gnome, Kde, Editor, Noninteractive
d-i debconf debconf/frontend select Noninteractive

d-i pkgsel/install-language-support boolean false
tasksel tasksel/first multiselect standard, ubuntu-server


# Stuck between a rock and a HDD place
d-i partman-auto/method string lvm
d-i partman-lvm/confirm boolean true
d-i partman-lvm/device_remove_lvm boolean true
d-i partman-auto/choose_recipe select atomic

d-i partman/confirm_write_new_label boolean true
d-i partman/confirm_nooverwrite boolean true
d-i partman/choose_partition select finish
d-i partman/confirm boolean true

# Write the changes to disks and configure LVM?
d-i partman-lvm/confirm boolean true
d-i partman-lvm/confirm_nooverwrite boolean true
d-i partman-auto-lvm/guided_size string max

# No proxy, plx
d-i mirror/http/proxy string

# Default user, change
d-i passwd/user-fullname string adminubuntu
d-i passwd/username string adminubuntu
d-i passwd/user-password password adminubuntu
d-i passwd/user-password-again password adminubuntu
d-i user-setup/encrypt-home boolean false
d-i user-setup/allow-password-weak boolean true

# No language support packages.
d-i pkgsel/install-language-support boolean false

# Individual additional packages to install
d-i pkgsel/include string build-essential ssh

#For the update
d-i pkgsel/update-policy select none

# Whether to upgrade packages after debootstrap.
# Allowed values: none, safe-upgrade, full-upgrade
d-i pkgsel/upgrade select safe-upgrade

# Go grub, go!
d-i grub-installer/only_debian boolean true

d-i finish-install/reboot_in_progress note
Use Local Repository
Add following in the kickstart file:
# Setup the installation source
d-i mirror/country string manual
d-i mirror/http/hostname string 192.168.0.79
#d-i mirror/http/directory string $install_source_directory
# /var/www/cobbler/ks_mirror/Ubuntu-14.04-x86_64/ubuntu
d-i mirror/http/directory string /ks_mirror/Ubuntu-14.04-x86_64/ubuntu
d-i mirror/http/proxy string
d-i apt-setup/security_host string 192.168.0.79
d-i apt-setup/security_path string /ks_mirror/Ubuntu-14.04-x86_64/ubuntu
d-i apt-setup/services-select multiselect none
Jul 25, 2015
TechnologyIssues
Chromebook could not support:
So I re-compile the Chromebook kernel for soving these issue.
Kernel Version
# uname -r
3.10.18
Get The SourceCode
# git clone --branch v3.10.18 https://chromium.googlesource.com/chromiumos/third_party/kernel
