
Kickstarting Ubuntu In SpaceWalk
Aug 20, 2015Technology
Preparation
You have to use apt-mirror for getting the packages to local repository, so that you could directly install the system via http method. The configuration file for apt-mirror is listed as following:
$ cat /etc/apt/mirror.list
set base_path /mnt/myrepo
set nthreads     20
set _tilde 0
#################Trusty Repository Starts ########################
deb-amd64 http://mirrors.aliyun.com/ubuntu/ trusty main restricted universe multiverse main/debian-installer restricted/debian-installer multiverse/debian-installer universe/debian-installer
deb-amd64 http://mirrors.aliyun.com/ubuntu/ trusty-security main restricted universe multiverse main/debian-installer restricted/debian-installer universe/debian-installer
deb-amd64 http://mirrors.aliyun.com/ubuntu/ trusty-updates main restricted universe multiverse main/debian-installer restricted/debian-installer universe/debian-installer
deb-amd64 http://mirrors.aliyun.com/ubuntu/ trusty-proposed main restricted universe multiverse
deb-amd64 http://mirrors.aliyun.com/ubuntu/ trusty-backports main restricted universe multiverse

deb-i386 http://mirrors.aliyun.com/ubuntu/ trusty main restricted universe multiverse main/debian-installer restricted/debian-installer multiverse/debian-installer universe/debian-installer
deb-i386 http://mirrors.aliyun.com/ubuntu/ trusty-security main restricted universe multiverse main/debian-installer restricted/debian-installer universe/debian-installer
deb-i386 http://mirrors.aliyun.com/ubuntu/ trusty-updates main restricted universe multiverse main/debian-installer restricted/debian-installer universe/debian-installer
deb-i386 http://mirrors.aliyun.com/ubuntu/ trusty-proposed main restricted universe multiverse
deb-i386 http://mirrors.aliyun.com/ubuntu/ trusty-backports main restricted universe multiverse

deb-src http://mirrors.aliyun.com/ubuntu/ trusty main restricted universe multiverse
deb-src http://mirrors.aliyun.com/ubuntu/ trusty-security main restricted universe multiverse
deb-src http://mirrors.aliyun.com/ubuntu/ trusty-updates main restricted universe multiverse
deb-src http://mirrors.aliyun.com/ubuntu/ trusty-proposed main restricted universe multiverse
deb-src http://mirrors.aliyun.com/ubuntu/ trusty-backports main restricted universe multiverse
#################Trusty Repository ends ########################

#################Precise Repository starts ########################
deb-amd64 http://mirrors.aliyun.com/ubuntu precise main main/debian-installer restricted restricted/debian-installer universe multiverse multiverse/debian-installer universe/debian-installer
deb-amd64 http://mirrors.aliyun.com/ubuntu precise-security main restricted universe multiverse main/debian-installer restricted/debian-installer universe/debian-installer
deb-amd64 http://mirrors.aliyun.com/ubuntu precise-updates main restricted universe multiverse main/debian-installer restricted/debian-installer universe/debian-installer
deb-amd64 http://mirrors.aliyun.com/ubuntu precise-proposed main restricted universe multiverse
deb-amd64 http://mirrors.aliyun.com/ubuntu precise-backports main restricted universe multiverse

deb-i386 http://mirrors.aliyun.com/ubuntu precise main main/debian-installer restricted restricted/debian-installer universe multiverse multiverse/debian-installer universe/debian-installer
deb-i386 http://mirrors.aliyun.com/ubuntu precise-security main restricted universe multiverse main/debian-installer restricted/debian-installer universe/debian-installer
deb-i386 http://mirrors.aliyun.com/ubuntu precise-updates main restricted universe multiverse main/debian-installer restricted/debian-installer universe/debian-installer
deb-i386 http://mirrors.aliyun.com/ubuntu precise-proposed main restricted universe multiverse
deb-i386 http://mirrors.aliyun.com/ubuntu precise-backports main restricted universe multiverse

deb-src http://mirrors.aliyun.com/ubuntu precise-security main restricted universe multiverse
deb-src http://mirrors.aliyun.com/ubuntu precise-updates main restricted universe multiverse
deb-src http://mirrors.aliyun.com/ubuntu precise-proposed main restricted universe multiverse
deb-src http://mirrors.aliyun.com/ubuntu precise-backports main restricted universe multiverse
#################Precise Repository ends ########################
Sync your local repository via apt-mirror, the sync procedure could takes many days,
depends on your bandwidth.
Make Your Own KickStart File
You have to install system-config-kickstart for generating the kickstart file. But
the official program conflicts with hwdata, we manually downgrade it and install
specified version, then sytem-config-kickstart could be installed.
# apt-get remove hwda
# wget ftp://mirror.ovh.net/mirrors/ftp.debian.org/debian/pool/main/h/hwdata/hwdata_0.234-1_all.deb
# dpkg -i hwdata_0.267-1_all.deb
# sudo apt-get install system-config-kickstart
Run it and its effects is like following:

Select the installation method via:
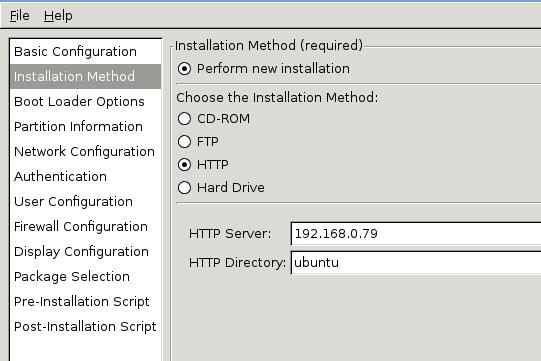
Save your kickstart file, and save it into some webserver’s directory, since PXE always have the network connection, we could put it the reachable webserver.
PXE Menu Configuration
Just give out an example of the PXE Menu on SpaceWalk:
# cat /var/lib/tftpboot/pxelinux.cfg/default
DEFAULT menu
PROMPT 0
MENU TITLE Cobbler | http://fedorahosted.org/cobbler
TIMEOUT 200
TOTALTIMEOUT 6000
ONTIMEOUT local

LABEL local
        MENU LABEL (local)
        MENU DEFAULT
        LOCALBOOT 0

LABEL precise-ia32:1:SpacewalkDefaultOrganization
        kernel /images/precise-ia32:1:SpacewalkDefaultOrganization/vmlinuz
        MENU LABEL precise-ia32:1:SpacewalkDefaultOrganization
        append ks=http://192.168.0.79/ubuntu1204kickstart1.cfg initrd=/images/precise-ia32:1:SpacewalkDefaultOrganization/initrd.gz ksdevice=eth0 --
        ipappend 2
MENU end
We use the kickstart file located in a webserver, using this we could install the system unattendly.
An example of the this kickstart file is listed:
# cat ubuntu1204kickstart1.cfg  | more
#Generated by Kickstart Configurator
#platform=x86

#System language
lang en_US
#Language modules to install
langsupport en_US
#System keyboard
keyboard us
#System mouse
mouse
#System timezone
timezone Asia/Shanghai
#Root password
rootpw --iscrypted xxxxxxxxxxxxxxxxxxxxxxxxxxx
#Initial user
user xxxx --fullname "xxxx" --iscrypted --password xxxxxxxxxxxxxxxxxxxxxx
#Reboot after installation
reboot
#Use text mode install
text
#Install OS instead of upgrade
install
#Use Web installation
url --url http://192.168.0.79/ubuntu/
#System bootloader configuration
bootloader --location=mbr
#Clear the Master Boot Record
zerombr yes
#Partition clearing information
clearpart --all --initlabel
#Disk partitioning information
part swap --size 1024
part / --fstype ext4 --size 1 --grow
#System authorization infomation
auth  --useshadow  --enablemd5
#Network information
network --bootproto=dhcp --device=eth0
#Firewall configuration
firewall --disabled
#Do not configure the X Window System
skipx

%packages
ubuntu-minimal
openssh-server
screen
curl
wget

%post

# update fstab for the root partition
perl -pi -e 's/(errors=remount-ro)/noatime,nodiratime,$1,barrier=0/' /etc/fstab

# point sh to bash instead of dash
rm /bin/sh
ln -s /bin/bash /bin/sh

# add normal apt source list
(
cat <<'EOP'
deb http://192.168.0.79/ubuntu/ precise main restricted universe
deb http://192.168.0.79/ubuntu/ precise-security main restricted universe
deb http://192.168.0.79/ubuntu/ precise-updates main restricted universe
EOP
) > /etc/apt/sources.list
apt-get update
apt-get upgrade -y

# install some additional packages
# apt-get install -y xenstore-utils

# set up xenserver automation scripts
# AUTOMATER_REPO=https://raw.github.com/krobertson/xenserver-automater
# curl $AUTOMATER_REPO/master/usr/sbin/xe-set-hostname > /usr/sbin/xe-set-hostname
# curl $AUTOMATER_REPO/master/usr/sbin/xe-set-network > /usr/sbin/xe-set-network
# curl $AUTOMATER_REPO/master/usr/sbin/generate-sshd-keys > /usr/sbin/generate-sshd-keys
# curl $AUTOMATER_REPO/master/etc/init/xe-automator.conf > /etc/init/xe-automator.conf
# chmod a+x /usr/sbin/xe-set-hostname
# chmod a+x /usr/sbin/xe-set-network
# chmod a+x /usr/sbin/generate-sshd-keys

# setup locales
locale-gen en_US.UTF-8
update-locale LANG="en_US.UTF-8"
echo 'LANG=en_US.UTF-8' >> /etc/environment
echo 'LC_ALL=en_US.UTF-8' >> /etc/environment

# install xe tools
# cd /tmp
# wget http://some/url/to/xe-guest-utilities_6.0.0-743_amd64.deb
# dpkg -i xe-guest-utilities_6.0.0-743_amd64.deb

# install paravirt kernel image
apt-get install -f -y linux-virtual
dpkg -l | grep generic | grep linux | awk '{print $2}' | xargs apt-get remove -y

# clean up some stuff
rm -f /etc/ssh/ssh_host_*
rm -f /var/cache/apt/archives/*.deb
rm -f /var/cache/apt/*cache.bin
rm -f /var/lib/apt/lists/*_Packages
A Known Bug
The initrd.gz file and vmlinuz file should be picked from the installation iso. While the spacewalk uses a CentOS based initrd.gz file for starting the system. thus you will met “cdrom” error.
$ ls -l /var/lib/tftpboot/images/precise-ia32:1:SpacewalkDefaultOrganization/
total 31788
-r--r--r-- 1 root root 18434355 Aug 20 11:36 initrd.gz
-r--r--r-- 3 root root  8188836 Aug  7  2014 initrd.gz.back
-r--r--r-- 3 root root  5919280 Jul 29  2014 vmlinuz